Riding the API Rails: Automating Public Transport Tests with Robot Framework, Docker, and Cloud-Powered CI/CD
 arya bhattathiri
In today’s interconnected world, APIs are the backbone of most applications, especially those dealing with complex systems, through this I am trying to dealing with complex systems like public transportation. Imagine an app that helps users navigate a city’s transit system, relying on a core transit API that, in turn, interacts with various integrated APIs for real-time traffic updates, weather forecasts affecting transit schedules, third-party payment gateways for fare transactions, and external mapping services for route visualization.We’ll explore how to automate comprehensive API tests using Robot Framework, Docker, and Jenkins, covering scenarios like response correctness, response time, error handling (400s, 401s), and behavior with missing/invalid input. We’ll also dive into securing API keys and integrating with cloud services, all while maintaining a consistent and efficient CI/CD pipeline.
Section 1: Navigating the API Landscape with Robot Framework
Setting the Stage: Our Complex Public Transport API and Test Scenarios:
Let's say we're dealing with a public transport system that exposes a core transit API, which integrates with several external APIs:
GET /routes: To fetch available routes.GET /departures/{routeId}: To get departure times for a specific route.POST /calculate-fare: To calculate fares based on origin, destination and third party payment API.GET /realtime/{stopId}: To get real-time arrival information and integrated traffic API data.GET /weather/{stopId}: to get weather information that affect the schedule.GET /map/{routeId}: to get the map data from external mapping service.
When testing these APIs, especially with their integrations, we need to consider various scenarios to ensure reliability:
Response Correctness: Verifying that each API integration returns the expected data and format.
Response Time: Measuring the API's performance and ensuring it meets acceptable latency, including the impact of integrated APIs.
Error Handling (400s, 401s): Checking how the API handles invalid requests and authentication errors, considering the authentication of each integrated service.
Behavior with Missing/Invalid Input: Testing the API's robustness when provided with incorrect or incomplete data, including data passed to integrated APIs.
Integration Testing: Verifying that the core transit API interacts correctly with each of the integrated APIs.
Robot Framework, with its human-readable syntax, makes it easy to write tests that are both powerful and maintainable. Think of it as writing a story where each keyword is an action. For our transport API, we'll use
RequestsLibraryto interact with the endpoints, and we may useJSONLibraryto help with JSON validation.Example Test Cases (Including some scenarios):
*** Settings ***
Library           RequestsLibrary
Library           JSONLibrary

*** Variables ***
${BASE_URL}       https://public-transport-api.cloud.example.com/v1
${API_KEY}        ${ENV:API_KEY}

*** Test Cases ***
Verify Route Availability and JSON Structure
    Create Session    transport_api    ${BASE_URL}
    ${headers}=    Create Dictionary    X-API-Key=${API_KEY}
    ${response}=    Get Request    transport_api    /routes    headers=${headers}
    Should Be Equal As Integers    ${response.status_code}    200
    ${json}=    Convert To JSON    ${response.content}
    Should Contain    ${json}[0][routeName]    "busnumber:"
    ${result}= Evaluate json.dumps(${json})
    Should Contain Json    ${result}    $.[0].routeId

Verify Departure Times - Response Time
    Create Session    transport_api    ${BASE_URL}
    ${headers}=    Create Dictionary    X-API-Key=${API_KEY}
    ${response}=    Get Request    transport_api    /departures/123    headers=${headers}
    Should Be Equal As Integers    ${response.status_code}    200
    ${elapsed_time}=    Get Time    ${response.elapsed}
    Should Be True    ${elapsed_time} < 1.0

Calculate Fare - Invalid Input
    Create Session    transport_api    ${BASE_URL}
    ${headers}=    Create Dictionary    X-API-Key=${API_KEY}
    ${payload}=    Create Dictionary    origin=StationA
    ${response}=    Post Request    transport_api    /calculate-fare    json=${payload}    headers=${headers}
    Should Be Equal As Integers    ${response.status_code}    400

Verify Unauthorized Access - Realtime API
    Create Session    transport_api    ${BASE_URL}
    ${response}=    Get Request    transport_api    /realtime/123
    Should Be Equal As Integers    ${response.status_code}    401

Verify Weather Integration - Valid Response
    Create Session    transport_api    ${BASE_URL}
    ${headers}=    Create Dictionary    X-API-Key=${API_KEY}
    ${response}= Get Request transport_api /weather/123 headers=${headers}
    Should Be Equal As Integers ${response.status_code} 200
    ${json}= Convert To JSON ${response.content}
    Should Contain Key ${json} weatherDescription

Verify Map Integration - Valid Response
    Create Session    transport_api    ${BASE_URL}
    ${headers}=    Create Dictionary    X-API-Key=${API_KEY}
    ${response}= Get Request transport_api /map/123 headers=${headers}
    Should Be Equal As Integers ${response.status_code} 200
    ${json}= Convert To JSON ${response.content}
    Should Contain Key ${json} mapUrl
- We can also use Robot Framework’s data-driven capabilities to test multiple routes or fare combinations without writing repetitive code.
Prerequisites:
Before diving into the project, make sure you have the following prerequisites installed and configured:
Python: Robot Framework is built on Python, so you’ll need Python 3.6 or later installed.
pip: Python’s package installer, used to install Robot Framework and its libraries.
Robot Framework: Install it using
pip install robotframework.RequestsLibrary: Install it using
pip install robotframework-requests.JSONLibrary: Install it using
pip install robotframework-jsonlibrary.Docker: Install Docker Desktop (or Docker Engine) on your machine.
Jenkins: Install and set up Jenkins on a server or your local machine.
Git: Install Git for version control and to interact with your code repository.
Postman (For the Manual testing): If you plan to perform manual testing, install Postman.
Cloud Account (Optional): if you plan to use cloud api calls inside of your Jenkins pipeline.
API Key: Obtain your API key from the public transport API provider.
Project Sample Overview:
To illustrate the concepts, let’s outline a sample project structure:
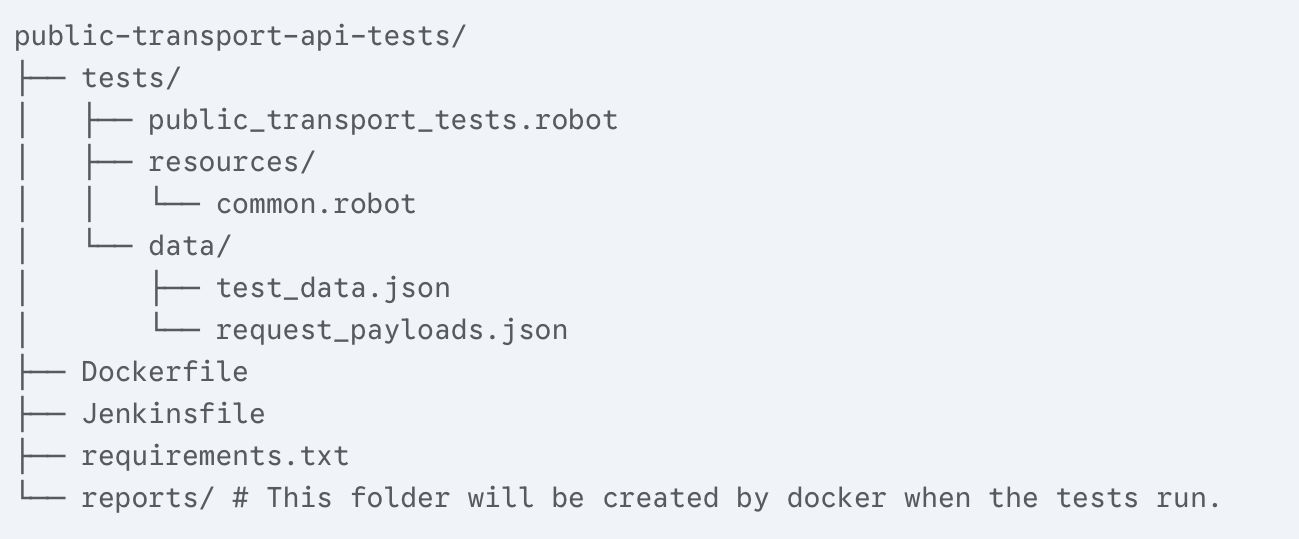
tests/public_transport_tests.robot: Contains the Robot Framework test cases.tests/resources/common.robot: Contains shared variables or keywords, reusable logic.tests/data/test_data.json: Stores test data (e.g., route IDs, stop IDs) in JSON format.tests/data/request_payloads.json: Stores JSON payloads for POST requests (e.g., fare calculation requests).Dockerfile: Defines the Docker image for running the tests.Jenkinsfile: Defines the Jenkins CI/CD pipeline.requirements.txt: Lists the Python dependencies.reports/: This directory is mounted to the docker container, to store test reports generated by Robot Framework.
Explanation of JSON Files:
test_data.json:
This file can hold static test data that you want to reuse across multiple tests. For example, you might store a list of valid route IDs or stop IDs.
Using JSON files for test data allows you to separate your test data from your test logic, making your tests more maintainable.
request_payloads.json:
If your API requires complex JSON payloads for POST or PUT requests, you can store these payloads in a separate JSON file.
This makes it easier to manage and modify your request payloads without changing your test scripts.
Section 2: Containerizing Our API Tests with Docker
Docker: Our Test Environment on Wheels:
We’ll create a Docker image that has everything we need to run our Robot Framework tests.
Now that we have Docker installed, let’s create the Docker image that will run our Robot Framework API tests. We’ll use the Dockerfile we defined in our project sample:
FROM python:3.9-slim-buster

WORKDIR /app

RUN pip install robotframework robotframework-requests

COPY . /app

CMD ["robot", "tests/public_transport_tests.robot"]
Here’s a breakdown of each line in the Dockerfile:
FROM python:3.9-slim-buster:This line specifies the base image for our Docker image. We’re using the official Python 3.9 slim-buster image, which is a lightweight Debian-based image with Python pre-installed.WORKDIR /app:This sets the working directory inside the Docker container to/app. All subsequent commands will be executed in this directory.RUN pip install robotframework robotframework-requests robotframework-jsonlibrary:This line installs Robot Framework and its required libraries (RequestsLibrary and JSONLibrary) usingpip. These libraries are necessary for our API tests.COPY . /app:This line copies all the files from the current directory (where theDockerfileis located) to the/appdirectory inside the Docker container. This includes our Robot Framework test files, data files, and any other necessary files.CMD ["robot", "tests/public_transport_tests.robot"]:This line specifies the command that will be executed when the Docker container starts. In this case, it runs the Robot Framework test suite located attests/public_transport_tests.robot.This ensures that our tests run consistently, regardless of the underlying operating system or environment.Using volumes we can get the test reports out of the docker container.
Building the Docker Image:
To build the Docker image, follow these steps:
- Navigate to the Project Directory:
- Open a terminal or command prompt and navigate to the directory where your
Dockerfileis located.
2. Build the Image:
Run the following command:
docker build -t robot-api-tests .docker build: This is the Docker command to build an image.-t robot-api-tests: This tags the image with the namerobot-api-tests. You can choose the name you prefer..: This specifies the build context, which is the current directory.
3. Verify the Image:
After the build process is complete, run the following command to verify that the image was created successfully:
docker imagesYou should see the
robot-api-testsimage in the list.
Running the Docker Container:
To run the Docker container and execute the tests, use the following command:
docker run -v $(pwd)/reports:/app/reports robot-api-tests
docker run: This is the Docker command to run a container.-v $(pwd)/reports:/app/reports: This mounts thereportsdirectory from your local machine to the/app/reportsdirectory inside the container. This allows Robot Framework to save test reports to your local machine.robot-api-tests: This specifies the name of the Docker image to run.
Section 3: Cloud-Powered CI/CD with Jenkins
- Jenkins: The Conductor of Our Test Orchestra:
Now, let’s automate the entire process using Jenkins. We’ll set up a CI/CD pipeline that automatically runs our tests whenever we push code changes to our repository, and we will integrate the cloud api calls inside of the pipeline.
- Jenkinsfile Example (Cloud Integration Included):
pipeline {
    agent { docker { image 'python:3.9-slim-buster' } }
    stages {
        stage('Checkout') {
            steps {
                git credentialsId: 'your-git-credentials', url: 'your-git-repo'
            }
        }
        stage('Build Docker Image') {
            steps {
                sh 'docker build -t robot-api-tests .'
            }
        }
        stage('Run Robot Tests') {
            steps {
                sh 'docker run -v $WORKSPACE/reports:/app/reports robot-api-tests'
            }
        }
        stage('Cloud API interaction') {
            steps {
                sh 'curl https://cloud-api-endpoint.example.com/trigger-deployment'
            }
        }
        stage('Publish Reports'){
            steps{
                archiveArtifacts artifacts: 'reports/**'
            }
        }
    }
}
The Cloud API interaction stage can trigger deployments, send notifications, or perform other cloud-related tasks, making our pipeline more integrated.We can use Jenkins plugins to integrate with cloud services like AWS, Azure, or Google Cloud, for enhanced functionality.
Section 4 : API Keys and Secure Access
The Key to the City: Understanding API Keys
In our public transport scenario, we need API keys to access real-time data or fare calculation services. API keys are like digital access passes. They authenticate your requests and grant you permission to use an API. These keys are crucial for security and tracking API usage.
Often, API keys are generated and provided by the API provider when you register for their service. They are usually found in the developer portal or account settings.
Getting the API Keys (When You Don’t Have Code Access):
Documentation of API:The first place to look is the API’s official documentation. Most API providers have detailed instructions on how to obtain API keys. Search for terms like ‘authentication,’ ‘API keys,’ or ‘getting started.’
Developer Portals:Many APIs have dedicated developer portals where you can register, create applications, and manage your API keys. Look for a ‘Developers’ or ‘API’ section on the provider’s website.
Contacting Support:If you can’t find the API key information in the documentation or developer portal, don’t hesitate to contact the API provider’s support team. They can guide you through the process and provide you with the necessary credentials.
Using Postman to Explore:Sometimes, you might be given an API endpoint without clear documentation. In these cases, use Postman to explore the API. Try sending requests without an API key to see how the API responds. Often, error messages will indicate the required authentication method and where to provide the API key (e.g., in headers or as query parameters). Postman allows you to set environment variables, this is an excellent way to keep your API keys secure, and out of your test code.
OAuth 2.0 and Other Authentication Methods:Be aware that not all APIs use simple API keys. Some use more complex authentication methods like OAuth 2.0, which involves obtaining access tokens through an authorization flow. Understanding the API’s authentication method is crucial for successful testing.
Securing Your API Keys:Never hardcode API keys directly into your test scripts or code. This is a major security risk. Instead, use environment variables or secure configuration files.
In Docker, use environment variables when running the container to pass API keys. In Jenkins, use credential management to store and securely access API keys.
When using Postman, environment variables are also the best way to store your API keys.
If the API uses OAuth 2.0 then Postman has build in support for this authentication method, and will handle the token refresh for you.
Example Robot Framework Code with API Key Handling:
*** Settings ***
Library           RequestsLibrary
*** Variables ***
${BASE_URL}       https://public-transport-api.cloud.example.com/v1
${API_KEY}        ${ENV:API_KEY} # Read API key from environment variable
*** Test Cases ***
Verify Route Availability with API Key
    Create Session    transport_api    ${BASE_URL}
    ${headers}=    Create Dictionary    X-API-Key=${API_KEY}
    ${response}=    Get Request    transport_api    /routes    headers=${headers}
    Should Be Equal As Integers    ${response.status_code}    200
    ${json}=    Convert To JSON    ${response.content}
    Should Contain    ${json}[0][routeName]    "Express Line A"
Jenkinsfile Example with Secure Credentials:
pipeline {
    agent { docker { image 'python:3.9-slim-buster' } }
    environment {
        API_KEY = credentials('public-transport-api-key') // Retrieve API key from Jenkins credentials
    }
    stages {
        // ... (other stages)
        stage('Run Robot Tests') {
            steps {
                sh 'docker run -e API_KEY=$API_KEY -v $WORKSPACE/reports:/app/reports robot-api-tests'
            }
        }
        // ... (other stages)
    }
}
Section 5: Manual and Automated Testing with Postman
Postman: Our Manual Testing Companion
Before diving into automation, manual testing with Postman is crucial for understanding your API’s behavior. Postman’s user-friendly interface allows us to easily send requests, inspect responses, and explore API endpoints.
Manual Testing Steps:
- Create a New Request:
- Open Postman and create a new request by clicking the “New” button and selecting “Request.”
2. Enter the API Endpoint:
- Enter the API endpoint URL (e.g.,
https://public-transport-api.cloud.example.com/v1/routes).
3. Select the HTTP Method:
- Choose the appropriate HTTP method (e.g., GET, POST, PUT, DELETE).
4. Add Headers (including API Keys):
- In the “Headers” tab, add any required headers, such as
X-API-Keywith your API key value.
5. Add Request Body (for POST/PUT requests):
- In the “Body” tab, select “raw” and “JSON” to add a JSON request payload.
6. Send the Request:
- Click the “Send” button to send the request.
7. Inspect the Response:
- Postman displays the response status code, headers, and body. Verify the response data and status code to ensure they meet your expectations.
8. Create Collections:
- Organize your requests into collections for better management. Collections allow you to group related API calls together.
9. Use Environment Variables:
- Create environment variables to store reusable values, such as API keys and base URLs. This makes it easier to switch between different environments (e.g., development, staging, production).
10. Use Postman’s built in OAuth 2.0 helper.
- If your API uses OAuth 2.0, Postman has a built in helper to get and refresh tokens.
Postman Automation: Running Tests with the Collection Runner and Newman
Postman also enables automated testing through its collection runner and Newman, a command-line tool.This allows us to run test suites and integrate them into our CI/CD pipeline.
Automated Testing Steps:
- Write Test Scripts:
In Postman, navigate to the “Tests” tab for each request.
Write JavaScript test scripts to validate the response status code, headers, and body.
Example Postman test script.
pm.test("Status code is 200", function () {
    pm.response.to.have.status(200);
});

pm.test("Response time is less than 1000ms", function () {
    pm.expect(pm.response.responseTime).to.be.below(1000);
});

pm.test("Response body contains routeName", function () {
    var jsonData = pm.response.json();
    pm.expect(jsonData[0]).to.have.property('routeName');
});
2. Run Tests with the Collection Runner:
In Postman, select the collection you want to run.
Click the “Run” button to open the collection runner.
Configure the runner options (e.g., iteration count, delay).
Click “Run [Collection Name]” to execute the tests.
3. Use Newman for Command-Line Execution:
Export your Postman collection and environment as JSON files.
Install Newman:
npm install -g newmanRun the tests from the command line:
newman run your-collection.json -e your-environment.jsonNewman can generate reports, which can be integrated into your CI/CD pipeline.
4. Integrating Newman into Jenkins:
Add a step in your Jenkinsfile to run the Newman command.
Archive the Newman reports as artifacts in Jenkins.
Section 6: Best Practices for API Testing
Keep Tests Independent:Each test should be self-contained and not rely on the results of other tests. This makes it easier to debug and maintain.
Use Environment Variables:Store API keys, endpoints, and other sensitive information in environment variables. This prevents them from being hardcoded in your tests.
Comprehensive Test Coverage:Test all possible scenarios, including edge cases and error handling. Aim for high test coverage to ensure the reliability of your APIs.
Monitoring:Implement API monitoring to detect issues in real-time. Tools like Prometheus and Grafana can help you visualize API performance and health.
Here, by combining Robot Framework, Docker, and Jenkins, we created a API testing. Whether you’re building a public transport app or any other API-driven application, these tools can help you deliver high-quality, reliable software. And with Postman, you have the flexibility for both manual and automated API testing.
Subscribe to my newsletter
Read articles from arya bhattathiri directly inside your inbox. Subscribe to the newsletter, and don't miss out.
Written by