🚀 Automating EC2 Instance Launch with Ansible: A Step-by-Step Guide
 Mahira Technology Private Limited

Looking to simplify your cloud infrastructure provisioning? In this guide, we’ll walk you through launching an EC2 instance directly from your local environment using Ansible — a powerful automation tool trusted by DevOps engineers and sysadmins alike.
Ansible streamlines tasks like provisioning cloud resources, managing configurations, deploying apps, and much more. And when paired with AWS, it becomes a game-changer for automating infrastructure.
🎯 Why Use Ansible for EC2 Deployment?
Ansible brings flexibility and repeatability to your cloud workflows. Whether you’re integrating it into CI/CD pipelines or provisioning dynamic environments, the use cases are endless. Let’s dive into how to set it up and get your first instance running.
🧰 Prerequisites
Before getting started, ensure the following tools and accounts are ready:
An active AWS account
IAM user with programmatic access (Access Key ID & Secret Key)
Installed versions of:
Ansible
Python
Boto (Python library for AWS integration)
🛠️ Setup Instructions
1. Create an IAM User in AWS
Log into your AWS console
Navigate to IAM (Identity and Access Management)
Create a new user with programmatic access
Assign appropriate permissions or use
AmazonEC2FullAccessfor testingNote down the Access Key ID and Secret Access Key
2. Installing Ansible
Depending on your system, use one of the following methods:
On RHEL/CentOS:
sudo yum install ansible
On Ubuntu/Debian:
sudo apt-get update
sudo apt-get install software-properties-common
sudo apt-add-repository ppa:ansible/ansible
sudo apt-get update
sudo apt-get install ansible
Using pip:
sudo pip install ansible
Confirm the installation:
ansible --version
3. Install Python and Boto
Python:
sudo apt-get install python3.6
Boto (AWS SDK for Python):
sudo apt install python3-pip   # Or yum install python-pip on RHEL
pip install boto
📜 Writing the Ansible Playbook
Create a YAML file (e.g., launch_ec2.yml) with the following content:
- name: Launch EC2 Instance
  hosts: localhost
  tasks:
    - name: Start AWS EC2 instance
      ec2:
        key_name: aws_instance_ansible
        instance_type: t2.micro
        image: YOUR-AMI_ID
        region: us-east-1
        wait: yes
        group: Ansible
        count: 1
        vpc_subnet_id: default
        assign_public_ip: yes
        aws_access_key: YOUR_ACCESS_KEY
        aws_secret_key: YOUR_SECRET_KEY
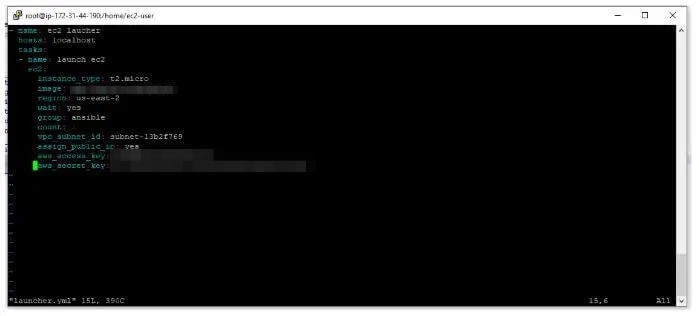
🔐 Replace the placeholders (YOUR_ACCESS_KEY, YOUR_SECRET_KEY) with the credentials from your IAM user.
🖥️ Ansible Hosts Configuration
Open (or create) the file at /etc/ansible/hosts and add:
This ensures Ansible knows it’s running tasks locally.
🔑 Gather Required AWS Details
Key Pair: Go to EC2 dashboard > Key Pairs > Create Key Pair
AMI ID: From the EC2 > Launch Instance flow, note the AMI ID
Instance Type: Choose from available options (e.g.,
t2.micro)VPC/Subnet: Use default if no custom setup
✅ Run the Playbook
First, validate:
ansible-playbook -C launch_ec2.yml
Then launch:
ansible-playbook launch_ec2.yml
Head back to your AWS EC2 console, and voilà! 🎉 Your instance should now be live.
🧠 Conclusion :-
Using Ansible for EC2 provisioning empowers you to manage cloud infrastructure with precision and consistency. With this setup, you’re just steps away from building an end-to-end automated environment.
💡 Want to scale this up? Add SSH provisioning, attach EBS volumes, or integrate with dynamic inventories for a production-ready solution.
#Ansible #AWS #EC2 #InfrastructureAsCode #DevOps #Automation #Boto #Python #IaC #MahiraTechnology #CloudComputing #MediumPost
Subscribe to my newsletter
Read articles from Mahira Technology Private Limited directly inside your inbox. Subscribe to the newsletter, and don't miss out.
Written by
Mahira Technology Private Limited
Mahira Technology Private Limited
A leading tech consulting firm specializing in innovative solutions. Experts in cloud, DevOps, automation, data analytics & more. Trusted technology partner.