How To Use 3D Object Capture in SwiftUI
 Carlos Mbendera
Hello There! Recently I competed in a hackathon with a friend and built an app using Apple’s new Object Capture framework, In this Article, I will be walking you through my implementation of Apple’s Object Capture framework that was introduced in WWDC23.
Please note that to implement Object Capture in your app, target devices must be an iPhone or iPad with the following:
A LiDAR Scanner
An A14 Bionic chip or later
iOS or iPadOS 18 or later
Please feel free to comment any tips, advice or ideas you may have regarding the code.
References
When building my implementation, I referenced the following articles, projects and videos.
Japanese Article Breaking Down Super Simple Object Capture
WWDC23: Meet Object Capture for iOS
Apple Official Sample Project - Scanning objects using Object Capture
Target Functionality
By the end of the video, your app should be to make and interact with 3D Models like this.
Show Me The Code!
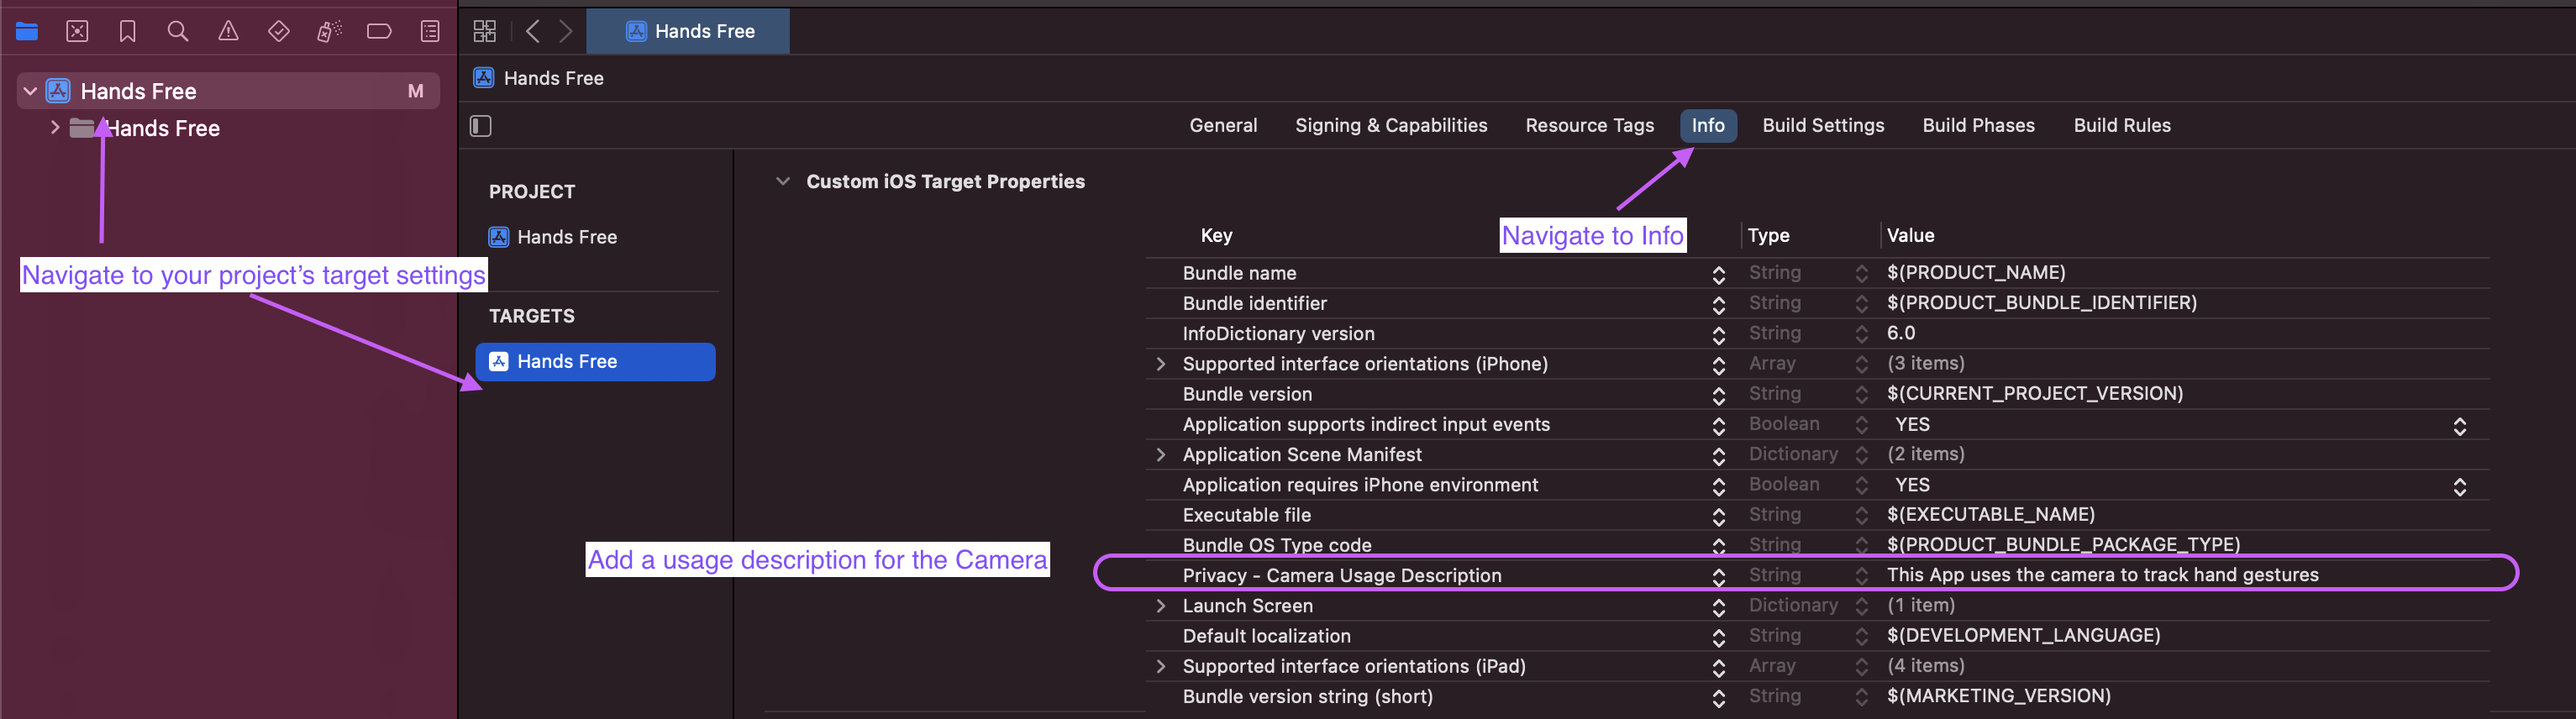
Firstly, we need to request access to the user’s Camera before we can start scanning objects. To do this, we want to navigate to our Target’s Settings in Xcode.
Here’s Apple’s guide on doing that.
Navigate to your Project’s target
Go to the Target’s Info
Add
Privacy - Camera Usage Descriptionand write a description for it
Awesome!
Now we’ll create a few Swift files and I’ll highlight what each file does and how you can modify it for your use case. I’m using the SuperSimpleObjectCapture’s project structure as that’s the most malleable. If you want something that’s a better reference for shipping code, use Apple’s project that can be found above.
ScanningView.swift
This is the entry point for our scanning logic. In the SuperSimpleObjectCapture, it’s the Content View. I’ve refactored the code a bit to make it a bit more compacted. You should get an error regarding the CreateButton and ARQuickLookView. But we’ll implement those in due time.
//Shoutout to the SimpleObjectCapture project crated by @littleossa
  import SwiftUI
  import RealityKit

  struct ScanView: View {

      @State private var session: ObjectCaptureSession?
      @State private var imageFolderPath: URL?
      @State private var photogrammetrySession: PhotogrammetrySession?
      @State private var modelFolderPath: URL?
      @State private var isProgressing = false
      @State private var quickLookIsPresented = false

      var modelPath: URL? {
          return modelFolderPath?.appending(path: "model.usdz")
      }

      var body: some View {

          ZStack(alignment: .bottom) {
              if let session {
                  ObjectCaptureView(session: session)

                  VStack(spacing: 16) {

                      if session.state == .ready || session.state == .detecting {
                          // Detect and Capture
                          CreateButton(session: session)
                      }

                      HStack {
                          Text(session.state.label)
                              .bold()
                              .foregroundStyle(.yellow)
                              .padding(.bottom)
                      }

                  }
              }

              if isProgressing {
                  //I'd suggest creating a view that shows the user that the model is processing in a more straight forward
                  Color.blue.opacity(0.4)
                      .overlay {
                          VStack {
                              Text("Processing Model")
                              ProgressView()
                          }
                      }
              }


          }
          .task {
              guard let directory = createNewScanDirectory()
              else { return }
              session = ObjectCaptureSession()

              modelFolderPath = directory.appending(path: "Models/")
              imageFolderPath = directory.appending(path: "Images/")
              guard let imageFolderPath else { return }
              session?.start(imagesDirectory: imageFolderPath)
          }
          .onChange(of: session?.userCompletedScanPass) { _, newValue in
              if let newValue,
                 newValue {
                  //MARK: Take Note of this dear reader
                  // This time, I've completed one scan pass.
                  // However, Apple recommends that the scan pass should be done three times.
                  session?.finish()
              }
          }
          .onChange(of: session?.state) { _, newValue in
              if newValue == .completed {
                  session = nil

                  Task {
                      await startReconstruction()
                  }
              }
          }
          .sheet(isPresented: $quickLookIsPresented) {

              if let modelPath {
                  ARQuickLookView(modelFile: modelPath) {
                      guard let directory = createNewScanDirectory()
                      else { return }
                      quickLookIsPresented = false
                      // TODO: Restart ObjectCapture
                  }
              }
          }
      }
          func createNewScanDirectory() -> URL? {
              guard let capturesFolder = getRootScansFolder()
              else { return nil }

              let formatter = ISO8601DateFormatter()
              let timestamp = formatter.string(from: Date())
              let newCaptureDirectory = capturesFolder.appendingPathComponent(timestamp,
                                                                              isDirectory: true)
              print("Start creating capture path: \(newCaptureDirectory)")
              let capturePath = newCaptureDirectory.path
              do {
                  try FileManager.default.createDirectory(atPath: capturePath,
                                                          withIntermediateDirectories: true)
              } catch {
                  print("Failed to create capture path: \(capturePath) with error: \(String(describing: error))")
              }

              var isDirectory: ObjCBool = false
              let exists = FileManager.default.fileExists(atPath: capturePath,
                                                          isDirectory: &isDirectory)
              guard exists, isDirectory.boolValue
              else { return nil }
              print("New capture path was created")
              return newCaptureDirectory
          }

          func getRootScansFolder() -> URL? {
              guard let documentFolder = try? FileManager.default.url(for: .documentDirectory,
                                                                      in: .userDomainMask,
                                                                      appropriateFor: nil,
                                                                      create: false)
              else { return nil }
              return documentFolder.appendingPathComponent("Scans/", isDirectory: true)
          }

          func startReconstruction() async {
              guard let imageFolderPath,
                    let modelPath else { return }
              isProgressing = true
              do {
                  photogrammetrySession = try PhotogrammetrySession(input: imageFolderPath)
                  guard let photogrammetrySession else { return }
                  try photogrammetrySession.process(requests: [.modelFile(url: modelPath)])
                  for try await output in photogrammetrySession.outputs {
                      switch output {
                      case .requestError, .processingCancelled:
                          isProgressing = false
                          self.photogrammetrySession = nil
                          // TODO: Restart ObjectCapture
                      case .processingComplete:
                          isProgressing = false
                          self.photogrammetrySession = nil
                          quickLookIsPresented = true
                      default:
                          break
                      }
                  }

              } catch {
                  print("Error!!!", error)
              }
          }

  }
Awesome! At this point, if you try building the app it will complain about ARQuickLookView and CreateButton in the Scan View. Let’s sort that out
ARQuickLookView.swift
So this view uses the QuickLook library from Apple and is called after we’re done creating a 3D Model in order to preview the result.
You may be tempted to rewrite this code for a custom User Interface to handle your model file (at least I was) but that might not be the best approach. In true SwiftUI fashion, this view works very well for what it was designed for. Modifying it will be very sad and painful.
Thus, what I opted to do is focus on how I save and manage the file produced. Please drop some suggestions in the comments, I would greatly appreciate them.
//Shoutout to the SimpleObjectCapture project crated by @littleossa
  import SwiftUI
  import QuickLook

  struct ARQuickLookView: UIViewControllerRepresentable {

      let modelFile: URL
      let endCaptureCallback: () -> Void

      func makeUIViewController(context: Context) -> QLPreviewControllerWrapper {
          let controller = QLPreviewControllerWrapper()
          controller.previewController.dataSource = context.coordinator
          controller.previewController.delegate = context.coordinator
          return controller
      }

      func updateUIViewController(_ uiViewController: QLPreviewControllerWrapper, context: Context) {}

      func makeCoordinator() -> Coordinator {
          return Coordinator(parent: self)
      }

      class Coordinator: NSObject, QLPreviewControllerDelegate, QLPreviewControllerDataSource {
          let parent: ARQuickLookView

          init(parent: ARQuickLookView) {
              self.parent = parent
          }

          func numberOfPreviewItems(in controller: QLPreviewController) -> Int {
              return 1
          }

          func previewController(_ controller: QLPreviewController, previewItemAt index: Int) -> QLPreviewItem {
              return parent.modelFile as QLPreviewItem
          }

          func previewControllerWillDismiss(_ controller: QLPreviewController) {
              parent.endCaptureCallback()
          }
      }
  }

  extension ARQuickLookView {

      class QLPreviewControllerWrapper: UIViewController {
          let previewController = QLPreviewController()
          var quickLookIsPresented = false

          override func viewDidAppear(_ animated: Bool) {
              super.viewDidAppear(animated)

              if !quickLookIsPresented {
                  present(previewController, animated: false)
                  quickLookIsPresented = true
              }
          }
      }
  }
CreateButton.swift
 // You can honestly create your own Create Button, this is the one from the SimpleObjectCapture project.
  // Estenially the label for the create button changes depending on the state of the project
  // And where we are in the Object Capture pipeline

  import SwiftUI
  import RealityKit

  @MainActor
  struct CreateButton: View {
      let session: ObjectCaptureSession

      var body: some View {
          Button(action: {
              performAction()
          }, label: {
              Text(label)
                  .foregroundStyle(.white)
                  .padding()
                  .background(.tint)
                  .clipShape(Capsule())
          })
      }

      private var label: LocalizedStringKey {
          if session.state == .ready {
              return "Start Detecting"
          } else if session.state == .detecting {
              return "Start Capturing"
          } else {
              return "Undefined"
          }
      }

      private func performAction() {
          if session.state == .ready {
              let isDetecting = session.startDetecting()
              print(isDetecting ? "Start Detecting" : "Did Not Start Detecting Session")
          } else if session.state == .detecting {
              session.startCapturing()
          } else {
              print("Undefined")
          }
      }
  }


  extension ObjectCaptureSession.CaptureState {

      var label: String {
          switch self {
          case .initializing:
              "Initializing"
          case .ready:
              "Ready"
          case .detecting:
              "Detecting"
          case .capturing:
              "Capturing"
          case .finishing:
              "Finishing"
          case .completed:
              "Completed"
          case .failed(let error):
              "Failed with Error: \(String(describing: error))"
          @unknown default:
              fatalError("Unknown Default: \(self)")
          }
      }
  }
Conclusion
That’s it, with 3 Swift Files you can now scan and create 3D Models in your iOS Apps. Congratulations! So the work flow is as follows:
User opens the app and grants Camera permission
They click the start detecting button when their object is in the viewfinder
They confirm the detected proportions
They scan the 3D Object
The model is generated and can be previewed with QuickLook
Please note that this app is a starter and Apple has some other things they’d recommend you implement with this framework, such as having 3 iterations of the scans. Here’s their relevant project.
WWDC23: Meet Object Capture for iOS
Apple Official Sample Project - Scanning objects using Object Capture
Thanks for reading. I really appreciate it and hope that your project compiles bug-free.

< Me being appreciative> Gif from Samurai Champloo
Subscribe to my newsletter
Read articles from Carlos Mbendera directly inside your inbox. Subscribe to the newsletter, and don't miss out.
Written by
Carlos Mbendera
Carlos Mbendera
bff.fm tonal architect who occasionally writes cool software