Docker for Beginners: Containerize Your First Application
 Rishav Raj
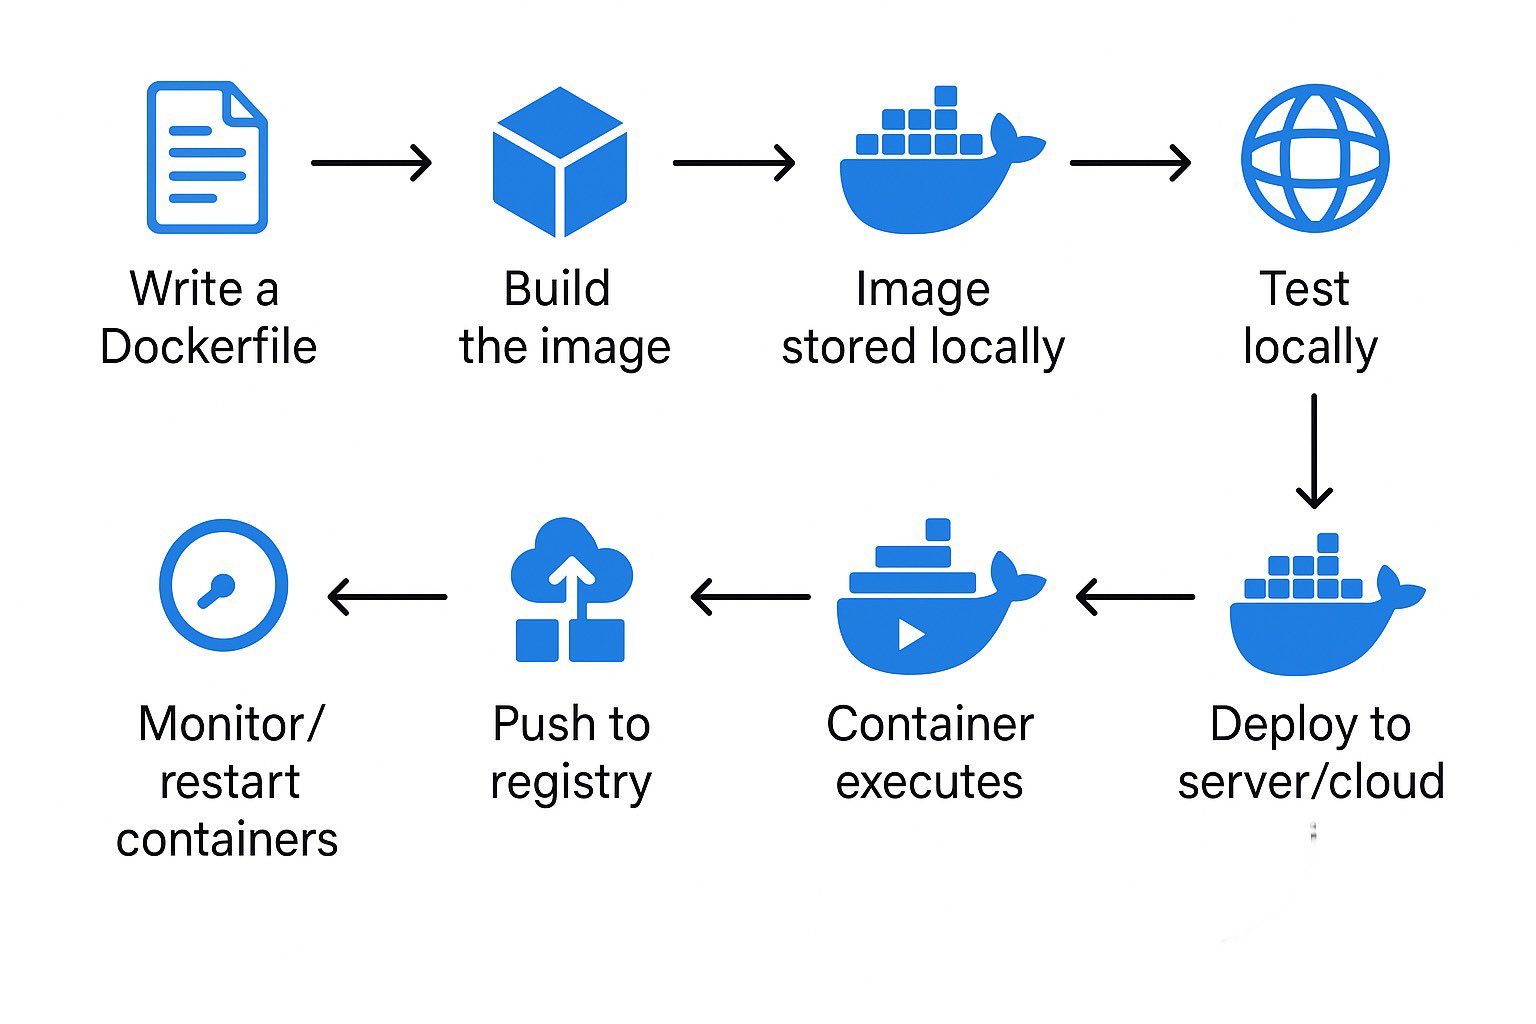
Ever wonder how developers build applications that run flawlessly across different environments? Docker is a game-changer! This article unveils the basics of containerization with Docker, explaining why it's crucial and how it simplifies your development process and covers some basic jargons you might come across along. We will also create a Node.js application and will write a Dockerfile to containerize it.

Why Containerize Your Applications?
Let’s break it down. Imagine you’ve built a cool Node.js app using packages like Express, Nodemon, and Mongoose. Running it on another machine isn’t always smooth—you’d have to copy the code, install the right dependencies, and maybe even tweak some settings depending on the OS. That’s a hassle. And we've all been there: "It works on my machine!"—the classic developer dilemma.
This is exactly where Docker shines. It packages your app along with everything it needs to run into a container. No matter where you run it (your laptop, a friend’s computer, or a cloud server), it works the same. Fast, consistent, and reliable.
Think of a shipping container. No matter what’s inside, it’s sealed and ready for transport across land, sea, or air without repacking. Docker containers are similar: they wrap your application, dependencies, and runtime into one portable unit that runs seamlessly across different environments like Windows, Linux, or macOS.
What is Docker?
Docker is a software platform that lets us containerize our application and make it easy to build, run, manage and distribute. It improves the consistency and portability of applications.
Understanding Jargons
Registry: A central database to store and share Docker images (like Docker Hub). You can compare it with GitHub.
Repository: A collection of Docker images within a registry. Similar to GitHub repositories.
Dockerfile: It is a standardized, executable component that defines the processes to generate a Docker image from a base image.
Images: It is executable package of software that includes everything needed to run an application: code, runtime, libraries etc.
Containers: Running instances of Docker images.
Installing Docker
Before we dive any further, let’s set up docker and get it running up on our machines.
Windows/Mac: Download and install Docker Desktop from its official site.
Linux: Use the package manager specific to your distribution. For example:
sudo apt update
sudo apt install docker.io
Once installed, verify the installation by running:
docker --version
If Docker is properly installed, this will show the version number.
Basic Docker Commands
Let’s go over some basic Docker commands that are commonly used.
| Command | Description |
docker --version | Checks the installed Docker version |
docker pull <image> | Downloads an image from Docker Hub |
docker images | Lists all downloaded images |
docker ps | Lists running containers |
docker ps -a | Lists all containers (including stopped ones) |
docker run <image> | Runs a container from the specified image |
docker stop <container_id> | Stops a running container |
docker rm <container_id> | Removes a stopped container |
docker rmi <image_id> | Removes a Docker image |
docker build -t <tag> . | Builds a Docker image from the Dockerfile |
Make sure Docker is running before executing any commands.
Docker cheat sheet - https://www.geeksforgeeks.org/docker-cheat-sheet/
Creating Your First Dockerized Application
Now, it’s time to create your first dockerized application. We will create a simple Node.js application and containerize it using docker.
Step 1: Setup your project
Create a directory and initialize a Node.js application.
mkdir myapp
cd myapp
npm init -y
Create a file index.js
const express = require('express');
const app = express();

app.get('/',(req,res)=>{
    res.send("Hello from server");
})

app.listen(3000,()=>{
    console.log("Server is running on port 3000");
});
Add dependencies:
npm install
Step 2: Create Dockerfile
Create a Dockerfile in root directory.
FROM node:18

WORKDIR /app

COPY package*.json .
RUN npm install

COPY . .

EXPOSE 3000

CMD ["node", "index.js"]
Finally, our project should look like this:

Step 3: Build and run your Docker Container
docker build -t my-node-app .
docker run -p 3000:3000 my-node-app
-p flag in the is used for port mapping. It connects a port on your host machine to a port inside the Docker container.Visit http://localhost:3000 and see your app running.
🎉 Voila! You've just built your very first Dockerized application.
Understanding the Dockerfile
A Dockerfile is like a recipe for Docker. It contains step-by-step instructions to build a Docker image of your application.
Let’s break down the Dockerfile we used in the Node.js example:
FROM node:18
FROM: This line tells Docker which base image to use. Here, we use Node.js version 18. Think of it as the starting point of your container.
WORKDIR /app
WORKDIR: This sets the working directory inside the container where all the next commands will run. If the directory doesn’t exist, Docker will create it.
COPY package*.json .
RUN npm install
COPY: This copies files from your local machine into the container. Here, we copy package.json and package-lock.json to install dependencies first (helps with layer caching).
RUN: Executes a command inside the image. Here, npm install installs all the dependencies listed in your package.json.
COPY . .
This line copies everything else in your current directory (except what's in .dockerignore) to the /app directory inside the container.
EXPOSE 3000
EXPOSE: This informs Docker that the container listens on port 3000. It doesn’t actually publish the port – that happens during docker run with the -p flag
CMD ["node", "index.js"]
CMD: This specifies the command to run when a container starts. Here, it runs the Node.js server with index.js
Sharing your Docker Images Using Docker Hub
Once you've built a Docker image of your app, you might want to share it so that others can run your software without cloning the code or installing dependencies. That’s kind of the whole point of Dockerizing your application, right?
And this is where Docker Hub comes to the rescue. Think of it as the GitHub of container images. It lets you publish, store, and share Docker images with just a few commands!
Here’s how to publish your Docker image on Docker Hub step-by-step:
Step 1: Create an account on Docker Hub
Go to https://hub.docker.com/ and sign up.
Step 2: Tag your image
Since our local image is named my-node-app. We need to tag it with our Docker Hub username and repository name:
docker tag my-node-app <username>/my-node-app:v1
Replace <username> with your Docker Hub username. v1 is just a version tag.
Step 3: Login to Docker Hub
docker login
Enter your Docker Hub username and password when prompted.
Step 4: Push the Image
Now, push the image to your Docker Hub repository:
docker push rishavd3v/my-node-app:v1
Once uploaded, your image will be publicly accessible (or private, if you’ve set it so).
Others can now run your container using just two commands:
docker pull rishavd3v/my-node-app:v1
docker run -p 3000:3000 rishavd3v/my-node-app:v1
That’s it! They don’t need to clone your repo or set up anything — just pull and run. 🚀
Conclusion
Docker makes it incredibly easy to build, test, and deploy applications across different environments. Thanks to containers, developers no longer need to worry about messy dependencies or the classic "it works on my machine" issue. In today’s development world, Docker is more than just a tool, it’s a must-have skill.
Whether you’re working solo on personal projects or collaborating in a team, Docker can streamline your workflow, reduce setup time, and eliminate configuration headaches. It's your gateway to faster development, smoother CI/CD pipelines, and scalable deployments.
Of course, there’s much more to Docker than what we’ve covered here. Since this blog is tailored for beginners, we’ve kept it concise. But stay tuned—more advanced Docker topics like multi-stage builds, volumes, networking, Docker Compose etc. will be covered in upcoming posts.
Hope this blog gave you a solid start with Docker. Now go ahead start containerizing and explore the Docker ecosystem!
Subscribe to my newsletter
Read articles from Rishav Raj directly inside your inbox. Subscribe to the newsletter, and don't miss out.
Written by
Rishav Raj
Rishav Raj
CSE student by day, dev by night. I’m passionate about all things tech and love diving into the world of software development. When I’m not coding, you can find me dreaming up my next project.