Beginner's Guide to AI-Powered Interior Design Workflow (Part 3)
 Wayne Huang
Table of contents

Generate the First Image
After installing ComfyUI and downloading the model, you should see the following screen:

We can click the blue Queue button below to create our first image:

After waiting for a while, the image will be generated. In the meantime, we can click the time button in the top left corner or press the shortcut key Q to open the image generation queue (highlighted in the red box in the image below).

After clicking, you can see the current status of image processing. If you select multiple images, they will be processed and generated one by one in order. Once processing is complete, the time taken to generate each image will be displayed (shown as green numbers in the bottom left corner of the image).


Isn’t that easy? Next, we'll explain the functions of each component in detail.
Important Information: If the Mac version of ComfyUI only generates a black screen instead of an image, please configure Ksampler as shown in the highlighted section below:
sampler_name : dpmpp_2m_sde
scheduler : beta

During the process of creating the first image, we can see many blocks connected on the interface. These blocks are called nodes.
Nodes
ComfyUI is a node-based workflow tool. In ComfyUI, nodes are the basic building blocks, as shown in the image below:

The part highlighted in yellow is a node.

Nodes can connect to each other, and these connections represent the transfer of data from one node to another. In the image above, the Clip node (text node) outputs text, which is then input into the positive input of the connected KSampler node.
On the left side of the node: Input, for example, the positive and negative inputs of the KSampler node.
On the right side of the node: Output, for example, the Latent output of the KSampler node.

Hover the mouse over the output point and press the left mouse button to drag and create a connection line. Outputs of the same color can connect to inputs of the same color. Connect the line to the input of another node to complete the data link between the two nodes.

This process has a safety mechanism. Only connectable points are shown, making it easy to see where connections can be made. If you try to connect to an invalid input point, no connection will be created.
Custom Node
Besides the standard built-in nodes, if you want to use more features like Inpaint or ControlNet, you need to download the corresponding custom nodes. Detailed information about Custom Nodes will be discussed later in this tutorial.
Workflow
After understanding nodes, let's talk about workflows. By connecting these different nodes, we can link them together to create a workflow that fits our needs. We can build our own workflows or download ones created by others.
Text-to-Image Workflow
For example, this is the basic Text-to-Image workflow in ComfyUI.

In a text-to-image workflow, our goal is to input a set of prompts to produce an image. To achieve this, we need to connect nodes together.
Explanation of the Text-to-Image Workflow:
Load the image generation model in the Checkpoint Loader node.
Enter prompts in the CLIP Text Encode node:
Positive Prompt: Describes elements you want in the image.
Negative Prompt: Excludes elements you don't want.
Set the image size and the number of images to generate in the Latent Image node.
These parameters are sent to the KSampler node for processing. The KSampler node controls the generation process of the model, including:
Steps: Determines the number of denoising steps, affecting detail and quality.
CFG Scale: Controls how much the AI follows the prompts.
Sampler: Chooses different algorithms to affect style and detail.
After processing in the KSampler node, a Latent Image is produced, which is not yet a human-readable image.
It needs to be decoded through the VAE node to convert it into a visible image.
Finally, the generated image can be output to the Preview or Save Image node for viewing or saving.
Node Introduction:
Load Checkpoint:
This node's function is to load image generation models. Any model placed in the Checkpoint folder can be accessed by this node. The most common models are the Stable Diffusion models, but others like Flux are also used. The model you choose directly impacts the generation time, image quality, and VRAM usage. These models can be downloaded from websites like Civitai, GitHub, and Hugging Face, which will be explained later.
 💡Regarding SD (Stable Diffusion) models: SD models are a type of diffusion model, which is a deep learning model primarily used for tasks such as image generation, restoration, and style transfer. The basic concept is: 1. Gradually add random noise to the image (Forward Process) until it becomes completely unrecognizable noise. 2. Then, through AI, gradually remove the noise (Reverse Process) to restore the image to a clear state. This method allows diffusion models to learn how to recover high-quality images from noise, ultimately enabling the generation of images based on prompts.
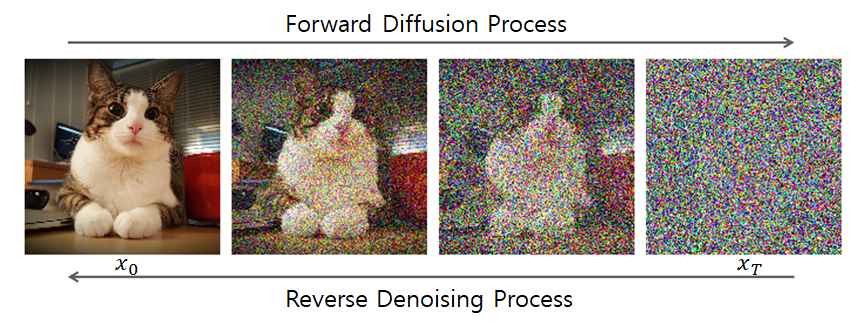 💡In ComfyUI, the most common models are SD models. The common versions of SD models include SD 1.5, SD 3, and SDXL, which are usually indicated in the model's name. For example, Juggernaut XL in the image is an SDXL model.
CLIP :
When introducing nodes earlier, it was mentioned that the Clip node is where users input prompts. To help the model understand human intentions more accurately, besides the Positive Prompt that describes what we want, we can also specify traits, items, or types we don't want the model to generate, known as Negative Prompts.
 💡Usually, the clip for positive prompts is marked in green, while the negative is marked in red.
This node converts human text into a form that the model can understand, and then uses these parameters to generate the final image.
KSampler:
KSampler is a core node in ComfyUI that combines information like prompts, models, and noise data to generate the final image.

Seed: A fixed seed will produce the same image.
Control_after_generate: After generating, you can randomize, increment, decrement, or fix the seed value to produce the same image.
Steps: Determines the number of denoising iterations, affecting detail, quality, and generation time. Typically starts at 20 and can be adjusted based on quality needs.
CFG Scale: Controls how much the AI follows the prompts. The higher the value, the more it matches the prompts, but it may affect the naturalness of the image. The standard setting is between 6-9.
Sampler: Affects style and detail, adjusted according to the model used. Different models often have optimal settings.
Denoise: Used to control the degree of change in image-to-image generation. Lower values preserve original image details, while higher values result in more significant AI redrawing.
Latent Image:

Latent Image is an intermediate data form in the AI image generation process. Unlike regular images made of RGB pixels, it uses mathematical vectors (Latent Space Representation) to describe the image's features. In simple terms, a Latent Image is a "hidden image" that AI understands but isn't visible to the human eye. This is a compressed form used by AI before creating the final image.
In the text-to-image process, this node can first create an empty latent image to set the image size. Batch size determines how many images are generated at once.
VAE:
VAE (Variational Auto Encoder) is the node responsible for image compression and decoding in Stable Diffusion and ComfyUI. Its main function is to convert images into latent space and decode them back into visible images after AI generation.
Decode - Converts AI-generated latent images into visible pictures.
Encode - Converts visible pictures into latent images, used in the image-to-image process.

Preview Image
The converted image will appear in this node. Additionally, the Save Image node will directly save the image.

Image-to-Image Workflow
After explaining the nodes and workflow in detail, let's practice changing the workflow:
Sometimes, we need to use an image as a reference for generating another image. In this case, we use an image-to-image workflow. This workflow is mostly the same as the text-to-image workflow, but you just need to add a reference image to the model.
How do you do it?
Since Ksampler can only accept a latent image as input, we first need to convert the reference image into a latent image. This is where the VAE Encode node comes in. It converts the input image into a latent image, which can then be passed to Ksampler.
The process for inputting the image is shown in the diagram below. It's quite simple, right? Once the reference image is encoded by the VAE, it can be passed into Ksampler.

After replacing the Empty Latent Image node with the original input image size, a new image-to-image workflow is created. The newly generated image will be produced according to the size of the input image. Adjusting the Denoise value allows you to change the extent of AI redrawing.

Next, we can click Workflow → Save to name and save the completed workflow. The saved workflow will appear in the workflow section on the side (folder icon).


When you want to reuse the workflow later, you can simply click to bring it up.
Complex workflows are built step by step by gradually adding controls. Next, we'll introduce some useful methods for controlling image generation. We'll also learn how to download and use custom nodes and models.
Controlling Image Generation
AI-generated images are powerful, but to apply them in interior design, we need to minimize the randomness of the generated images. By using special Custom Nodes and models, we can guide the AI to create the images we need.
Common Control Methods
LoRA (Low-Rank Adaptation):
This is a lightweight AI training method that works with a Checkpoint model. Once loaded, it can specialize the Checkpoint model, allowing it to accurately produce specific characters, objects, or styles without retraining the entire model.
- Examples: Ink painting style, anime style, interior design, product photography, cinematic look, and more with LoRA.

ControlNet:
ControlNet allows AI to generate new images based on the structure of a reference image.
- Examples include specified shapes, character poses, line drawings, and depth maps.

IPAdapter:
IPAdapter allows AI to mimic the style, colors, and facial features of a reference image to control the new image it generates. It is useful for:
Creating images in a similar style (like the style of a particular illustrator).
Generating AI characters based on a specific face (though they won't be exactly the same).
Automatically matching colors and lighting, helping AI produce more natural effects.
In this tutorial, we'll use ControlNet as an example. The other controls can be achieved using the Krita + ComfyUI plugin. If you're interested, you can try installing it yourself. Each feature page includes detailed instructions.
SDXL Model Download
Before using ControlNet, let's download the SDXL model. "XL" means it can generate larger images than SD 1.5.
Civitai
Civitai is an open platform for sharing, downloading, and discussing Stable Diffusion (SD) related AI models and resources. Here, you can find various styles of Stable Diffusion models (Checkpoint), LoRA (lightweight style tuning models), ControlNet, Textual Inversion, VAE, and other AI extensions. It is a community for AI artists and developers to connect and share.

In the search bar, type Juggernaut XL and press enter.

Here, I chose to download Jugg_X_byRunDiffusion. You can pick the version you want to download. Each version offers different features, so make sure to read the description.

The sidebar provides details about the model. In the "About this version" section, you can find information such as the type of model, upload time, and recommended settings. When you use this model later, you can follow these settings to generate the model.
Click download and save the model to: comfyUI (your installation location) / models / checkpoints folder

Other models can be downloaded in the same way and placed in the Checkpoints folder for use. Before using a model, it's a good idea to check the recommended settings to achieve the best quality.
ControlNet Model Download and Installation
Different generation models, like SDXL and FLUX, have their own ControlNet versions. Be sure to check the model version before downloading and using it.
Hugging Face
Hugging Face is an open platform offering AI, machine learning (ML), and natural language processing (NLP) tools. It's not just a community for AI developers but also the largest AI model repository globally, allowing users to download AI models for free. The ControlNet model we want to download is shared on Hugging Face.
Download the file diffusion_pytorch_model_promax.safetensors from this link.
Did you notice the "sdxl" name on this page? It indicates that this ControlNet model is specifically for SDXL.

Save the file to: comfyUI (your installation location) / models / controlnet. This folder is specifically for storing the ControlNet files you download.

Now that the preparations are complete, you can start installing Custom Nodes.
Installing Custom Nodes Using ComfyUI Manager
To use these new features, we need to install new Custom Nodes specifically designed for them. If you installed ComfyUI using the desktop installer, ComfyUI Manager is already installed. However, if you are using the portable version or manually downloaded it, you'll need to install it separately, which we won't cover here.
Click the Manager in the top right corner to open ComfyUI Manager.

ComfyUI Manager is an extension management tool designed specifically for ComfyUI. It allows users to easily install, update, and remove various extensions (Custom Nodes) without needing to manually download or modify configuration files.
Its features include:
One-click installation of extension plugins (Custom Nodes).
Automatic updates for extensions to ensure the latest version.
Simple management of all installed plugins to avoid conflicts.
Let's click on the Custom Node Manager at the top center:

Once on this page, we directly search for and install the following three Custom Nodes:
ComfyUI ArtVenture
Comfyui_controlnet_aux
Comfyroll Studio

After installing the three custom nodes, click "Restart" to reboot ComfyUI and complete the installation.
ControlNet Workflow
The main purpose of ControlNet is to allow AI to generate images by "following specific image structures" rather than relying solely on text prompts. For information on what kind of control each ControlNet provides, you can refer to this table:
| Control Type | Function | Application Scenarios |
| Pose Control(OpenPose) | Control human poses | Generate characters with the same actions as the reference photo. |
| Canny Edge | Control outline structure | Change the output by editing outlines |
| Depth Map | Maintain the 3d detail of the scene. | Let AI generate scenes with the same perspective as the reference image. |
| Scribble | Reference hand-drawn creations | Quickly sketch a rough composition and let the AI automatically fill in the details. |
| MLSD | Maintain architectural structure | Suitable for drawing architectural and mechanical scenes. |
Let's first look at the ControlNet workflow:

Compared to the image-to-image workflow, ControlNet includes a few additional steps:
Load ControlNet Model - Load the ControlNet model by selecting the one we just downloaded.
ControlNet Preprocessor - Choose the control method by referring to the table above.
Apply ControlNet - Connect each ControlNet node to the workflow.
To add a new node, double-click on a blank area with the left mouse button to bring up the search bar:

The rest is simple: just connect the matching names and colors from the output to the input.

Connect the VAE of the Checkpoint model, link the positive and negative prompts, connect the control_net, and connect the IMAGE.

Connect the output of Apply ControlNet to Ksampler to complete the workflow editing.

The latent image input for Ksampler can be adjusted freely, whether you use a blank latent image or a reference image. Remember that the level of denoising will affect how much control you have over the original image. Try different settings a few times to see how various parameters impact the entire workflow.

We used control to shape the magic bottle into a house, showcasing the effect of ControlNet. The interesting part about ComfyUI is that as long as you follow the basic rules, there are endless possibilities.

Regarding controlling image generation, that's all for now. Other methods like IPadapter are also interesting ways to control images. If you're interested, you can look for other tutorials or explore the explanations on GitHub or Hugging Face pages.
Conclusion
In this article, we covered the basics of ComfyUI, including nodes, workflows, and custom nodes, and we used advanced control methods. With this tutorial, readers should have a basic understanding and can explore the many interesting applications of ComfyUI on their own. Next, we can connect ComfyUI to the drawing software Krita for practical use.
Click this link: https://tw.reroom.ai/ or simply search for ReRoom AI to find us.
More tutorial articles will be updated soon, so subscribe to our blog for updates.
Subscribe to my newsletter
Read articles from Wayne Huang directly inside your inbox. Subscribe to the newsletter, and don't miss out.
Written by