Beginner's Guide to AI-Powered Interior Design Workflow (Part 4)
 Wayne Huang
This tutorial will guide you on how to install and use Krita with ComfyUI. By combining Krita's layer features with ComfyUI's AI generation abilities, you'll have better control over AI image creation.
This article will cover:
Installing Krita and the Krita Diffusion AI plugin
Installing ComfyUI custom nodes and downloading necessary AI model files
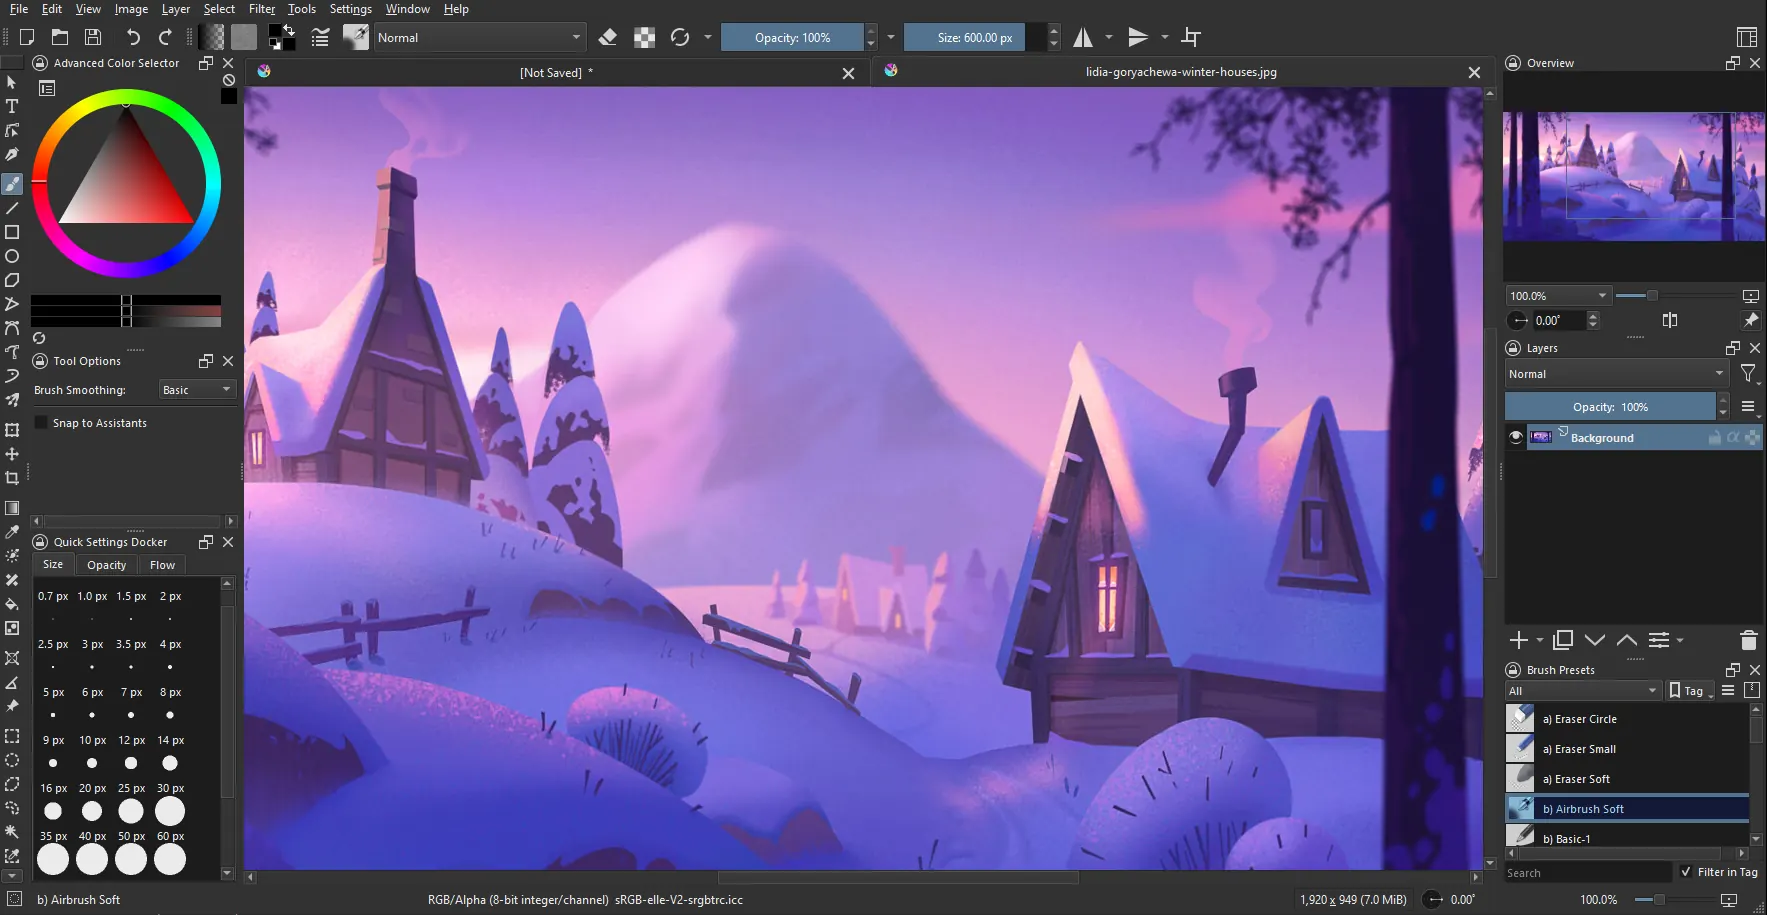
A brief introduction to the Krita interface and the Diffusion AI plugin interface
Using the Diffusion AI plugin's generation mode to turn collages into real images
Installing Krita
The basics of Krita and ComfyUI were introduced in the first article of this series, so they won't be repeated here. Readers interested in why we chose the Krita and ComfyUI combination can read this article:
https://tw-blog.reroom.ai/comfy-krita?source=more_series_bottom_blogs
We need to install the following three software:
Krita
ComfyUI
Krita Diffusion AI plugin
Installing Krita:
First, download the Krita software and install it. You can find the download link below. Just follow the steps one by one to complete the installation:
https://krita.org/zh-tw/download/
Installing ComfyUI:
We provided a general introduction to installing the ComfyUI plugin in our previous tutorial. If you haven't read it yet, you can follow the step-by-step guide here: Installing ComfyUI.
Let's open ComfyUI now and keep it ready for later use.
Installing the Krita Diffusion Plugin:
Install the Plugin
First, visit this website: https://docs.interstice.cloud/installation/
Go to the second point: Latest Release to download the newest version of the plugin file. At the time of writing this article, the latest version is Version 1.31.2.

Then open Krita, click on Tools > Scripts > Import Python Plugin from File. Simply select the downloaded ZIP file (without extracting it) to import.

Next, restart Krita and open any file. Then, go to Settings > Dockers > AI Image Generation.
Setting Up Connection in ComfyUI
Next, let's set up the connection. First, open your ComfyUI and click on Settings in the lower left corner.

Click on the Server-Config section on the left, and note your ComfyUI's Host and Port. In this example, they are 127.0.0.1 and 8000.

Okay, let's go back to Krita and press the settings button. In the first column, labeled Connection, you'll see many options. Here, choose Custom Server.

In the server URL, match the previously noted Host and change the Port to 8000, then click Connect:The plugin will prompt you about missing nodes. Let's proceed to install these nodes:

Installing Required Nodes
Before you start using the plugin, you need to install some essential Custom Nodes. Download the following nodes using the ComfyUI Manager:
ControlNet preprocessors → Fannovel16/comfyui_controlnet_aux
IP-Adapter → cubiq/ComfyUI_IPAdapter_plus
Inpaint nodes → Acly/comfyui-inpaint-nodes
External tooling nodes → Acly/comfyui-tooling-nodes
If you're unsure how to install these, please refer to the section on installing custom nodes with ComfyUI Manager in this article. These nodes, like ControlNet and IP-Adapter, have been introduced before. Simply search for and download them in the ComfyUI Manager.
Download Required Files
Next, we need to check the version of the SD model we are using. Different versions require different files. Let's return to the plugin installation guide page. Click on the left side under ComfyUI Setup and scroll down to the Required Models section. Click the button on the far right Model list (minimal) (Minimal Model Requirements). This lists the minimum requirements to run the plugin. You must download these files for the model you are using to make the plugin work.

Here, I choose the SDXL Base model:

Choose the model version you want to use and make sure your graphics card can handle it, as real-time rendering will use a lot of memory:
SD1.5 - Requires the least graphics card power, suitable if you don't have a mid to high-performance card.
SDXL - Offers better results but needs a more powerful graphics card.
FLUX - The latest model, for those interested in exploring its use, though it won't be covered here.
I chose to use the SDXL version. Download the model below (click the link to download directly) to the specified folder (refer to the path in the image below) to complete the plugin setup!
Once the setup is complete, it will show as connected, and the plugin will be ready to use!

Krita Diffusion Plugin Introduction
After connecting with ComfyUI, place the plugin in your preferred location. My setup is shown below. It's recommended to dedicate a full column to this plugin for easier operation later.

Plugin Interface Introduction
Let's introduce the plugin interface:

AI Generation Mode:
Using AI rendering, we will focus on the generation and real-time methods.

Model Selection:
Here, you can choose the model you want to use. If you have installed nodes related to the SDXL or FLUX models, you can select the default model here. The small icon on the left will show which version of the model it is, such as XL or 1.5.

To make changes, go to Settings in the top right corner, then Styles, and finally the Style Presets section. The default setting, like Cinematic Photo (XL), cannot be changed, but users can add their own presets. Advanced users can set up their frequently used models here. For more information on models, you can refer to this article.
Generally, the default model is sufficient (as shown in the image below). We will use the default Cinematic Photo (XL) setting to generate images.

Settings:
Most of the necessary settings have already been mentioned, so there's no need to repeat them here.

Strength/Step Adjustment:
Adjusting the strength and steps will impact the generation time and the final quality. Interested readers can refer to this article for more information.

Generate Button:
The Generate button will display different options depending on the action you take. For example, the image below shows extra options that appear after you select an area. More details will be available during actual use. Below the Generate button, there is a progress bar that shows the current progress of the model generation.


Generation Settings:
Batches: The number of images generated at once.
Seed: When you check the Fixed box, the Seed value is locked, allowing you to generate the same image repeatedly. To change the Seed value after checking the Fixed box, click the dice button next to it.
Enqueue: This option lets you decide the order of generation. By default, images are generated in the order they are submitted, but you can also set it to generate the last submitted image first.

Prompt Input:
The yellow highlighted area is where you can enter your ideas and what you hope to generate in the image.

Control Layer:
The pink icon circled in the bottom right is the control layer. When you click it, the control layer highlighted in yellow will appear.
On the far left, you can choose different control types. In the middle, you select the layer to reference, and on the far right, you set the reference strength.

Below is a simple introduction to control types. If you're interested, you can explore further. In this workflow, we will use Depth / Canny / Composition controls.
Using Composition as an example, the model will refer to the structure of the layer you choose to generate the image. The higher the strength, the closer the overall shape will be to the original image, but it also limits the model's freedom in generation. Usually, more time is needed to adjust the reference strength.
Practically, this can be used to provide the model with a building structure, allowing it to generate more accurate floor plans.
| Control Type | Function | Application Scenarios |
| Pose Control(OpenPose) | Control human poses | Generate characters with the same actions as the reference photo. |
| Canny Edge | Control outline structure | Change the output by editing outlines |
| Depth Map | Maintain the 3d detail of the scene. | Let AI generate scenes with the same perspective as the reference image. |
| Scribble | Reference hand-drawn creations | Quickly sketch a rough composition and let the AI automatically fill in the details. |
| MLSD | Maintain architectural structure | Suitable for drawing architectural and mechanical scenes. |
Adding a Prompt Area:
By clicking the T icon in the green box, you can add a prompt area that links to a layer or a selected range. Users can describe what they want to generate in that area.
The yellow area below is for prompts used by all areas together. It can be used to describe the overall atmosphere, composition, or image quality.

Image Generation Display and Selection Area:
As shown in the image below, the generated pictures will be displayed below for selection.

Once you understand the overall plugin interface, you'll see it's not that complicated.
If you've followed the step-by-step tutorial, you'll notice that these controls and operations are quite similar to ComfyUI. The main difference is that Krita's image selection and layer features offer a more user-friendly control interface.
Generate Mode
In the mode selection at the top left, we first choose the Generate mode. By using the select and generate functions, we can create and refine the image step by step.

Generating an Image
First, we'll use AI to create an interior design image as a starting point: simply enter the prompt and click generate to create the image.
When you click on any of the images generated in the bottom left, a locked layer will be created on the right to store the generated content.
The generated images will appear below the plugin. Be sure to select "Apply" to confirm your image choice. This ensures the result is loaded when making local changes later.


Changing the Selection Area
You can choose from the side options like Rectangle Select (⌘+R), Ellipse Select, Polygon Select, Freehand Select, Magnetic Select, Bezier Curve, or Magic Wand to pick the area you want to change.
When you use Krita's selection tools to select an area, the plugin's generate button will change, and the following dropdown menu will appear:

They are:
Auto Detect / Fill / Expand / Add Content / Remove Content / Remove Background / Custom Generate
Let's explain each of these features in detail.
Fill
The Fill effect works by transforming the original unnatural text drawing into an oil painting style. Fill reads the colors around the selected area and blends the generated content into the image. As a result, it might extend slightly beyond the selected area.

Expand
First, press the C key and click on the image. Control points will appear, allowing you to drag in the direction you want to expand the canvas. Press Enter to confirm the changes.

Use the Magic Wand to select an area, then choose the Expand generation mode:

After pressing Expand, the AI model will automatically generate the part you want to extend.

Remove Content
After selecting an object, choose "Remove Content" from the dropdown menu.

Sometimes, if you don't provide a prompt, the generated result might not be perfect. It's better to describe the effect you want after removing an object. In this case, I wanted to show just a white wall. The final result is shown in the image below:

Add Content
The main difference between the Add Content feature and Fill is that it can generate images without being limited by the colors in the picture, providing more varied results.
Next, I will add a wall lamp to the previous area. To use this feature, you need to add a Regional Text Prompt layer or a Control Layer.

We add a Regional Text Prompt layer and describe the object we want to add. In the General Prompt below, we also describe the object we want to include. The final result is shown in the image below:

Remove Background
First, select the area you want to keep, then describe the new background, and finally press "Remove Background."

Finally, the replacement is complete, but you might notice that the edges look a bit unnatural. This happens because of the selection area. To make a more precise replacement, you need to select the objects you want to keep more accurately.

Custom Generate
Unlike the Fill and Add features, Custom Generate lets you choose the context for creating images. Before using Custom Generate, you can select the content you want to reference and save it by clicking the dashed circle on the right. Currently, it's not recommended for readers to use this feature, as the results are not stable. You can use the previously introduced features instead.
Conclusion
Using ComfyUI with Krita to generate interior design images can definitely help you control more details and achieve a high level of customization. However, mastering the entire process takes time.
From my experience writing this tutorial, the most time-consuming part wasn't generating the images themselves, but understanding how ComfyUI and Krita work and how different settings affect the final image. There are no shortcuts here; you have to keep experimenting and adjusting to gradually achieve your desired results.
If you're setting up ComfyUI yourself, you'll need a decent investment in computer hardware, and it doesn't support multiple users at the same time. If a team needs to use it, this requires careful consideration. For a team, this might mean buying multiple devices, which can be costly. Alternatively, using cloud GPUs for processing can also become expensive over time.
In this situation, if you just want to quickly create valuable interior design visuals without spending too much time on technical details, AI tools like ReRoom, specifically designed for interior design, can be a good alternative.

It's very easy to use. Upload a photo of the space or a screenshot of a SketchUp model, pick a style, and it quickly render an image. Plus, its features are regularly updated based on the real needs of designers, adapting to various work situations. ReRoom provides simple solutions if you run into any problems while using it.。


In simple terms, if you want to focus more on planning and designing instead of technical adjustments, consider using ReRoom as an additional tool. It could make your workflow smoother.

Click this link: https://tw.reroom.ai/ or simply search for ReRoom AI to find us.
Feel free to follow us on Instagram, where we share the latest features, user tips, and interesting experiences.
Thank you once again for reading to the end. I hope AI tools help you work more efficiently. Goodbye!
Subscribe to my newsletter
Read articles from Wayne Huang directly inside your inbox. Subscribe to the newsletter, and don't miss out.
Written by