Embedded Systems Roadmap: A Self-Paced Journey from Beginner to Advanced
 Arpit Shrivastava
Table of contents
- Introduction: Why Learn Embedded Systems?
- How to use this roadmap
- Let's dive into the roadmap together!
- Basics: Laying the Foundation
- Intermediate: Expanding Your Skills and Projects
- Advanced: Mastering Embedded Systems
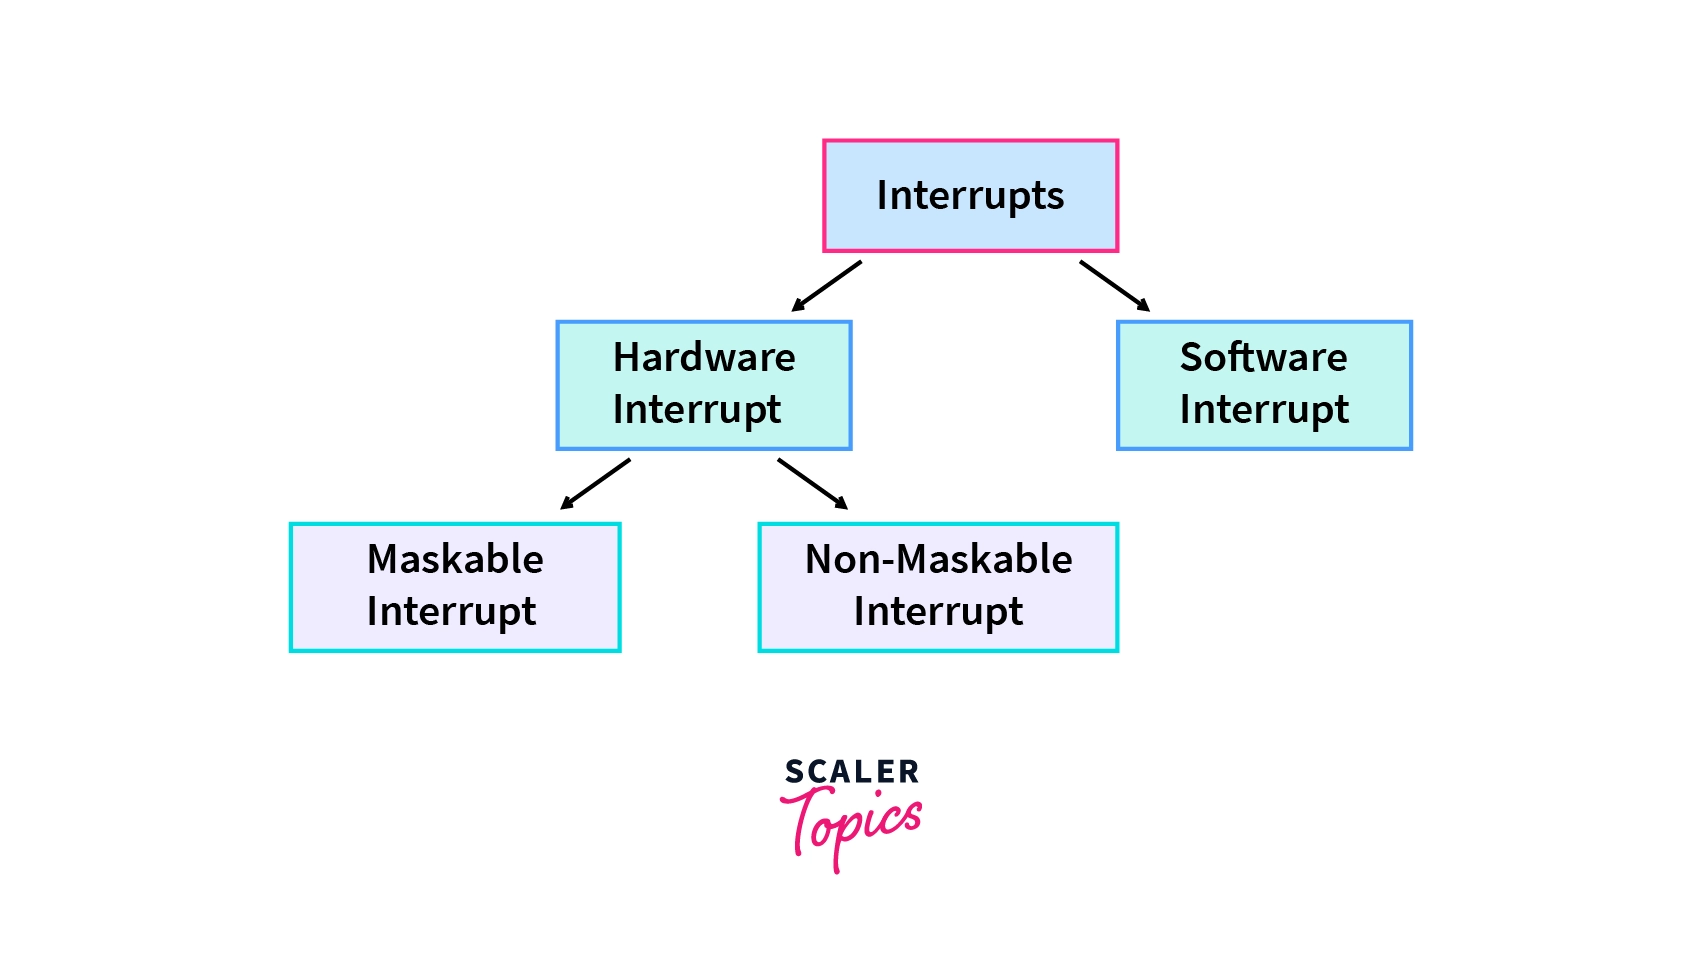
- Low-Level Mastery and OS-Level Development
- Advanced Hardware Design and Integration
- Leadership, Collaboration, and Continuous Learning
- Mini Project Ideas – Advanced Stage
- Your adventure in embedded systems never truly ends. There's always something new to learn, some new problem to solve. That's what makes this field so endlessly fascinating.
- Conclusion: Embrace the Journey and Keep Experimenting
Diving into embedded systems feels like exploring a vast ocean of hardware, code, and endless possibilities.
Are you a hobbyist connecting your first sensor?
Maybe you're an early-career professional looking to level up your skills?
The embedded systems world welcomes you with open arms.
From the Arduino that blinked your first LED. To the STM32 microcontroller running a tiny RTOS. All the way to the ESP32 sending sensor data to the cloud.
Every step becomes an adventure worth taking.
This guide presents a self-paced roadmap inspired by an embedded systems skill tree. It will help you navigate from basics to advanced mastery. You'll level up one skill at a time, at your own pace.
An example of an Embedded Systems Skill Tree*, mapping skills from "Basics" at the bottom to "Advanced" at the top.*
You can color in each box as you acquire the skill, gamifying your learning journey.
Not every box needs to be completed – choose your own path and set your own goals as you progress.
Introduction: Why Learn Embedded Systems?

Look around you right now.
Embedded systems surround us everywhere.
They live in smartwatches, drones, thermostats, cars, and countless other devices.
These systems blend hardware and software to create smart solutions for real-world problems.
Learning these skills empowers you to:
Create Innovative Projects: Build your own gadgets, robots, or IoT devices from scratch. Imagine constructing a home automation system that opens your blinds at sunrise. Or picture a sensor network that monitors your garden's soil moisture.
Boost Your Career: Embedded engineers are in high demand across industries. From automotive to consumer electronics, opportunities abound. Mastering this skill set opens doors to exciting roles. You might explore firmware development, hardware design, or IoT solution architecture.
Understand Technology Deeply: Unlike writing code for a PC, embedded work gets you closer to the metal. You'll learn how processors actually work. You'll discover how sensors communicate with each other. You'll understand how software reliably controls hardware in real time.

How to use this roadmap
This guide is structured in three main levels.
We start with Basics, move to Intermediate, and finish with Advanced.
This mirrors a natural skill progression.
But here's the thing - it's not a strict sequence.
Feel free to jump around based on your interests.
Think of it like a video game's skill tree. You might start at the bottom with fundamental skills. Then you can branch out in whatever direction excites you most.
Everyone's journey looks different. Set your own goals and pace. The key is consistent hands-on practice and maintaining your curiosity.
We've included mini project ideas and practical tips throughout. These will keep you motivated and help cement your knowledge.

Let's dive into the roadmap together!
Basics: Laying the Foundation
The Basics level is where it all begins.
Here, you'll get comfortable with the building blocks of embedded systems.
You'll learn to work with simple hardware. You'll write your first basic programs. You'll use fundamental tools that every embedded developer needs.
This is the stage of blinking LEDs. It's about reading your first sensors. It's saying "Hello, world!" to your microcontroller.
Your goal at this level? Develop a strong foundation in both electronics and programming concepts. Everything you build later will rest on these fundamental skills.
Essential Tools & Platforms to Get Started
Get an Arduino (or Similar Board)
Arduino boards are incredibly beginner-friendly microcontrollers.
They come with a huge community behind them. You'll find plenty of tutorials for almost anything you want to build.
Starting with an Arduino Uno helps you quickly go from zero to a working gadget.
Why Arduino? It abstracts away a lot of complexity. You can write C/C++ code in the Arduino IDE and upload it with just one click.
Arduino boards also have many add-on modules. Sensors, LEDs, motors – you name it. These modules make experimentation fun and accessible.
Other options: Not feeling Arduino? You could start with an ESP32. It offers Wi-Fi and Bluetooth connectivity. Plus, you can program it via Arduino IDE or MicroPython.
Or try a Raspberry Pi Pico. This microcontroller (not to be confused with the larger Raspberry Pi computer) offers great value.
The key is finding a simple platform that makes learning enjoyable.
Use a Hardware Simulator
Don't have hardware yet? No problem!
Simulators like Wokwi or Tinkercad Circuits have you covered. They let you virtually build circuits and run microcontroller code.
This is perfect for practicing wiring and coding without fear. After all, you can't break virtual components!
You can simulate an Arduino. Blink virtual LEDs to your heart's content. Get comfortable before handling real components.
Basic Electronics Toolkit
Time to invest in a simple toolkit.
Get a multimeter to measure voltage and check continuity. Pick up a breadboard and jumper wires for building circuits without soldering. Grab some resistors, LEDs, and basic sensors.
Learning to use a multimeter's continuity check feature is a game-changer. It helps you test if current flows through a connection. This skill saves hours of frustration when wiring circuits.
Programming Environment
Set up the development environment for your chosen board.
For Arduino, install the Arduino IDE or PlatformIO. PlatformIO supports Arduino, ESP32, STM32, and more.
Using CircuitPython or MicroPython on your board? Get the firmware loaded and set up a serial console. Try Thonny IDE for MicroPython – it's user-friendly.
Your first step is often simply getting your PC to talk to the board over USB.
Pro Tip: Treat initial setup as part of learning. You might run into driver issues or port configurations. Don't get discouraged!
Solving these problems teaches you how development tools really work. It's perfectly okay to search for solutions or ask for help on forums. This troubleshooting process is a valuable skill in itself.
Microcontroller Basics: Blinking LEDs to Reading Sensors
Now that your hardware is ready, let's write your first few programs!
Blink an LED
This is the classic first project.
Make an LED turn on and off at a set interval. This is the "Hello World" of embedded programming.
You'll learn how to configure an output pin in code. On Arduino, you'll use the pinMode and digitalWrite functions.
It seems trivial at first glance. But from this simple project, you learn about the MCU's GPIO pins. You also get a feel for the code-upload-run cycle.
Read a Button (Digital Input)
Connect a push button to a microcontroller pin. Detect when it's pressed.
This introduces the concept of input pins. It also reveals issues like debouncing.
Real buttons can cause noisy signals when pressed. They create multiple rapid on/off flickers. You'll learn simple strategies to ensure reliable reading.
Try using software delays or capacitors. Or explore debouncing libraries that handle the complexity for you.
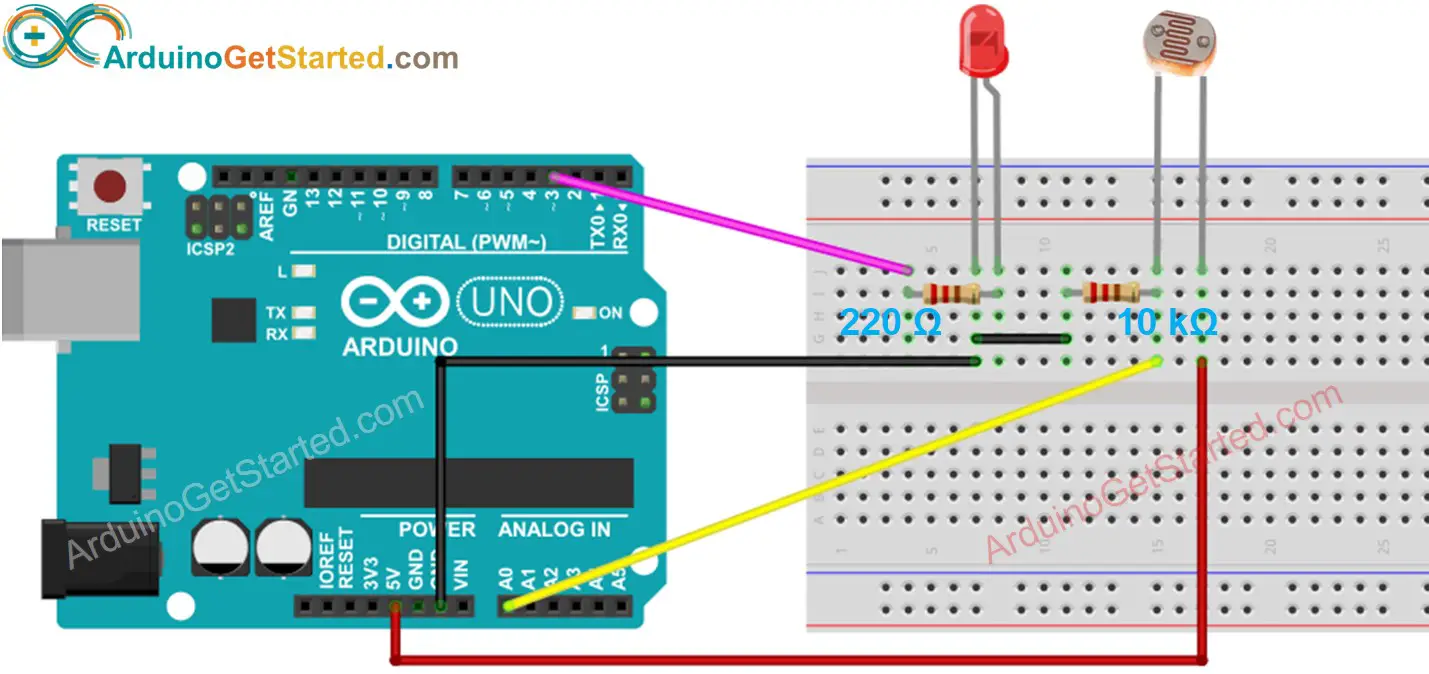
Analog Inputs – Using Sensors
Many sensors output analog voltages. Think temperature sensors, light sensors, or potentiometers.
Learn how to use your board's ADC (Analog-to-Digital Converter). It converts a sensor's analog signal into a digital value your code can use.
Try reading a potentiometer's value to control an LED's blink rate. Or measure temperature from a sensor and print it out.
On Arduino, this is done with analogRead(). It gives you a number proportional to the input voltage.
This skill unveils the world of analog vs digital. It's fundamental for working with real-world signals.
Output with PWM (Pulse-Width Modulation)
Not all outputs are simply ON or OFF.
PWM simulates analog output using digital signals. It toggles a pin HIGH and LOW very fast with a certain duty cycle.
Try using PWM outputs to fade an LED in and out smoothly. Or drive a small DC motor at different speeds.
Arduino's analogWrite() function on certain pins uses PWM under the hood.
Move a Motor
Interface with a basic actuator like a servo or DC motor.
This often involves a bit more circuitry. You might need a transistor or motor driver chip to supply sufficient current.
By making a servo sweep or a motor spin, you learn about power considerations. A microcontroller pin can't drive a motor directly.
This step is incredibly satisfying. It literally puts things in motion!
Configure a Timer
Most microcontrollers have hardware timers. They trigger actions at precise intervals or count events.
At the basic level, you might not directly configure low-level timer registers. Instead, you'll use functions built on timers. On Arduino, these include millis() or delay().
As you get comfortable, try using non-blocking timing. For example, use millis() to perform an action every second. This approach doesn't stop the CPU with a delay().
Understanding timers sets you up for more advanced concepts. You'll explore interrupts and multi-tasking later.
Communication Basics: UART, I2C, SPI (Talking to Devices)
Embedded devices rarely work alone.
They communicate with sensors, other chips, or PCs. Early on, get familiar with these primary communication protocols:
UART Serial Communication
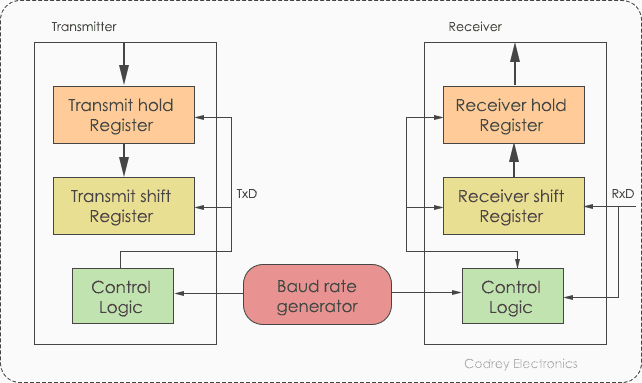
UART is a simple protocol for two devices to send text/data back and forth. It's called asynchronous serial communication.
You'll likely use serial to print debug messages from your microcontroller to your computer. This happens via USB-Serial.
Try using Serial.println() on Arduino to log sensor readings. This becomes an essential debugging technique.
Make your Arduino send a message over serial when you press a button. Or periodically send sensor data that you can read on your PC.
Understanding serial communication opens many doors. You can connect modules like GPS receivers or Bluetooth devices. Many of these use serial interfaces.
I2C (Inter-Integrated Circuit)
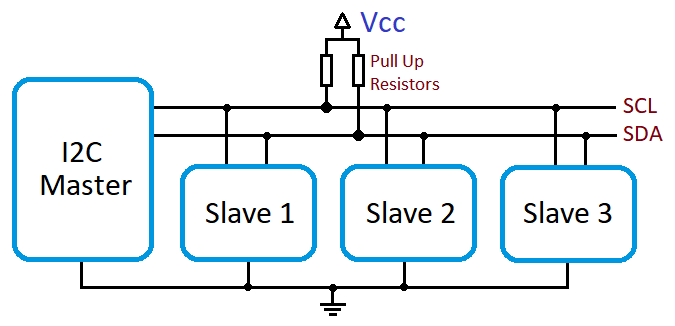
I2C is a common two-wire bus for connecting peripherals to microcontrollers.
Many devices communicate via I2C:
Temperature sensors
Accelerometers
OLED displays
And many more
Learn how to use I2C libraries on your platform to read data from a sensor.
Hook up a temperature/humidity sensor like the popular DHT sensor. Or try an I2C-based sensor like BMP280.
You'll learn about device addresses and reading/writing registers. Don't worry too much about the complexity. Libraries often handle the low-level details for you.
SPI (Serial Peripheral Interface)

SPI is another common protocol using 4 wires:
MISO (Master In, Slave Out)
MOSI (Master Out, Slave In)
SCK (Serial Clock)
CS (Chip Select)
It's often used for faster communication or specific devices:
SD cards
Screens
Radio modules
Practice using SPI by interfacing an SD card module. You could log sensor data to a file. Or try an SPI OLED screen to display text or sensor readings.
SPI requires understanding concepts like master/slave and chip select lines. While a bit more complex than I2C, basic usage with libraries remains approachable.
By experimenting with I2C and SPI early, you'll get comfortable adding modules to your projects.
Try combining skills: Read a sensor over I2C. Then send the data to an SD card over SPI for logging.
These protocols are fundamental to virtually all embedded projects.
Basic Software Concepts and Best Practices
State Machines for Simple Logic

As your programs grow more complex, organizing code becomes crucial.
A state machine helps manage different states of operation. Imagine an LED that blinks fast in one mode and slow in another based on a button press.
Try designing a simple state machine. Perhaps create a traffic light controller (states: Green, Yellow, Red). Or build a device that cycles through modes when a button is pressed.
This approach helps you plan your code's structure. It's a stepping stone to handling complex logic without getting lost.
Reading Documentation & Datasheets

Even at the basic stage, start glancing at datasheets. Look at the pinout diagram of your microcontroller. Check the datasheet for sensors you're using.
It's okay if much of the information goes over your head initially. Focus on picking out key details:
What voltage does this sensor expect?
Which pin is SDA (I2C data line)?
Developing a habit of consulting documentation makes you independent and effective.
Version Control (Git) from Day 1
It might feel like overkill for blinking an LED. But using version control for your code is a great habit. Even if you're working solo.
Initialize a Git repository for your projects. This lets you save your progress and experiment fearlessly. You can always revert if something goes wrong.
Platforms like GitHub or GitLab allow you to document and share your projects. As you progress, you might collaborate with others. Knowing Git will be invaluable then.
Write Clean, Modular Code
Begin practicing writing code in functions and modules.
Is your main loop doing multiple things? Separate those into functions like readSensor() and actuateMotor().
This isn't a formal requirement at first. But as projects grow, modular code becomes easier to extend and debug.
Good habits early on lead to fewer headaches later!
Mini Project Ideas – Basics Stage
To cement your basic skills, build small projects that are fun and doable:
Morse Code LED Blinker
Use a button and an LED. When the button is pressed, capture short and long presses. These encode Morse code dots and dashes. Then blink them out on the LED.
This combines button reading, timing, and output control.
Temperature Logger
Read temperature from a sensor. Display it on an LCD or send it to your computer via serial.
You could log the data by timestamp. This teaches you how to format output. Maybe even try storing data to an SD card (using SPI).

Mini Piano with Buzzers
Use a piezo buzzer and some buttons (or a keypad). Each button plays a different tone when pressed. This uses PWM or tone generation features of your board.
The project teaches mapping input to output. It also introduces the concept of frequency for sound generation.
Motion Alarm
Connect a motion sensor (PIR sensor) to your Arduino. Make a simple alarm system.
If motion is detected, sound a buzzer or flash LEDs. This project introduces using sensor modules. It also teaches conditional logic to make decisions (if motion, then alarm).
Each of these projects combines multiple basic skills. They're exactly what you need to move to the next level.
Plus, they're fun and motivating to show off to friends and family!
Intermediate: Expanding Your Skills and Projects
Ready to take the next step in your journey?
Welcome to the Intermediate stage!
This is where things get really exciting.
Your projects become multi-faceted. Your code grows more structured. You start using advanced features of microcontrollers and connectivity.
At this level, you might venture beyond Arduino.
Try exploring STM32 microcontrollers, widely used in industry. Or dive into ESP32 for IoT projects with Wi-Fi and Bluetooth. You might even experiment with Raspberry Pi for certain tasks.
The focus here is on breadth and integration. You'll connect multiple components. You'll manage concurrency. You'll write more robust software.
Let's explore what awaits you!
Advanced Microcontroller Techniques
Interrupts – Reacting in Real Time
In the basic stage, your code likely used simple loops and delays.
Now it's time to level up.
Learn to use interrupts to handle events instantly without polling.
An interrupt is a signal that pauses the normal flow. It runs a special function called an ISR (Interrupt Service Routine).
Instead of constantly checking a button in a loop, configure an interrupt. It will trigger when the button is pressed, no matter what the CPU is doing.
Try enabling a hardware timer interrupt to toggle an LED at precise intervals. Or use an interrupt pin to detect a quick event. This could be a rotary encoder tick or a fast sensor pulse.
Mastering interrupts makes your systems more efficient and responsive. It's also a gateway to using real-time operating systems.
Using a Real-Time Operating System (RTOS)
An RTOS allows you to run multiple tasks "simultaneously" on a microcontroller.
It schedules them in tiny time slices or based on priority.
At the intermediate level, you don't need to write an RTOS. That's an advanced skill. But you can start using one.
Try FreeRTOS or Zephyr on a board like the STM32 or ESP32.
Break your project into separate tasks:
One task reads sensors
Another task updates a display
A third task handles communication
Let the RTOS schedule these tasks efficiently.
You'll learn about important concepts:
Threads (tasks)
Mutexes (mutual exclusion locks) to prevent conflicts when tasks share resources
Queues or message passing for tasks to communicate
This experience teaches you how larger, more complex firmware is structured. It's highly valued in professional embedded development.
Memory and Power Management
Intermediate projects often run longer. They may be battery-powered or memory-constrained. You need to become mindful of these resources.
Practice using low-power modes of your microcontroller. Put the MCU to sleep and use interrupts to wake it up periodically. This is crucial for building battery-operated gadgets.
Also get familiar with memory limitations. Understand the difference between RAM and Flash storage on your microcontroller. Learn to use tools or compile output to see how much memory your program uses.
This might involve optimizing your code. Or choosing more efficient data structures as projects grow.
Direct Memory Access (DMA)
As you advance, you'll encounter scenarios where the CPU shouldn't spend time on simple data copying.
DMA is a feature that lets peripherals move data in memory without CPU intervention. For example, it can read a block of ADC samples into a buffer automatically.
While DMA is an advanced microcontroller feature, you can start using it now. Try it for tasks like sampling audio from a microphone. Or streaming data to an SD card.
This will deepen your understanding of how hardware and software interact efficiently.
Connectivity and Complex Peripherals
![]()
Wireless Communication (Wi-Fi, Bluetooth, etc.)
Building on your I2C/SPI knowledge, now you integrate networking.
With an ESP32 or a Raspberry Pi, connect your device to the internet. Or link it to a smartphone.
Use Wi-Fi to send sensor readings to an online service or database. This effectively sends data to the cloud. You might learn about HTTP requests or MQTT protocol for IoT.
Alternatively, use Bluetooth Low Energy (BLE) to communicate with a mobile app. Create a custom BLE GATT profile on an ESP32. This allows your device to send data or receive commands wirelessly from a phone.
This introduces networking concepts. It requires more complex debugging (network issues, pairing, etc.). It greatly expands what your projects can do.
It's incredibly rewarding to see your embedded device talk to the world!
Advanced Sensors and Outputs
In the basic stage, you used simple sensors.
Now try integrating more advanced ones. These might require special handling or produce lots of data.
For example, use an IMU (Inertial Measurement Unit) sensor. It combines accelerometers and gyroscopes to track motion in multiple axes. This could be the heart of a self-balancing robot or a fitness tracker.
Handling such sensors teaches you about data fusion. You might also learn about calibration (dealing with sensor noise).
Another example is using a camera module or a microphone with your microcontroller. An Arduino might struggle here. So you'd use more powerful boards like an ESP32-CAM for camera. Or a Teensy for audio processing.
Working with high-data-rate peripherals pushes you to use advanced techniques:
Buffering
DMA
Off-chip memory
Using an Oscilloscope or Logic Analyzer

These are essential tools for debugging hardware communications and signals.
At the intermediate level, start using a logic analyzer. They're often more affordable than oscilloscopes. Try a Saleae Logic clone or even the built-in logic analyzer in some IDEs. These tools capture digital signals for analysis.
If your I2C communication isn't working, a logic analyzer shows you the waveform. This helps pinpoint issues like wrong addresses or wiring problems.
An oscilloscope allows you to see analog waveforms. Use it to observe sensor outputs or your PWM signal's shape.
Even if you don't own these tools, many makerspaces have them. Or you can use lower-cost alternatives. Some digital storage oscilloscopes (DSOs) or even Arduino-based scopes work for slow signals.
Learning to use these tools is a game-changer. You'll gain insight into what's happening electrically in your circuit. You'll see beyond what the code says.
A common intermediate skill is debugging a project with these tools when things aren't working.
Displays and User Interface
Add a display or other UI elements to your projects.
Control an LCD or OLED display (maybe via I2C or SPI) to show readings or menus. This is a useful skill for creating standalone devices.
You could also integrate input methods:
Keypads
Rotary encoders
Touch sensors
These allow users to navigate menus on your device.
This teaches you to manage more complex software state and timing. Updating a display while reading inputs requires careful coding. You'll also learn to optimize, since updating too often can slow things down.
It's the foundation for making your projects user-friendly and stand-alone. They won't require a PC attached to be useful.
Building Larger Projects & Software Practices
Multi-Module Projects and Integration
At this stage, you'll start combining many pieces:
Multiple sensors
Communication modules
Outputs
More sophisticated code structures
An example intermediate project could be a weather station that:
Reads various sensors (temperature, humidity, pressure, wind speed)
Displays information on an LCD
Logs data to an SD card
Uploads data online via Wi-Fi
Coordinating all these functions requires careful planning.
You'll learn to break the project into subsystems. You might use a scheduler or simple cooperative multitasking to manage everything. A full RTOS could be overkill for some projects but perfect for others.
You'll become adept at troubleshooting integration issues:
Does using Wi-Fi cause your sensor reading to glitch due to timing?
Does the SD card operation interfere with your OLED updates?
Solving these challenges makes you a true engineer who can see the whole system.
Version Control and Collaboration
If you haven't already, start using Git more extensively.
Create branches for new features. Track issues and bugs systematically. Perhaps collaborate with a friend on a project.
This simulates a professional environment. It teaches you how to manage changes and integrate code from multiple people.
You might also use platforms like GitHub to find open-source libraries. Or contribute back to the community. Even something as simple as reporting an issue or improving documentation is valuable experience.
Continuous Integration (CI) for Firmware
While CI/CD is common in software, it's emerging in embedded development too.
An intermediate-level challenge could be setting up a basic CI pipeline for your project. For example, use GitHub Actions to automatically compile your code when you push changes. You might even run unit tests (more on those next).
This ensures your code builds correctly on every change. It catches errors early in the development process.
It also pushes you to separate hardware-dependent code from logic. This way, you can test the logic on a PC environment.
It's an impressive skill to have as an early-career professional. It shows that you can bring software best practices into embedded development.
Writing Unit Tests and Algorithm Sandbox
As your code grows, quality matters more and more.
Try writing unit tests for parts of your embedded code. You might simulate some logic on your PC.
For example, if you wrote a function to compute something:
A filter for sensor data
State machine logic
Write tests in C++ or Python to verify it works for various inputs.
There are frameworks like Unity Test for C in embedded. They let you run tests for embedded code on your PC.
You can also use an "algorithm sandbox" on a PC. This helps you prototype complex code before deploying to the device. Sensor fusion algorithms are perfect candidates for this approach.
Testing and iterative development make your firmware more reliable. These are habits that scale to large projects in professional settings.
Mini Project Ideas – Intermediate Stage
Now for some project ideas that leverage intermediate skills. These will push you out of your comfort zone in the best way possible:
Smart Home Sensor Network
Build a simple IoT network with multiple nodes.
Use a couple of ESP32/ESP8266 devices or Arduinos with Wi-Fi modules:
One monitors temperature and humidity in one room
Another detects motion or light in another room
Have them send data to a central Raspberry Pi or to a cloud service. Create a small dashboard (maybe a web page or mobile app) to view the data in real-time.
This project involves:
Wireless communication
Multiple sensors
MQTT or HTTP protocols
Coordinating multiple devices
It's a great intermediate challenge that teaches system design.
Balancing Robot or Drone Controller

If you're into robotics, try making a two-wheel self-balancing robot. Use an IMU sensor and DC motors with motor drivers.
You'll implement a PID control algorithm (closed-loop control). This keeps the robot upright based on feedback from the sensors.
This is an intermediate-to-advanced project in terms of complexity. But you can start simple:
Get sensor readings working first
Then output to motors
Finally, iterate on the control code
Alternatively, build a basic flight controller for a drone. Start with a simulator or a simple frame for safety.
You will learn tons about:
Real-time sensor processing
Interrupts (reading gyro at steady intervals)
Optimizing code for speed and reliability
Data Logger with Sleep Mode
Create a battery-powered environmental data logger.
Use an STM32 or Arduino with low-power libraries. Read sensors (temperature, air quality, GPS location, etc.). Log to an SD card or transmit occasionally.
Implement sleep modes to conserve power. Aim for your device to run for weeks on batteries.
This project emphasizes power management:
Decide when to wake up (maybe via RTC alarm interrupt)
Learn how to efficiently log data
Ensure data isn't lost if power dies unexpectedly
It's a very practical scenario for remote sensing. It teaches you about trade-offs in design between functionality and power consumption.
Custom Gaming or MIDI Controller
Combine hardware and software by building a custom USB device.
Create a MIDI controller with knobs and buttons for music production. Or design a DIY gamepad with special features for your favorite games.
Use something like an Arduino Pro Micro (ATmega32u4). Or try an STM32 that can act as a USB HID device.
Write firmware that sends USB messages based on inputs. This introduces USB communication and requires reading some new protocol details.
It's rewarding because you can use your device with real PC software:
Use your MIDI controller in a digital audio workstation
Play games with your custom gamepad
Create a specialized input device for creative software
These projects will stretch your abilities.
Expect to do a bit of research and problem-solving for each. That's normal at this stage and part of the learning process.
When you complete them, you'll have not only cool demos but also a robust set of intermediate skills. These prepare you for truly advanced topics in the embedded systems world.
Advanced: Mastering Embedded Systems
Congratulations on reaching the Advanced level!
You're no longer just following tutorials.
Now you're architecting entire systems. You're digging into how hardware and software work together. You might even be creating new tools or frameworks for others.
At this stage, you might design custom PCBs for your projects. You could write portions of an operating system. You might optimize critical code in assembly for maximum performance.
Advanced doesn't mean you've mastered every intermediate skill. Embedded is an incredibly broad field. But you have the confidence to learn any new skill on demand.
This part of the roadmap is about pushing limits. It's about fine-tuning your expertise. It's about becoming the expert others turn to.
Let's explore what mastery looks like.
Low-Level Mastery and OS-Level Development
Write a Bootloader

A bootloader is a small program that runs when your microcontroller powers on.
It's responsible for initializing the hardware. It may load the main application. It often enables firmware updates.
Writing a simple bootloader (or heavily modifying an open-source one) is a master-level skill.
It gives you intimate knowledge of:
Your microcontroller's startup procedure
Memory layout
Instruction set architecture
You might start by implementing an Arduino custom bootloader. Or write one for an STM32 that can receive new firmware over serial or USB.
This involves understanding linkers and how to place code in memory. You'll implement communication protocols at a low level. You'll ensure reliability with checksums and fallback modes if an update fails.
Once you've done this, the magic of how devices update themselves will be demystified. You'll understand what's happening under the hood when you press "upload" in the IDE.
Developing (or Porting) an RTOS
If you used an RTOS at the intermediate level, try diving deeper.
Writing a Real-Time Operating System from scratch is complex. But you can start with basic features:
Task switching via context switching
A scheduler (round-robin or priority-based)
Inter-task communication primitives
Even implementing a simplified cooperative scheduler can teach OS fundamentals. This is where tasks yield control voluntarily.
Alternatively, contribute to an existing RTOS project. Or port it to a new microcontroller board that's not yet supported.
This might include writing low-level code for:
Timers
Interrupts
System tick handlers
Memory management
You'll gain a deep understanding of how scheduling and context switching works under the hood. This knowledge transforms you from an RTOS user to an RTOS expert.
Optimize Assembly & Advanced Debugging
At this level, you may encounter scenarios where high-level code isn't enough.
Learn to read and write assembly language for your target processor:
ARM assembly if you use STM32/ESP32
AVR assembly for Arduino AVR boards
Try writing a critical routine in assembly to make it run faster. Or use assembly to handle a timing-critical section.
For example, you might bit-bang a very fast signal. Or optimize a math function that's called thousands of times per second.
You likely won't write entire projects in assembly. But knowing it allows you to optimize bottlenecks. It helps you understand compiler output when things go wrong.
Pair this with advanced debugging techniques:
Use trace debugging (if available) where the CPU records program execution flow
Analyze map files and listing files from your compiler
Debug memory overlaps or unexpected resets
Solving a tricky bug might require reading data sheets. You'll analyze timer code and simulate edge case scenarios.
Imagine troubleshooting a 49-day uptime reboot issue. This famous overflow bug occurs when a millisecond timer wraps around. Solving it is a true test of your expertise.
Implement Communication Protocols (Bit Banging & Custom Stacks)
Instead of using libraries, try implementing a communication protocol manually.
This is called "bit-banging."
Create your own driver for SPI or I2C using just GPIO toggling and precise timing in software. This becomes useful if you need to use pins on a chip without those peripherals. Or for creating entirely custom protocols.
You could also implement a higher-level protocol stack:
A minimal BLE GATT server without using the vendor's Bluetooth stack
A custom serial protocol with error correction for communicating between two MCUs
Building these from scratch forces you to handle every detail:
Timing constraints
Synchronization
Error handling
Edge cases
It gives you appreciation for the robust libraries and silicon features you used before.
It's challenging work. But after doing it, you'll be the person who can make any two devices talk to each other. No matter how incompatible they seem at first.
Advanced Hardware Design and Integration
Design Your Own PCB and Custom Hardware

At the advanced level, many embedded engineers design custom circuit boards.
Transition from breadboarded rats' nests to clean printed circuit boards (PCBs). You'll design these using PCB software like KiCad or Eagle.
Start simple:
Design an Arduino-compatible board
Create a breakout board for a microcontroller with exactly the features you want
Integrate the power supply, microcontroller, and necessary components. Add sensors, connectors, and supporting circuitry.
Once your PCB arrives from a fabrication service, assemble it. Solder the components and bring it to life by programming it.
This process teaches you about:
Electrical design
Schematics
Manufacturing considerations
Component selection
You might need to debug your board if it doesn't work right away. This is a superb learning experience. You'll read schematics and use tools to trace signals. Your multimeter and oscilloscope become your best friends.
By the end, you'll intimately understand hardware design. You'll feel confident reading complex board schematics. You'll be able to create custom hardware for any project you imagine.
Analog Mastery – Sensors and Power Electronics

Digital logic is predictable. Analog electronics often behave in nonlinear, unexpected ways.
Delve into analog challenges like burden voltage in measurement circuits. When you measure current through a sensor, the measuring device affects the circuit. Advanced engineers learn to account for this.
Experiment with designing proper analog front-ends for sensors:
Op amp circuits for amplifying tiny signals
Filters for smoothing sensor noise
Voltage dividers for measuring higher voltages safely
You could also challenge yourself with power electronics:
Design a simple DC-DC converter
Create a motor driver H-bridge
Build an LED driver circuit
These analog and power skills become vital when your embedded project interfaces with the real world. They help you sense tiny signals reliably. They let you drive large loads efficiently and safely.
Multi-Core and Multi-Processor Systems
Basic projects use a single microcontroller. Advanced projects might involve multiple processors or multi-core systems.
The ESP32 has dual cores. You can assign different tasks to different cores. You'll need to manage their interaction carefully.
Or you may design a system with one microcontroller overseeing others. This creates a master controller with several slave devices.
Learn how to coordinate tasks between cores. Use thread safety and careful planning to avoid conflicts. Master techniques to make processors communicate via SPI, I2C, or UART links.
An example advanced project could be a custom IoT gateway:
An embedded Linux board handles high-level networking
An attached microcontroller handles real-time tasks
They communicate through a well-defined interface
Understanding how to partition systems and make them work together is a hallmark of an advanced embedded engineer. It opens possibilities for creating more complex and capable devices.
Secure and Robust Systems

Advanced embedded systems need to be secure and fault-tolerant.
Investigate topics like secure boot and encryption for firmware. Ensure your device only runs trusted code. Learn how to implement secure firmware updates.
Implement OTA (Over-The-Air) updates in one of your projects. Make your device download new firmware from the cloud and update itself safely.
This combines several advanced skills:
Bootloader design
Networking
Security (signing or encrypting the update)
Also focus on fault tolerance:
How does your device recover from crashes?
Implement a watchdog timer that resets the system if it hangs
Create logging mechanisms to record what happened
These techniques ensure you can build systems that work not just in the lab. They continue to work reliably in the field, even in harsh conditions. They recover gracefully from unexpected situations.
Leadership, Collaboration, and Continuous Learning
Teach or Mentor Others
One of the best ways to solidify your knowledge is to teach it.
As an advanced learner, write about your projects. Give a talk at a local maker meetup. Help others in online communities with their embedded questions.
Teaching a class or workshop on embedded basics forces you to organize your understanding. It often reveals gaps in your knowledge that you can then fill.
It's extremely rewarding to see someone else blink their first LED thanks to your guidance. Explaining concepts like interrupts or PWM to a beginner ensures you truly grasp them.
This leadership skill is valued in team settings at work. You might become the go-to person to onboard new hires. You could lead complex projects that intimidate others.
Contribute to Open Source or Industry Projects
By now, you likely use many open-source libraries and tools.
Give back by contributing to them:
Fix a bug in a peripheral library you've used
Add a new feature to an existing codebase
Improve documentation for others
If you design a neat project, open-source it. Share the schematics and code for others to learn from.
You could contribute to larger projects:
Arduino core
Zephyr RTOS
PlatformIO
MicroPython
This gives you exposure to collaborative development at scale. It hones important skills like code reviews and following coding standards. It connects you with the global embedded community.
Stay Updated and Keep Exploring
The field of embedded systems constantly evolves.
New microcontrollers emerge each year. Wireless technologies continue to advance. Novel techniques like TinyML bring AI to tiny devices.
Make it a habit to read tech blogs. Follow experts in the field. Try out new tools and development boards regularly.
For example, experiment with running a tiny machine learning model on a microcontroller. Use TensorFlow Lite for microcontrollers to implement voice recognition on a Cortex-M4 MCU.
It's exciting to add Machine Learning to a small device:
Wake-word detection ("Hey Siri" for your own projects)
Simple image classification with a camera
Anomaly detection in sensor data
By continuously learning, your skills remain sharp and relevant. Pick up that weird new dev board that just came out. Try coding in embedded Rust or CircuitPython to broaden your perspective.
Curiosity is your greatest asset as an advanced embedded engineer.
Mini Project Ideas – Advanced Stage
Advanced projects are substantial undertakings. But here are a few ideas that encompass many advanced topics:
Custom Microcontroller Board + OS
Design and build a custom PCB for a microcontroller of your choice. An ARM Cortex-M is a good starting point.
Then write a complete firmware stack for it:
A bootloader
A custom operating system or port an existing one
Applications that showcase its capabilities
For example, make your own variant of an Arduino-like board. Get Arduino Core running on it.
Or create a unique gadget like a new kind of sensor node or wearable. Support it with custom firmware tailored to its specific needs.
This project takes you through:
Schematic design
PCB layout
Hardware bring-up (initial test and debug)
Software at both low and high levels
It's the ultimate showcase of your hardware and software skills combined.
Distributed IoT System with Edge AI
Build an end-to-end IoT system with multiple nodes and intelligence.
Set up several sensors around a house:
Some detect sound
Others monitor motion
Perhaps a few measure environmental conditions
Have them send data to a central hub. On this hub (maybe a Raspberry Pi or powerful microcontroller), run a machine learning model.
The model analyzes patterns:
Identifying if a sound comes from a person or pet
Detecting anomalies in sensor readings
Predicting maintenance needs based on vibration patterns
Then trigger actions based on the analysis:
Sound an alarm
Send a notification
Adjust home systems automatically
This project involves:
Wireless networking
Data collection
Machine learning
Real-time decision making
It integrates cloud or edge computing with embedded nodes. It's complex but tremendously satisfying when it all works together.
Real-Time Audio Processing System
If you're into signal processing, create a system that processes audio in real-time.
Use a capable board:
A high-end STM32
A dedicated DSP chip
Perhaps even an FPGA for the ambitious
Capture audio from a microphone. Process it in real-time:
Apply effects
Filter noise
Maybe implement speech recognition on-device
Then output the processed sound to speakers or headphones.
You'll need to optimize for performance:
Use DMA for ADC data transfers
Write efficient filtering algorithms
Maybe code in assembly or use DSP hardware instructions
This project pushes your understanding of real-time constraints. It demands optimization at every level.
The end result could be something useful:
A DIY digital effects pedal for guitar
A voice-controlled appliance that works offline
A hearing assistance device
Robotics Autonomous Vehicle
Combine everything – sensors, control theory, hardware, and software.
Build a small autonomous robot or drone that makes decisions on its own.
Create a rover that maps and navigates a room:
Implement SLAM (Simultaneous Localization and Mapping) on an embedded computer
Use microcontrollers to handle motor control and sensor fusion
Or develop a quadcopter with custom firmware for acrobatics.
Such a project involves:
Multi-processor coordination
Complex control loops
Ensuring reliability with fail-safes
Extensive debugging and testing
It's an ultimate test of embedded system design and integration skill. Every subsystem must work flawlessly. They all must communicate reliably.
Working on any of these projects will solidify your status as an embedded systems expert.
Remember, these are big endeavors. It's absolutely fine if they take months or are done in small increments. The journey itself will teach you invaluable lessons. Even if you hit roadblocks or need to scale down some goals, you'll still grow tremendously.
Your adventure in embedded systems never truly ends. There's always something new to learn, some new problem to solve. That's what makes this field so endlessly fascinating.
Conclusion: Embrace the Journey and Keep Experimenting
.png)
Learning embedded systems is a marathon, not a sprint.
Sometimes you'll feel overwhelmed by how much there is to learn. That's completely normal!
The key is to enjoy the process of discovery.
Every project you build is a step forward. Even the simplest or most imperfect ones teach you something valuable.
Celebrate those small wins:
Finally figuring out why your circuit wasn't working
Seeing sensor data pop up correctly on your dashboard
Getting two devices to communicate reliably
These moments fuel your motivation to tackle the next challenge.
Self-paced means freedom.
You can choose what interests you most at any given time.
Really excited about wireless IoT? Dive into that earlier, even if you're still mastering some basics.
Love tinkering with hardware? Go ahead and design a simple PCB just for fun.
Follow your curiosity, and the learning will happen naturally.
Just remember to circle back and fill gaps in your foundational knowledge. Advanced skills often build on those basics.
Stay inspired by remembering why you started.
Maybe it was the dream of building a robot. Or creating something useful for your home. Perhaps it was the goal of contributing to cutting-edge technology at work.
Keep that vision in mind when things get tough.
Join communities where passion for embedded systems thrives:
Online forums like Reddit's r/embedded
The Arduino community
Local maker groups
Hackathons and meetups
Nothing boosts morale like finding someone who solved the same problem. Or showing off your project and hearing encouragement from peers.
Never stop experimenting.
The field of embedded systems rewards the curious.
Try weird ideas. Take on mini-challenges like making your code run with half the memory. Don't be afraid to break things occasionally.
Some of the best learning comes from debugging a project that "almost works." Finding that last piece of the puzzle brings immense satisfaction.
In this journey from blinking LEDs to mastering real-time systems, you're learning to bridge the gap between digital and physical worlds.
This is a powerful skill. It enables you to invent and innovate freely.
So keep pushing your limits. Keep leveling up skill by skill. And most importantly, have fun with each creation.
Happy hacking, and welcome to the exciting world of embedded systems!
Subscribe to my newsletter
Read articles from Arpit Shrivastava directly inside your inbox. Subscribe to the newsletter, and don't miss out.
Written by
Arpit Shrivastava
Arpit Shrivastava
I'm Arpit, Co-Founder of ScroBits. I love talking about IoT, SaaS and Cloud DevOps. We make IT outsourcing fun and effective with our MERN stack expertise. When not in the tech world, I enjoy plogging, mountaineering, and working out. Ready to transform your business? Let's chat and make tech magic happen.