RESTful API Design
 Manshi Tyagi
Welcome to the world of RESTful API development! In this blog, we’ll explore how to build clean and efficient APIs using Express.js, a popular Node.js framework. Whether you’re a beginner or an experienced developer, understanding RESTful principles and implementing them effectively is crucial for building scalable and maintainable web services.
In this guide, we’ll focus on two key aspects:
Structuring Your Express Project for Clean API Design : Learn how to organize your project in a way that promotes modularity and scalability.
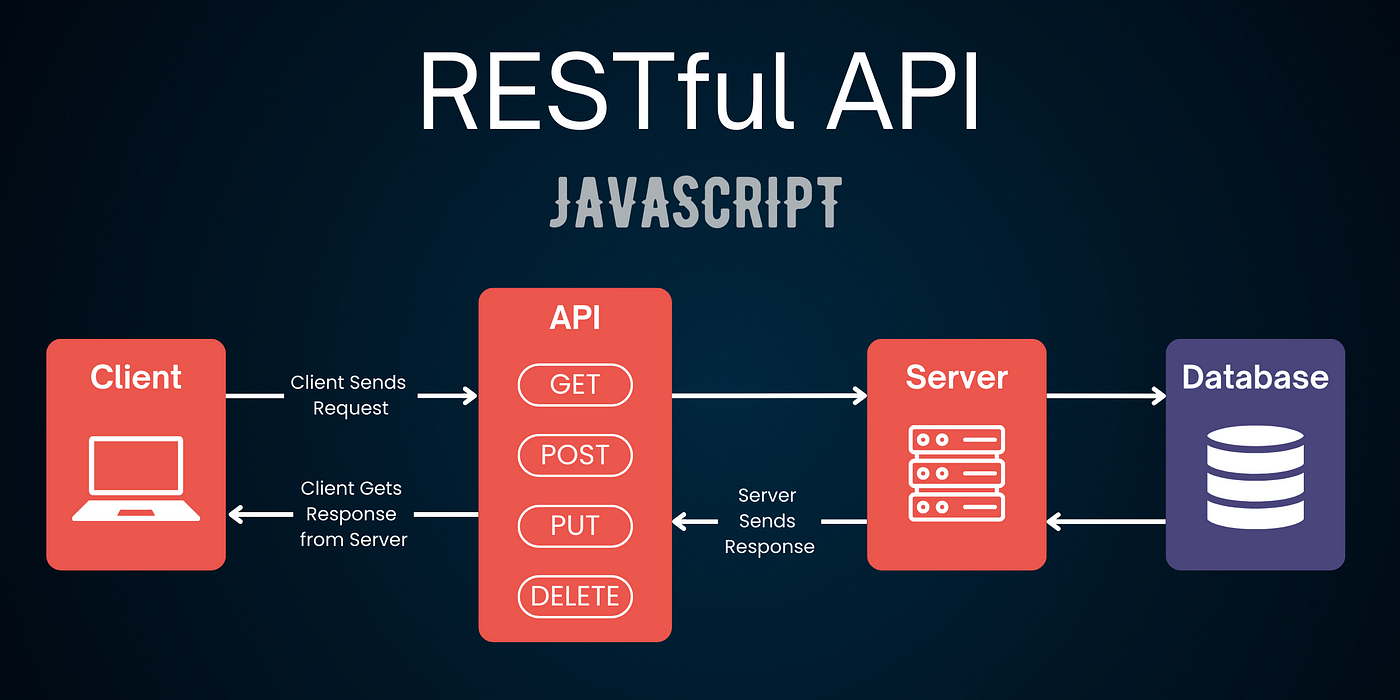
REST API Design Made Simple with Express.js : Understand how to implement the four fundamental HTTP methods (
GET,POST,PUT,DELETE) to interact with a single resource (users).
Let’s dive in!
What is a RESTful API?
A RESTful API (Representational State Transfer) is a set of rules for designing web services that are easy to use and understand. Think of it like a menu in a restaurant:
Menu Items : These are the resources (e.g., users, products, orders).
Orders : These are requests made by clients (e.g., GET, POST, PUT, DELETE).
Responses : These are the dishes served back to the client (data in JSON format).
RESTful APIs follow specific principles, such as using standard HTTP methods (GET, POST, PUT, DELETE) and returning meaningful status codes (e.g., 200 OK, 404 Not Found).
Understanding RESTful Concepts:
Resources: Represent data entities (e.g., users, products) managed by your API.
Endpoints: URLs that map to specific resources or actions on those resources.
HTTP Methods: Define operations on resources. Common methods include:
GET: Retrieves data from a resource.
POST: Creates a new resource.
PUT: Updates an existing resource.
DELETE: Deletes a resource.
JSON: A lightweight data format for transmitting data between applications.
Why Use Express.js?
Express.js is a lightweight and flexible Node.js framework that makes building web applications and APIs incredibly easy. It's like having a well-organized kitchen where everything is in its place, allowing you to focus on cooking (coding) rather than managing tools.
With Express.js, you can:
Handle HTTP requests efficiently.
Structure your code cleanly using middleware and routes.
Scale your application as needed.
How to Create Your Own REST APIs
Setting Up Your Project
Before we dive into coding, let’s set up our project. Imagine you’re setting up a new workspace for a creative project—everything needs to be organized from the start.
Initialize Your Project
First, create a new directory for your project and initialize it with
npm:mkdir my-apicd my-apinpm init -yThis command creates a
package.jsonfile, which manages your project dependencies.Install Express
Next, install Express.js as a dependency:
npm install expressCreate the Main File
Create a file named
server.jswhere you’ll write your server logic.
// server.js
const express = require('express');
const app = express();
const port = 3000;

// Middleware to parse JSON data
app.use(express.json());

// Simple route to test if the server is running
app.get('/', (req, res) => {
  res.send('Hello, World!');
});

// Start the server
app.listen(port, () => {
  console.log(`Server is running on http://localhost:${port}`);
});
Run your server: node server.js
Structuring Your Express Project
A well-structured project is like a well-organized house. Each room (folder) has a specific purpose, making it easy to find what you need.
Inside your project directory, create the following folders:
mkdir src cd src mkdir controllers models routes utils
my-api/
│
├── server.js          # Entry point of the application
├── package.json       # Project configuration
├── node_modules/      # Installed dependencies
├── src/
│   ├── controllers/   # Business logic for handling requests
│   ├── models/        # Data models (if using a database)
│   ├── routes/        # Route definitions
│   └── utils/         # Utility functions
└── .env               # Environment variables (optional)
Why This Structure?
Controllers : Handle business logic (e.g., fetching, updating data).
Models : Define how data is stored (e.g., database schemas).
Routes : Map endpoints to controller functions.
Utils : Store reusable functions (e.g., validation logic).

Implementing CRUD Operations
Now, let’s build a simple API for managing users. We’ll use the four HTTP methods: GET, POST, PUT, and DELETE.
Step 1: Define Routes
Create a file
src/routes/users.jsto define user-related routes.
// src/routes/users.js
const express = require('express');
const router = express.Router();

// Mock data (replace with a database later)
const users = [
  { id: 1, name: 'Alice', email: 'alice@example.com' },
  { id: 2, name: 'Bob', email: 'bob@example.com' }
];

// GET all users
router.get('/', (req, res) => {
  res.status(200).json(users);
});

// GET a single user by ID
router.get('/:id', (req, res) => {
  const userId = parseInt(req.params.id);
  const user = users.find(u => u.id === userId);

  if (!user) {
    return res.status(404).json({ message: 'User not found' });
  }

  res.status(200).json(user);
});

// POST a new user
router.post('/', (req, res) => {
  const newUser = req.body;
  users.push(newUser);
  res.status(201).json(newUser);
});

// PUT (Update) a user by ID
router.put('/:id', (req, res) => {
  const userId = parseInt(req.params.id);
  const index = users.findIndex(u => u.id === userId);

  if (index === -1) {
    return res.status(404).json({ message: 'User not found' });
  }

  users[index] = { ...users[index], ...req.body };
  res.status(200).json(users[index]);
});

// DELETE a user by ID
router.delete('/:id', (req, res) => {
  const userId = parseInt(req.params.id);
  const index = users.findIndex(u => u.id === userId);

  if (index === -1) {
    return res.status(404).json({ message: 'User not found' });
  }

  users.splice(index, 1);
  res.status(204).send(); // No content
});

module.exports = router;
Step 2: Import Routes into server.js
Update server.js to include the user routes.
// server.js
const express = require('express');
const app = express();
const port = 3000;

// Middleware to parse JSON data
app.use(express.json());

// Import user routes
const usersRouter = require('./src/routes/users');
app.use('/api/users', usersRouter);

// Start the server
app.listen(port, () => {
  console.log(`Server is running on http://localhost:${port}`);
});
Step 3: Test Your API
Start your server again: node server.js
Use tools like Postman or cURL to test your API:
GET All Users :
http://localhost:3000/api/usersGET Single User :
http://localhost:3000/api/users/1POST New User :
http://localhost:3000/api/userswith a JSON body like{ "name": "Charlie", "email": "charlie@example.com" }PUT Update User :
http://localhost:3000/api/users/1with a JSON body like{ "name": "Updated Name" }DELETE User :
http://localhost:3000/api/users/1
Using Status Codes
HTTP status codes are like signals that tell the client what happened with their request. Here are some common ones:
200 OK : Request was successful.
201 Created : Resource was created successfully (e.g., after a POST request).
204 No Content : Request was successful, but there’s no content to return (e.g., after a DELETE request).
404 Not Found : The requested resource doesn’t exist.
500 Internal Server Error : Something went wrong on the server side.
Always use appropriate status codes to provide clear feedback to the client.
Best Practices
Keep Routes Clean : Use descriptive and consistent endpoint names (e.g.,
/api/users).Validate Inputs : Ensure incoming data is valid before processing it.
Handle Errors Gracefully : Provide meaningful error messages and use appropriate status codes.
Document Your API : Use tools like Swagger or Postman Collections to document your API endpoints.
Conclusion
Building a RESTful API with Express.js is straightforward once you understand the basics. By structuring your project properly, implementing CRUD operations, and using HTTP status codes effectively, you can create robust and maintainable APIs.
Remember, practice makes perfect! Try extending this example by adding more features, integrating a database, or exploring authentication. Happy coding!
To read more about tech & web development, you can follow me on Hashnode (@ManshiWrites) and Twitter
Thank you so much for reading! 👩💻
Subscribe to my newsletter
Read articles from Manshi Tyagi directly inside your inbox. Subscribe to the newsletter, and don't miss out.
Written by
Manshi Tyagi
Manshi Tyagi
Hi, I'm Manshi, a full-stack web developer. I write about building web apps and my journey in tech. Follow along as I share what I'm learning and creating.