How to get started with Raspberry Pi :: Part II :: Connecting NVMe
 Neven Cvetkovic
Table of contents
In previous article (Part I - Assembling and Connecting Raspberry Pi) we looked how to assemble Raspberry Pi 5 kit and get it running. In this article we will explore how to connect NVMe SSD drive. If you don’t plan on running NVMe SSD drive, feel free to skip these steps and go to the next article in the series (Part III - Connecting Bluetooth Devices). If you don’t plan on connecting any Bluetooth devices, please go directly to main article (Part IV - Connecting Kubernetes).
Introduction
If you wanted a bit more capacity and faster disk speeds, you might want to connect an internal SSD drive through NVMe M.2 PCIe interface on the Raspberry Pi 5 device. Let’s explore how to connect our NVMe drive and configure the booting options.
NVMe
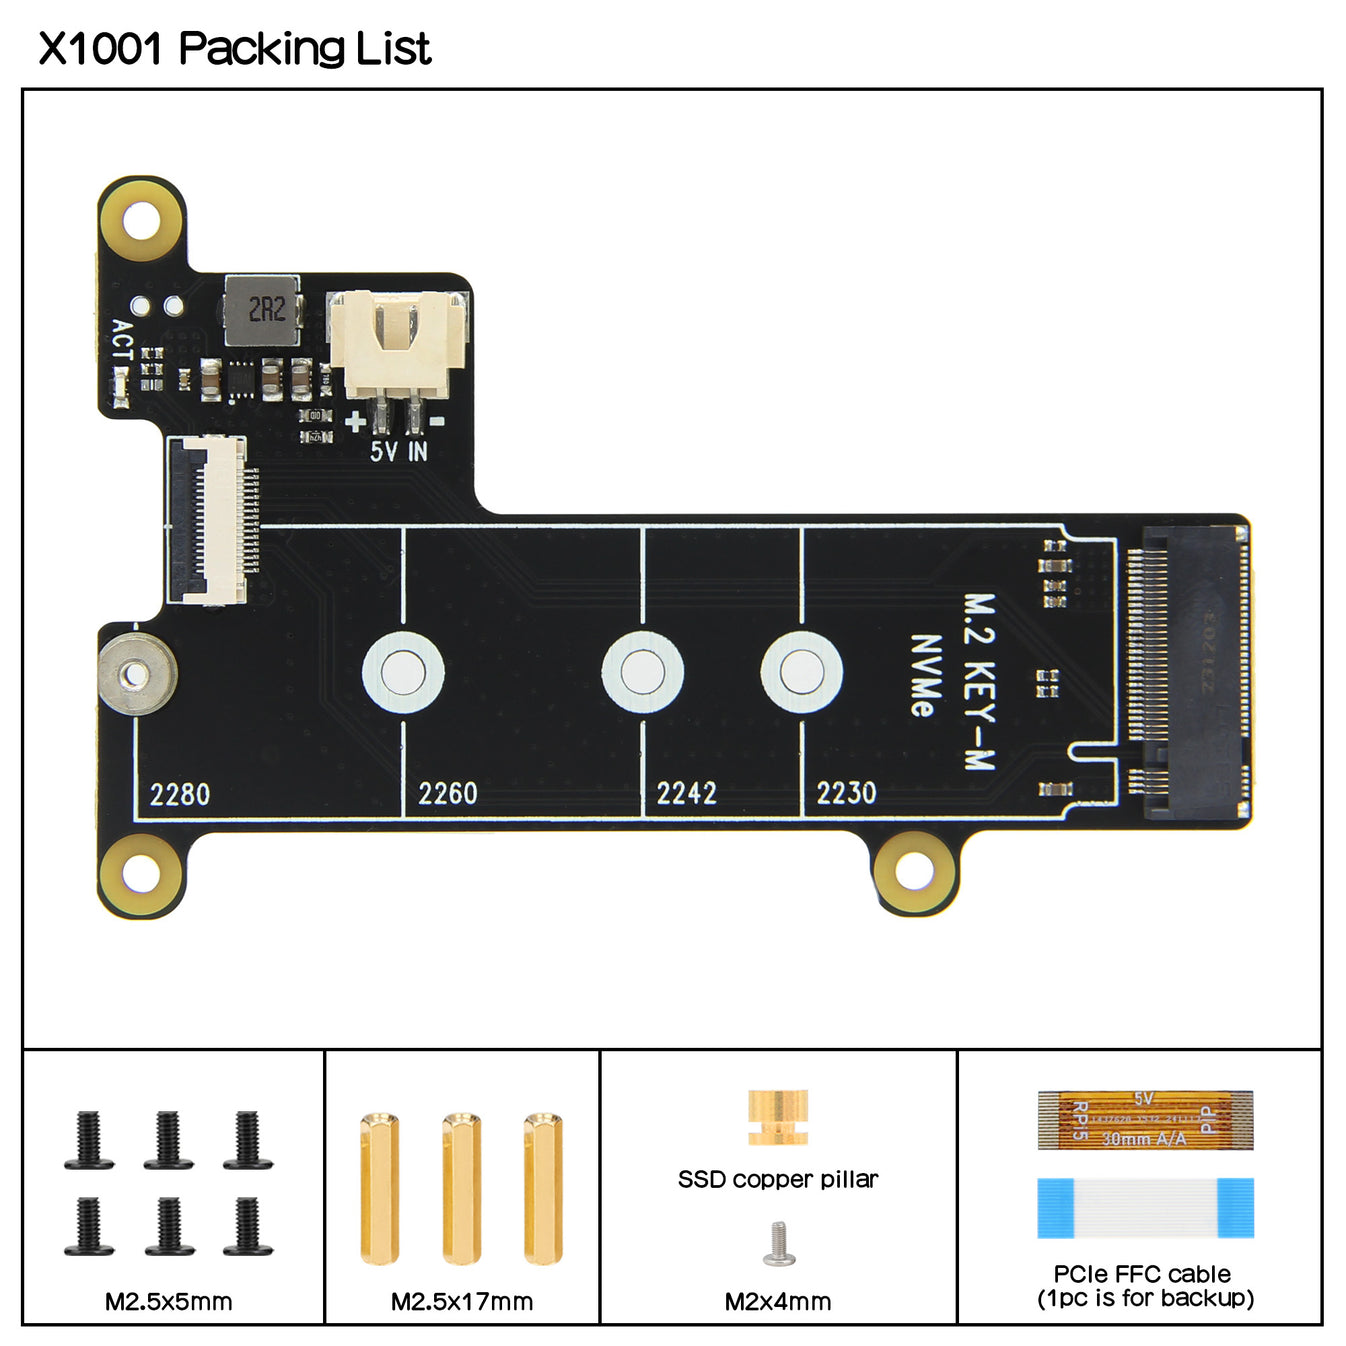
As part of my Raspberry Pi 5 kit, I received a NVMe Solid State Drive PCIe board (i.e. Geekworm X1001 NVMe M2 SSD PCIe Peripheral Board). The X1001 V1.1 shield is an NVME M2 SSD PIP (PCIe Peripheral Board) for the Raspberry Pi 5 that uses the new PCIE interface of the Raspberry Pi 5 to utilise the NVME M2 SSDs for fast data transfers and ultra-fast booting.
I’ve also purchased an additional M2 SSD from Kingston (i.e. Kingston NV3 NVMe PCIe 4.0 Internal SSD 1TB M.2 2280-SNV3S/1000G) for little over 600 SEK (US$60) in hope it would be compatible with my NVMe PCIe board.

Assembling NVMe
Geekworm X1001 comes with spacers that you can use to attach over the Raspberry Pi 5 heat sink. The power is supplied through the PCIe FFC cable (flat bend cable). Small screw will help you screw in your M2 SSD drive. I’ve got the longest one 2280, and there is a screw to help you fix the SSD drive in.
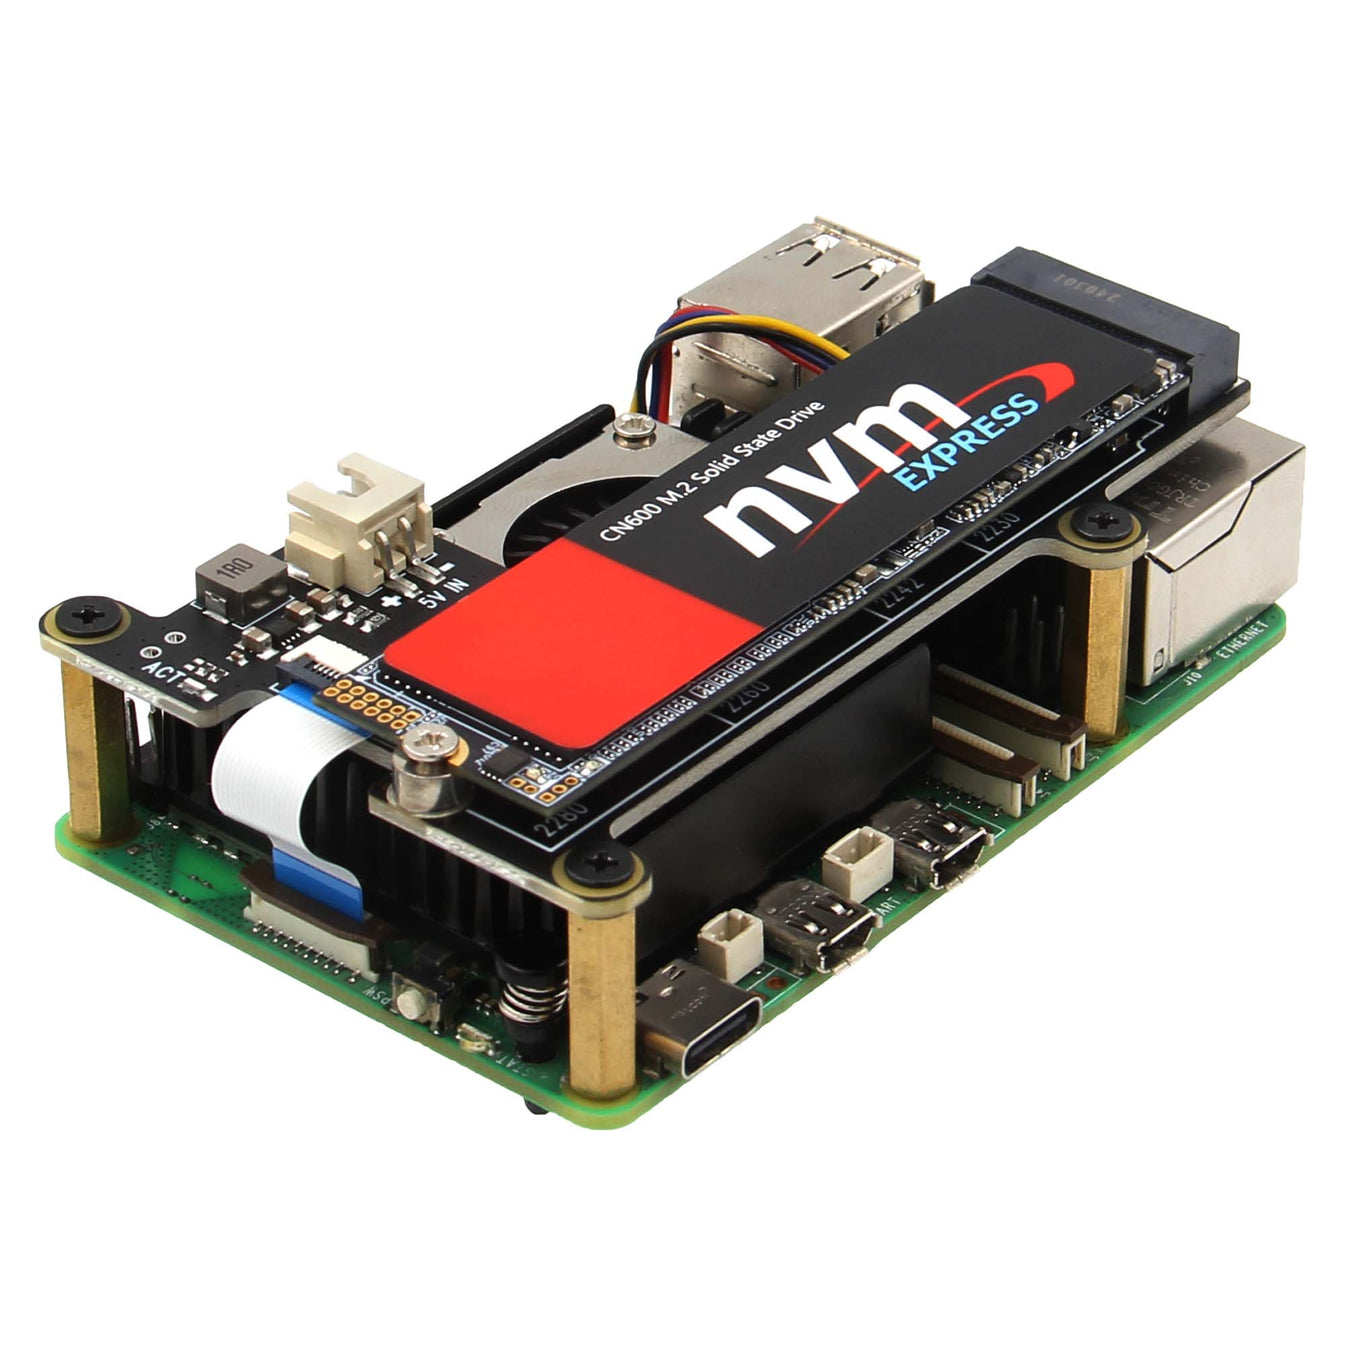
Make sure you connect the FFC cable and click into the Raspberry Pi 5 PCIe slot, with blue tape facing outwards (see above photo). Quickly boot your Raspberry Pi 5 and check that a blue diode on the X1001 board lights up.
If the boot EEPROM detects power on the PCIe connector, or if PCIE_PROBE=1, or if NVME is in the boot order, then the
pciex1parameter should be automatically applied. We shouldn’t need to configure PCIe version if our SSD is supported. If the drive is not recognized, you might need to adddtparam=pciex1to your/boot/firmware/config.txt, or configure usingraspi-config.
I like to do all these commands from a root user, so I don’t have to type in sudo in front of every command, e.g.
neven@pi:~ $ sudo su -

root@pi:~#
If everything is connected properly, you should be able to see your new SSD NVMe drive in settings using lspci command:
root@pi:~# lspci

0001:00:00.0 PCI bridge: Broadcom Inc. and subsidiaries BCM2712 PCIe Bridge (rev 30)
0001:01:00.0 Non-Volatile memory controller: Kingston Technology Company, Inc. NV3 NVMe SSD TC2201 (DRAM-less)
0002:00:00.0 PCI bridge: Broadcom Inc. and subsidiaries BCM2712 PCIe Bridge (rev 30)
0002:01:00.0 Ethernet controller: Raspberry Pi Ltd RP1 PCIe 2.0 South Bridge
Configuring NVMe SSD
We can check how the current SD card has been configured. Let’s use lsblk to see how the partitions are configured and mounted:
sda           8:0    1  58.2G  0 disk
├─sda1        8:1    1   512M  0 part /boot/firmware
└─sda2        8:2    1   2.1G  0 part /
nvme0n1     259:0    0 931.5G  0 disk
Also, we can check the fdisk to see how the partitions have been configured, e.g.
root@pi:~# fdisk /dev/sda

Welcome to fdisk (util-linux 2.38.1).
Changes will remain in memory only, until you decide to write them.
Be careful before using the write command.

This disk is currently in use - repartitioning is probably a bad idea.
It's recommended to umount all file systems, and swapoff all swap
partitions on this disk.
Press p to output the current configuration:
Command (m for help): p

Device       Start      End   Sectors   Size Id Type
/dev/sda1     8192  1056767   1048576   512M  c W95 FAT32 (LBA)
/dev/sda2  1056768  5382143   4325376   2.1G 83 Linux
Observe the output and exit fdisk program without saving anything, by selecting option q:
Command (m for help): q
Let’s configure the SSD (i.e. /dev/nvme0n1) in the same way as the SD card using fdisk with two partitions:
VFAT partition with 256MB
Linux (ext4) partition with the rest of the space, e.g. 931.3G
root@pi:~# fdisk /dev/nvme0n1

Welcome to fdisk (util-linux 2.38.1).

Changes will remain in memory only, until you decide to write them.
Be careful before using the write command.

Command (m for help):
Press n for new partition, select 1 for first partition, and use default value for first sector, i.e. 2048. For the last sector, use the size use +256M:
Command (m for help): n
Partition number (1-128, default 1): 1
First sector (2048-1953525134, default 2048):
Last sector, +/-sectors or +/-size{K,M,G,T,P} (2048-1953525134, default 1953523711): +256M

Created a new partition 1 of type 'Linux filesystem' and of size 256 MiB.
Press n for the next partition, select 2, and use default value for start block - just press enter, i.e. 526336 and 1953523711 as suggested by fdisk:
Command (m for help): n
Partition number (2-128, default 2): 2
First sector (526336-1953525134, default 526336):
Last sector, +/-sectors or +/-size{K,M,G,T,P} (526336-1953525134, default 1953523711):

Created a new partition 2 of type 'Linux filesystem' and of size 931.3 GiB.

Command (m for help):
Let’s select the (filesystem) type of partitions, e.g.
Press t for type of partition, select 1 and type in 1 for EFI System type.
Command (m for help): t
Partition number (1,2, default 2): 1
Partition type or alias (type L to list all): 1

Changed type of partition 'Linux filesystem' to 'EFI System'.
Press t for type of partition, select 2 and type in 20 for Linux filesystem
Command (m for help): t
Partition number (1,2, default 2): 2
Partition type or alias (type L to list all): 20

Changed type of partition 'Linux filesystem' to 'Linux filesystem'.
Make sure everything looks correct, by pressing p to output current configuration, e.g.
Command (m for help): p

Disk /dev/nvme0n1: 931.51 GiB, 1000204886016 bytes, 1953525168 sectors
Disk model: KINGSTON SNV3S1000G
Units: sectors of 1 * 512 = 512 bytes
Sector size (logical/physical): 512 bytes / 512 bytes
I/O size (minimum/optimal): 512 bytes / 512 bytes
Disklabel type: gpt
Disk identifier: ACC74DAA-1234-5678-9ABC-DDDDEEEEFFFF

Device          Start        End    Sectors   Size Type
/dev/nvme0n1p1   2048     526335     524288   256M EFI System
/dev/nvme0n1p2 526336 1953523711 1952997376 931.3G Linux filesystem
Finally, press w to write the file partition configuration to the SSD disk.
Let’s create two file systems on these two partitions, e.g.
root@pi:~#

sudo mkfs.vfat -F 32 /dev/nvme0n1p1   # Boot partition
sudo mkfs.ext4 /dev/nvme0n1p2         # Root partition
Let’s create temporary mount points for these two partitions, e.g.
mkdir -p /mnt/root
mkdir -p /mnt/boot_firmware
Let’s mount the two created partitions, e.g.
sudo mount /dev/nvme0n1p1 /mnt/boot_firmware
sudo mount /dev/nvme0n1p2 /mnt/root
We ned to copy all the files from both partitions to corresponding NVMe partitions, except the special files that can’t be copied such as /dev, /proc, /sys, /tmp, /run, /mnt, /media and /lost+found):
sudo rsync -axHAWXS --numeric-ids /boot/firmware /mnt/boot_firmware

sudo rsync -axHAWXS --numeric-ids \
  --exclude=/proc/* \
  --exclude=/sys/* \
  --exclude=/dev/* \
  --exclude=/tmp/* \
  --exclude=/run/* \
  --exclude=/mnt/* \
  --exclude=/media/* \
  --exclude=/lost+found  /  /mnt/root/
Also, we need to update fstab in NVME drive with PARTUUID for NVMe partitions. Let’s see what the current /etc/fstab looks like (copied /mnt/root/etc/fstab should be the same):
root@pi:~# cat /mnt/root/etc/fstab

proc            /proc           proc    defaults          0       0
PARTUUID=8a123456-01  /boot/firmware  vfat    defaults          0       2
PARTUUID=8a123456-02  /               ext4    defaults,noatime  0       1
You can find the PARTUUID for all drives with blkid, including the two NVMe partitions, e.g.
root@pi:~# blkid

/dev/nvme0n1p1: UUID="93C7-2222" BLOCK_SIZE="512" TYPE="vfat" PARTUUID="28593a14-1111-2222-3333-444455556666"
/dev/nvme0n1p2: UUID="36e3b54f-aaaa-bbbb-cccc-ddddeeeeffff" BLOCK_SIZE="4096" TYPE="ext4" PARTUUID="d1d0fe1b-aaaa-bbbb-cccc-ddddeeeeffff"

/dev/sda2: LABEL="rootfs" UUID="ce208fd3-1111-2222-3333-444455556666" BLOCK_SIZE="4096" TYPE="ext4" PARTUUID="8a123456-02"
/dev/sda1: LABEL_FATBOOT="bootfs" LABEL="bootfs" UUID="4EF5-1111" BLOCK_SIZE="512" TYPE="vfat" PARTUUID="8a123456-01"
Next we need to edit the /mnt/root/etc/fstab (future fstab file we will boot from) and update with the PARTUUID you found in the previous step, e.g.
VFAT partition -
PARTUUID=28593a14-1111-2222-3333-444455556666Root partition -
PARTUUID=d1d0fe1b-aaaa-bbbb-cccc-ddddeeeeffff
root@pi:~# vi /mnt/root/etc/fstab

proc            /proc           proc    defaults          0       0
PARTUUID=28593a14-1111-2222-3333-444455556666  /boot/firmware  vfat    defaults          0       2
PARTUUID=d1d0fe1b-aaaa-bbbb-cccc-ddddeeeeffff  /               ext4    defaults,noatime  0       1
Let’s wrap this up and find out what is the boot sequence defined in the EEPROM module, e.g.
root@pi:~# rpi-eeprom-config

[all]
BOOT_UART=1
POWER_OFF_ON_HALT=1
BOOT_ORDER=0xf241
Boot order is by default set to 0xf241
frefers to restart from the first boot-mode in the BOOT_ORDER field i.e. loop6refers to NVME4refers to USB / MSD2refers to Network1refers to SD card
So, the boot sequence tries SD card (1) first, then USB (4), and then network (2), it loops again, and again.
Let’s update the sequence to include booting from NVMe (6)now instead of network (2), e.g. 0xf641 - read from right to left - SD card(1) first, then USB (4) and then NVMe (6) and then loop again (f) if it fails:
rpi-eeprom-config --edit

[all]
BOOT_UART=1
POWER_OFF_ON_HALT=1
BOOT_ORDER=0xf641
Save the file. Observe if the file has been successfully written to EEPROM:
root@pi:~# rpi-eeprom-config --edit

Updating bootloader EEPROM
 image: /lib/firmware/raspberrypi/bootloader-2712/default/pieeprom-2024-09-23.bin
config_src: blconfig device
config: /tmp/tmpc81zsc9x/boot.conf
################################################################################
[all]
BOOT_UART=1
POWER_OFF_ON_HALT=0
BOOT_ORDER=0xf641

################################################################################

*** To cancel this update run 'sudo rpi-eeprom-update -r' ***

*** CREATED UPDATE /tmp/tmpc81zsc9x/pieeprom.upd  ***

   CURRENT: Mon 10 Mar 17:10:37 UTC 2025 (1741626637)
    UPDATE: Mon 23 Sep 13:02:56 UTC 2024 (1727096576)
    BOOTFS: /boot/firmware
'/tmp/tmp.iGSxI5uFS7' -> '/boot/firmware/pieeprom.upd'

UPDATING bootloader. This could take up to a minute. Please wait

*** Do not disconnect the power until the update is complete ***

If a problem occurs then the Raspberry Pi Imager may be used to create
a bootloader rescue SD card image which restores the default bootloader image.

flashrom -p linux_spi:dev=/dev/spidev10.0,spispeed=16000 -w /boot/firmware/pieeprom.upd
UPDATE SUCCESSFUL
If the EEPROM UPDATE was successful, shutdown the Raspberry Pi, eject USB SD card, and reboot the system.
🏆 Congratulations! You should be booting from NVMe SSD drive now.
For more details - check the Raspberry Pi Docs - Boot Order.
Summary
In this article we looked at how to connect an internal M.2 Solid State Drive (through NVMe PCIe board) and dived deeper into how to configure boot order on your Raspberry Pi 5. Internal M.2 SSD should give you a faster disk speeds and faster boot times.
In the next article (Part III - Connecting Bluetooth Devices) we explore how to connect Bluetooth devices to your Raspberry Pi. Feel free to skip this step and go straight to configuring Kubernetes on your Raspberry Pi.
References
NVM Express - NVMe (Wikipedia article)
M.2 - Next generation form factor (Wikipedia article)
PCI Express - PCIe (Wikipedia article)
Understanding SSD Technology: NVMe, SATA, M.2 (Kingston article)
Raspberry Pi 5 - Updating Bootloader and Boot from NVMe SSD (community article)
Subscribe to my newsletter
Read articles from Neven Cvetkovic directly inside your inbox. Subscribe to the newsletter, and don't miss out.
Written by