Authentication and Authorization Handbook
 Tuan Tran Van
Authentication and Authorization. In the context of access to APIs, authentication is the process of verifying the identity of a user who is making an API request (verifying who the user is), and authorization is the process of determining whether the user has the permission to access a particular API (verifying what a user is allowed to do).
In this blog, we will cover different types of authentication and authorization, best practices, and common mistakes.
Comprehensive Explanation of Session, Cookie, and JWT on the Entire Network
The HTTP protocol is a “stateless protocol”, that is, every time the server receives a request from the client, it is a completely new request, and the server does not know the historical request records of the client. The main purpose of a Session or Cookie is to make up for the stateless nature of HTTP.
What is the Session?
When the client requests the server, the server will open up a “memory space” for this request. The memory space stores the Session object, and the storage structure is ConcurrentHashMap. The Session makes up for the nature of HTTP. The server can use a session to store the client's operation records during the same session.
How do we determine whether it is the same session?
Because when the server receives the request for the first time, it opens up a session space (creates a Session object), and at the same time generates a sessionId, and sends the response to the client requesting to set a Cookie through the Set-Cookie: JSESSIONID=XXX command in the response header.
After the client receives the response, it sets a Cookie with information of JSESSIONID=XXX on the local client. The expiration time of this Cookie is the end of the browser session.

Next time, when the client sends the request to the same website each time, the request header will carry this Cookie information (including sessionId). Then, by reading the Cookie information in the request header, the server obtains the value named JSESSIONID and gets the sessionId of this request.
Disadvantages of Session
However, the Session mechanism has a disadvantage. Suppose your server does load balancing and stores the Session on server A during the first request. Suppose the traffic to server A surges within a period of time, and requests will be forwarded to server B for access. However, server B does not store the session of server A, which will invalidate the session.
What is a Cookie
You should have noticed that when introducing a Session, Cookie has already been mentioned. The session is implemented based on cookies. Session is stored on the server side, and the sessionId will be stored in the Cookie of the client.
Cookies in the HTTP protocol include Web Cookies and browser cookies. It is a small piece of data sent by the server to the web browser. The Cookie sent by the server to the browser will be stored in the browser and sent to the server together with the next request. Usually, it is used to determine whether two requests come from the same browser, such as when a user remains logged in.
Cookies are mainly used for the following three purposes:
1. Session management
- Cooperate with the server and identify user sessions by storing
sessionid.
2. Store user information
Login status: Remember whether the user is logged in. No need to log in again on the next visit.
Preference settings: Such as language, theme, etc. Automatically apply on the next visit.
3. Track user behavior
Browsing history: Records visited pages for easy recommendation and navigation.
Analyze behavior: Understand user habits for optimization and precision marketing.
Creating Cookies
When receiving an HTTP request from the client, the server can send a response with the Set-Cookie header. Cookies are usually stored by the browser, and then the Cookie is sent to the server along with the HTTP header.
Set-Cookie and Cookie headers
The Set-Cookie HTTP response header sends cookies from the server to the user agent. Here is an example of sending a Cookie.

This header tells the client to store cookies.
Now, with each new request to the server, the browser will send all previously stored cookies back to the server using the Cookie header.

There are two types of cookies. One is Session Cookies, and the other is Persistent Cookies. If a cookie does not contain an expiration date, it is regarded as a session cookie. Session cookies are stored in memory and are never written to disk. When the browser is closed, the cookie will be permanently lost thereafter. If a cookie contains an “expiration period“, it is regarded as a persistent cookie. At the specified expiration date, the cookie will be deleted from the disk.
Session Cookie
The example above creates a session cookie. Session cookies have a characteristic that when the client closes, the cookie will be deleted because it does not specify the Expires or Max-Age directive.
However, web browsers may use session restoration, which will keep most session cookies in a permanent state as if the browser has never been closed.
Permanent Cookies
Permanent cookies do not expire when the client is closed. Instead, they expire after a “specific date (Expires)” or a “specific length of time (Max-Age)”. For example.
Set-Cookie: id=a3fWa; Expires=Sat, 21 Sep 2024 11:28:00 GMT;
Secure and HttpOnly flags of cookies
Secure cookies need to be sent to the server in an encrypted manner through the HTTPS protocol. Even if they are secure, sensitive information should not be stored in cookies because they are inherently insecure, and this flag does not provide real protection.
Function of HttpOnly
The lack of the HttpOnly property in session cookies can lead to attackers being able to obtain users’ cookie information through programs (JS scripts, Applets, etc.), resulting in the leakage of users’ cookie information and increasing the threat of cross-site scripting attacks by attackers.
HttpOnly is an extension made by Microsoft for cookies. This value specifies whether cookies can be accessed through client scripts
If the HttpOnly property is not set to true in cookies, it may lead to cookie theft. Stolen cookies can contain sensitive information identifying site users, such as ASP.NET session IDs or Forms authentication tickets. Attackers can replay stolen cookies to disguise themselves as users or obtain sensitive information and conduct cross-site scripting attacks.
Scope of cookies
The Domain and Path identifiers define the scope of cookies: that is, which URLs cookies should be sent to.
The Domain identifier specifies which hosts can accept cookies. If not specified, the current host (excluding subdomains) is the default. If Domain is specified, subdomains are generally included.
For example, if Domain=mozilla.org is set, cookies are also included in subdomains (such as developer.mozilla.org).
For example, if Path=/test is set, the following addresses will all match:
/test/test/user//test/user/login
Why do we need a token when we have already had a session?
In modern web development, although sessions can realize user authentication and state management to a certain extent, they also have some limitations.
Suppose you are running a large online shopping mall. When users log in to your mall, the server will create a session to record the user’s login status. This Session is like an exclusive card prepared for users at the mall service desk, which records the user’s identity information.
However, when your mall’s business becomes busier and more users are shopping at the same time, the server needs to have this session information for each user, which will occupy a large amount of server memory resources. Moreover, if your mall uses multiple servers to share traffic (such as through a load balancer), then a complex mechanism is needed to ensure that when users switch between different servers, their Session information can be correctly transmitted and identified. Otherwise, users may be suddenly logged out or unable to shop normally.
In addition, suppose a user is shopping in your mall using a mobile phone and suddenly has an urgent matter and needs to go out. At this time, if the user uses another device (such as a tablet) to access your mall again outside, since the Session is usually bound to a specific device, the user may need to log in again, which will bring inconvenience to the user.
What is a Token?
Now, let’s introduce a token. The token is like a magic pass. After a user logs in successfully, the server will generate a token containing the user’s identity information and return this token to the user. The user can save this token on their own device.
When users browse products, add to the shopping cart, or check out in the mall, they only need to carry this token in each request. After the server receives the request, it can determine the user’s identity and permissions by verifying the validity of the Token, without having to look up and manage complex Session information.
For example, a user logs in to your mall on a mobile phone and obtains a Token. When the user goes out and uses a tablet to access the mall again, only this Token needs to be provided in the browser of the tablet, and the server can immediately identify the user’s identity without the user having to log in again. Moreover, no matter how many users are online at the same time in your mall, the server does not need to save a large amount of Session information for each user. It only needs to verify the Token for each request, greatly reducing the burden on the server.
In addition, Token can be easily integrated with third-party services. For example, if your mall wants to cooperate with an external payment service, only the Token needs to be passed to the payment service. The payment service can determine the user’s identity by verifying the Token without having to establish its own Session management mechanism.
Access Token
Access Token is a resource credential required when accessing resource interfaces (APIs).
The composition of a token is not fixed. A simple token composition includes:
uid(user’s unique identity identifier);time(timestamp of the current time);sign(signature, a hexadecimal string of a certain length compressed by a hash algorithm from the first few digits of the token).
import java.security.MessageDigest;
import java.util.Base64;
import java.util.Date;

public class TokenGenerator {

    public static String generateToken(int uid) {
        long time = new Date().getTime();
        String tokenContent = uid + "-" + time;
        // Generate a sign for the token content.
        String sign = generateSign(tokenContent);
        return uid + "-" + time + "-" + sign;
    }

    // Generate a sign for the given content using SHA-256 hash algorithm.
    private static String generateSign(String content) {
        try {
            MessageDigest digest = MessageDigest.getInstance("SHA-256");
            byte[] hash = digest.digest(content.getBytes());
            StringBuilder hexString = new StringBuilder();
            for (byte b : hash) {
                // Convert each byte to a two-digit hexadecimal string.
                String hex = Integer.toHexString(0xff & b);
                if (hex.length() == 1) hexString.append('0');
                hexString.append(hex);
            }
            return hexString.substring(0, 8);
        } catch (Exception e) {
            return null;
        }
    }

    public static void main(String[] args) {
        int uid = 1234;
        String token = generateToken(uid);
        System.out.println("Generated token: " + token);
    }
}
Output:
Generated token: 1234-1729530432169-3638dd14
It has the following characteristics:
The server is stateless and has good scalability.
Supports mobile devices.
Sufficiently secure.
Supports cross-program invocations.
The token authentication process:

From the above process, we can know that the token needs to be carried in every subsequent request, so the token needs to be placed in the HTTP Header. User authentication based on a token is a server-side, stateless authentication method, and the server does not need to store token data. The calculation time for parsing the token is exchanged for the storage space of the session, thereby reducing the pressure on the server and reducing frequent database query operations.
Refresh Token
Refresh Token is another kind of token that is dedicated to refreshing the access token. If there is no refresh token, the access token can also be refreshed, but every time it’s refreshed, the user needs to enter the login username and password, which will be very troublesome. With the refresh token, this trouble can be reduced. The client directly uses the refresh token to update the access token without the user performing additional operations.
The validity period of the Access Token is usually relatively short. When the Access Token becomes invalid due to expiration, a new token can be obtained by using the Refresh Token. If the Refresh Token also expires, the user can only log in again.
In addition, the Refresh Token and expiration time are stored in the server’s database and are only verified when applying for a new Access Token. It will not affect the response time of business interfaces and does not need to be kept in memory all the time, like Session, to handle a large number of requests.
Authentication
There are many ways to do API Authentication, such as basic auth, API Keys, JWT, OAuth, etc, and each has its benefits and trade-offs. There is no “one size fits all“ to the question “What is the best API authentication method?“, It has its own idea use cases. So, the best practice in deciding which authentication method to use is “it depends“, not simply “choose the best for everything“.
HTTP Basic Authentication (Basic Auth)
When we talk about authentication, we have to start with HTTP basic authentication, because, as the name suggests, it’s the most “basic” way to implement API authentication. We put base64-encoded user:password pairs in the Authorization header field and send it over the internet. Since base64 is encoding, not hashing or encryption, this method is insecure by default, unless it is used with HTTPS.
However, the insecure nature of basic auth doesn’t necessarily mean it’s useless:
In highly controlled internal networks where no north-south internet traffic is allowed, external access is completely blocked, and network traffic is monitored, basic auth over HTTP might be used(however, even in such environments, one of the best practices is to use HTTPS for better security)
Basic authentication over HTTP might be used for simplicity in local development or for debugging and testing in a tightly controlled environment.
When some entry-level protection over non-sensitive data is needed, like if we are exposing some metrics of our app but we don’t want everybody to access it except for Prometheus to scrape it, we can use basic auth to protect the metrics endpoint, and configure basic auth in the
[scrape_config](https://prometheus.io/docs/prometheus/latest/configuration/configuration/#scrape_config) of Prometheus.When we don’t need to handle HTTPS on a per-service basis, and HTTPS is handled in general, like by a service mesh.
API Keys
An API key is a unique identifier (like a user/password pair) issued by an API provider and linked to users for access control. Similar to basic auth, it’s not secure unless it’s transmitted over HTTPS.
Like basic auth, the API Key over HTTP could only be used in a controlled environment. But unlike basic auth, API key, as the name suggests, offers access to APIs, and APIs oftentimes need to be exposed to external networks. So, use HTTPS with API Key authentication whenever possible.
Since the API key is similar to a basic auth credential or user/password, one of the best practices is to treat it like a password: Rotate it regularly. Even if we do so, it’s still relatively long-term, so another best practice is to use temporary security credentials whenever possible: before creating some keys and start hacking, review alternatives to long-term access keys that are mentioned in the following sections.
If we choose to use an API key for authentication, there is one more best practice to follow: The API key must be used with every request.
But how?
Although we can set it in the query string, we shouldn’t: web servers and browser histories often log URLs, including query parameters. This means our API key could be stored in various log files, making it accessible to anyone with access to those logs. The best practice here is to transmit API keys in the Authorization header, typically using the Bearer scheme: Authorization: Bearer YOUR_API_KEY. Like passwords, API keys should not be stored in plaintext but securely hashed.
JSON Web Token (JWT)
What is JWT?
JSON Web Token (shortened to JWT) acts like a digital handshake between two participants, say you and a website. It’s a compact and secure method that ensures both parties can trust the exchanged information.
Here’s what the JWT looks like:
eyJhbGciOiJIUzI1NiIsInR5cCI6IkpXVCJ9. eyJpYXQiOjE2OTg2ODg0OTksIm5hbWUiOiJEZXZ0cm92ZXJ0Iiwic3ViIjoidGhpcyBpcyBhIHN1YmplY3QifQ. NT2JhQ9oLc_HIZB6WW8yAaxSHcZ8QvNE1H0C5Adhmrg
You will notice it’s split into 3 sections, each separated by dots(.)

The JWT acts as proof of who you are online:
Because it’s made in a special way, it’s tough for others to fake it. Plus, only websites that have the “right“ key can understand it. This is great for times when you log into a website and use different parts of it without having to log in again and again.
Structure of JWT
A JWT technically consists of three parts separated by dots (.), which are:
Header
Starting with the first chunk before the dot, we have the Header. This is encoded using Base64 and reveals both the type of token and the algorithm behind the signature.
A quick look:
eyJhbGciOiJIUzI1NiIsInR5cCI6IkpXVCJ9
=
{
  "alg": "HS256", // the signature's algorithm
  "typ": "JWT"    // the token type
}
Payload
Moving to the middle, between those two dots, we encounter the Payload, which is also a Base64 encoded section.
Within the payload, you will find the “claims“, which are the tidbits of information, maybe the user’s ID or their email address.
Speaking of claims, they come in three flavors: registered, public, and private. Here is a brief look:
eyJpYXQiOjE2OTg2ODg0OTksIm5hbWUiOiJEZXZ0cm92ZXJ0Iiwic3ViIjoidGhpcyBpcyBhIHN1YmplY3QifQ
=
{
  "iat": 1698688499,
  "name": "Devtrovert",
  "sub": "this is a subject"
}
A word of caution: It’s best to avoid putting the sensitive info in the payload, even though the JWT ensures the data hasn’t been changed, it doesn’t hide the content.
Now let’s explore those other claims further.
**Registered
**Let’s kick things off with registered claims.
They’re a bunch of predefined bits of information that the JWT standard provides for our benefit, while you don’t have to use them, it’s a good practice to do so:
iss (issuer): Think of this as the “author” of the JWT (e.g., “iss”: “auth.devtrovert.com”).
sub (subject): This is all about who the JWT is about, often pointing to a specific user (e.g. “sub”: “john-handsome”).
aud (audience): Who should be reading the JWT? It could be meant for one entity or many (e.g. “aud”: “example-app”).
exp (expiration time): Simply put, when does this JWT expire? It counts seconds since the Epoch time (e.g., “exp”: 1583241600).
nbf (not before time): It tells when we can start using the JWT, using a similar time format as exp. (e.g. “nbf”: 1583241600).
iat (issued at time): This is just when the JWT was made, like a timestamp of its creation (e.g. “iat”: 1583241600).
jti (JWT ID): A special ID for the JWT, which can be handy for various purposes like keeping track or ensuring it’s used only once.(e.g. “jti”: “a1234567”).
These are part of the JWT standard.
So, when you decide to use them, it’s wise to stick to the standard’s rules, even if they’re optional.
**Public
**Public claims are the ones you can set yourself.
But, because you don’t want to accidentally use the same claim name as someone else (or registered claims), it’s a neat idea to use a web address-like format.
Here’s what I mean:
"http://example.com/roles": ["editor", "subscriber"]
By using this structure, we make sure our “roles” claim is its own unique thing and doesn’t collide with any other “roles” claim out there.
**Private
**Private claims are claims that you make up to suit your app’s specific needs and they aren’t meant for the public, and there’s no official list of them anywhere.
“Hold up… If they’re called ‘private’, why can everyone read them?”
Good point, it’s a naming thing, despite the name, private claims aren’t secrets.
When we look inside a JWT, everything, both public and private claims, is out in the open because of how JWTs are encoded, so anyone with the right tools can see them.
The terms “public” and “private” in the context of JWT claims don’t refer to their visibility or their encryption status:
Public Claims: These are commonly understood claims, using a web URL format for naming helps keep things organized and avoids confusion.
Private Claims: These are your special additions, tailored just for your app, and they get the “private” label because they’re all about your app’s unique needs
For instance, having a claim like “department”: “HR” might mean the person associated with the JWT works in Human Resources.
Signature
This is the third part of our JWT, right after the last dot, we encounter the signature.
What is fascinating about this piece is that it’s constructed by joining the header and the payload, then encrypting this merged data using a secret key. This signature ensures that our data remains untouched and authentic during its… journey.
For a hands-on perspective, imagine the process like this:
NT2JhQ9oLc_HIZB6WW8yAaxSHcZ8QvNE1H0C5Adhmrg
=
HMACSHA256(
base64UrlEncode(header) + "." +
base64UrlEncode(payload),
secret)
When pieced together, our JWT presents itself as:
eyJhbGciOiJIUzI1NiIsInR5cCI6IkpXVCJ9. eyJpYXQiOjE2OTg2ODg0OTksIm5hbWUiOiJEZXZ0cm92ZXJ0Iiwic3ViIjoidGhpcyBpcyBhIHN1YmplY3QifQ. NT2JhQ9oLc_HIZB6WW8yAaxSHcZ8QvNE1H0C5Adhmrg
Now, any server that verifies this token has the secret key, which is “my secret“ in this example. Unlike me, you better don’t share it with anyone.
This equips the server to decipher the signature and confirm the authenticity of the header and payload.
A Dip into Algorithms
As we are on the topic of cryptographic algorithms, it might be a good moment to share some basics about two algorithm types.
Symmetric: A single key is used for both operations. For encryption, it means both encryption and decryption, or both creating a signature and verifying it. Both parties (sender and receiver) must process and protect this secret key. In the content of JWTs, typically, only the server retains this secret key.
Asymmetric: This involves a key pair: a public key and a private key. For encryption, the public key encrypts, and its corresponding private key decrypts. For digital signatures, the private key is used to sign (create a signature), and the public key is used to verify the signature.
Now, there are 3 common algorithms used to sign and verify the JWTs:
HMAC (Symmetric): Uses a single secret key to create and check a signature for data; only the server holds this key to confirm the data hasn’t been changed in transit. For JWTs, HMAC combined with SHA-256 hashing is common, known as HS256.
RSA (Asymmetric): Works with two keys: a public key and a private key. While you might hear about encrypting data with the public key and decrypting it with the private one, for JWTs, it’s a bit different. Here, the private key signs the token, and the public key checks its authenticity.
ECDSA (Asymmetric): This is a newer method for making digital signatures. While RSA is widely used, ECDSA can offer the same safety but is faster and needs shorter keys, which makes it a good choice for systems where speed and saving space are important.
How JWTs are used in Authentication
Let’s break down how JWTs play a vital role in the authentication process step by step:

Logging In: A user enters their username and password, the server checks these details against its records.
JWT creation: If the server confirms the user’s details are correct, it creates a JWT. This token contains the user’s details and other important information (but not sensitive). Then, the server signs this token with a secret key, ensuring its security.
Sending the Token: The server sends the token back to the user, this usually happens in the HTTP header for easy retrieval and usage in subsequent requests.
Token in Action: Whenever the user wants to access something on the server, they send this token back. They typically add it to their request headers, like a special access pass.
Server verification: When the server receives a request with a token, it verifies the token’s authenticity. It checks if the signature matches and then gets the user’s details from the token to process the request.
Response to the client: After validating the token and processing the request, the server sends the needed data back to the user.
One of the great things about JWTs is that they allow stateless authentication. What does this mean?
Well, the server doesn’t need to remember or store every token. Each token is self-contained, carrying all the info the server need to identify the user.
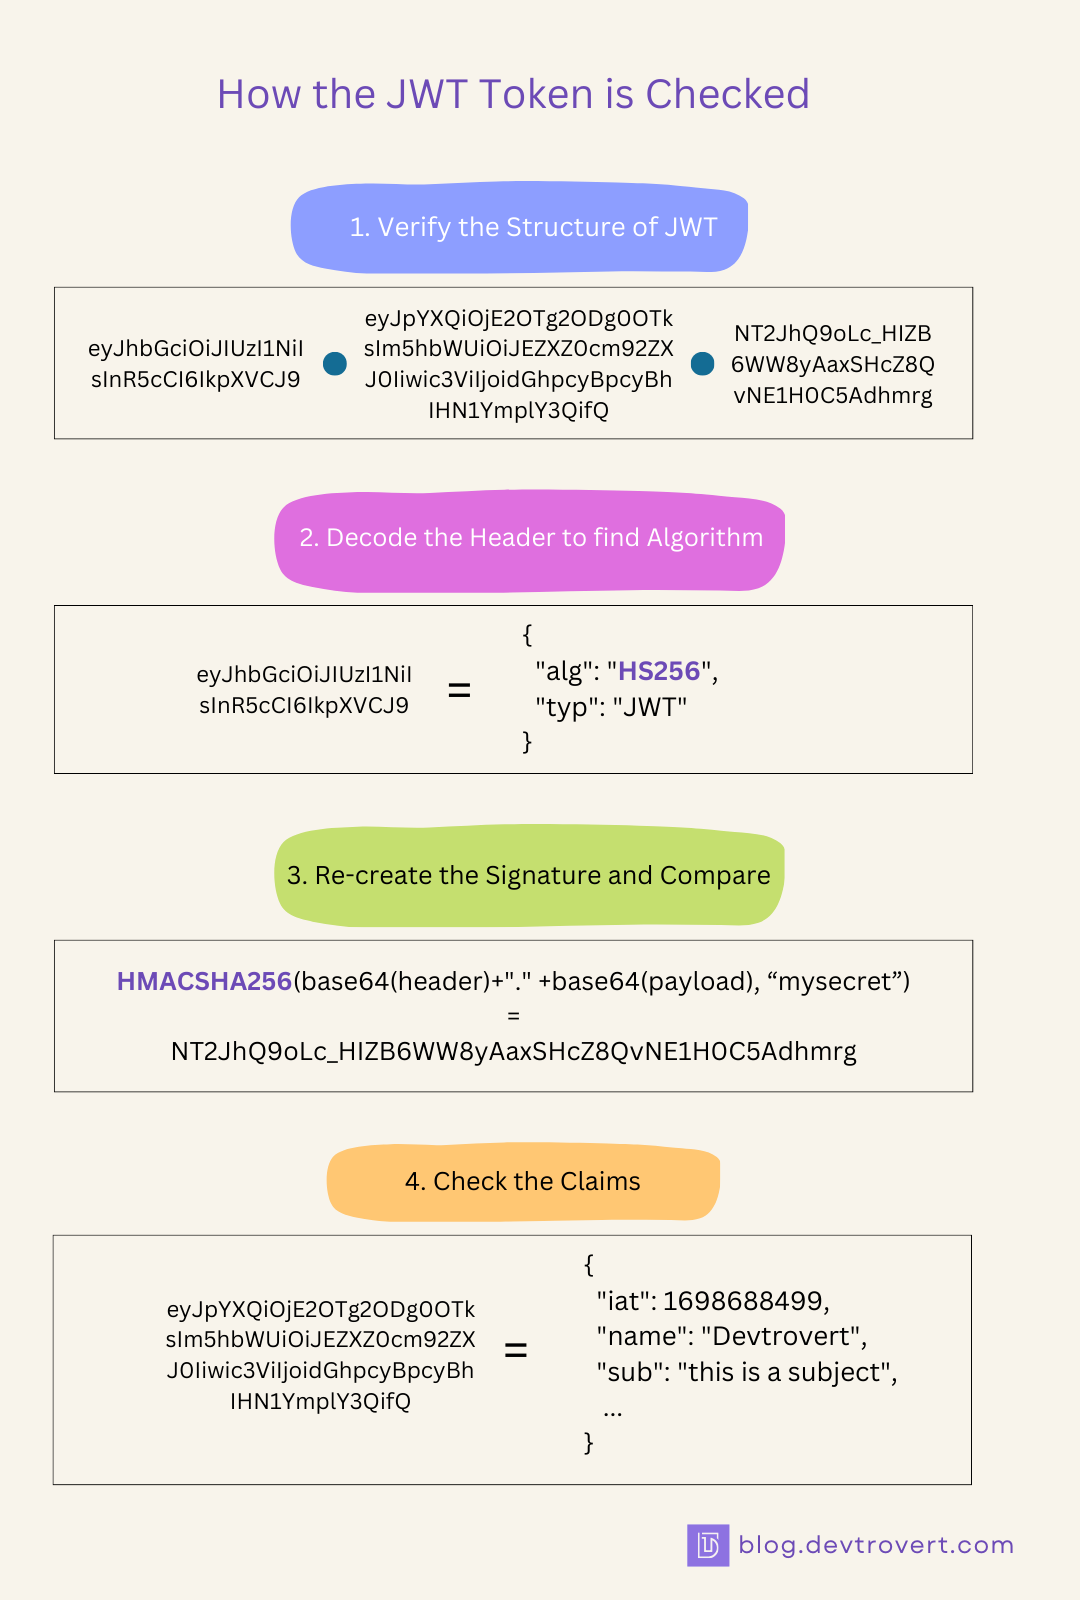
How the JWT token is checked?
When the user sends a token to the server, how does the server know it’s valid? Let’s go through that process:
Validate the Token structure: Our server looks at the token to see if it has the right format, it should have three parts: the Header, the Payload, and the Signature (structured like ‘xxxxx.yyyyy.zzzzz’).
Decoding: Our server then decodes the token, since in’s usually in Base64URL format, decoding it lets the server see the Header and the Payload’s details:
Figuring Out the Algorithm: By checking the token’s header, the sever can see which algorithm was used to sign the token.
Matching Signatures: The server then tries to recreate the token’s signature. If the new signature matches the one in the received token, it shows the token hasn’t been changed or tampered with.
Checking the Claims: Lastly, the server examines the JWT’s standard claim. It looks at timestamps and identifiers like when the token expires (‘exp’), when it starts being valid (‘nbf’), when it was made (‘iat’), who made it (‘iss’), who it’s for (‘aud’), and who it’s about (‘sub’).
Pitfalls of JWT
While JWT offers many advantages, it’s essential to be aware of potential pitfalls and security concerns that can arise if it’s not implemented properly.
Here are some key issues associated with JWT tokens:
Security Risks from Improper Algorithm Choice: There are different ways to encrypt JWTs. If the encryption method isn’t properly chosen or implemented, it can be vulnerable to attack.
Key Management is an Issue: If the secret key used to create and verify JWTs is compromised, attackers could forge tokens and gain unauthorized access.
Revocation Challenges: It can be tricky to revoke a JWT once it’s been issued. This means that if a user’s credentials are compromised, their token might still be valid.
Bypassing Signature Verification: Vulnerabilities in certain JWT libraries and implementations allow for signature verification to be bypassed. These vulnerabilities could enable attackers to create forged tokens that appear legitimate to the application.
Store JWT in a cookie or localStorage
Source: Store JWT in cookie or localStorage
For more questions and answers, visit our website at Frontend Interview Questions
Storing JWT (JSON Web Token) in a cookie is considered safer than storing it in the session storage or the local storage for several reasons:
Cookies are less vulnerable to Cross-Site Scripting (XSS) attacks than session storage or local storage. XSS attacks occur when a malicious script is injected into a website and can access and manipulate the data stored in the user’s browser. Since cookies have an extra layer of security in the form of the HTTPOnly flag, they can not be accessed by JavaScript code, which reduces the risk of XSS attacks.
Cookies can be configured to have an expiration time, after which they are automatically deleted from the user’s browser. This means that if an attacker gains access to the JWT stored in a cookie, the token will only be valid for a limited time, reducing the risk of long-term damage.
Cookies can be confined to be sent over HTTPS, which provides encryption and authentication of the data being transmitted. This reduces the risk of man-in-the-middle attacks, where an attacker intercepts and modifies the data being transmitted between the user’s browser and the server.
Session storage and local storage are more vulnerable to Cross-Site Request Forgery (CSRF) attacks than cookies. CSRK attacks occur when an attacker sends a request from a user’s browser without their knowledge or consent. Since session storage and local storage are accessible by JavaScript code, an attacker can easily read and send the JWT token from these storage mechanisms, whereas cookies are less vulnerable to these types of attacks.
In summary, storing JWT in a cookie with the HTTPOnly flag and an expiration time is considered safer than storing it in session storage or local storage. However, it’s important to note that cookies are not immune to attacks, and other security measures such as input validation, access control, and rate limiting should also be implemented to ensure the overall security of the application.
OpenID Connect (OIDC)
OpenID Connect is an identity layer on top of the OAuth 2.0 protocol. It extends the OAuth 2.0 standard to standardize a way for authentication.

The difference between the two is that OAuth 2.0 provides authorization, while OIDC provides authentication.
OpenID Connect enables an Internet identity ecosystem for easy and secure integration. For example, if a user wants to create an account at a new website, they may use Google to create their account rather than creating an account on the new website. The OpenID provider (Google, in this case) handles the authentication processes and obtains the user’s consent to provide specific information, such as a user profile, to the relying party (the new website, in this case).
OAuth does not provide the user identity right away, but rather it provides an access token for authorization. OpenID Connect enables the client to identify the user based on authentication performed by the authorization server. This is achieved by defining a scope named openid when requesting the authorization server for user login and consent. openid is a mandatory scope to tell the authorization server that OpenID Connect is required.
The URI for the OpenID Connect authentication request made by the client looks like this:
https://accounts.google.com/o/oauth2/v2/auth?
 response_type=code&
 client_id=your_client_id&
 scope=openid%20contacts&
 redirect_uri=https%3A//oauth2.example.com/code
The result of the request is an authorization code that the client can exchange for an access token and ID token. If the OAuth flow is implicit, then the authorization server responds with an access token and an ID token right away.
The ID token is a JWT or JSON Web Token. A JWT is an encoded token that consists of three parts: header, payload, and signature. After acquiring the ID token, the client can decode it to get the user info encoded in the payload part, like this:
{
  "iss": "https://accounts.google.com",
  "sub": "10965150351106250715113082368",
  "email": "johndoe@example.com",
  "iat": 1516239022,
  "exp": 1516242922
}
Claims
The payload of the ID token contains some fields known as claims. Basic claims are:
isstoken issuer.subunique identifier for the user.emailuser’s email.iattoken issuing time is represented as Unix time.exptoken expiration time represented as Unix time.
However, claims are not limited to these fields. It’s up to the authorization server to encode claims. The client can use this information to authenticate the user.
If the client needs more user information, the client can specify standard OpenID Connect scopes to tell the authorization server to include the required information in the ID token’s payload. These scopes are profile, email, address, and phone.
Multi-Factor Authentication (MFA)
MFA significantly enhances security by requiring “multiple factors.“ (hence the name, Multi-Factor) for authentication. In practice, this can be combined with other authentication methods for high-risk operations or sensitive data. It can be used to secure the authentication at the IDP level in OIDC.
Single Sign-On
What is SSO?
Single Sign-On (SSO) is a technology that allows users to securely authenticate to multiple applications and sites at once using a single set of credentials and seamlessly move between them without re-authentication.
SSO authentication begins when a user logs in to one of the clients associated with SSO. Instead of entering the username and password for each service each time, the user does so once. The data creates a unique session that other services will recognize.
When a user attempts to access another service or application within SSO, the service asks the IdP to confirm the user’s authentication. Instead of asking for credentials again, the service accepts the token that proves that the user has already been authenticated.
SSO is a part of a more general Identity and Access Management (IAM) concept. This comprehensive system covers the processes used to manage the user identities and their access to various resources.
All aspects of an IAM system can be divided into three groups: user experience, security, and infrastructure.

SSO implementation is based on protocols such as OAuth, Open ID Connect, and SAML (Security Assertion Markup Language). SAML is also beyond the scope of this material since this standard is still more commonly used in corporate SSO solutions. Therefore, we will only focus on the definition to understand the difference.
SAML is an XML-based standard for exchanging authentication and authorization data between an identity provider and a service provider.
SSO implementation scheme
We have already become acquainted with the OAuth and OpenID protocols, so let’s immediately schematically consider one of the examples of SSO implementation in practice. Since we want to get end-to-end authentication both in web applications and on mobile clients, we default to auth code flow with PKCE as a basis, and get approximately the following picture: where to begin with, each client needs to be integrated with the IdP.

Schematically, the algorithm for SSO operation between services can be described as follows:
The user wants to log in to one of the hosts using SSO
The standard OAuth 2.0 path occurs, in which the user is redirected to the authorization form on the IdP (Identity Provider) host when they enter their login data.
Then, the redirect to the target client occurs, where, according to the standard, the services exchange the received code for a set of tokens. At the same time, before the redirect, the IDP also saves the user’s session on its domain (for example, in cookies).
The user wants to log in to another service using this IDP.
The client redirects the user to the authorization page on the IdP. Still, the provider will immediately “catch” the previous session because it has been on the IdP host since the previous authorization in the user UA (browser).
Then, according to the PKCE flow, the user will be redirected back to the client with the code without entering a login/password.
The user will be authorized in the same way as on client 1
That’s it. SSO, at minimum, is ready. Of course, provided that you have, for example, a microservice architecture and some services are located on one host, you can move part of the authorization and exchange of code for a set of tokens to a separate service and leave only refresh in the rest.
Authorization
Authorization verifies that the user is allowed to do. Let’s start with one of the most common authorization methods in everyday use: OAuth.
OAuth 2.0
OAuth (Open Authorization) is a token-based authorization mechanism that enables users to grant third-party apps access to their data without having to share their login credentials. With greater flexibility and scalability than OAuth 1.0, OAuth 2.0 replaced 1.0 in 2012 and is now the de facto standard for online authorization.
For example, I use my Garmin fitness app (resource server and authorization server) to track my daily workouts, and now I want to create a new app, “Nutriplan“ (the client), to monitor my nutrition and calorie intake and consumption. In this case:
The Nutriplan app asks for access to resources on the Garmin app, which is granted by the user logging in to the Garmin app with their user/password, but the user/password is not shared with the Nutriplan.
An authorization code is created and shared with Nutriplan. However, the authorization code can’t be used to access user data in the Garmin app.
With the authorization code, the Nutriplan app requests an access token from the Garmin app’s authorization server endpoint.
The Nutriplan client uses the access token to access my resources on the Garmin app to recommend nutrition plans according to my fitness data in the Garmin app.
During the whole process, my Garmin app login password isn’t shared with Nutriplan but my data in my Garmin app is shared securely with third-party apps, access delegation without sharing credentials.
Scope-Based Authorization
OAuth 2.0 uses a scope-based authorization, where specific permissions are defined in scopes as a way to limit the amount of access that is granted into an access token. For example, an access token issued to a client app may be granted READ and WRITE access to protected resources, or just READ access. The client requests a scope during the authorization process and the user can then grant or deny these permissions.
Role-Based Access Control (RBAC)
Role-Based Access Control (RBAC) is a method of regulating access to resources based on the roles of individual users. By assigning users to roles (e.g, admin, editor, viewer) and defining different permissions for each role, RBAC simplifies permission management and improves security. There are some generally accepted good practices for using RBAC.
Least Privilege: Minimal and only explicitly required permissions should be assigned to roles, and start with a default deny policy and explicitly grant permissions only where needed.
Clearly define roles: Create roles that represent specific job functions or responsibilities within the organization, and avoid creating roles that are too broad or too narrow. Keep the number of roles to a minimum; too many roles can lead to complexity and difficulty in managing permissions. Consider using role hierarchies to simplify management.
Periodic review, audit, and documentation: Conduct regular security audits to stay up-to-date and identify potential vulnerabilities; maintain clear and comprehensive documentation of our RBAC policies and procedures.
Attribute-Based Access Control (ABAC)
ABAC provides finer-grained control by passing access decisions on not just the generic role, but detailed attributes of the user, resource, and environment. It is therefore more flexible than RBAC, but the tradeoff is that it’s more complex to implement.
For complex scenarios, we can consider integrating ABAC principles with RBAC to provide dynamic and context-aware access control.
Policy-Based Access Control (PBAC)
PBAC is a strategy for managing user access where the roles of users are combined with policies to determine what access privileges users of each role should have. PBAC can be used with RBAC/ABAC together. Cloud IAM users should already be familiar with roles and policies. PBAC offers several benefits over the traditional access control model, like RBAC.
Finer-grained: Like ABAC, PBAC allows for highly granular control over access based on a wide range of attributes or conditions. We can define policies based on both user and resource attributes.
Attribute-Based Access Control (ABAC) Integration: PBAC is often used in conjunction with ABAC, allowing for even more flexible and expressive control.
Dynamic Access Control: PBAC enables dynamic access control decisions based on real-time conditions. Access can be granted or revoked automatically based on changes in user attributes, resource attributes, or environmental factors. This allows for more flexible and adaptive security policies.
Conclusion
This material helped you learn something new and organize your existing knowledge. Please remember that specifications and standards, no matter how inconvenient and optimal they may seem, are written by professionals who have spent much time and effort searching for an optimal solution and closing security holes. Take your time with implementation immediately, and spend time studying the documentation and the subject matter.
References
https://blog.gitguardian.com/authentication-and-authorization/
https://frontendinterviewquestions.medium.com/store-jwt-in-cookie-or-localstorage-7fa39fcc85b5
Subscribe to my newsletter
Read articles from Tuan Tran Van directly inside your inbox. Subscribe to the newsletter, and don't miss out.
Written by
Tuan Tran Van
Tuan Tran Van
I am a developer creating open-source projects and writing about web development, side projects, and productivity.