How to Crochet a Rose Algorithm: Demystifying Code Through Crochet Design
 Cherish Hudgens
Table of contents
- Using Crochet to Visually Explain the Rose Curve and Polar Coordinates
- An in-depth exploration of the rose formula
- Visualizing the geometry of a rose
- Step 1: Deciding what all is needed — unpacking the basic formula
- Step 2: Setting up some variables
- Step 3: Coding the formula — pulling it all together
- Step 4: Setting up the for loop
- Step 5: Setting up the Cartesian polar coordinates, coding the formula
- Coding the Rose in Java with Processing
- Now, onto the crocheted part
- Reconciling Dynamic Motion (Theta) with Linear Petal Construction
- Rose Pattern
- Final Thoughts
Using Crochet to Visually Explain the Rose Curve and Polar Coordinates
Have you ever wondered what gives roses their compositional spiral-like patterns? For anyone who has pondered that, this article is for you! We set out to bridge the gap between mathematics and yarn crafts.
Now, I definitely get it — Math can be challenging. There have been occasions where I’ve certainly needed time to wrap my head around what happens in different formulas or equations. But through some exploration, I’ve noticed there’s a connection between real-world items and their mathematical counterparts. By tapping into that connection, we can deepen our understanding of how this math works. This article explores how the rose formulas, r = a • cos(kθ) and r = a • sin(kθ), relate to programming and crochet practices. What follows is my own interpretation of these concepts.
An in-depth exploration of the rose formula
The topic of discussion for this post centers around the formula r=a⋅cos(kθ). This formula is where trigonometry, geometry, and calculus meet, turning math into visual art. This visual art in turn reflects what happens in the rose applique crochet project.
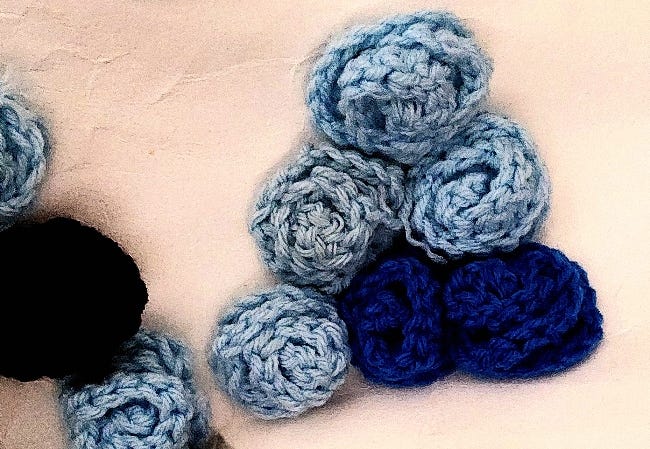
Photo by author
The shape of roses is the work of mathematical systems called the polar equations and, as Yoland Savriama et al. explains, radial symmetry. There are some commonalities. Just like a crocheted flower begins with a magic ring at the center, the coded rose begins at the origin, which is the heart of the coordinate plane. With each loop in crochet, you build petals outward in soft spirals. Similarly, the loop in code uses angles and radii to plot points, spiraling out mathematically. Both start at a central anchor and blossom from there — one with yarn, the other with math.
It’s like mapping each stitch in a spiral based on distance from the center (r) and then deciding its placement left/right and up/down using cosine and sine. You’re “stitching” each point mathematically!
Visualizing the geometry of a rose
You might notice my rose drawing has 14 petals, even though I used k = 7, which should generate just 7 petals for an odd number. That’s because I continued plotting the curve across two full rotations, from 0 to 4π radians.
The rose curve doesn’t stop after one cycle. It loops back around and retraces the pattern. In this case, those repeated sweeps produced a second set of the same 7 petals (7 x 2), giving the appearance of 14 in total. It’s a great example of how mathematics builds layered beauty through repeated motion.
Now onto the different variables that make up the formula!
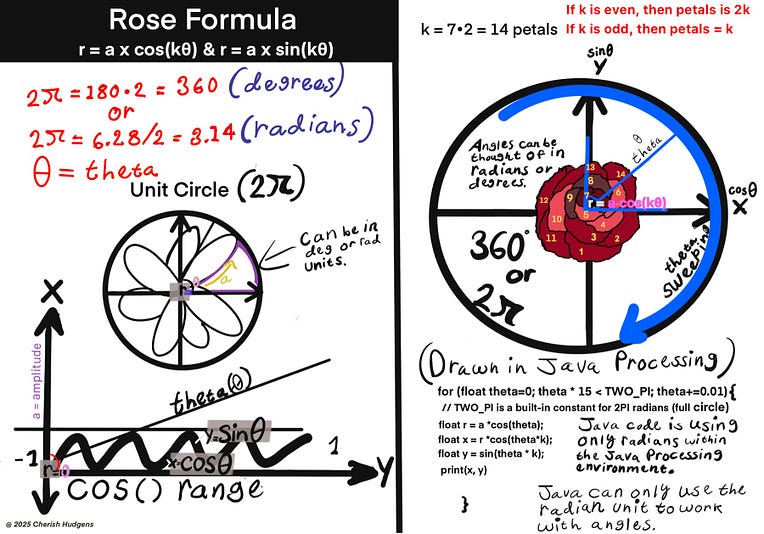
Step 1: Deciding what all is needed — unpacking the basic formula
First, we figure out our point of origin (starting point). When cos(kθ) = 0, you’re starting at the center of it all, and this is where every petal begins. Anything at r=0 is the starting point and hasn’t yet progressed outward. You may think of it as the core or nucleus of the rose. In crochet, the physical version of this would be a magic ring, chain space, or the point where all petals are gathered and spiraling outward.
From there, we want to measure the distance from the center, which is what r(θ) = a × cos(kθ) measures.
Now, we can look into what variable a represents here. It acts as a scaling factor that adjusts the overall size of the petals when it’s multiplied by the cos() function. It determines the maximum distance (amplitude) the petals reach from the center.
Next, we want to determine the number of petals the rose will have. The number of petals is controlled by the variable k, which can be either even or odd. If k is an odd number, like k = 3, you’ll get exactly 3 petals. However, when k is even, the number of petals is doubled. So, if k = 2, that value would become 2 x 2 = 4.
We also want to track the progression of the sinusoidal curve and how it will open up through the value of theta or θ. Theta is an angle.
Mapping out the terrain for Cos() & Sin(). Now, we want to generate the petals from the shape of the waves formed on the Cartesian plane. So, we create curves using sin() and cos(). Think of the range from -1 to 1 as the amount of landscape (or terrain) available to the cos and sin functions on the Cartesian grid over which the two functions have full reign. This environment is the entire stretch of terrain they operate within — no peaks higher than 1, no valleys lower than -1. This limited but smooth terrain gives the rose its natural, wave-like rhythm as we sweep through each angle around the unit circle.
Step 2: Setting up some variables
Any programming language can work for this, but I chose Java, which uses the Processing framework. This language is a visual-friendly tool perfect for bringing math to life through visual code.
float k = 2.6;      // Controls petal count: odd k = k petals, even k = 2k petals
float a = 190;      // Controls size of the rose
float theta = 1.5;  // Angle in radians (swept by the loop)
float r = 70;       // Radius, recalculated in the loop
Step 3: Coding the formula — pulling it all together
Next, we map out the steps in the formula using computer code. We’re looking to determine how all the expressions within the formula work together to render the rose we want.
The petal shapes in a rose curve are sculpted by trigonometric waves that originate from the unit circle. Though the petals themselves extend beyond or within the circle’s boundary, the rhythm and symmetry of their formation are deeply rooted in the same geometry, where cosine and sine define movement around a perfect circle.
Step 4: Setting up the for loop
You may ask, “What role does the for loop play here?”. Believe it or not, the for loop (or any loop, really) acts as a set of hands used to help shape, mold, and draw out all parts of the formula. It’s one component in the programming world that brings a dynamic quality to whatever it touches. This loop, in particular, helps our rose blossom by incorporating all the components of the equation to their highest visual potential. Simply put, the loop gives the equation dynamic behavior.
The loop employs the value of theta to sweep through angles from 0 to 2π. If we think of r(θ) = a × cos(kθ) as our starting point, theta or θ helps the radius progress forward by tracing a path around the unit circle, one step at a time. Theta is driving the motion. Theta is an angle that helps the radius point to and travel in a specific direction.
for(int theta =0; theta < TWO_PI*5; theta+=0.01){
r = a*cos(theta); //r = a × cos(kθ).. tells you how far to reach out at each point.
float x = r*cos(k * theta);
float y = r*sin(theta);

vertex(x,y);
  }
On the other hand, a bigger step size ( like theta += 0.1) is much like using a looser hand tension, or fewer stitches. You can fill the circle quickly, but the result is not as detailed. So in both crochet and code, that fine control gives you elegance in the spiral.
Think of theta += 0.01 as the kind of hand tension or motion you use to guide the crochet hook when crocheting or the steady stroke path you follow to create outlines while drawing. When your tension is tight and consistent, your stitches are smaller and closer together, resulting in a smoother, more uniform spiral. The value 0.01 places more points around the curve, just like adding more stitches in a round or row. Also, the 0.01 doesn’t scale the size of the loop or the rose directly. Instead, it controls how finely we step through angles (theta) between 0 and 2π.
Step 5: Setting up the Cartesian polar coordinates, coding the formula
Moreover, we also have to set up a few values corresponding to the portion of the Cartesian grid where our unit circle will sit. This is done by establishing x and y values, which represent the vertical (x) and horizontal (y) axes. These axes give us the space to plot coordinates and draw the rose curve.
float x = r*cos(k * theta);
float y = r*sin(k * theta);
Then, we start coding the rest of the formula within the Processing programming environment. After assigning the initial values of x and y for our polar coordinates, we declare more variables, each one referencing how the formula is structured.
Coding the Rose in Java with Processing
// Rose formula: r = a cos(nθ) and r = a sin(nθ)

float k = 2.6;      // Controls petal count: odd k = k petals, even k = 2k petals
float a = 190;      // Controls size of the rose
float theta = 1.5;  // Angle in radians (swept by the loop)
float r = 70;       // Radius, recalculated in the loop

void setup() {
  size(500, 500);                     // Set window size
  background(255);                   // White background
  translate(width / 2, height / 2);  // Move origin to center
  noFill();                          // No interior fill for the rose
  stroke(0);                         // Set stroke color (black)
  strokeWeight(1.5);                 // Optional: adjust line thickness

  beginShape();
  for (theta = 0; theta < TWO_PI * 15; theta += 0.01) {
    r = a * cos(theta);          // Polar equation: distance from center
    float x = r * cos(k * theta);        // Convert to Cartesian coordinates
    float y = r * sin(k * theta);
    vertex(x, y);                    // Add a point to the shape
  }
  endShape();
}
The above code produces the following output:
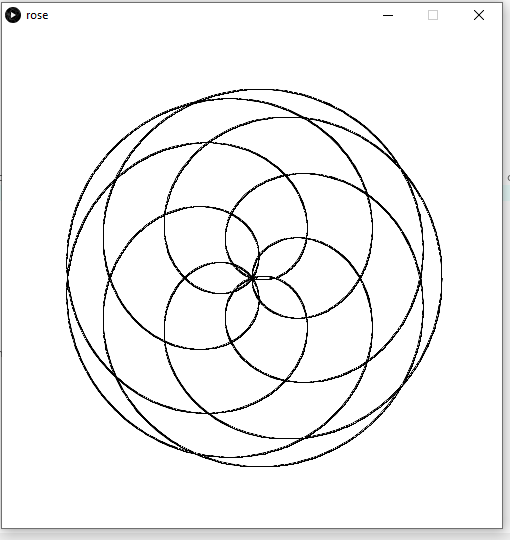
This output is the closest to what I hoped to achieve in drawing this rose. Remember, though, that these were just the initial steps for getting our rose set up in the programming environment. You probably noticed how the rose appears layered but trapped in a flat, 2D space. If you seek a more advanced tutorial on adding more dimension to your version, I highly recommend exploring the work of Paul Nylander, who works extensively with mathematical art. I also suggest watching Kazuki Umeda’s series, parts one and two, to create rose shapes with p5.js!
At this point, we have explored how the rose formula builds a spiral visually. While crochet patterns don’t numerically align with this equation, the shape and rhythm of the stitches often mirror the spirals defined by this mathematical function. So, if you’re crocheting for the first time, don’t worry. No math is required to complete most crochet projects! All you’ll need is to count your stitches as you go.
Now, onto the crocheted part
In the programming environment we just explored, theta acts like the guiding motion of a hand moving a crochet hook. Together with the for loop and the fine increment of 0.01, theta gradually carves out the rose shape, just as steady hand movements shape stitches in a pattern.
Reconciling Dynamic Motion (Theta) with Linear Petal Construction
Earlier, I mentioned how a magic ring corresponds to the point where cos(kθ) = 0 within the equation. A magic ring or chain space forming a loop would be ideal for most projects worked in the round. Well, for this project, the true beauty unfolds during the assembly of the rose. We would not use a looped space for this particular rose because it would not produce the same spiraled effect.
Although the crocheted rose is crafted as a linear row of petals, adding each petal incrementally and then shaping them into a spiral at the end allows the shape to mimic the essence of the polar function. Rather than forming petals radially from the start, this version builds them one after another along a continuous row and only reveals its radial symmetry after the petals get coiled by hand.
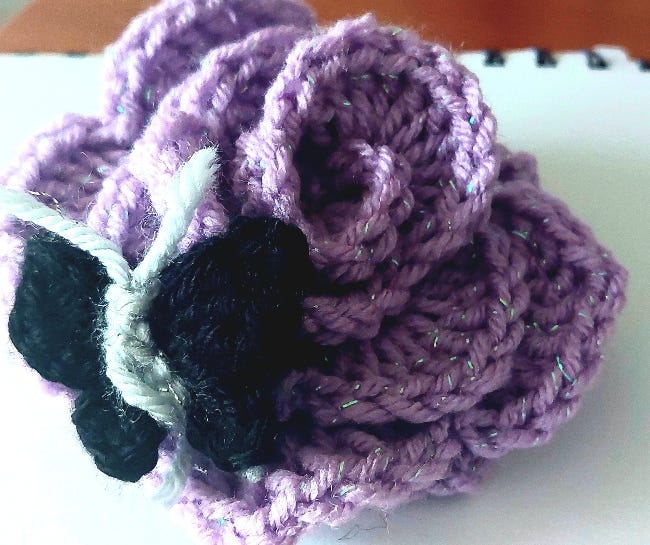
Photo by author
Even though the rose starts as a flat row, this incremental buildup of petals still behaves like a plotted curve. One stitch at a time, one-directional change at a time, until a larger, more cohesive spiral shape forms. When you finally gather the petals into a center, you’ve pulled the row into a spiral, which mirrors how the cosine function compresses or expands radius values across angular intervals.
The center point (magic ring) r = 0 when cos(kθ) = 0.
Stitch repeats/petal count — k determines the number of petals.
Expanding outward in rings or spirals — increasing θ to draw more of the curve.
The petal shape from a series of shell cluster stitches all placed in one stitch — the wave-like form represents the cosine function.
Rose Pattern

Instructions for making the rose.
The above picture shows the algorithm (instructions) for crocheting a coiled rose shape. You can do this using any crochet hook size or yarn weight of your choice.
Final Thoughts
All things considered, there’s a clear overlap between the abstract and the tangible. Mathematics, though often challenging, does a beautiful job of revealing how its principles are reflected in the natural world — including the physical shapes we create through fiber arts.
If you’re a crocheter, coder, or math lover, you may want to give the rose curve a try and see what kind of result you can create.
Thank you for reading!
Feel free to leave a comment, share this post, or follow me for more explorations into the natural aspects of math. I’d love to hear what you think about this!
Subscribe to my newsletter
Read articles from Cherish Hudgens directly inside your inbox. Subscribe to the newsletter, and don't miss out.
Written by