Create a Student–Tutor Booking App with Flutter Calendar – A Step-by-Step Guide
 syncfusion
TL;DR: Learn how to build a student-tutor appointment system using the Syncfusion Flutter Calendar library. The guide explains how to define data models, develop the user interface with separate views for students and tutors, and customize the calendar’s appearance and functionality. It outlines the handling of appointment requests, including how tutors can accept or reject them and how rejected requests are displayed to the student.
Welcome to the student and tutor appointment system!
Calendars are an essential tool for organizing and managing time effectively. They simplify complex scheduling tasks by providing a clear visual representation of events, appointments, and deadlines. Whether it’s for personal use, business needs, or educational planning, Calendars help streamline workflow and enhance productivity. By offering interactive features, modern Calendar systems can handle dynamic scenarios like real-time updates, appointment requests, and conflict resolution.
In this blog, we will demonstrate how to build a dynamic student-tutor appointment system using the Syncfusion Flutter Calendar library. This system enables students to request appointments, tutors to accept or decline them, and ensures seamless synchronization between students and tutors.
Dynamic student-tutor appointment system
Let’s get started!
Defining the appointment request model
To begin, create the AppointmentRequest class as a data model to efficiently organize and manage appointment requests. This model includes the following properties: the student’s name, the date and time of the appointment, a boolean value indicating whether the request has been accepted, and an optional rejection reason.
We initialize these properties when an appointment request is created. Additionally, the AppointmentDataSource class, which extends CalendarDataSource, provides the Calendar with the required data. It accepts a list of Appointment objects and assigns them to the appointment’s property, ensuring the system remains organized, flexible, and scalable.
class AppointmentRequest {
  String studentName;
  DateTime startTime;
  bool isAccepted;
  String? rejectionReason;

  AppointmentRequest(
    this.studentName,
    this.startTime,
    this.isAccepted, {
    this.rejectionReason,
  });
}

class _AppointmentDataSource extends CalendarDataSource {
  _AppointmentDataSource(List<Appointment> source) {
    appointments = source;
  }
}
Developing the tutor and student appointment system
The AppointmentSystem widget serves as the main interface, organizing the student and tutor views. Using Flutter’s layout capabilities and Syncfusion’s Calendar widget, the system creates a cohesive scheduling environment.
Organizing student and tutor calendars
Continuing, organize the student and tutor calendars within the AppointmentSystem widget. The AppointmentSystem provides a structured interface for managing appointments. The layout divides the screen into two sections, each containing methods for building the student and tutor calendars.
Student Calendar: This calendar displays a blue header, highlights the current day, and includes a button to request an appointment.
Tutor Calendar: Shows the tutor’s calendar with a purple header and lists pending requests that can be accepted or rejected.
This layout effectively organizes the calendars and appointment management tools for students and tutors.
class AppointmentSystem extends StatefulWidget {
  const AppointmentSystem({super.key});

  @override
  AppointmentSystemState createState() => AppointmentSystemState();
}

class AppointmentSystemState extends State<AppointmentSystem> {
  final List<AppointmentRequest> _pendingRequests = [];
  final List<Appointment> _appointments = [];
  final List<AppointmentRequest> _rejectedRequests = [];

  @override
  Widget build(BuildContext context) {
    return Scaffold(
      appBar: AppBar(
        title: const Text('Appointment System'),
        flexibleSpace: Container(
          decoration: const BoxDecoration(
            gradient: LinearGradient(
              colors: [
                Colors.blue,
                Colors.purple,
              ],
              begin: Alignment.topLeft,
              end: Alignment.bottomRight,
            ),
          ),
        ),
      ),
      body: Row(
        children: [
          Expanded(child: _buildStudentCalendar()),
          const VerticalDivider(thickness: 1),
          Expanded(child: _buildTutorCalendar()),
        ],
      ),
    );
  }
}
Customizing the Calendar
The buildCalendar method offers a flexible way to create customized calendar views with adjustable header styles and appointment displays.
It uses the SfCalendar widget to display a month view, where appointments are shown based on the provided appointments dataSource. The method allows for customization of the header’s background color and text style, which can be adjusted by passing a headerColor parameter.
Widget _buildCalendar(Color headerColor) {
  return SizedBox(
    height: 450,
    child: SfCalendar(
      view: CalendarView.month,
      dataSource: _AppointmentDataSource(_appointments),
      todayHighlightColor: headerColor,
      headerStyle: CalendarHeaderStyle(
        backgroundColor: headerColor,
        textStyle: const TextStyle(
          color: Colors.white,
          fontSize: 20,
          fontWeight: FontWeight.bold,
        ),
      ),
      selectionDecoration: BoxDecoration(
        border: Border.all(
          color: headerColor,
          width: 2,
        ),
      ),
    ),
  );
}
Building the student calendar
The student calendar is designed with a vertical layout containing a month view calendar. The calendar allows students to view their existing appointments, request new ones, and track rejected appointments.
The student calendar relies on the following methods to enable its functionality:
buildCalendar: Sets up the calendar’s appearance and functionality.
showRequestDialog: Opens a dialog to request an appointment.
requestAppointment: Adds the appointment request to the pending list.
Furthermore, the calendar highlights today’s date and provides a button to request new appointments. If applicable, rejected requests are displayed in a separate section.
Widget _buildStudentCalendar() {
  return Column(
    children: [
      const Padding(
        padding: EdgeInsets.all(8.0),
        child: Text(
          'Student Calendar',
          style: TextStyle(
            fontSize: 18,
            fontWeight: FontWeight.bold,
          ),
        ),
      ),
      _buildCalendar(Colors.blueAccent),
      const SizedBox(height: 20),
      ElevatedButton.icon(
        icon: const Icon(Icons.add),
        label: const Text(
          'Request Appointment',
          style: TextStyle(
            fontSize: 16,
            fontWeight: FontWeight.bold,
            color: Colors.white,
          ),
        ),
        onPressed: () => _showRequestDialog(context),
        style: ElevatedButton.styleFrom(
          iconColor: Colors.white,
          padding: const EdgeInsets.symmetric(
            vertical: 16,
            horizontal: 24,
          ),
          backgroundColor: Colors.blueAccent,
        ),
      ),
      if (_rejectedRequests.isNotEmpty) _buildRejectedRequests(),
    ],
  );
}

Student Calendar with requests.
Handling appointment requests
Subsequently, handling appointment requests involves the showRequestDialog method, which prompts users to enter their details, such as their name and preferred date and time for the appointment. This method displays a dialog with a text field for the student’s name and a button to pick the appointment date and time. When the Pick Date & Time button is pressed, the user can choose a date using the date picker and a time with the time picker.
After selecting the date and time, the method stores the chosen time and handles the appointment request. The user can submit their request by clicking the Request button, which triggers the requestAppointment function to process the data and close the dialog. This approach ensures a smooth and interactive experience when requesting appointments.
void _showRequestDialog(BuildContext context) {
  final nameController = TextEditingController();
  DateTime selectedTime = DateTime.now();

  showDialog(
    context: context,
    builder: (context) => AlertDialog(
      title: const Text('Request Appointment'),
      content: Column(
        mainAxisSize: MainAxisSize.min,
        children: [
          TextField(
            controller: nameController,
            decoration: const InputDecoration(labelText: 'Student Name'),
          ),
          const SizedBox(height: 10),
          ElevatedButton(
            child: const Text('Pick Date & Time'),
            onPressed: () async {
              DateTime? pickedDate = await showDatePicker(
                context: context,
                initialDate: DateTime.now(),
                firstDate: DateTime.now(),
                lastDate: DateTime(2100),
              );
              if (pickedDate != null) {
                TimeOfDay? pickedTime = await showTimePicker(
                  context: context,
                  initialTime: TimeOfDay.now(),
                );
                if (pickedTime != null) {
                  selectedTime = DateTime(
                    pickedDate.year,
                    pickedDate.month,
                    pickedDate.day,
                    pickedTime.hour,
                    pickedTime.minute,
                  );
                }
              }
            },
          ),
        ],
      ),
      actions: [
        TextButton(
          onPressed: () {
            if (nameController.text.isNotEmpty) {
              _requestAppointment(nameController.text, selectedTime);
              Navigator.pop(context);
            }
          },
          child: const Text('Request'),
        ),
      ],
    ),
  );
}

void _requestAppointment(String studentName, DateTime startTime) {
  setState(() {
    _pendingRequests.add(
      AppointmentRequest(
        studentName,
        startTime,
        false,
      ),
    );
  });
}
Appointment request dialog box.
Building the tutor calendar
The tutor calendar focuses on managing and processing incoming appointment requests. Tutors can view scheduled appointments and pending requests, providing two main actions: accepting or rejecting requests. These actions are managed through buttons in the UI, and the tutor can interact with each request.
The buildTutorCalendar method provides an interface for the tutor, allowing them to view the month calendar with color-coded appointments and a list of pending requests. Each request includes buttons to accept or reject.
Widget _buildTutorCalendar() {
  return Column(
    mainAxisSize: MainAxisSize.min,
    children: [
      const Padding(
        padding: EdgeInsets.all(8.0),
        child: Text(
          'Tutor Calendar',
          style: TextStyle(
            fontSize: 18,
            fontWeight: FontWeight.bold,
          ),
        ),
      ),
      _buildCalendar(Colors.deepPurple),
      const SizedBox(height: 10),
      Container(
        margin: const EdgeInsets.symmetric(vertical: 10),
        padding: const EdgeInsets.symmetric(
          horizontal: 10,
          vertical: 8,
        ),
        decoration: BoxDecoration(
          color: Colors.deepPurple,
          borderRadius: BorderRadius.circular(12),
        ),
        child: const Text(
          'Pending Appointment Requests',
          style: TextStyle(
            fontSize: 16,
            fontWeight: FontWeight.bold,
            color: Colors.white,
          ),
        ),
      ),
      Expanded(
        child: ListView.builder(
          itemCount: _pendingRequests.length,
          itemBuilder: (context, index) {
            var request = _pendingRequests[index];
            return Card(
              child: ListTile(
                title: Text('Request from ${request.studentName}'),
                subtitle: Text('Time: ${request.startTime}'),
                trailing: _buildRequestActions(index),
              ),
            );
          },
        ),
      ),
    ],
  );
}

Tutor Calendar with requests.
Handling pending requests
To begin addressing the pending appointment requests in the tutor calendar, the buildRequestActions method provides intuitive action buttons: one to accept and one to reject.
The first button, with a checkmark icon, allows the tutor to accept the appointment by triggering the acceptAppointment method.
The second button, with a close icon, lets the tutor reject the request, calling the rejectAppointment method.
These buttons provide an intuitive way for the tutor to manage requests directly from the list of pending appointments.
Widget _buildRequestActions(int index) {
  return Row(
    mainAxisSize: MainAxisSize.min,
    children: [
      IconButton(
        icon: const Icon(Icons.check, color: Colors.green),
        onPressed: () => _acceptAppointment(index),
      ),
      IconButton(
        icon: const Icon(Icons.close, color: Colors.red),
        onPressed: () => _rejectAppointment(index),
      ),
    ],
  );
}
Handling pending requests
Managing accepted appointments
Once a tutor accepts an appointment request, the acceptAppointment method is invoked. This method creates a new Appointment object using the details from the received request, such as the startTime, which is then used to set the endTime (30 minutes later). The subject is set to indicate that the appointment is accepted, and the color is assigned a green hue to distinguish accepted appointments.
The newly created appointment is added to the appointments list, which represents the tutor’s calendar. At the same time, the accepted request is removed from the pendingRequests list, ensuring that the request is no longer visible in the tutor’s pending queue.
void _acceptAppointment(int index) {
  setState(() {
    var request = _pendingRequests[index];
    var acceptedAppointment = Appointment(
      startTime: request.startTime,
      endTime: request.startTime.add(const Duration(minutes: 30)),
      subject: '${request.studentName} - Accepted',
      color: Colors.green,
    );
    _appointments.add(acceptedAppointment);
    _pendingRequests.removeAt(index);
  });
}

Accepted appointment highlighted in green on calendar.
Managing accepted appointments
Finally, the buildRejectedRequests method creates a section at the bottom of the student calendar to display rejected appointment requests. This section provides students with a clear overview of which appointment requests have been rejected.
Widget _buildRejectedRequests() {
  return Expanded(
    child: ListView.builder(
      itemCount: _rejectedRequests.length,
      itemBuilder: (context, index) {
        var request = _rejectedRequests[index];
        return Card(
          elevation: 4,
          margin: const EdgeInsets.symmetric(vertical: 5, horizontal: 12),
          child: ListTile(
            leading: const Icon(Icons.cancel, color: Colors.red),
            title: Text(
              'Request from ${request.studentName} at: ${request.startTime}',
            ),
            subtitle: Text(
              'Reason: ${request.rejectionReason}',
              style: const TextStyle(color: Colors.red),
            ),
            trailing: const Text('Rejected'),
          ),
        );
      },
    ),
  );
}
When a tutor decides to reject an appointment request, the rejectAppointment method is triggered to update the system efficiently. This method prompts the tutor to enter a rejection reason via a dialog before finalizing the rejection.
The reason is stored in the rejectionReason property of the AppointmentRequest model, ensuring that students receive feedback on why their request was denied.
void _rejectAppointment(int index) {
  TextEditingController reasonController = TextEditingController();
  showDialog(
    context: context,
    builder: (context) => AlertDialog(
      title: const Text('Reject Appointment'),
      content: Column(
        mainAxisSize: MainAxisSize.min,
        children: [
          const Text(
              'Please enter the reason for rejecting this appointment:'),
          TextField(
            controller: reasonController,
            decoration: const InputDecoration(hintText: 'Enter reason here'),
          ),
        ],
      ),
      actions: [
        TextButton(
          onPressed: () {
            if (reasonController.text.isNotEmpty) {
              setState(() {
                var request = _pendingRequests[index];
                request.rejectionReason = reasonController.text;
                _rejectedRequests.add(request);
                _pendingRequests.removeAt(index);
              });
              Navigator.pop(context);
            }
          },
          child: const Text('Submit'),
        ),
      ],
    ),
  );
}

Handling rejected requests
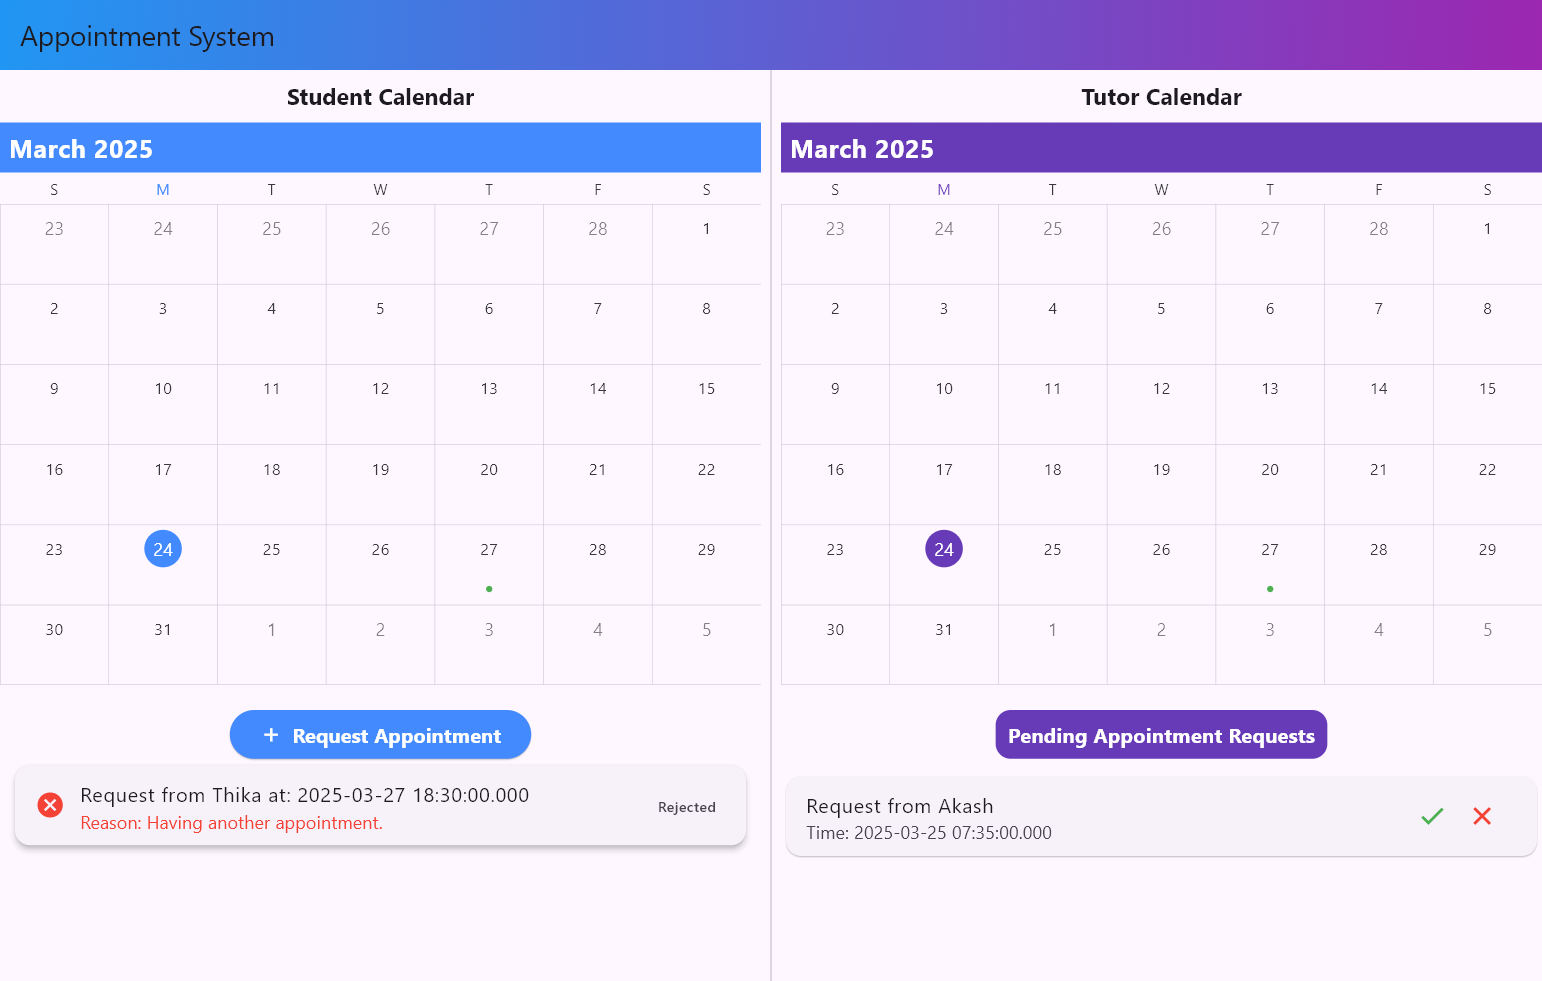
After executing these code examples, we will get the output that resembles the following image.

Student–Tutor Booking App with Flutter Calendar
GitHub reference
For more details, refer to Flutter Calendar GitHub demo.
Note: In web debug mode via VS Code’s Run and Debug button, date pickers and button taps may not work due to a known Flutter framework issue (160155). Running the app using flutter run -d chrome directly resolves this issue.
Conclusion
Thank you for reading! In this blog, we’ve explored how to create a student and tutor appointment system in Flutter Calendar.
Existing customers can download the new version of Essential Studio on the License and Downloads page. If you are not a Syncfusion customer, try our 30-day free trial to check out our incredible features.
You can also contact us through our support forums, support portal, or feedback portal. We are always happy to assist you!
Related Blogs
Subscribe to my newsletter
Read articles from syncfusion directly inside your inbox. Subscribe to the newsletter, and don't miss out.
Written by
syncfusion
syncfusion
Syncfusion provides third-party UI components for React, Vue, Angular, JavaScript, Blazor, .NET MAUI, ASP.NET MVC, Core, WinForms, WPF, UWP and Xamarin.