Introducing Testim: AI-Powered Test Automation
 NonStop io Technologies
Testim is the leading AI-powered test automation platform for custom web applications. It enables fast authoring of AI-stabilized UI and end-to-end tests, uniquely designed to help Agile teams efficiently manage and scale their automation projects. Testim allows testers and developers to create, manage, and execute automated tests for web applications across different browsers and platforms.
Setting Up Testim:
To set up Testim, you need to install the Testim Chrome Extension. This extension scans the entire DOM, extracts elements, and creates a score for their attributes. It is essential for gaining access to the DOM required for authoring new tests and recording new user flows within Testim. Additionally, with the extension, you can playback tests locally within the context of your browser.
Here’s how to install the Testim Extension:
1. Search for “Testim Chrome Extension” or “Testim Editor” in the Chrome Web Store.
2. Click on “Install” to add the extension to your Chrome browser.
3. Once the extension is installed, sign up for testim.io with a free account.
What is Test Status?
You can add a status to your tests to help manage which test needs to be worked on. The following statuses are used:
Draft: Tests being created or edited.
Evaluating: Tests under review for effectiveness.
Active: Tests ready for execution.
Quarantine: Tests are temporarily disabled due to issues or failures.
Testim runs based on the below parameters and conditions:
Groups:
Groups allow you to combine several steps into a reusable unit for better organization and efficiency.
Steps to Create a Group:
1. Select multiple steps in the test editor by holding the Ctrl (Windows) or Command (Mac) key while left-clicking or marking an area around the steps.
2. While the steps are selected, click on “Add Group” to create a group.
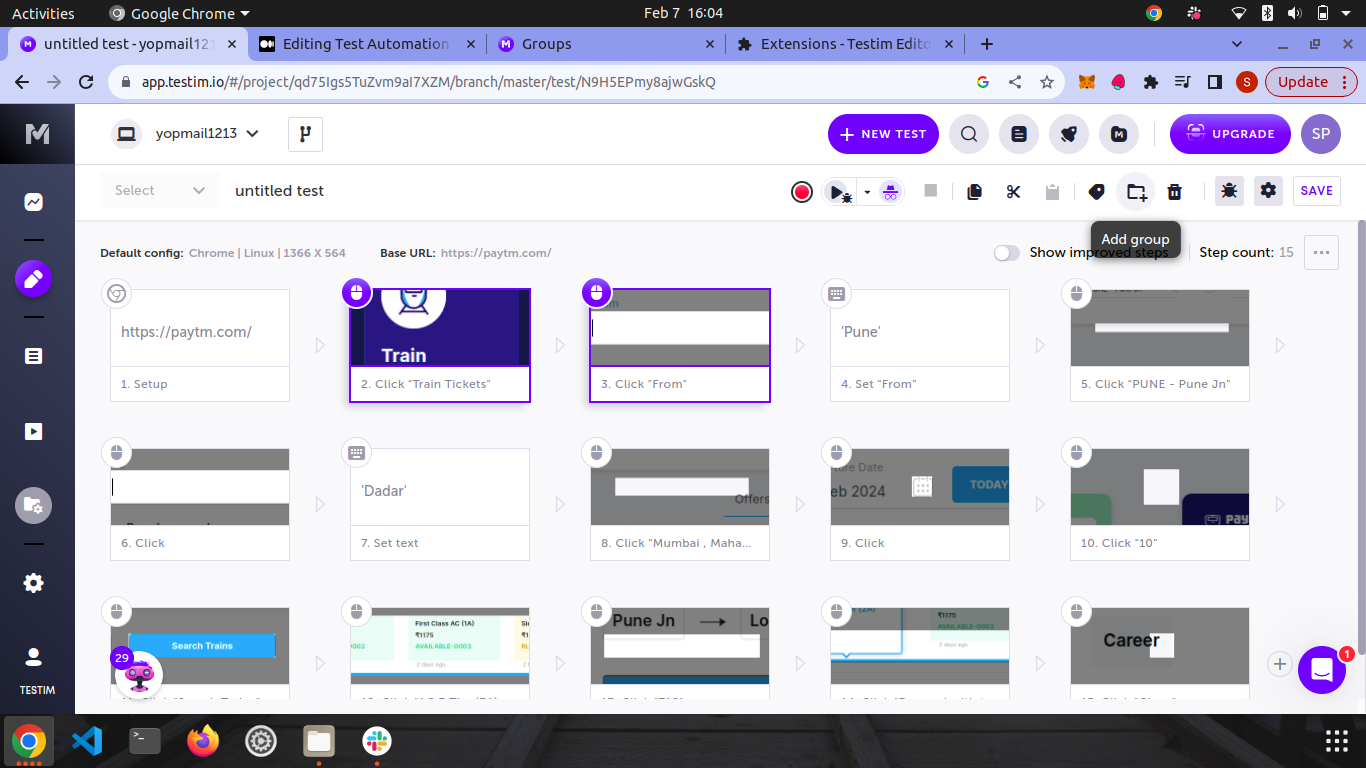
Benefits: Groups enhance test readability, maintainability, and reusability by encapsulating related steps together.
Conditions/Options:
Conditions determine when a step in your test should run or be skipped, providing control over test execution flow.
Steps to Apply a Condition:
1. Within the test editor, select the step to which you want to apply the condition.
2. Locate the “When to run” option for the selected step.
3. Specify the desired condition, such as element visibility, element text, custom condition, or never run.
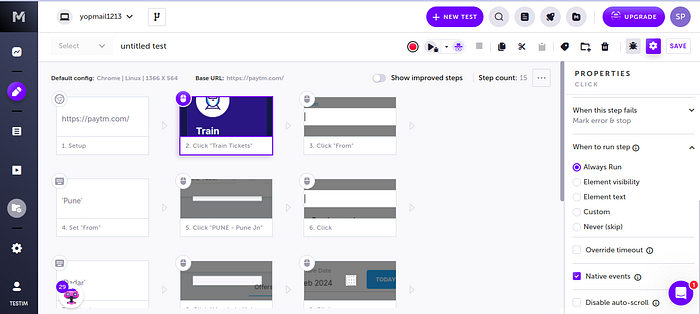
Benefits: Conditions enable dynamic test execution based on specific criteria, ensuring tests adapt to changes in the application under test
Base URL :
The base URL is the initial webpage or starting point of the website where the test begins.
Steps to Define Base URL:
1. Access the Setup Step of the test, which is typically the first step in the test sequence.
2. Within the Setup Step, specify the base URL of the website.
Importance: Setting the base URL ensures the test navigates to the correct starting point before executing subsequent steps.
Scheduler :
The scheduler allows you to automate test runs based on predefined schedules, enhancing efficiency and reliability.
Steps to Create a Test Run Schedule:
1. Navigate to “Runs” -> “Scheduled Runs” within the Testim platform.
2. Click on “New scheduler” or “Let’s Schedule” if it’s your first scheduled run.
3. Configure the schedule settings, including frequency, timing, and recurrence options.
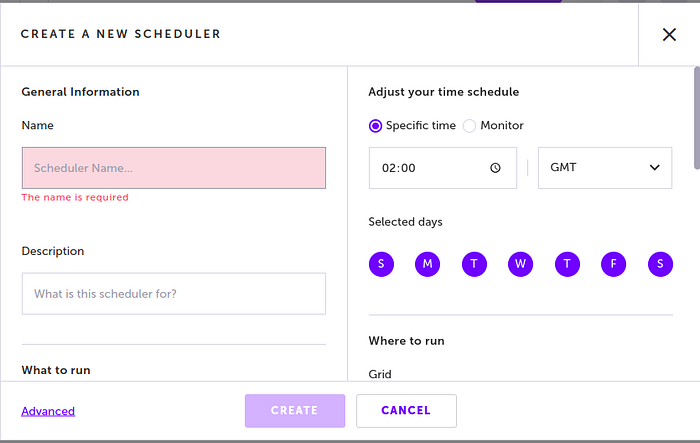
Benefits: Scheduled runs streamline testing processes, ensuring consistent validation of application functionality and performance.
Run Multiple Test Cases:
Steps to Run Multiple Test Cases:
1. Access the Test List in Testim.
2. Select the desired test cases by clicking on each test case while holding down the Ctrl (Windows) or Command (Mac) key.
3. Once the desired test cases are selected, click on the “Play” button to execute them together.
Advantages: Running multiple test cases simultaneously saves time and facilitates comprehensive testing coverage.
Run Tests in Incognito Mode:
Steps to Run Tests in Incognito Mode:
1. Navigate to the Test List -> Tests within the Testim platform.
2. Open the test you want to run in incognito mode.
3. Click on the Options arrow next to the Run button.
4. Select “Run in Incognito mode” from the dropdown menu.
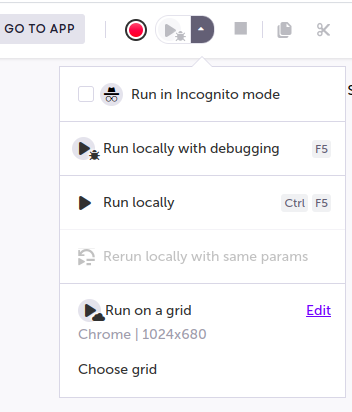
Purpose: Running tests in incognito mode simulates a clean browsing environment, ensuring test reliability and reproducibility.
Stop, Pause & Debug Tests:
Steps to Stop a Test: Click the Stop button on the action menu during test execution.
Steps to Pause a Test: Click on the “Pause” button in the action menu.
Steps to Resume a Test: Click the Play button in the action menu to resume test execution from the paused state.
Breakpoint in a test: Breakpoints will automatically pause the test at a specific step (before it runs).
Steps to insert breakpoint: Hover on an arrow between two steps and click the Toggle Breakpoint button.
Purpose: These options control test execution, allowing you to troubleshoot and manage tests effectively.
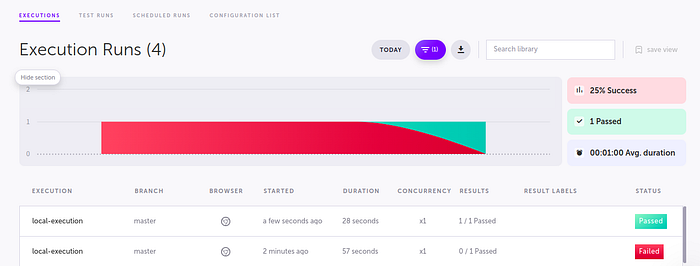
Execution Runs:
The execution graph provides an overview of the number of executions passed and failed, while the list displays information about individual execution runs, including the following fields:
Execution: Indicates the specific execution run being displayed.
Branch: Denotes the branch or version of the test suite being executed.
Browser: Specifies the web browser used for the execution run.
Started: Displays the timestamp indicating when the execution run started.
Duration: Shows the duration of the execution run.
Concurrency: Indicates the level of concurrency or parallelism used during the execution run.
Results: Provides a summary of the test results for the execution run.
Result Labels: Displays any custom labels or tags associated with the test results.
Status: Indicates the overall status or outcome of the execution run.
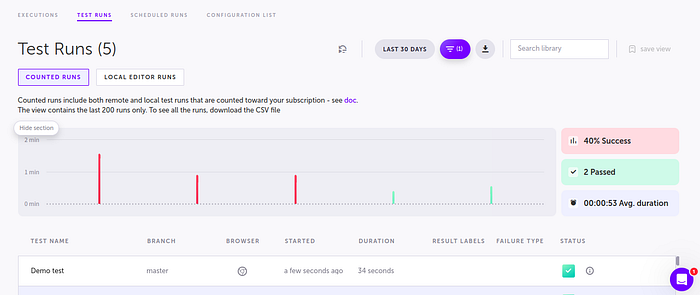
Test Runs
The “Test Runs” screen allows you to view statistics on past runs executed by the CLI, CI, or Scheduled Runs. It displays aggregated statistics such as the success percentage, the total number of tests run, the number of tests that passed, and the average duration of the runs.
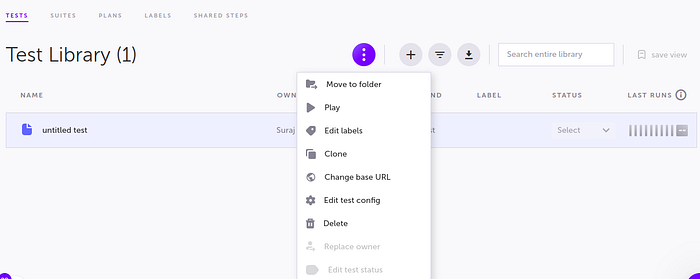
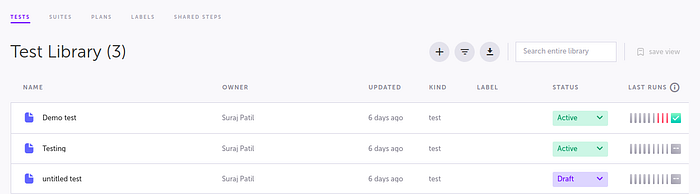
Test Library
The Test Library screen is where you organize your tests into folders. Here, you’ll see a list of all folders and tests in your project, and you can perform different actions on each test.
Reports :
The Reports tab in the Insights section provides detailed information about your project’s quality over a chosen time frame. It includes data on successful and failed test runs, team activity, and which tests have failed the most.
Project Setting :
Project Settings consist of General Settings and Pull Request Settings. In General Settings, you can edit your project name and set the default base URL. Pull Request Settings include options like:
Protect Master from changes: Prevents direct writing to the master branch, making it read-only.
Require approving reviewer: Specifies who can review your pull requests when enabled.

These parameters and conditions allow users to customize and control how tests are executed in Testim, ensuring flexibility and adaptability to various testing scenarios.
Subscribe to my newsletter
Read articles from NonStop io Technologies directly inside your inbox. Subscribe to the newsletter, and don't miss out.
Written by
NonStop io Technologies
NonStop io Technologies
Product Development as an Expertise Since 2015 Founded in August 2015, we are a USA-based Bespoke Engineering Studio providing Product Development as an Expertise. With 80+ satisfied clients worldwide, we serve startups and enterprises across San Francisco, Seattle, New York, London, Pune, Bangalore, Tokyo and other prominent technology hubs.