The Repository Pattern
 Muyiwa Olayinka
Motivation
In my early days of building backends, I didn’t really see the harm in tightly coupling my service layer to the database. After all, I knew my choice of database and ORM and if I was going to use one it would never change — until it did. I tried migrating a simple API to Drizzle ORM . The amount of changes involved: refactoring queries, debugging type mismatch, wasting hours on what should have been a Trivial swap.
Now imagine this in production: A monolithic API with hundreds of endpoints, suddenly needing to support a second database or ditch its ORM for raw SQL. Refactoring would be a nightmare. That’s when i discovered about the Repository Pattern — a design principle that decouples your business logic from data access, making such changes trivial. After seeing how this changed my approach to backend design, I knew I had to share this with every developer facing the same struggles.
Introduction to the Repository pattern
The Repository Pattern — popularized by Eric Evans in Domain-Driven Design — solves a universal backend problem: business logic cluttered with database calls. Instead of scattering SQL, ORM queries, or API logic across your codebase, Repositories act as a ‘single source of truth’ for data access.
Think of them like a library catalog: Your app simply asks for data (e.g., getUserByEmail), and the Repository handles the how—whether it’s querying PostgreSQL, fetching from Redis, or calling an external API. This abstraction not only cleans up your code but also makes it trivial to swap databases or ORMs later.
While Evans envisioned Repositories as part of DDD, their utility extends to any application where you want to decouple ‘what your app does’ from ‘where its data lives’.
Core Concepts of the Repository pattern
Before we delve into the Repository pattern, let’s clarify some fundamental ideas behind the Repository Pattern.
What is a Repository?
Think of a Repository as the gatekeeper or dedicated assistant for your application’s data. Its main job is to stand between your business logic and the messy details of how data is stored and retrieved. It does this by:
Acting like a Collection: It presents data as if it were a simple list or collection of objects (e.g.,
users.findById('...')ororders.save(order)), hiding the underlying complexity of database queries or API calls.Hiding Complexity & Ensuring Separation of Concerns: Just like a TV remote lets you change channels without seeing the internal wiring, the Repository hides database specifics (SQL, ORM syntax, connection details, caching logic) from your core business rules, thus enforcing a critical Separation of Concerns.
Enabling Persistence Ignorance: Your core application objects (like our
Userentity) don’t need to know how or where they are stored. The Repository handles all the saving, fetching, and deleting, allowing your domain objects to focus purely on their data and behaviors.
How do we actually build one?
At a high level, implementing the pattern involves:
Define an interface (e.g.,
IUserRepositorywith methods likefindByEmail).This is the contract your business logic will depend on.Implement it: Write one or more concrete classes (e.g.,
TypeORMUserRepository,DrizzleORMUserRepository) that provide the actual logic to perform those operations using a specific database technology.Provide the concrete Repository instance to your services or other business logic classes through Dependency Injection.
Why is it so powerful?
Unmatched Flexibility: Need to swap from MySQL to PostgreSQL, or change ORMs? No panic! Since your service only depends on the interface, you just create a new implementation of the IUserRepository for the new technology and inject that instead. Your core business logic remains untouched!
Effortless Testability: Want to test your service logic without hitting a real database? Easy! Create a “mock” object that implements the
IUserRepositoryinterface and feed it predictable data. This makes unit tests fast and reliable. For integration tests, it simplifies using test-specific databases.Centralized Data Access Logic: Any logic related to data retrieval or saving (like specific query patterns, caching strategies, or soft deletes) lives within the Repository. This centralizes concerns, making changes and maintenance much simpler than scattering data logic across your service layer.
Below is a diagrammatic representation of how the repository pattern works in a Typescript Node.js Backend application.

Router: HTTP endpoint manager
Controller: Traffic director. Responsible for parsing requests, delegates logic to service
Service: Business logic Hub. Responsible for handling the business logic
Repository: Data access abstraction. Responsible for communication with the database.
MySQL: Persistent data storage. Responsible for storing of data.
MongoDB: Another persistent data storage. Responsible for storing of data also.
Redis: An In-Memory database for caching of data.
Implementing the Repository Pattern with Typescript
Firstly, we’re setting up a simple user management API to perform CRUD operations on users. You can find the full code here.
To see the power of repository patterns come alive, I have three different setups:
The awesome takeaway? It literally doesn’t matter which database or ORM you fancy! our business logic will remain blissfully unaware of these nitty-gritty details, all thanks to the Repository Pattern.
Let’s take a look at the folder structure for a TypeORM + MySQL Repository Pattern implementation.
src
|--entity           /* Our data models (like the User!) */
|--migrations       /* Database schema changes (TypeORM specific here)
|--repos            /* Where the Repository pattern lives! 🏠*/
|--user             /* User-related service logic*/
|--data-soursce.ts  /* TypeORM connection setup */
|--main.ts          /* Our application's entry point */
.env
.gitignore
package.json
tsconfig.json
Since this is a beginner-friendly blog, I would like to take you through the development process as well.
Database setup
server setup
Repository Pattern setup
Database Setup
Before we dive into the code, let’s get your MySQL database ready! Whether you’re a command-line warrior or prefer the comfort of a GUI (MySQL Workbench), these steps will have your database up and running in no time.
Why Create a Dedicated User?
Good question! While it’s tempting to use the default root user, creating a separate database user for your application:
Boosts security (no accidental "oops-I-deleted-everything" moments)
Makes credential management easier
Follows production-grade best practices
Pro Tip: Since we’re using the classic mysql package (not mysql2), we'll stick to traditional authentication. But don't worry—it's just as powerful!
Choose Your Adventure:
Terminal Titans: Follow the CLI steps below (my personal favorite — it’s like being a database wizard 🧙♂️).
GUI Enthusiasts: Jump to MySQL Workbench — I’ve included notes for you too!
Ready? Let’s get your database humming!
mysql --version /* Check if MySQL is installed */
mysql  Ver 8.0.41-0ubuntu0.24.04.1 for Linux on x86_64 ((Ubuntu))

sudo mysql /* Login with sudo privileges */

SELECT USER() /* see the current user */

CREATE DATABASE userz /* Create a Database named users */

SHOW DATABASES; /* list all database */

CREATE USER 'users'@'localhost' IDENTIFIED BY 'pa55word'; /* create a new user called "user" with a password */

GRANT ALL PRIVILEGES ON userz.* TO 'users'@'localhost'; /* grant user with all privileges on the database userz */

FLUSH PRIVILEGES /* Reloads permissions */

exit /* leave MySQL session */

mysql -u users -p /* enter mysql session with username user */

USE userz; /* select the userz database */

SELECT DATABASE() /* Check if the userz database has been selected from the previous command*/

SHOW TABLES /* Should be empty now, but shows tables later */

sudo mysql

ALTER USER 'rep_pat'@'localhost' IDENTIFIED WITH mysql_native_password BY 'pa55word';  /* Authenticate using mysql native password */

FLUSH PRIVILEGES;  /* Reloads permissions */
Using GUI
Open MySQL workbench → Connect to localhost as root
Navigate to “Users and Privileges” → Add a new user.
Under “Schema Privileges”, grant access to userz.
Server setup
- Project Initialization
mkdir repository-pattern-example; cd repository-pattern-example
- Creates a new project folder and navigates into it.
git init
- Initializes the project with Git repository for version control
gh repo create repository-pattern --public --source=. --remote=upstream --description=" a code example of the repository pattern"
- Creates a public GitHub repository(requires GitHub CLI to be installed on your computer) and links it to your local project
git remote origin add <your-github-repo-url>
- Connects your local repo to GitHub
git branch -M main
- Renames the default branch from Master to Main (modern Git convention)
- Folder Structure
mdkir src/entity src/migrations src/user src/repos
- Creates a structured directory layout:
— entity: Database model (e.g., User.ts)
— migrations: Database schema change scripts
— user: Feature-specific code (controllers, services, routes)
— repos: Repository implementations
cd src; touch entity/User.ts user/user.controller.ts user/user.service.ts user/user.routes.ts
- Creates empty TypeScript files for:
— User.ts: your database entity/model
— user.controller.ts: HTTP request handler
— user.service.ts: Business logic
— user.routes.ts: API endpoints
touch repos/user.repository.ts data-source.ts main.ts
- Adds critical files:
— user.repository.ts: Repository pattern implementation
— data-source.ts: Database connection setup
— main.ts: App entry point
cd ..; touch .env .gitignore
- Creates configuration files:
— .env: Stores environment variables (database credentials, etc.)
— .gitignore: Specifies files to exclude from Git(e.g, node_modules, pnpm-lock.yaml, *logs)
3. Dependency Installation
pnpm init
- Generates a package.json file to track dependencies (alternative to npm init/ yarn init).
tsc --init
- Creates a tsconfig.json file with default TypeScript compiler settings.
pnpm install express typescript dotenv bcryptjs ts-node typeorm reflect-metadata mysql
- Installs production dependencies:
— express: Web framework
— typeorm: ORM for database interactions
— mysql: MySQL driver
— bcryptjs: Password hashing package
— dotenv: loads .env variables
— reflect-metadata: Enables TypeORM decorators
pnpm install -D @types/express @types/node nodemon
- Installs development dependencies:
— Type definitions (@types/) for Node.js and Express
— nodemon: Auto-restarts server during development
We need to add some scripts to the package.json file to make running scripts easier.
"scripts": {
   "dev": "nodemon --watch src --exec ts-node src/main.ts",
    "migration:create": "ts-node ./node_modules/typeorm/cli.js migration:create src/migrations/seedUsers",
    "migration:generate": "ts-node ./node_modules/typeorm/cli.js migration:generate src/migrations/InitialSchema -d src/data-source.ts",
    "migration:run": "ts-node ./node_modules/typeorm/cli.js migration:run -d src/data-source.ts",
    "migration:revert": "ts-node ./node_modules/typeorm/cli.js migration:revert -d src/data-source.ts",
    "migration:show": "ts-node ./node_modules/typeorm/cli.js migration:show -d src/data-source.ts"
}
Key Scripts:
dev:
— Runs the server in development mode with nodemon(auto-restarts on file changes).
— Uses ts-node to execute TypeScript files directly (no manual compilation needed).Migration Commands (TypeORM-specific):
— migration:create: Generates an empty migration file for custom SQL.
— migration:generate: Auto-generates migrations based on entity changes
— migration:run: Applies pending migrations to the database
— migration:revert: Rolls back the most recent migration.
— migration:show: Lists all migrations and their status.
PORT=5000
DB_HOST=localhost
DB_PORT=3306
DB_USERNAME=user
DB_PASSWORD=pa55word
DB_NAME=userz
in our .env file, we need to add some environmental variables. What each variable does:
PORT: The port your Express server listens on (e.g., http://localhost:5000).
DB_*: MySQL connection details (matches these to your database setup)
{
  "compilerOptions": {
    "target": "es2016",
    "experimentalDecorators": true,
    "emitDecoratorMetadata": true,
    "module": "commonjs",
    "esModuleInterop": true,
    "forceConsistentCasingInFileNames": true,
    "strict": true,
    "skipLibCheck": true
  }
}
We also need to make some changes to tsconfig.json. Critical settings:
expermientalDecorators + emitDecoratorMetadata
— Required for TypeORM to use decorators like @Entity, @Column.esModuleInterop
— Allows mixing CommonJS(require) and ES Modules(import).strict:
— Enforces TypeScript’s strictest checks (catches bugs early).
Here is the main entry to our application.
src/main.ts

// Load environment variables from .env file
import * as dotenv from 'dotenv';
dotenv.config();

// Import core dependencies
import express, { Application, Request, Response } from 'express';
import { AppDataSource } from './data-source';
import userRouter from './user/user.routes';

// Initialize Express application
const app: Application = express();

// Set server port - falls back to 5000 if PORT isn't in .env
const PORT: number = +process.env.PORT! || 5000;

// Middleware to parse JSON request bodies
app.use(express.json());

// Mount user routes under /api/v1/users prefix
app.use('/api/v1/users', userRouter);

// Health check endpoint - useful for monitoring and deployments
app.get('/api/v1/healthcheck', (req: Request, res: Response) => {
  res.send({ status: 'Server is healthy' });
});

/**
 * Database Initialization & Server Startup
 *
 * 1. First establishes connection to database using TypeORM
 * 2. Only starts Express server if database connection succeeds
 * 3. Handles connection errors gracefully
 */
AppDataSource.initialize()
  .then(() => {
    console.log('Database connected successfully');

    app.listen(PORT, () => {
      console.log(`Server running on http://localhost:${PORT}`);
      console.log(`API endpoints available at http://localhost:${PORT}/api/v1`);
    });
  })
  .catch((error) => {
    // If database connection fails, log error and exit process
    console.error('Database connection failed', error);
    process.exit(1); // Exit with error code
  });

/**
 * Graceful Shutdown Handler
 *
 * When the process receives SIGTERM (like during deployment restarts):
 * 1. Closes database connections cleanly
 * 2. Exits the Node.js process
 *
 * Prevents database connection leaks and ensures data integrity
 */
process.on('SIGTERM', () => {
  console.log('SIGTERM received - shutting down gracefully...');
  AppDataSource.destroy().then(() => {
    console.log('Database connection closed');
    process.exit(0); // Exit with success code
  });
});
Here is the data source which is where the connection setup to our database is defined.
src/data-source.ts

// Load environment variables from .env file
import * as dotenv from 'dotenv';
dotenv.config();

// Import TypeORM dependencies
import { DataSource } from 'typeorm';
// Import entity classes
import { User } from './entity/User';

/**
 * TypeORM Data Source Configuration
 *
 * This is the central database connection setup that will be used throughout the application.
 * It's exported so other parts of the app (like repositories and migrations) can use it.
 */
export const AppDataSource = new DataSource({
  // Database type (mysql, postgres, etc.)
  type: 'mysql',

  // Connection parameters (fallback to defaults if .env missing)
  host: process.env.DB_HOST || 'localhost',          // Database server address
  port: parseInt(process.env.DB_PORT || '3306'),     // Convert port string to number
  username: process.env.DB_USERNAME || 'root',       // Database username
  password: process.env.DB_PASSWORD || '',           // Database password
  database: process.env.DB_NAME || 'your_database',  // Database name

  /**
   * Development vs Production Settings
   */
  synchronize: true, // AUTO-CREATES TABLES ON STARTUP (DANGER in production!)
                    // Set to false in production and use migrations instead
  logging: false,   // Disables query logging (set to true for debugging)

  /**
   * Application Entities and Migrations
   */
  entities: [User], // List all database entities here
  subscribers: [],  // Event subscribers (empty for most applications)

  // Migration configuration
  migrations: [__dirname + '/migrations/*.ts'], // Location of migration files
});
This entity is very important as this is how our table is going to be generated via migration process.
src/entity/User.ts

// Import TypeORM decorators for entity definition
import { Entity, PrimaryGeneratedColumn, Column} from 'typeorm';

/**
 * User Entity Class
 *
 * Represents a user in the database and contains business logic for user operations.
 * TypeORM will automatically create a corresponding 'user' table based on this class.
 */
@Entity() // Marks this class as a TypeORM entity
export class User {
  // Unique identifier using UUID (better than auto-increment IDs for distributed systems)
  @PrimaryGeneratedColumn('uuid')
  id!: string;

  // User's full name
  @Column()
  name!: string;

  // Unique email address (enforced at database level)
  @Column({ unique: true })
  email!: string;

  // Hashed password (never store plain text passwords!)
  @Column()
  password!: string;

  // Automatic timestamp when record is created
  @Column({ type: 'timestamp', default: () => 'CURRENT_TIMESTAMP' })
  createdAt!: Date;

  // Automatic timestamp when record is updated
  @Column({ type: 'timestamp', default: () => 'CURRENT_TIMESTAMP', onUpdate: 'CURRENT_TIMESTAMP' })
  updatedAt!: Date;

}

/* ------------------------- */
/*         DTOs              */
/* (Data Transfer Objects)   */
/* ------------------------- */

/**
 * CreateUserDto - Used for user creation requests
 * Ensures required fields are present when creating a user
 */
export interface CreateUserDto {
  name: string;
  email: string;
  password: string;
}

/**
 * UpdateUserDto - Used for user updates
 * All fields are optional (partial updates)
 */
export interface UpdateUserDto {
  name?: string;
  email?: string;
  password?: string;
}
Now you can create the table user since you have created the entity for the user. To do this, run the migration script in you package.json.
pnpm run migration:generate

pnpm run migration:run
Upon a successful migration, you can now check your MySQL session and you should see the table by running this command.
DESCRIBE userz;
Now let’s focus on the business logic for the application.
src/user/user.service.ts

// Import DTOs and Entity from our domain model
import { CreateUserDto, UpdateUserDto, User } from '../entity/User';
// Import repository interface for dependency injection
import { IUserRepository } from '../repos/user.repository';
// Imports the package for password hashing and comparison.
import * as bcrypt from 'bcryptjs';

/**
 * User Service Class
 *
 * Contains core business logic for user operations.
 * Delegates data persistence to the injected repository.
 */
export class UserService {
  /**
   * Constructor with Dependency Injection
   * @param userRepository - The repository handling data persistence
   */
  constructor(private userRepository: IUserRepository) {}

  /**
   * Creates a new user with validation
   * @param userData - User creation data
   * @throws Error if validation fails or email exists
   * @returns The created user
   */
  async create(userData: CreateUserDto): Promise<User> {
    // Validate email format
    if (!this.validateEmail(userData.email)) {
      throw new Error("Invalid email format");
    }

    // Validate password length
    if (userData.password.length < 8) {
      throw new Error("Password must be at least 8 characters long");
    }

    // Check for existing user by email
    const existingUser = await this.userRepository.findByEmail(userData.email);
    if (existingUser) {
      throw new Error('User with this email already exists');
    }

    // Hash password before storage
    const hashedPassword = await bcrypt.hash(userData.password, 10);

    // Create user entity
    const user = new User();
    user.name = userData.name;
    user.email = userData.email;
    user.password = hashedPassword;

    // Persist the new user via repository
    return this.userRepository.create(user);
  }

  /**
   * Retrieves all users
   * @returns Array of all users
   */
  async findAll(): Promise<User[]> {
    return this.userRepository.findAll();
  }

  /**
   * Finds a user by ID
   * @param id - User ID
   * @throws Error if user not found
   * @returns The requested user
   */
  async findById(id: string): Promise<User> {
    const user = await this.userRepository.findById(id);
    if (!user) {
      throw new Error('User not found');
    }
    return user;
  }

  /**
   * Updates a user's information
   * @param id - User ID to update
   * @param userData - Partial update data
   * @returns The updated user or null if not found
   */
  async update(id: string, userData: UpdateUserDto): Promise<User | null> {
    return this.userRepository.update(id, userData);
  }

  /**
   * Deletes a user
   * @param id - User ID to delete
   */
  async delete(id: string): Promise<void> {
    await this.userRepository.delete(id);
  }

  /**
   * Validates user credentials
   * @param email - User's email
   * @param password - User's password
   * @returns User if valid, null otherwise
   */
  async validateUser(email: string, password: string): Promise<User | null> {
    const user = await this.userRepository.findByEmail(email);
    if (!user) return null;

    const isValid = await bcrypt.compare(password, user.password);
    return isValid ? user : null;
  }

  /**
   * Validates email format
   * @param email - Email to validate
   * @returns true if valid, false otherwise
   * @private
   */
  private validateEmail(email: string): boolean {
    return /^[^\s@]+@[^\s@]+\.[^\s@]+$/.test(email);
  }
}
Next is our controller file where we parse the body of the request and also send the necessary HTTP code to the client.
src/controller/user.controller.ts

import { Request, Response } from 'express';
import { CreateUserDto, UpdateUserDto } from '../entity/User';
import { UserService } from './user.service';

/**
 * User Controller Class
 *
 * Handles HTTP requests and responses for user operations.
 * Acts as the bridge between routes and business logic (service layer).
 */
export class UserController {

  /**
   * Constructor with Dependency Injection
   * @param userService - Injected service containing business logic
   *
   * Note: We explicitly bind methods to maintain 'this' context
   * when used as Express route handlers
   */
  constructor(private userService: UserService) {
    this.create = this.create.bind(this);
    this.findAll = this.findAll.bind(this);
    this.findById = this.findById.bind(this);
    this.update = this.update.bind(this);
    this.delete = this.delete.bind(this);
  }

  /**
   * Create User Endpoint
   * POST /users
   */
  async create(req: Request, res: Response) {
    try {
      // 1. Parse incoming DTO from request body
      // 2. Delegate to service layer
      // 3. Return created user with 201 status
      const user = await this.userService.create(req.body as CreateUserDto);
      res.status(201).json(user);
    } catch (error: any) {
      // Handle specific error cases as needed
      res.status(400).json({ error: error.message });
    }
  }

  /**
   * Get All Users Endpoint
   * GET /users
   */
  async findAll(req: Request, res: Response) {
    try {
      const users = await this.userService.findAll();
      res.json(users);
    } catch (error: any) {
      // Server error (database connection, etc.)
      res.status(500).json({ error: error.message });
    }
  }

  /**
   * Get User by ID Endpoint
   * GET /users/:id
   */
  async findById(req: Request, res: Response) {
    try {
      const user = await this.userService.findById(req.params.id);
      res.json(user);
    } catch (error: any) {
      // Not found error
      res.status(404).json({ error: error.message });
    }
  }

  /**
   * Update User Endpoint
   * PUT /users/:id
   */
  async update(req: Request, res: Response) {
    try {
      const user = await this.userService.update(
        req.params.id,
        req.body as UpdateUserDto
      );
      res.json(user);
    } catch (error: any) {
      // Bad request (validation errors, etc.)
      res.status(400).json({ error: error.message });
    }
  }

  /**
   * Delete User Endpoint
   * DELETE /users/:id
   */
  async delete(req: Request, res: Response) {
    try {
      await this.userService.delete(req.params.id);
      // Successful deletion returns no content
      res.status(204).send();
    } catch (error: any) {
      res.status(400).json({ error: error.message });
    }
  }
}
Up next is the user routes file where endpoints are defined and the controller is called.
src/routes/user.routes.ts

import express from 'express';
import { UserRepository } from '../repos/user.repository';
import { UserController } from './user.controller';
import { UserService } from './user.service';

// Create a new Express router instance for user-related routes
const userRouter = express.Router();

// Instantiate the UserRepository
// This is responsible for interacting with the database or data source
const userRepository = new UserRepository();

// Instantiate the UserService and inject the UserRepository
// The service uses the repository to perform business operations
const userService = new UserService(userRepository);

// Instantiate the UserController and inject the UserService
// The controller handles incoming HTTP requests and delegates to the service
const userController = new UserController(userService);

// Define route for creating a new user (POST /users)
userRouter.post('/', userController.create);

// Define route for retrieving all users (GET /users)
userRouter.get('/', userController.findAll);

// Define route for retrieving a user by ID (GET /users/:id)
userRouter.get('/:id', userController.findById);

// Define route for updating a user by ID (PUT /users/:id)
userRouter.put('/:id', userController.update);

// Define route for deleting a user by ID (DELETE /users/:id)
userRouter.delete('/:id', userController.delete);

// Export the configured router to be used in the main app
export default userRouter;
The Repository Pattern Setup
src/repos/user.repository.ts

// Import necessary modules and classes
import { Repository } from 'typeorm'; // TypeORM's Repository class for database operations
import { AppDataSource } from '../data-source'; // Database connection setup
import { CreateUserDto, UpdateUserDto, User } from '../entity/User'; // User entity and DTOs

// Interface defining the contract for UserRepository
// This ensures all required methods are implemented and helps with type safety
export interface IUserRepository {
  create(userData: CreateUserDto): Promise<User>; // Create a new user
  update(id: string, userData: UpdateUserDto): Promise<User>; // Update existing user
  findAll(): Promise<User[]>; // Get all users
  findById(id: string): Promise<User | null>; // Find user by ID
  findByEmail(email: string): Promise<User | null>; // Find user by email (useful for authentication)
  delete(id: string): Promise<void>; // Delete a user
}

// Concrete implementation of the UserRepository
export class UserRepository implements IUserRepository {
  private ormRepository: Repository<User>; // TypeORM repository instance for User entity

  constructor() {
    // Initialize the TypeORM repository using the AppDataSource (database connection)
    this.ormRepository = AppDataSource.getRepository(User);
  }

  /**
   * Creates a new user in the database
   * @param userData Data for creating a new user (CreateUserDto)
   * @returns Promise that resolves to the created User entity
   */
  async create(userData: CreateUserDto): Promise<User> {
    // First create a User instance with the given data
    const user = this.ormRepository.create(userData);
    // Then save it to the database
    return this.ormRepository.save(user);
  }

  /**
   * Updates an existing user
   * @param id ID of the user to update
   * @param userData Data to update (UpdateUserDto)
   * @returns Promise that resolves to the updated User entity
   * @throws Error if user is not found after update
   */
  async update(id: string, userData: UpdateUserDto): Promise<User> {
    // First perform the update operation
    await this.ormRepository.update(id, userData);
    // Then fetch the updated user
    const updatedUser = await this.findById(id);
    // Throw error if user not found (shouldn't happen if update succeeded)
    if (!updatedUser) throw new Error('User not found after update');
    return updatedUser;
  }

  /**
   * Retrieves all users from the database
   * @returns Promise that resolves to an array of User entities
   */
  async findAll(): Promise<User[]> {
    // Simple find operation without any conditions returns all records
    return this.ormRepository.find();
  }

  /**
   * Finds a user by their ID
   * @param id User ID to search for
   * @returns Promise that resolves to User entity or null if not found
   */
  async findById(id: string): Promise<User | null> {
    // findOneBy searches by the given criteria (in this case, ID)
    return this.ormRepository.findOneBy({ id });
  }

  /**
   * Finds a user by their email address
   * @param email Email address to search for
   * @returns Promise that resolves to User entity or null if not found
   */
  async findByEmail(email: string): Promise<User | null> {
    // Useful for authentication (checking if email exists)
    return this.ormRepository.findOneBy({ email });
  }

  /**
   * Deletes a user from the database
   * @param id ID of the user to delete
   * @returns Promise that resolves when deletion is complete
   */
  async delete(id: string): Promise<void> {
    // Simple delete operation by ID
    await this.ormRepository.delete(id);
  }
}
Lastly, we start the server
pnpm run dev
P.S I have implemented other scenarios of the application using Drizzle + Postgress and Mongoose + MongoDB in the GithHub repository, please check the branches to see the different implementations.
Testing Repositories in Typescript
Firstly we will be installing the necessary testing packages
pnpm install -D jest @types/jest ts-jest supertest @types/supertest
Now let's create some test files
touch src/repos/user.repository.test.ts src/user/user.service.test.ts test-data-source.ts
After creating those required files, we have to also make some changes to user.respository.ts file to make sure that when we are testing, the test-data-source is used instead of the data-source
src/repos/user.repository.ts

  constructor() {
    const dataSource =
      process.env.NODE_ENV === 'test' ? TestDataSource : AppDataSource;
    this.ormRepository = dataSource.getRepository(User);
  }
Ready to make sure everything works? Testing is crucial! For this guide, we’ll dive into the two heavy hitters of backend testing: Unit tests and Integration tests. They’re the gold standard for building reliable applications.
We’ll start with Unit tests. The idea here is to test individual pieces of our code in isolation. Since our UserService talks to the UserRepository, hitting a real database every time we test the service would be slow and cost resources.
So, for unit tests, we’ll mock the user repository. Think of it as creating a stand-in, a “fake” repository that we control completely. This lets us test our service’s logic lightning-fast, without ever touching the actual database. We’re testing the service’s behavior, assuming the repository does its job correctly (we’ll check that assumption later!).
src/user/user.service.test.ts

/ Import necessary modules and classes
import { User } from '../entity/User'; // User entity
import { IUserRepository } from '../repos/user.repository'; // User repository interface
import { UserService } from './user.service'; // The service we're testing

// Define valid user data that will be used in multiple tests
const validUserData = {
  name: 'Test User',
  email: 'test@example.com',
  password: 'securePassword123!', // Note: This should meet your password requirements
};

// Create a mock repository using Jest's mocking capabilities
// This implements the IUserRepository interface with mock functions
const mockRepo: jest.Mocked<IUserRepository> = {
  findByEmail: jest.fn(), // Mock function for email lookup
  create: jest.fn(),      // Mock function for user creation
  findAll: jest.fn(),     // Mock function for getting all users
  findById: jest.fn(),    // Mock function for finding by ID
  update: jest.fn(),      // Mock function for updates
  delete: jest.fn(),      // Mock function for deletions
};

// Describe block for the UserService test suite
describe('UserService', () => {
  let service: UserService; // This will hold our service instance

  // beforeEach runs before each test case
  beforeEach(() => {
    jest.clearAllMocks(); // Clear all mock calls and instances
    service = new UserService(mockRepo as any); // Create new service with mock repo
  });

  // Nested describe block for testing the create() method
  describe('create()', () => {
    // Test case: Should reject duplicate emails
    it('should reject duplicate emails', async () => {
      // Arrange (setup test conditions)
      // Mock the repository to return a user (simulating existing user)
      mockRepo.findByEmail.mockResolvedValue(new User());

      // Act & Assert
      // Expect the service to throw an error when email exists
      await expect(service.create(validUserData)).rejects.toThrow(
        'User with this email already exists'
      );

      // Verify the mock was called with the correct email
      expect(mockRepo.findByEmail).toHaveBeenCalledWith(validUserData.email);
    });

    // Test case: Should create new users with valid data
    it('should create new users with valid data', async () => {
      // Arrange
      // Create a mock user object with expected properties
      const mockUser = new User();
      Object.assign(mockUser, {
        id: '123', // Simulated user ID
        ...validUserData, // Spread the valid user data
        createdAt: new Date(), // Simulated timestamps
        updatedAt: new Date(),
      });
      // Mock the password comparison method
      mockUser.comparePassword = jest.fn();

      // Setup mock repository responses
      mockRepo.findByEmail.mockResolvedValue(null); // No existing user
      mockRepo.create.mockResolvedValue(mockUser); // Return our mock user

      // Act
      const result = await service.create(validUserData);

      // Assert
      expect(result).toEqual(mockUser); // Should return the mock user
      expect(mockRepo.create).toHaveBeenCalled(); // Verify create was called
    });

    // Test case: Should hash passwords before saving
    it('should hash passwords before saving', async () => {
      // Arrange
      mockRepo.findByEmail.mockResolvedValue(null); // No existing user
      // Mock create to simply return what it receives
      mockRepo.create.mockImplementation(async (user) => user);

      // Act
      await service.create(validUserData);

      // Assert
      // Get the first argument of the first call to create
      const savedUser = mockRepo.create.mock.calls[0][0];
      // Password should be hashed (not plain text)
      expect(savedUser.password).not.toBe(validUserData.password);
      // Check if password matches bcrypt pattern (starts with $2a$, $2b$ or $2y$)
      expect(savedUser.password).toMatch(/^\$2[ayb]\$.{56}$/);
    });
  });
});
While unit tests check the individual pieces in isolation (like our service logic using a mocked repository), integration tests are where we connect things and see if they work together. Here, we’ll use the actual UserRepository to ensure it correctly talks to the database. It's about verifying that the "integration" point between our application and the persistence layer is solid.
src/repos/user.repository.ts

// Import necessary modules and classes
import { User } from '../entity/User'; // User entity model
import { TestDataSource } from '../test-data-source'; // Test database connection
import { UserRepository } from './user.repository'; // Repository we're testing

// Describe block for the UserRepository test suite
describe('UserRepository', () => {
  let repository: UserRepository; // This will hold our repository instance

  // beforeAll runs once before all tests in this describe block
  beforeAll(async () => {
    // Initialize the test database connection
    await TestDataSource.initialize();
    // Create a new instance of the repository
    repository = new UserRepository();
  });

  // afterAll runs once after all tests complete
  afterAll(async () => {
    // Destroy the database connection to clean up
    await TestDataSource.destroy();
  });

  // beforeEach runs before each test case
  beforeEach(async () => {
    // Clear all data from the User table between tests
    // This ensures each test starts with a clean slate
    await TestDataSource.getRepository(User).clear();
  });

  // Test case: should create and find users
  it('should create and find users', async () => {
    // Arrange - create a test user object
    const user = new User();
    user.name = 'Test';
    user.email = 'test@test.com';
    user.password = 'hashed_password'; // Note: In real tests, this would be properly hashed
    user.comparePassword = async () => true; // Mock password comparison method

    // Act - create the user in the database
    const createdUser = await repository.create(user);
    // Then try to find the user by ID
    const found = await repository.findById(createdUser.id);

    // Assert - verify the found user has the same email
    expect(found?.email).toBe(user.email);
  });
});
Moment of truth! Let’s see those tests in action. Run the command below in your terminal:
pnpm run test
If all goes well (and with the repository pattern, it should!😉), you’ll see output similar to this, confirming your tests passed:
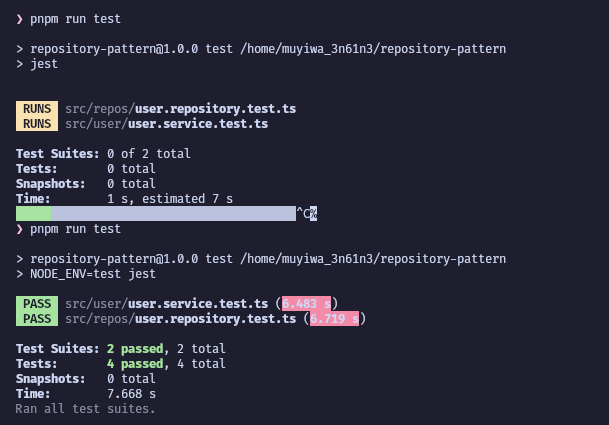
Unit and Integration test results.
Fantastic! You’ve successfully implemented and tested your application’s data access layer using the Repository pattern which is a huge step towards building robust, maintainable backends!
When to and When not to use the Repository Pattern
Let’s start with then to use the Repository Pattern
Complex Business Logic Application
When your application has complex business rules that needs to be separated from the data access layer.
When you need to centralize data access logic from maintainability
Multiple Data Sources
When you are working with multiple databases(e.g., MySQL + MongoDB).
When you might need to switch database ORM in future.
Testability Requirements
When you need to easily mock data access for unit testing
When you want to test the business logic without hitting the real database
Large-Scale Applications
When building applications that will grow over time and need maintainable architecture.
When multiple teams need to work on different layers independently
Domain-Driven Design(DDD) Projects
When you need to work with domain objects rather than raw database entities.
When following DDD principles where the domain layer should be persistence-ignorant
Now, let’s look at situations where the Repository Pattern may not be the best option
Simple CRUD Applications
When your application is primarily simple Create-Read-Update-Delete operation
When the abstraction provides no real benefits (YAGNI principle)
Tight Deadlines for small projects
- When building a prototype or MVP that won’t evolve
Microservices with Simple Data Needs
when building small, focused microservices with simple data requirements
When each service has its own dedicated database that won’t change
Performance-Critical Applications
When you need to write highly optimized SQL queries for performance
When the abstraction layer might prevent necessary database optimizations
Well there is always a middle ground, for many projects, a lightweight repository pattern can be beneficial without being overly prescriptive. Consider:
Using your ORM’s built-in repository (like TypeORM’s) as a base
Only abstracting what you need to (maybe just complex queries)
Starting simple and adding repository layers as needs emerge
P.S The repository pattern is a tool, not a religion. Use it where it add value, skip it where it is unnecessary.
Conclusion and Best Practices
We’ve journeyed from the pain of tightly coupled data access to understanding, implementing, and testing the Repository Pattern. By introducing this layer of abstraction, we empower our applications with significant benefits:
Decoupled & Cleaner Code: Your business logic (
UserService) is no longer cluttered with database specifics, making it easier to read, understand, and maintain.Enhanced Testability: Mocking the repository interface in unit tests becomes trivial, leading to faster, more reliable tests for your core logic.
Increased Flexibility: Swapping databases, ORMs, or even integrating other data sources (like caching layers or external APIs) becomes a matter of implementing a new repository class, without forcing changes throughout your service layer.
Centralized Data Logic: Common data access concerns and complex query logic are encapsulated in one place, improving consistency and simplifying updates.
The Repository Pattern is a powerful tool, but like any tool, its effectiveness depends on how it’s used. To truly leverage its benefits, consider these best practices:
Always Depend on the Interface: This is perhaps the most critical rule. Your services and other business logic should only know about and interact with the
IUserRepositoryinterface, never the concreteUserRepositoryimplementation. This is the key to decoupling.Keep Repositories Focused: A repository’s primary responsibility is data persistence — finding, saving, deleting, and potentially abstracting complex queries. Avoid putting unrelated business logic (like complex calculations, external service calls, or workflow steps) inside your repositories. That belongs in your service layer.
Repository Methods Should Return Domain Objects: Repository methods should ideally return your application’s core domain entities (like your
Userclass), or collections of them. Avoid leaking ORM-specific query builder objects or raw database results out of the repository.Hide Query Implementation Details: The service layer should ask what data it needs (e.g.,
findByEmail(email)), not how to fetch it (e.g.,findWhere("email = ?", email)). The repository encapsulates the internal querying logic (whether it's SQL, ORM syntax, etc.).Consider the Unit of Work Pattern (for complex transactions): For scenarios where a single business operation requires coordinating changes across multiple repositories (e.g., saving a user and creating a related profile entry atomically), consider implementing the Unit of Work pattern. It helps manage transactions at a higher level within the service layer. (Keep this brief if you haven’t covered Unit of Work at all).
The Repository Pattern provides a clear architectural boundary that pays dividends in larger or evolving applications. By adhering to its principles and following these best practices, you’re well on your way to building backends that are robust, maintainable, and adaptable to change.
Thank you so much for reading through this blog I really hope you got to learn something new. Follow me for more blogs like this; I will be releasing Authentication with JWT using Private and Public Keys next, I’m sure you don’t want to miss that!
Subscribe to my newsletter
Read articles from Muyiwa Olayinka directly inside your inbox. Subscribe to the newsletter, and don't miss out.
Written by