A Beginner's Guide to Mainnet Forking Rootstock Chain
 YoungAncient
This is a pretty interesting topic and a handy skill every competent contract developer should have. It’s easy, yes, but quite tasking also!
Before we dive in, reading this alongside searching terms on Google would be a waste of time, so let’s break down some terms!
Glossary
Anvil is a fast, lightweight local Ethereum node provided by Foundry. It can fork mainnet or other chains for testing with real-world data seamlessly.
Mainnet refers to an actual blockchain protocol, e.g., Ethereum mainnet, Rootstock, etc.
Testnet refers to a test blockchain protocol, such as Sepolia, Base Sepolia, Lisk Sepolia, and many more. All real blockchains have testnets, which serve as a playground for developers during development.
Local Node in hardhat is a feature that allows developers to run a test development node on the localhost, where developers can deploy contracts, run interactions, and much more. It can be run using the hardhat command npx hardhat node Or foundry command anvil.
Forking is a popular term in GitHub that refers to copying a repository from one user's account to another. When you fork a repository, you create a copy of the original repository under your own GitHub account, allowing you to make changes independently without affecting the original project.
Rootstock is the longest-running and leading Bitcoin L2. It combines Bitcoin’s security with Ethereum’s smart contract capability.
RPC stands for Remote Procedure Call. The blockchain uses a JSON-RPC specification, a data communication protocol like REST, GraphQL, etc., that enables communication between a client and a server over the blockchain network.
RPC URL is a link provided by a node or a node-as-a-service provider such as Alchemy, Infura, or QuickNode that allows developers to interact with a blockchain network remotely. It serves as a gateway to communicate with the blockchain, enabling users to send requests and retrieve data via Remote Procedure Calls (RPC).
Local is short for the local environment, which refers to a laptop or computer.
Let’s Dive In
When writing smart contracts, developers usually deploy to testnets like Sepolia, Rootstock testnet, etc., for testing purposes before deploying to the mainnet after all checks and audits are completed. But what if there is a case where the contract depends directly on other contracts already deployed? What do we do?
For example, say you wrote contract A which depends on contracts B, C, and D. If you were writing the contracts at the same time, it is possible to deploy all on a testnet (for the sake of testing ) since we are the owners, but in this case, B, C, and D have been deployed by someone else to the mainnet (or a testnet), so the only hope of testing the smart contract is either deploying your contract and being optimistic about its behavior when interacting with the contracts or do forking!
A real scenario is, for instance, we are writing a staking contract that interacts with Uniswap or an NFT-gated event contract for users with Bored Apes NFTs, and you agree that both Uniswap and Bored Apes contracts have been deployed. The best way to interact and test such contracts is through forking.
The term ‘Mainnet forking’ is somewhat of a misnomer, as it is not just mainnets that can be forked; testnets can also be forked. For this article, we will be forking the Rootstock testnet, but all the steps are applicable for forking both testnets and mainnets.
What is Forking?
Forking is a term popular in Github, it means copying a person’s repository into one’s GitHub account so that changes can be made. When you fork a person’s repo, you get all the functions, files, folders, etc, in the repository.
The same goes for the blockchain!
Forking can also be referred to as blockchain copying or cloning. It helps to clone any targeted blockchain in a local node and everything within it, but in this case, smart contracts! Isn’t that cool?
Mainnet and testnets could be forked as long as the chain supports forking. In our case, Rootstock nodes support forking!
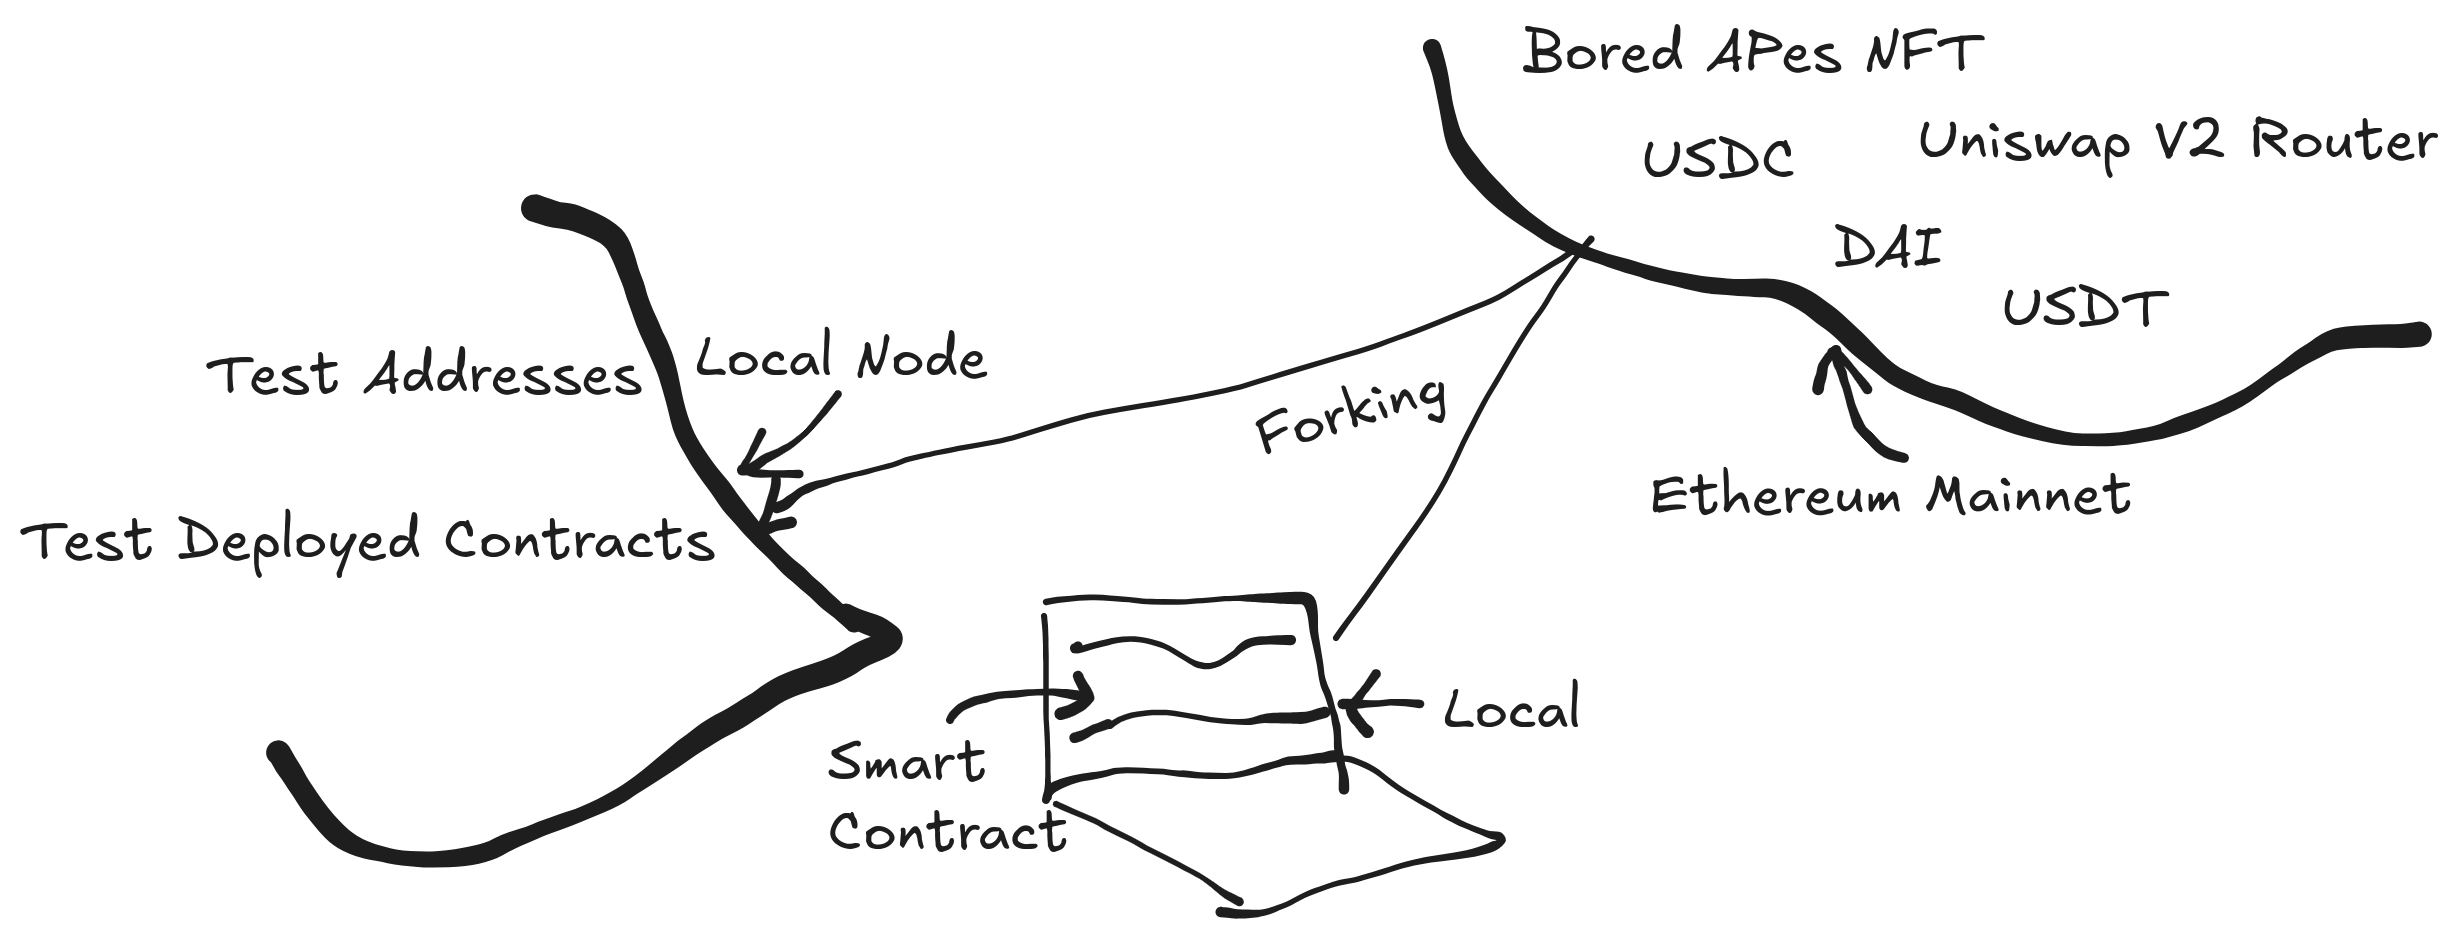
A basic diagram explaining how forking works
The smart contract (in your local) depends on the already deployed Uniswap, however, testing is needed before deployment. You might also be working in a team where multiple contracts are being developed, and your contract relies on another team member's contract that has already been deployed on a testnet or mainnet. For testing purposes, you'll need to either deploy your contract to a testnet or fork the testnet to your local and run tests.
Under the Hood!
When you fork a blockchain, your local node is linked to a full or archive node in the target chain, automatically, your local node acts like that node. You can impersonate addresses that own tokens and do many crazy things. The caveat is that whatever you do within the fork does not affect the main forked chain. Say you forked the Ethereum mainnet, impersonated a token owner, and transferred tokens to another account. That transfer only happened in your local node / virtual sandbox / Fork; it never affected the real chain.
But the reverse is the case!
Changes in the forked chain can affect the local fork. Say you were interacting with Uniswap to swap some amounts of tokens A and B, which was executed by impersonating an account that holds token A. Let’s say a few seconds before the test interaction is run, the account sold all of the token A previously owned, the swap transaction initiated from our forked version would fail because as earlier stated, our local node is copying or acting like a full node which it is connected to.
Testnet Vs Fork
A testnet is a separate blockchain designed for experimentation, where transactions have no real-world value. It’s ideal for testing smart contracts without financial risk.
A fork, on the other hand, creates a duplicate of the mainnet/testnet, preserving real-world state and contract interactions. This allows developers to test in a live-like environment using actual blockchain data while remaining isolated from the real network.
A fork is an ideal solution when you need to test with real-world data, such as actual token balances, contract states, or interactions with other dApps. It's also perfect for stress testing or simulating complex scenarios that would be difficult to recreate on a testnet. It gives a perfect sandbox to create and test scenarios.
How to fork?
We will be using Hardhat for scripting and Anvil for running the fork node.
The most tricky thing is writing code to impersonate a signer and interacting with contracts on the forked blockchain.
Forking a blockchain can be done with a few steps:
Getting the target blockchain RPC URL from providers like Alchemy, Infura, and many more.
There are 2 ways of using this RPC URL: adding it directly to the CLI while running a local node or adding it to the hardhat config file.
Talk is Cheap, Show the Code!
As said above, the RPC URL is obtained first. The contract that would be interacted with was deployed to the testnet, hence, we will fork the Rootstock testnet instead of the mainnet.
// it looks like this
ALCHEMY_ROOTSTOCK_API_KEY_URL="https://rootstock-testnet.g.alchemy.com/v2/<API_KEY>";
Now, to use the URL,
Method: CLI
If you don’t have Foundry installed on your device, the first step is installation.
Installation
curl -L https://foundry.paradigm.xyz | bash
The script above installs Foundryup, the official installer for the Foundry toolchain.
Next, in the terminal, run:
foundryup
This command installs stable versions of the precompiled binaries: forge ,cast ,anvil, and chisel. Our main focus here is anvil. For more on the installation process, check the Foundry installation guide.
To check if the installation was successful,
anvil --version
The terminal output shows this:

Start Fork Node
The installation is complete, next, we start the node.
anvil --fork-url https://rootstock-testnet.g.alchemy.com/v2/<API_KEY>
The node is spun up as shown below:


As seen above, the chain is forked from the provided RPC URL, and then dummy accounts and private keys are also generated. Also, it creates a port 127.0.0.1:8545 This is the default localhost port that will be used to run the test scripts.
This node is currently connected to the node with the RPC link passed into the CLI. To run an interaction or test script, you need to open another terminal and run it there.
The Hardhat folder structure looks like this:

Hence, using scripts/<filename> is how we reference the script to be executed. In this case, the script name is interactions.ts
npx hardhat run scripts/interactions.ts --network localhost
Writing scripts to interact with the forked chain
Our goal is to interact with an already deployed smart contract on the Rootstock testnet.
The contract was interacted with by a specific address that repeatedly called the mintDummy function.

To properly interact with a contract, it is important to understand the contract in question. Let’s have a look at the contract code.

Here are some things to note:
The contract, when deployed, sets its owner to the deployer’s address via the
constructorfunction.The
mintDummyfunction can only be called by the owner because it has theonlyOwnermodifier. This means whoever made the transaction earlier interacting with themintDummyfunction was the owner.The
transferDummyfunction requires that the caller has sufficient balance before sending the specified amount of tokens to thetoaddress.
With these notes, we can plot the interaction script. The script would impersonate the owner of the contract, call the mintDummy function and transfer some of his tokens to another address.
First, find the owner’s address.

The caller’s address is
0×0f…C490. To be sure, we can check by calling the owner function in the contract on the explorer.
This confirms the initial claim.
Begin scripting!
  import { ethers } from "hardhat";

  async function main() {
    const DUMMYTOKENADDRESS = "0xd5b0e6f6F18f43e25B40dFB5c55Cc8888697fF39";
    const impersonateAccount = "0x0f09D1Fb501041E32170b1B759f1b2ef6349C490";
    // some code
  }

  // Recommend this pattern to be able to use async/await everywhere
  // and properly handle errors.
  main().catch((error) => {
    console.error(error);
    process.exitCode = 1;
  });
The script has the contract address and the account to be impersonated.
The next to-do is creating the contract object, which would be used to call the functions. This can be done in two ways. One way is copying the full code of the contract to the hardhat project and compiling it so that from the scripts we can directly access the artifacts. But this would be stressful for larger contracts with multiple file dependencies. The second way is using solidity interfaces. Interfaces represent a skeletal structure of the contract without any implementation detail. The interface has the function signatures of the contract. This approach is way better and the most used.
For the dummy contract, we have the interface:
// SPDX-License-Identifier: MIT
pragma solidity 0.8.24;

interface IDummyToken {
    function balances(address account) external view returns (uint);
    function mintDummy(uint amount, address to) external;
    function transferDummy(uint amount, address to) external;
}
This would then be used as the abi.
const abi = [
  "function balances(address account) external view returns (uint)",
  "function mintDummy(uint amount, address to) external",
  "function transferDummy(uint amount, address to) external"
];
Next, the script is updated:
import { ethers } from "hardhat";

async function main() {
  const DUMMYTOKENADDRESS =
    "0xf45Ba148Fa6b2db025e7a23a4A3f58027766690F".toLowerCase();

  const abi = [
    "function balances(address account) external view returns (uint)",
    "function mintDummy(uint amount, address to) external",
    "function transferDummy(uint amount, address to) external",
  ];

  const impersonateAccount = "0x0f09D1Fb501041E32170b1B759f1b2ef6349C490";
    // contract object with the default signer
  const dummyTokenContract = await ethers.getContractAt(abi, DUMMYTOKENADDRESS);
  const balanceBefore = await dummyTokenContract.balances(impersonateAccount);
  console.log(`receiver balance before -> ${balanceBefore}`);
}

main().catch((error) => {
  console.error(error);
  process.exitCode = 1;
});
The above script checks the balance of the token which the impersonateAccount holds.
NOTE: To run this script, don’t forget that the anvil fork node must be kept active in one terminal while another terminal is opened to run the new script commands.
With the code inside scripts/interactions.ts
Run in terminal :
npx hardhat run scripts/interactions.ts --network localhost
Here’s the output:

To confirm this token balance, we verify it using the block explorer.

This shows that the fork running in the local is in sync with the actual Rootstock blockchain.
Impersonating the Owner
Based on the earlier understanding of the contract, the owner is the only person who can mint the token, also, only someone with a non-zero token amount can transfer to another address. The goal here is to impersonate the owner to mint the tokens and transfer the tokens to a different address.
Before now, the contract uses the default signer, which in Hardhat is the private key stored in an env and referenced in the hardhatconfig file.
const dummyTokenContract = await ethers.getContractAt(abi, DUMMYTOKENADDRESS);
Now, impersonate the owner using the helpers module and then attach the impersonated signer to the contract object. This module helps to manipulate the local network, doing things like impersonating an account without having the private key, modifying account balances, and increasing blockchain time (popularly called time warp).
const helpers = require("@nomicfoundation/hardhat-network-helpers");   // helper module
import { ethers } from "hardhat";

async function main() {
  const DUMMYTOKENADDRESS =
    "0xf45Ba148Fa6b2db025e7a23a4A3f58027766690F".toLowerCase();

  const abi = [
    "function balances(address account) external view returns (uint)",
    "function mintDummy(uint amount, address to) external",
    "function transferDummy(uint amount, address to) external",
  ];

  const impersonateAccount = "0x0f09D1Fb501041E32170b1B759f1b2ef6349C490";
  await helpers.impersonateAccount(impersonateAccount);  // impersonate account
  const impersonatedSigner = await ethers.getSigner(impersonateAccount);// impersonate signer

    // attach impersonated signer to contract object
  const dummyTokenContract =
    await ethers.getContractAt(abi, DUMMYTOKENADDRESS, impersonatedSigner);

  const balanceBefore = await dummyTokenContract.balances(impersonateAccount);
  console.log(`owner balance before -> ${balanceBefore}`);

}

main().catch((error) => {
  console.error(error);
  process.exitCode = 1;
});
Running this script again, the result remains the same:

Nothing changes because we are making read calls, which reads data from the forked chain, and since there is no change of state the data remains the same.
Now, we move to the part that updates the state.
Writing transactions with the Impersonated Signer is a seamless thing to do since the contract object has registered the impersonated signer as the primary signer. The only thing needed is to invoke the functions passing in the right parameters.
const helpers = require("@nomicfoundation/hardhat-network-helpers");   // helper module
import { ethers } from "hardhat";

async function main() {
  const DUMMYTOKENADDRESS =
    "0xf45Ba148Fa6b2db025e7a23a4A3f58027766690F".toLowerCase();

  const abi = [
    "function balances(address account) external view returns (uint)",
    "function mintDummy(uint amount, address to) external",
    "function transferDummy(uint amount, address to) external",
  ];

  const impersonateAccount = "0x0f09D1Fb501041E32170b1B759f1b2ef6349C490";
  await helpers.impersonateAccount(impersonateAccount);  // impersonate account
  const impersonatedSigner = await ethers.getSigner(impersonateAccount);// impersonate signer

    // attach impersonated signer to contract object
  const dummyTokenContract =
    await ethers.getContractAt(abi, DUMMYTOKENADDRESS, impersonatedSigner);

  const balanceBefore = await dummyTokenContract.balances(impersonateAccount);
  console.log(`owner balance before -> ${balanceBefore}`);

  const amount = ethers.parseUnits("1000", 18);    // amount of token to be minted
    // mint tokens to impersonated account
  const mintTx = await dummyTokenContract.mintDummy(amount, impersonateAccount);
  await mintTx.wait();

  const balanceAfter = await dummyTokenContract.balances(impersonateAccount);
  console.log(`owner balance after -> ${balanceAfter}`);
}

main().catch((error) => {
  console.error(error);
  process.exitCode = 1;
});
Remember, we have an anvil forked node running in another terminal separate from the one we use for running the scripts.
The result gotten:

A Bug! (Low Block Gas limit)
This is because the Anvil fork currently running in our terminal has a default gas of 30000000, and the transaction has a much higher gas limit.

To fix this, terminate the running forked node, then restart the node using the former command with an extra configuration:
anvil --fork-url https://rootstock-testnet.g.alchemy.com/v2/<API_KEY> --gas-limit 100000000
The --gas-limit flag helps us set the gas limit of our choice, and 100000000 is high enough to accommodate the transactions to be executed.
The restarted forked node now has the new gas limit we set:

With the forked node sorted, switch to the other terminal to run the script.
npx hardhat run scripts/interactions.ts --network localhost
Result:

A New Bug! (Insufficient Gas)
This is because the owner account that is being impersonated does not have sufficient gas for the transaction. This can be manipulated using the helpers module by setting a mock balance :
await helpers.setBalance(impersonateAccount, ethers.parseEther("10"));
This line is added before the mint transaction is made.
const helpers = require("@nomicfoundation/hardhat-network-helpers");
import { ethers } from "hardhat";

async function main() {
  const DUMMYTOKENADDRESS =
    "0xf45Ba148Fa6b2db025e7a23a4A3f58027766690F".toLowerCase();

  const abi = [
    "function balances(address account) external view returns (uint)",
    "function mintDummy(uint amount, address to) external",
    "function transferDummy(uint amount, address to) external",
  ];

  const impersonateAccount = "0x0f09D1Fb501041E32170b1B759f1b2ef6349C490";
  await helpers.impersonateAccount(impersonateAccount);
  const impersonatedSigner = await ethers.getSigner(impersonateAccount);

  const dummyTokenContract = await ethers.getContractAt(
    abi,
    DUMMYTOKENADDRESS,
    impersonatedSigner
  );

  const balanceBefore = await dummyTokenContract.balances(impersonateAccount);
  console.log(`owner balance before -> ${balanceBefore}`);


  const amount = ethers.parseUnits("1000", 18);
    // sets mock balance
  await helpers.setBalance(impersonateAccount, ethers.parseEther("10"));

  const mintTx = await dummyTokenContract.mintDummy(amount, impersonateAccount); // Mint Tx
  await mintTx.wait();

  const balanceAfter = await dummyTokenContract.balances(impersonateAccount);
  console.log(`owner balance after -> ${balanceAfter}`);
}

main().catch((error) => {
  console.error(error);
  process.exitCode = 1;
});
Running the script again, the result:

Run multiple times to simulate minting multiple times. The result:

Here’s the catch: Check the block explorer; there are no new transactions!

Also, the tokens which the owner has remained the same as before:

But in the forked node, the amount of tokens that the owner has is changed to 6000000000000000000000 .
This shows how powerful the fork is, the fact that we can manipulate the chain, perform transactions, and test without boundaries or worrying about gas fees and affecting the actual blockchain state! Isn’t that cool?
But it is important to note that the fork saves every state change made by the scripts we run until the node is terminated. When restarted, the fork only has the forked chain data.
Next, we'll transfer tokens from the owner’s account to a recipient address. Since minting has already been done, the mint transaction can be commented out to prevent duplication and keep the focus on tracking balance changes before and after the transfer.
const helpers = require("@nomicfoundation/hardhat-network-helpers");
import { ethers } from "hardhat";

async function main() {
  const DUMMYTOKENADDRESS =
    "0xf45Ba148Fa6b2db025e7a23a4A3f58027766690F".toLowerCase();

  const abi = [
    "function balances(address account) external view returns (uint)",
    "function mintDummy(uint amount, address to) external",
    "function transferDummy(uint amount, address to) external",
  ];

  const impersonateAccount = "0x0f09D1Fb501041E32170b1B759f1b2ef6349C490";
  await helpers.impersonateAccount(impersonateAccount);
  const impersonatedSigner = await ethers.getSigner(impersonateAccount);

  const dummyTokenContract = await ethers.getContractAt(
    abi,
    DUMMYTOKENADDRESS,
    impersonatedSigner
  );

  const balanceBefore = await dummyTokenContract.balances(impersonateAccount);
  console.log(`owner balance before -> ${balanceBefore}`);


  const amount = ethers.parseUnits("1000", 18);
    // sets mock balance
  await helpers.setBalance(impersonateAccount, ethers.parseEther("10"));

  // const mintTx = await dummyTokenContract.mintDummy(amount, impersonateAccount); // Mint Tx
  // await mintTx.wait();

    // transfer transaction comes here

  const balanceAfter = await dummyTokenContract.balances(impersonateAccount);
  console.log(`owner balance after -> ${balanceAfter}`);
}

main().catch((error) => {
  console.error(error);
  process.exitCode = 1;
});
Say the recipient is 0xa6B1feB40D1c8eeAD5AFD6f7372E02B637F142FA , it would be proper to also check the balance of this address before and after the transaction.
Before making the transfer transaction, include the recipient:
const helpers = require("@nomicfoundation/hardhat-network-helpers");
import { ethers } from "hardhat";

async function main() {
  const DUMMYTOKENADDRESS =
    "0xf45Ba148Fa6b2db025e7a23a4A3f58027766690F".toLowerCase();

  const abi = [
    "function balances(address account) external view returns (uint)",
    "function mintDummy(uint amount, address to) external",
    "function transferDummy(uint amount, address to) external",
  ];

  const impersonateAccount = "0x0f09D1Fb501041E32170b1B759f1b2ef6349C490";
  await helpers.impersonateAccount(impersonateAccount);
  const impersonatedSigner = await ethers.getSigner(impersonateAccount);

  const dummyTokenContract = await ethers.getContractAt(
    abi,
    DUMMYTOKENADDRESS,
    impersonatedSigner
  );

  const balanceBefore = await dummyTokenContract.balances(impersonateAccount);
  console.log(`owner balance before -> ${balanceBefore}`);


  const amount = ethers.parseUnits("1000", 18);

  await helpers.setBalance(impersonateAccount, ethers.parseEther("10"));

  // const mintTx = await dummyTokenContract.mintDummy(amount, impersonateAccount);
  // await mintTx.wait();

  const receiver = "0xa6B1feB40D1c8eeAD5AFD6f7372E02B637F142FA".toLowerCase();

  const receiverBalanceBefore = await dummyTokenContract.balances(receiver);
  console.log(`receiver balance before -> ${balanceBefore}`);

  // transfer transaction here

  const receiverBalanceAfter = await dummyTokenContract.balances(receiver);
  console.log(`receiver balance after -> ${receiverBalanceAfter}`);

  const balanceAfter = await dummyTokenContract.balances(impersonateAccount);
  console.log(`owner balance after -> ${balanceAfter}`);
}

main().catch((error) => {
  console.error(error);
  process.exitCode = 1;
});
Running this:

The recipient has no tokens, while the owner’s balance remains constant.
// transfer transaction
const transferTx = await dummyTokenContract.transferDummy(amount, receiver);
await transferTx.wait();
Adding this to the script file:
const helpers = require("@nomicfoundation/hardhat-network-helpers");
import { ethers } from "hardhat";

async function main() {
  const DUMMYTOKENADDRESS =
    "0xf45Ba148Fa6b2db025e7a23a4A3f58027766690F".toLowerCase();

  const abi = [
    "function balances(address account) external view returns (uint)",
    "function mintDummy(uint amount, address to) external",
    "function transferDummy(uint amount, address to) external",
  ];

  const impersonateAccount = "0x0f09D1Fb501041E32170b1B759f1b2ef6349C490";
  await helpers.impersonateAccount(impersonateAccount);
  const impersonatedSigner = await ethers.getSigner(impersonateAccount);

  const dummyTokenContract = await ethers.getContractAt(
    abi,
    DUMMYTOKENADDRESS,
    impersonatedSigner
  );

  const balanceBefore = await dummyTokenContract.balances(impersonateAccount);
  console.log(`owner balance before -> ${balanceBefore}`);


  const amount = ethers.parseUnits("1000", 18);

  await helpers.setBalance(impersonateAccount, ethers.parseEther("10"));

  // const mintTx = await dummyTokenContract.mintDummy(amount, impersonateAccount);
  // await mintTx.wait();

  const receiver = "0xa6B1feB40D1c8eeAD5AFD6f7372E02B637F142FA".toLowerCase();

  const receiverBalanceBefore = await dummyTokenContract.balances(receiver);
  console.log(`receiver balance before -> ${receiverBalanceBefore}`);

  // transfer transaction
  const transferTx = await dummyTokenContract.transferDummy(amount, receiver);
  await transferTx.wait();

  const receiverBalanceAfter = await dummyTokenContract.balances(receiver);
  console.log(`receiver balance after -> ${receiverBalanceAfter}`);

  const balanceAfter = await dummyTokenContract.balances(impersonateAccount);
  console.log(`owner balance after -> ${balanceAfter}`);
}

main().catch((error) => {
  console.error(error);
  process.exitCode = 1;
});
Next, run the script. The result:

Running multiple times to simulate multiple transfers:

We can see that the owner now has fewer tokens, while the receiver has more. These all happened within the fork; nothing changed on the blockchain, as demonstrated earlier.
Debugging Tips
When forking a chain, several issues can arise, some of which are addressed in this article. Other potential challenges include RPC rate limits and Fork desynchronization.
RPC Rate Limits: Node providers like Alchemy, Infura, and others listed on Chainlist typically enforce rate limits to prevent server overload and protect against malicious attacks. If you encounter these limits, simply switch to a different RPC URL or use multiple RPCs to distribute the load and avoid overloading a single provider.
Fork desynchronization: This refers to a state where a forked chain becomes out of sync with the original chain. A common example in our case is when the owner’s initial balance on the original chain changes due to a swap or transfer or if the ownership of the contract is transferred to a different address. Desynchronization causes serious issues when forking and running scripts, which are usually confusing to newbies. The simple fix is to kill the node and restart it using the Anvil fork command. This resynchronizes the fork.
Conclusion
It has been a fun ride exploring how to fork the Rootstock chain and interact with deployed contracts through the fork while understanding the concepts, roadblocks, and how to handle them. This is a beginner’s guide and I do hope this helps beginners have a seamless introduction to this concept.
To dive deeper into more complex concepts and deeply practice this, check out Rootstock’s documentation, and also explore Rootstock developer resources for extra support and a supportive Rootstock community to stay connected. Happy Forking!
Subscribe to my newsletter
Read articles from YoungAncient directly inside your inbox. Subscribe to the newsletter, and don't miss out.
Written by
YoungAncient
YoungAncient
I love building powerful, friendly, and highly interactive user interfaces. I also love problem-solving and for me it is purpose. Nothing gives me joy more than building products/projects that help solve real problems and add meaningful value to businesses, people, and the world.