Angular Lifecycle Hooks makes angular component more reliable
 NonStop io Technologies
Concept of lifecycle hooks -
To run any angular component it needs to go through one cycle of events. This lifecycle of events called Angular Lifecycle Hooks. Which hooks up each data flow of the component. This lifecycle starts from the initialization of components and ends with the destruction of components.
Every angular component has its lifecycle. A lifecycle has typical eight phases called lifecycle hooks. So we have total of eight lifecycle hooks in angular component or directive
What is lifecycle hooks exactly -
A developer can call any lifecycle hook event by calling its function at that phase of the component lifecycle.
The exact use of angular lifecycle hooks — Developers can make use of a life cycle by implementing one or more hook functions from the Angular core library. Hook events can be used at any stage of an application to get excellent control over the components.
Note — These lifecycle hooks apply to both components and directives.
A quick look at all 8 lifecycle hooks -
Below images are the list of lifecycle hooks with a quick explanation. Among 8 lifecycle hooks first three are parent components lifecycle hooks, the next four are of child’s components lifecycle hooks and the last one is the last lifecycle hook of a component.
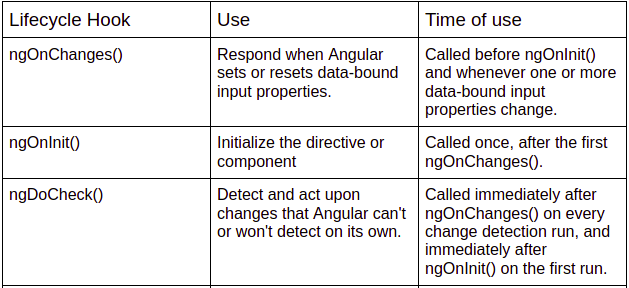
Parent Component Life cycle Hooks
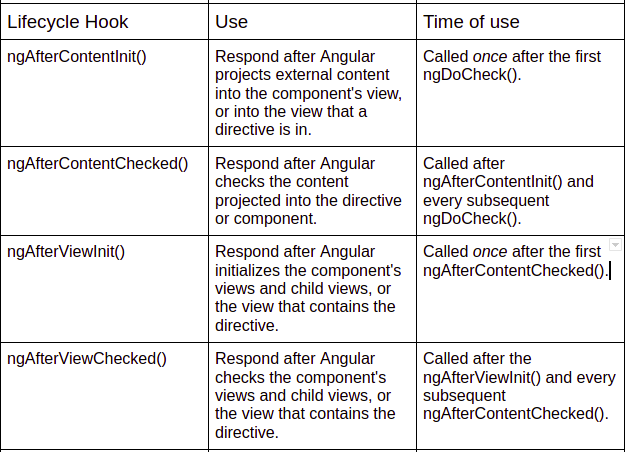
Child Component Life cycle Hooks

Parent Components last Life cycle Hooks
Use of Constructor in angular application-
A constructor is a special method that will be called whenever we create new objects. It is a feature of the class(typescript) itself, an object-oriented design concept. A constructor is also used to initialize the class members.
@Component({//…})export class ExampleComponent {constructor(){}}
We must have to use the constructor to inject dependencies in the angular component. Angular always executes the constructor method first then all lifecycle hooks will come into the picture.
Now we will look into lifecycle hooks -
- ngOnChanges() -
when any data-bound property of a directive or component changes, the OnChanges lifecycle hook is called. Let's have a look into example -
@Component({selector: ‘example’,template: `<div *ngFor=”let customer of customers”>{{customer}}</div>`})export class ExampleComponent implements OnChanges {@Input() customers;ngOnChanges() {console.log(“The property of customer changed”);}}@Component({selector: ‘example1’,template: `<example [customers]=”customers”></example>`})export class Example1Component {customers = [“Customer1”];}
Here we have used interface OnChanges on ExampleComponent and called method ngOnChanges() which will call the OnChanges lifecycle hook. Example1Component is binding its customers property to ExampleComponent. On change of customers property from Example1Component, ngOnChanges() method of ExampleComponent will call. In short, every change of @input value will call ngOnChanges() lifecycle hook.
2. ngOnInit() -
This lifecycle hook is the most usable hook as we can initialize all methods and variables here in it. When we need to initialize any method where we can have the logic of getting initial data for a component then we can use ngOnInit() to call that method. This lifecycle hook will implement after all data bound properties to get called so we will have all properties to use initially. Basically, this lifecycle hook will call once and after ngOnChanges() called initially.
@Component({Selector: ‘example’})export class ExampleComponent implements OnInit {ngOnInit() {console.log(“This is OnInit lifecycle hook”);}}
As we have a constructor to initialize everything then also we are calling ngOnInit, let me explain the difference between constructor and ngOnInit here.
Difference between constructor and ngOnInit here -
The Constructor is executed when the class is instantiated as a default method of the class and ensures all initialization of fields in the class. Angular, or better Dependency Injector (DI), analyses the constructor parameters and when it creates a new instance by calling a new class() it tries to find providers that match the types of the constructor parameters, resolves them, and passes them to the constructor. ngOnInit is a life cycle hook called by Angular after data bound is done for the first time and angular is done creating the component. Implementing OnInit is not mandatory but considered good practice.
export class ExampleComponent implements OnInit {constructor() {// Called first time before the ngOnInit()}ngOnInit() {// Called after the constructor and called after the first
// ngOnChanges() }}
Mostly we use ngOnInit for all the initialization or declaration and avoid doing work in the constructor. The constructor should only be used to initialize class members but shouldn’t perform actual work.
So you should use constructor() to set up Dependency Injection. ngOnInit() is a better place to “start” — it’s where the component's bindings are resolved.
3. ngDoCheck() -
This lifecycle hook comes after ngOnInit() and basically calls to detect and act upon changes that Angular can’t or won’t detect on its own. DoCheck invokes a custom change-detection function for a directive, in addition to the check performed by the default change-detector.
export class ExampleComponent implements OnChanges, DoCheck {@Input() customers;ngOnChanges() {console.log("The customers property has been changed");}ngDoCheck() {console.log("ExampleCompoent's ngDoCheck called.");}}
4. ngAfterContentInit()
ngAfterContentInit() is called when the content of a component has initialized. In this case, content is the component that are within the <ng-content></ng-content> tags. After ngDoCheck() it is called initially.
@Component({selector: 'example2',template: `<div>This is a Example2 Componnet</div>`})export class Example2Component {}@Component({selector: example1,template: `<ng-content></ng-content>`})export class Example1Component implements AfterContentInit {ngAfterContentInit() {}}@Component({template: `<example1><example2></example2></example1>`})export class ExampleComponent {}
The Example1Component will have any elements in between its tag <example1> </example1> inside the ng-content tag. Now, in the Examplecomponent, the Example2Component is projected in the example1 tag. When the Example2Component is being initialized, the ngAfterContentInit hook will be called in Example1Component.
5. ngAfterContentChecked()
This lifecycle hook performs its work by knowing the change in the content of the component using Angular change detection. It gets its call after ngAftercontentInit() and also gets executed after every execution od ngDoCheck().
@Component({selector: 'example1',template: `<ng-content></ng-content>`})export class Example1Component implements AfterContentInit {ngAfterContentInit() {}}@Component({template: `<example1> {{data}} </example1>`})export class ExampleComponent implements AfterContentChecked {data: anyngAfterContentChecked() {}}
The ExampleComponent component has a data property that is inside the Example1Component. When the data property changes, the ngAfterContentChecked() method will be called.
6. ngAfterViewInit()
This lifecycle hook gets called after ngAfterContentChecked(). And also gets called after a component’s view and its children’s views have been created and fully initialized. This lifecycle hook will be useful when we want to reference a component instance in our component using ViewChild/ViewChildren. After the initialization of view, it gets its call only once.
@Component({selector: example1,template: ``})export class Example1Component {example1Method() { }}@Component({template: `<example1 #example1></example1>`})export class ExampleComponent implements AfterViewInit{@ViewChild(example1) example1: Example1Component;constructor() { }ngAfterViewInit(){this.example1.example1Method();}}
We got the reference of example1’s class Example1Component by putting # in the ExampleComponent template. Then, we used ViewChild to tell Angular to set the instance of Example1Component to example1 variable.
7. ngAfterViewChecked()
This Angular lifecycle method gets called subsequently as it checks the component’s view and child view. This method gets called after ngAfterViewInit() and then for every ngAfterContentChecked() method. After checking and initialization are done, this lifecycle hook gets called.
8. ngOnDestroy()
ngOnDestroy() is a lifecycle hook that is called when a directive, pipe, or service is destroyed. This lifecycle hook is used for any custom cleanup that needs to occur when the instance is destroyed, by doing so you can prevent memory leakage. This lifecycle hook is mostly used to unsubscribe from observable streams and detach event handlers to avoid memory leaks.
Conclusion -
This total write-up is to describe the lifecycle of angular components and what events occur during that lifecycle and how angular handles them using Angular Lifecycle Hooks. Here we have a total of 8 lifecycle hooks that describe the start-to-end lifecycle of any component.
Subscribe to my newsletter
Read articles from NonStop io Technologies directly inside your inbox. Subscribe to the newsletter, and don't miss out.
Written by
NonStop io Technologies
NonStop io Technologies
Product Development as an Expertise Since 2015 Founded in August 2015, we are a USA-based Bespoke Engineering Studio providing Product Development as an Expertise. With 80+ satisfied clients worldwide, we serve startups and enterprises across San Francisco, Seattle, New York, London, Pune, Bangalore, Tokyo and other prominent technology hubs.