Effortless CRUD in Blazor: Build Forms Faster with the Data Form Component
 syncfusion
TL;DR: This blog guides you through using the Syncfusion Blazor Data Form component to perform CRUD operations in a .NET 10 Preview 2 Blazor web app. It covers setting up the app, defining the data model, implementing CRUD logic, and integrating the form within a Blazor Dialog. You’ll also learn about built-in validation.
In this tutorial, we’ll explore how to perform CRUD operations using the Blazor Data Form Component in a .NET 10 Preview 2 web app. The Blazor Data Form Component provides an easy and efficient way to create, edit, and delete records with minimal code.
Overview of Blazor Data Form Component
Say goodbye to tedious manual data entry with the Data Form. This component allows you to easily create various forms that can be automatically generated from your data model using other Blazor components.
It simplifies data input and editing, ensuring a user-friendly experience on your application’s registration page or data entry form while maintaining simplicity. With this streamlined component, you can efficiently validate and submit information.
Prerequisites
Before we begin, make sure you have the following prerequisites installed:
.NET Core 8.0 and above
Syncfusion Blazor NuGet package
Create a Blazor Web App
Create a new Blazor web app application using Visual Studio, install Syncfusion Blazor Packages, and configure the style and script reference as outlined in the getting started document.
Install the Syncfusion Blazor package
Install the Syncfusion Blazor package using the following NuGet command:
Install-Package Syncfusion.Blazor.Themes

Install-Package Syncfusion.Blazor.DataForm

Install-Package Syncfusion.Blazor.Popups
Create a model
Create a simple model representing employee data with the name EmployeeDetails, as shown in the code below.
public class EmployeeDetails
 {
     [Display(Name = "Employee ID")]
     [Editable(false)]
     [Required(ErrorMessage = "Please enter employee ID")]
     public int Id { get; set; }
     [Display(Name = "Employee Name")]
     [Required(ErrorMessage = "Please enter employee name.")]
     public string Name { get; set; }
     [Display(Name = "Employee Data Of Birth")]
     [Required(ErrorMessage = "Please enter employee date of birth.")]
     public DateOnly? DateOfBirth { get; set; }

     [Display(Name = "Employee Designation")]
     [Required(ErrorMessage = "Please enter employee designation.")]
     public string Designation { get; set; }
     [Display(Name = "Employee Salary")]
     [Required(ErrorMessage = "Please enter employee salary.")]
     public decimal Salary { get; set; }
 }
Add CRUD operations in the Employee class
Create a class to handle CRUD operations, including getting all data, adding new data, updating data, and deleting data.
Refer to the following code example.
public class EmployeeCrud
 {
     private List<EmployeeDetails> _employees = new List<EmployeeDetails>
     {
         new EmployeeDetails { Id = 1, Name = "John Doe", DateOfBirth=new DateOnly(1990,01,19), Designation = "Software Engineer", Salary = 50000 },
         new EmployeeDetails { Id = 2, Name = "Jane Doe", DateOfBirth=new DateOnly(1987,11,25), Designation = "Senior Software Engineer", Salary = 60000 }
     };

     public IEnumerable<EmployeeDetails> GetAllEmployees()
     {
         return _employees;
     }

     public EmployeeDetails GetEmployeeById(int id)
     {
         return _employees.FirstOrDefault(e => e.Id == id);
     }

     public void AddEmployee(EmployeeDetails employee)
     {
         employee.Id = _employees.Count + 1;
         _employees.Add(employee);
     }

     public void UpdateEmployee(EmployeeDetails employee)
     {
         var existingEmployee = _employees.FirstOrDefault(e => e.Id == employee.Id);
         if (existingEmployee != null)
         {
             existingEmployee.Name = employee.Name;
             employee.DateOfBirth = employee.DateOfBirth;
             existingEmployee.Designation = employee.Designation;
             existingEmployee.Salary = employee.Salary;
         }
     }

     public void DeleteEmployee(int id)
     {
         var employee = _employees.FirstOrDefault(e => e.Id == id);
         if (employee != null)
         {
             _employees.Remove(employee);
         }
     }
 }
Add the Data Form component and configure CRUD operations
Step 1: In your Blazor application, configure the Data Form component inside the Blazor Dialog component on the Components/Pages/Home.razor page, as shown in the code below.
<SfDialog Visible=@IsVisible Width="300px" IsModal=true ShowCloseIcon=true Header="Employee Details">
    <DialogTemplates>
        <Content>
            <SfDataForm ID="OrderEditForm" EditContext="editContext" OnSubmit="@SubmitForm" ButtonsAlignment="FormButtonsAlignment.Center">
                <FormValidator>
                    <DataAnnotationsValidator />
                </FormValidator>
                <FormItems>
                    <FormAutoGenerateItems />
                </FormItems>
                <FormButtons>
                    <SfButton IsPrimary=true>Save</SfButton>
                </FormButtons>
            </SfDataForm>
        </Content>
    </DialogTemplates>
</SfDialog>
Step 2: Add a new button to add a record. When this button is clicked, the Data Form Dialog will appear, allowing the user to enter employee details.
Refer to the following code example.
<SfButton IsPrimary=true OnClick="Save">Add New</SfButton>
@code {
    void Save()
    {
        EmployeeModel = new EmployeeDetails();
        editContext = new EditContext(EmployeeModel);
        // show the dialog
        IsVisible = true;
    }
}
Step 3: Display the added employee details in a table format with Edit and Delete buttons in each row, allowing for edit and delete operations upon clicking.
Refer to the following code example.
<h3>Employee Management</h3>
<table class="table">
    <thead>
        <tr>
            <th>Employee ID</th>
            <th>Name</th>
            <th>Date Of Birth</th>
            <th>Designation</th>
            <th>Salary</th>
            <th>Actions</th>
        </tr>
    </thead>
    <tbody>
        @foreach (var employee in employeesList)
        {
            <tr>
                <td>@employee.Id</td>
                <td>@employee.Name</td>
                <td>@employee.DateOfBirth</td>
                <td>@employee.Designation</td>
                <td>@employee.Salary</td>
                <td>
                    <SfButton @onclick="() => EditEmployee(employee)">Edit</SfButton>
                    <SfButton @onclick="() => DeleteEmployee(employee.Id)">Delete</SfButton>
                </td>
            </tr>
        }
    </tbody>
</table>

@code {
    private bool IsVisible { get; set; } = false;
    IEnumerable<EmployeeDetails> employeesList;
    public EmployeeDetails EmployeeModel { get; set; } = new EmployeeDetails();
    EditContext editContext;

    EmployeeCrud employeeCrudService { get; set; } = new EmployeeCrud();

    protected override void OnInitialized()
    {
        employeesList = employeeCrudService.GetAllEmployees();
        editContext = new EditContext(EmployeeModel);
    }
    void SubmitForm()
    {
        if (editContext.Validate())
        {
            if (EmployeeModel.Id == 0)
            {
                employeeCrudService.AddEmployee(EmployeeModel);
            }
            else
            {
                employeeCrudService.UpdateEmployee(EmployeeModel);
            }
            EmployeeModel = new EmployeeDetails();
            editContext = new EditContext(EmployeeModel);
            employeesList = employeeCrudService.GetAllEmployees();
            IsVisible = false;
        }
    }

    void EditEmployee(EmployeeDetails employee)
    {
        IsVisible = true;
        EmployeeModel = employee;
        editContext = new EditContext(EmployeeModel);
    }

    void DeleteEmployee(int id)
    {
        employeeCrudService.DeleteEmployee(id);
        employeesList = employeeCrudService.GetAllEmployees();
    }
}
Step 4: Finally, run the application. Now, you can add, edit, and delete employee records seamlessly with the Data Form component.
Refer to the following images.
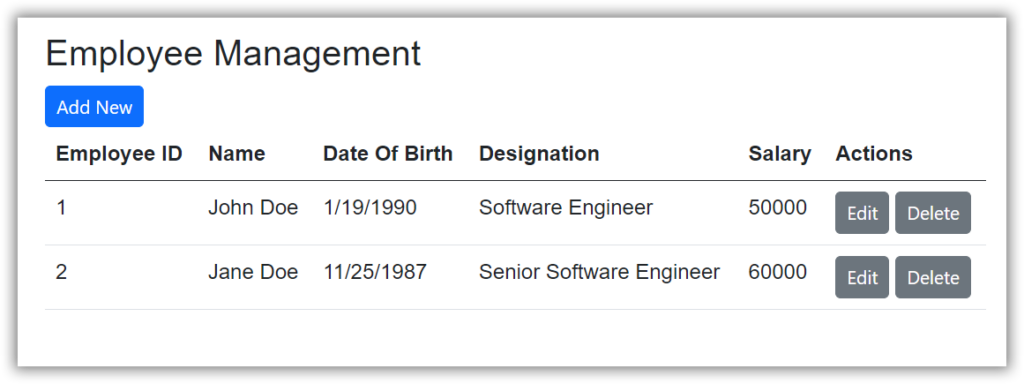
Edit and Delete Data Form
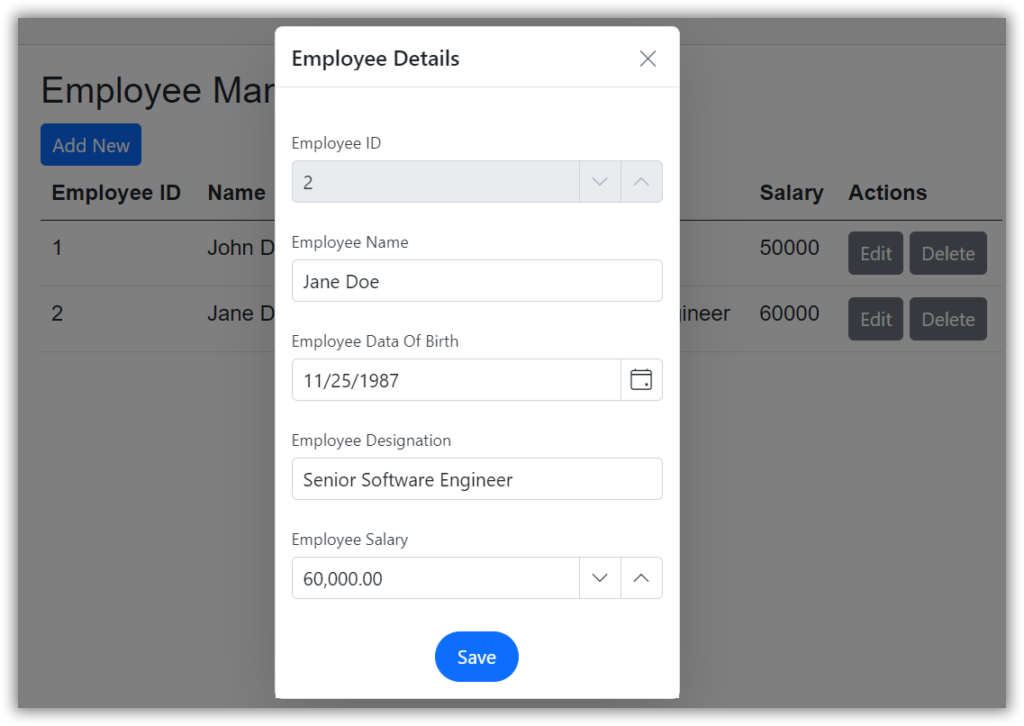
Add New Data Form
GitHub Reference
You can download the complete source code of this example from the GitHub repository.
Conclusion
Thanks for reading! By following these comprehensive steps, you can effectively add, edit, and delete employee records seamlessly with the Blazor Data Form component.
Try our Blazor component by downloading a free 30-day trial or from our NuGet package. Feel free to look at our online examples and documentation to explore other available features.
If you need assistance, please do not hesitate to contact us via our support forum, support portal, or feedback portal. We are always eager to help you!
Related Blogs
Subscribe to my newsletter
Read articles from syncfusion directly inside your inbox. Subscribe to the newsletter, and don't miss out.
Written by
syncfusion
syncfusion
Syncfusion provides third-party UI components for React, Vue, Angular, JavaScript, Blazor, .NET MAUI, ASP.NET MVC, Core, WinForms, WPF, UWP and Xamarin.