Containerize Your Environment: VS Code Dev Containers Explained
 Lukas Rottach
If you've ever struggled with configuring your development environment or spent hours troubleshooting why your colleague's code runs smoothly, but yours doesn’t. Visual Studio Code Dev Containers might just become your new best friend.
Imagine packing your cozy development environment, your favorite tools, extensions, and even that quirky config file you can't live without into a neat little container that runs consistently wherever you take it. No more hours spent troubleshooting environment mismatches or chasing down obscure dependencies.
In today's post, we'll dive into how Dev Containers can simplify your life, save your sanity, and maybe even keep your coworkers from secretly judging you. Let’s go!
Foreword
Visual Studio Code Dev Containers provide a seamless way to create, manage, and standardize development environments using container technology. Simply put, Dev Containers package your development setup, tools, runtimes, dependencies, and settings inside portable containers that you can easily share and reuse across different machines or even entire teams.
The key benefit? Consistency. Your code and development environment remain identical whether you're working from your home laptop, office desktop, or even the cloud. No more "works on my machine" syndrome.
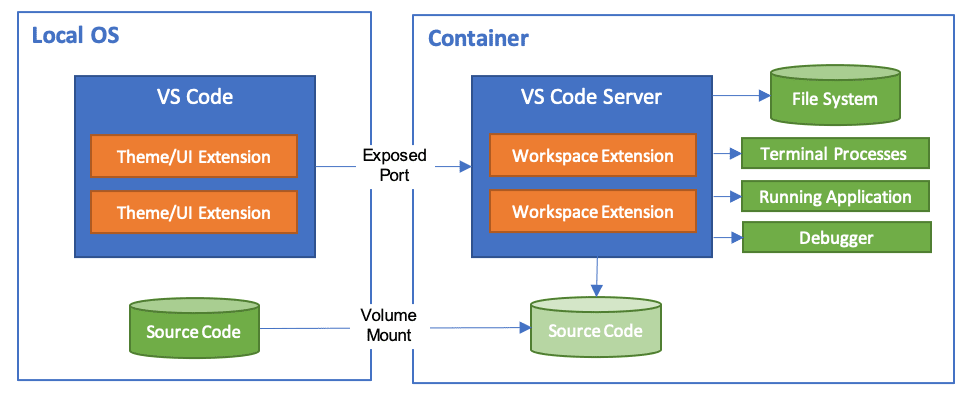
At a high level, Dev Containers leverage Docker and container images to spin up isolated, pre-configured environments directly within Visual Studio Code. All you need is a configuration file (devcontainer.json) to define your development container, specifying things like the base image, extensions, environment variables, and more. When you open your project in VS Code, it automatically detects your Dev Container configuration, builds or pulls the required image, and spins up your ready-to-go, standardized workspace.
In this blog post, I'll take you through how Dev Containers work, explore their best use cases, share my personal experiences, and give you both simple and more advanced examples of defining your very own Dev Containers. Let’s get started!
While this blog post primarily focuses on Docker-based Visual Studio Code Dev Containers, it's worth mentioning that you're not strictly limited to Docker. If you prefer an open-source, daemonless alternative, you can also use Podman with a few tweaks and adjustments. I've already covered how to set this up in another blog post, so feel free to check that out if Podman is more your style!
➡️ Check it out: Switching VS Code Dev Containers from Docker to Podman
Personal Notes 🧑💻
As someone who is working on multiple customer projects at once, each with their own unique tools, dependencies, and sometimes conflicting software versions. Maintaining sanity across environments used to be quite a challenge. Most of my professional work revolves around infrastructure as code, automation, and various Azure solutions. Throw in some occasional personal open-source projects, and you quickly find yourself drowning in a sea of virtual environments, installations, and configurations. Trust me, I've been there!
To add another layer of complexity (because who doesn’t love a bit of extra challenge?), I use different operating systems depending on context: at work, my main device is a Windows laptop; my personal development is done on a MacBook Pro. When I'm traveling or away from my desk, I rely heavily on an iPad Pro using GitHub Codespaces. You might already see the issue here, consistency across these diverse setups isn't exactly straightforward.
That's why I'm a huge fan of Visual Studio Code Dev Containers. They allow me to create repeatable, predictable environments that just work no matter where I open them. Whether I'm developing a Terraform module on my Windows laptop, tweaking automation scripts on my MacBook Pro, or quickly reviewing pull requests on my iPad via GitHub Codespaces, Dev Containers ensure my workflow remains consistent and frictionless.
A simple setup
Enough text. Let’s dive right in. I hope you are ready! First I want to start with a more simple, single file setup. The whole Dev Container configuration will live within a single configuration file.
When setting up Dev Containers for your project, there are some rules to follow to ensure everything works and that VS Code recognizes our configuration later.
The easiest way to get startet with Dev Containers is to install the VS Code Dev Containers extension, open the command palette and run >Dev Containers: New Dev Container….

This will guide you through a simple process to create your first basic Dev Container, which is a great starting point before expanding it further.
During the setup, you will be asked to choose the following options:
Choose a pre-configured template as a starting point, based on your project
Additional features to add to your configuration
In my case, I went for a simple Ubuntu container and added PowerShell and Terraform as features.

This will create a very simple Dev Container definition for us, giving you an idea of what it might look like. In this case only the three following properties have been configured:
Name
Source Image
Features
// For format details, see https://aka.ms/devcontainer.json. For config options, see the
// README at: https://github.com/devcontainers/templates/tree/main/src/ubuntu
{
    "name": "Ubuntu",
    // Or use a Dockerfile or Docker Compose file. More info: https://containers.dev/guide/dockerfile
    "image": "mcr.microsoft.com/devcontainers/base:jammy",
    "features": {
        "ghcr.io/devcontainers/features/powershell:1": {},
        "ghcr.io/devcontainers/features/terraform:1": {}
    }

    // Use 'forwardPorts' to make a list of ports inside the container available locally.
    // "forwardPorts": [],

    // Use 'postCreateCommand' to run commands after the container is created.
    // "postCreateCommand": "uname -a",

    // Configure tool-specific properties.
    // "customizations": {},

    // Uncomment to connect as root instead. More info: https://aka.ms/dev-containers-non-root.
    // "remoteUser": "root"
}
Of course, you can do much more here. For example, let's add some extensions we want to pre-install in our container, so we don't have to do it manually every time we rebuild the container.
Side note: I highly recommend defining the required extensions for a project in the Dev Container configuration. This ensures that every developer uses the correct extensions right from the start.
// For format details, see https://aka.ms/devcontainer.json. For config options, see the
// README at: https://github.com/devcontainers/templates/tree/main/src/ubuntu
{
    "name": "Ubuntu",
    // Or use a Dockerfile or Docker Compose file. More info: https://containers.dev/guide/dockerfile
    "image": "mcr.microsoft.com/devcontainers/base:jammy",
    "features": {
        "ghcr.io/devcontainers/features/powershell:1": {},
        "ghcr.io/devcontainers/features/terraform:1": {}
    },
    "customizations": {
        "vscode": {
            // Add some extensions here
            "extensions": [
                "GitHub.copilot",
                "GitHub.copilot-chat",
                "hashicorp.terraform",
                "ms-vscode.powershell"
            ]
        }
    }

    // Use 'forwardPorts' to make a list of ports inside the container available locally.
    // "forwardPorts": [],

    // Use 'postCreateCommand' to run commands after the container is created.
    // "postCreateCommand": "uname -a",

    // Configure tool-specific properties.
    // "customizations": {},

    // Uncomment to connect as root instead. More info: https://aka.ms/dev-containers-non-root.
    // "remoteUser": "root"
}
Some more capabilities of our Dev Container you can see in that default definition are the following:
forwardPorts: Specifies a list of container ports you'd like forwarded and accessible from your local machine. Useful for testing web servers, APIs, or databases running inside your Dev Container.
Personal Note: I don't use this feature often because I'm not a web developer. Occasionally, I configure these ports in projects with Azure Functions.postCreateCommand: Allows you to define a command or script that's executed automatically once the container has been fully set up and created. Handy for installing additional dependencies, starting services, or verifying your setup.customizations: Provides a way to configure additional, tool-specific settings. You might use this to fine-tune your Dev Container experience with tailored editor settings, extension configurations, or other integrations.remoteUser: Determines the default user account used inside your container. By default, Dev Containers usually run as a non-root user for security reasons, but you can uncomment this line and set it to"root"if your setup specifically requires elevated permissions.
Feel free to uncomment and experiment with these settings to tailor your Dev Container to exactly match your development workflow!
Now if you use your command pallet and run >Dev Containers: Reopen in Container. Watch how your container gets build and VS Code connects into it.

In most cases, VS Code automatically detects when you create a devcontainer.json file and offers to open it for you immediately.

What about Dev Container features?
Visual Studio Code Dev Containers come with a powerful, sometimes overlooked feature block called "features": {}. This little section of your devcontainer.json file allows you to quickly extend and enrich your development environment by adding pre-built scripts and tools in a modular fashion. Instead of manually scripting the installation and configuration of common development tools (think: Azure CLI, Terraform, Node.js, or Python), you can simply reference these ready-made “features” and let Dev Containers handle the heavy lifting.
In the example above, I added these two features:
ghcr.io/devcontainers/features/powershell:1ghcr.io/devcontainers/features/terraform:1
When browsing and adding features to your Dev Container directly within Visual Studio Code, you'll notice some of them have a little checkmark (✅) next to their name; for example, those provided by devcontainers. This checkmark indicates that the feature is officially maintained, verified, or recommended by Microsoft and the Dev Container community. Essentially, it's a quick visual confirmation that you're choosing a trusted and tested feature for your development environment, giving you confidence in its reliability and compatibility.
You can find all the sources for these features on GitHub. This means you can check out details like the installation process, scripts used, and documentation at any time. For example, take a look at the PowerShell feature here: https://github.com/devcontainers/features/tree/main/src/powershell
Something important about features
By default, using a feature like PowerShell or anything else, always installs the latest available version. In most of the projects I work on, that's not the best solution because these versions need to be controlled, tested, and maintained. If we check out the Terraform Dev Container feature on GitHub for example, we can see that there are some options available that default to the latest version.

Now if we want to lock the Terraform version for example, we add something like this to our feature in the devcontainer.json.
"features": {
        "ghcr.io/devcontainers/features/powershell:1": {},
        "ghcr.io/devcontainers/features/terraform:1": {
            "version": "1.5.7"
        }
    },
Now we have changed the default setting and can control the exact version from now on.
Advanced Dev Container Setups 🚀
Now that you've explored the basics, let's dive a bit deeper into the powerful capabilities of Visual Studio Code Dev Containers. While a simple devcontainer.json setup works perfectly for straightforward scenarios, more complex development environments often require an extra layer of control and customization.
Complex setups typically come into play when your project demands:
Specific software versions or custom builds that aren't available as pre-built features.
Complex dependencies or additional system configurations that are cumbersome to manage via inline scripts.
Extensive customization that needs to be repeatable and consistent across multiple environments or team members.
In such scenarios, you'll want to offload some (or even most) of your environment configuration logic into a dedicated Dockerfile. By doing so, you gain maximum flexibility: you can install precise dependencies, configure detailed settings, set environment variables, and more. All in a structured, reproducible, and transparent manner.
Here's how it works in practice:
Instead of defining everything directly within your
devcontainer.json, you reference a custom Dockerfile using the"dockerfile"property.Within your Dockerfile, you write standard Docker commands for installing packages, configuring the OS, setting up custom entry points, or adding files and scripts into the image.
When Visual Studio Code detects your Dev Container definition, it automatically builds your custom Docker image from the Dockerfile, ensuring your entire development environment is neatly packaged and ready for action.
This approach combines the convenience and portability of Dev Containers with the depth and flexibility of Dockerfiles. Giving you complete control over even the most sophisticated development environments.
Building the example
Let’s say you are working on a lot of automation stuff using PowerShell, Microsoft Graph and Azure. In this example we want to build a Dev Container setup which does the following.
Create a container using an Ubuntu 24.04 image
Install all the required dependencies
Installs PowerShell (newest version)
Installs
Microsoft.GraphandAzPowerShell modules
Side note: In my setup, I chose a small workaround. By default, Docker tries to build the container using an Ubuntu (arm-based) image on my MacBook Pro (Apple Silicon). This causes the installation of most packages and PowerShell to fail. So, I am forcing Docker to use an amd64 image of Ubuntu, which means these containers will be emulated on my MacBook. A better solution would be to build this natively. I am currently working on a more elegant version.
For now, this works: FROM --platform=linux/amd64 ubuntu:24.04
In this scenario, a devcontainer.json file would look like this.
{
    "name": "PowerShell Development",

    "build": {
        "dockerfile": "Dockerfile",
        "context": "."
    },

    "customizations": {
        "vscode": {
            "extensions": [
                "ms-vscode.powershell"
            ],
            "settings": {
                "terminal.integrated.defaultProfile.linux": "pwsh",
                "terminal.integrated.profiles.linux": {
                    "pwsh": {
                        "path": "pwsh",
                        "icon": "terminal-powershell"
                    }
                }
            }
        }
    },

    // "remoteUser": "vscode",

    "forwardPorts": [],
    "postCreateCommand": "pwsh -Command 'Write-Host \"PowerShell environment ready with Az and Microsoft.Graph modules installed.\"'"
}
Which brings us to the Dockerfile where most of the magic is happening.
FROM --platform=linux/amd64 ubuntu:24.04

# Avoid prompts from apt
ENV DEBIAN_FRONTEND=noninteractive

# Install dependencies
RUN apt-get update && apt-get install -y \
    curl \
    apt-transport-https \
    software-properties-common \
    wget \
    ca-certificates \
    gnupg \
    lsb-release \
    git \
    && rm -rf /var/lib/apt/lists/*

# Install PowerShell 7 (latest)
RUN wget -q https://packages.microsoft.com/config/ubuntu/24.04/packages-microsoft-prod.deb \
    && dpkg -i packages-microsoft-prod.deb \
    && rm packages-microsoft-prod.deb \
    && apt-get update \
    && apt-get install -y powershell

# Install Az and Microsoft.Graph PowerShell modules
RUN pwsh -Command "Install-Module -Name Az -Force -AllowClobber -Scope AllUsers" \
    && pwsh -Command "Install-Module -Name Microsoft.Graph -Force -AllowClobber -Scope AllUsers"

# Set PowerShell as the default shell
SHELL ["pwsh", "-Command"]
You build a container with a configuration like this as usual. The build might take some time due to the PowerShell module installation. In the end, you should have an up-to-date Dev Container with both PowerShell modules pre-installed.

Closing Thoughts
With a more advanced Dev Container setup like this, the possibilities are virtually endless. You can tailor your container environment to perfectly match the unique requirements of even your most complex projects. The example provided here is meant more as inspiration, showing you what's possible and hopefully giving you the confidence to experiment further.
Feel free to explore, combine different approaches, and adapt the configurations to suit your specific needs. Remember, the best part about Dev Containers is their flexibility, enabling you to build environments exactly how you envision them. Happy containerizing! 🚀
GitHub Codespaces
If you're already excited about Dev Containers, here's another bonus: GitHub Codespaces leverages the same underlying Dev Container technology. This means everything you've learned in this post, from defining environments in your devcontainer.json file to creating advanced Dockerfile configurations, applies directly to Codespaces as well. By mastering Dev Containers, you're also gaining the skills needed to effortlessly customize your Codespaces environments, enabling you to maintain a seamless and consistent development workflow across local and cloud-based environments.
Git Line Ending Issues with WSL 💡
When developing on Windows using the Windows Subsystem for Linux (WSL), you might encounter an annoying Git issue: suddenly Git shows numerous modified files with no visible differences—except for line endings. This happens because Windows and Linux handle line endings differently by default. The most effective and straightforward solution is typically adding or updating a .gitattributes file in your repository. By explicitly defining how line endings should be handled (for example, forcing LF for most files and CRLF for batch scripts), you ensure consistency and prevent unnecessary Git headaches.
Rebuilding Dev Containers 🔄
One of my favorite things about Dev Containers is how effortless it is to rebuild your entire development environment. Made some changes to your configuration, installed new dependencies, or simply feeling your container setup got a little messy? No worries: just hit Ctrl/Cmd+Shift+P and select "Dev Containers: Rebuild Container". VS Code quickly tears down your existing environment and rebuilds it from scratch, applying all your latest configurations. It’s like hitting a reset button. Fast, consistent, and reliable. This makes troubleshooting and experimenting risk-free, since your environment is always just a rebuild away from being clean again!
Cheers. Have a good day.
Subscribe to my newsletter
Read articles from Lukas Rottach directly inside your inbox. Subscribe to the newsletter, and don't miss out.
Written by
Lukas Rottach
Lukas Rottach
I am an Azure Architect based in Switzerland, specializing in Azure Cloud technologies such as Azure Functions, Microsoft Graph, Azure Bicep and Terraform. My expertise lies in Infrastructure as Code, where I excel in automating and optimizing cloud infrastructures. With a strong passion for automation and development, I aim to share insights and practices to inspire and educate fellow tech enthusiasts. Join me on my journey through the dynamic world of the Azure cloud, where innovation meets efficiency.