Exploring the world of Flutter Web!
 NonStop io Technologies
Flutter has proven to be a game-changer in the app development landscape and is emerging as a very useful tool for developers with its captivating features like cross-platform, faster development and visually stunning capabilities. While it has proven itself of already be a robust framework for iOS and Android, it has now extended its capabilities to support the Web since its 2.0 release and the latest version platforms like Windows, Linux, and macOS. This means applications can now be developed for all these platforms from a single codebase, leading to significant time and cost savings.
Why Flutter Web?
Flutter, known for its cross-platform capabilities and beautiful UI designs, extends its reach to the web with Flutter Web. This technology has proven to be very useful for developers to build web applications using the same codebase they use for mobile applications, providing a seamless development experience.
Advantages of Flutter Web:
Single Codebase: With Flutter, you can write code once which can be deployed across multiple platforms, including the web, mobile, and desktop.
Hot Reload: Flutter’s hot reload feature enables rapid iteration and real-time updates, allowing developers to see changes instantly as they make changes in the code.
Performance: Flutter Web delivers high performance, all credits to its compiled to JavaScript code, resulting in fast load times and smooth animations.
Rich UI Components: Flutter offers a rich set of customizable UI components, these include everything from buttons and navigation bars to complex layouts allowing developers to create visually stunning web applications with ease.
Skia graphics engine: Flutter uses the Skia graphics engine, which enables us to have high-quality rendering and smooth animations. This ensures that the built web applications deliver excellent performance and visual appeal.
Plugins and Packages: Flutter provides a wide and varied range of plugins and packages to integrate native device features into web applications and extend the functionality of our web app.
Let’s get started to dive deep into building the Flutter web app
1. Web configuration required for Flutter:
To get started with Flutter web development, you’ll need to configure your development environment for web support.
Enable Web Support: enable web support by running the following command in your terminal or command prompt:
flutter config --enable-web
2. Creating your first Flutter Web project
Open your terminal or command prompt and navigate to the directory where you’d like to create your project. Run the following command to create a new Flutter web project:
flutter create my_web_app
This command will generate a new Flutter project with the necessary files and folders for web development.
3. Building responsive Web apps with Flutter
Now your Flutter web development environment is set up, let’s dig deeper into building responsive web apps using Flutter.
when it comes to app designing there are 2 popular design approaches that one can follow — adaptive design and responsive design.
Adaptive design: It is an approach that involves creating separate interfaces for different screen sizes and device types which can give tailored experiences for users on different devices. In other words, through this design approach, we would be able to create different layouts for a smartphone and a desktop. The app will detect the device’s screen size and then load the appropriate layout.
Responsive design: this approach, on the other hand, involves creating a single layout that can adjust to different screen sizes and device types and the app will adjust the layout to fit the available screen space. This approach can create a more consistent experience across different devices, and it can be more efficient to design and maintain.
How to create a Responsive Flutter App?
3.1 Using Layout Widgets
Flutter provides a wide range of layout widgets like ‘Row’, ‘Column’, ‘Flexible’ and ‘Expanded’ to create responsive web apps. Expanded and Flexible Widgets are two widgets that can be used inside Row, Column, to give their children the flexibility to expand to fill the available space. The only difference is that the Expanded widget requires the child to fill all the available space, whereas Flexible does not. we can also give percentages instead of hardcoded values.
Column(
  children:<Widget>[
    Row(
      children:<Widget>[
      buildExpandedWidget(),
      buildFlexibleWidget(),
      ]
    ),
    Row(
      children:<Widget>[
      buildExpandedWidget(),
      buildExpandedWidget(),
    ],
   ),
],
);
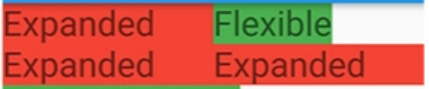
Expanded and Flexible widgets from the above example
3.2 Using MediaQuery
MediaQuery can be used to get the real-time size (width/height) and orientation (portrait/landscape) of the window screen. It is useful in case if you need to decide based on the complete device screen context rather than just the size of a particular widget.
class HomePage extends StatelessWidget {
@override
Widget build(BuildContext context) {
Size screenSize = MediaQuery.of(context).size;
Orientation orientation = MediaQuery.of(context).orientation;

return Scaffold(
  body: Container(
  color: Colors.blue,
  child: Center(
    child: Text(
        'View\n\n' +
        '[MediaQuery width]: ${screenSize.width.toStringAsFixed(3)}\n\n' +
        '[MediaQuery height]: ${screenSize.height.toStringAsFixed(3)}\n\n' +
        '[MediaQuery orientation]: $orientation',
        style: TextStyle(color: Colors.white, fontSize: 20),
        ),
      ),
    ),
  );
  },
}
3.3 Using LayoutBuilder
The main difference between Media Query and Layout Builder is that Media Query is based on the full context of the screen but Layout Builder determines the maximum width and height of parent widget only. This is useful when the parent constrains the child’s size and doesn’t depend on the child’s intrinsic size
LayoutBuilder(
  builder: (BuildContext context, BoxConstraints constraints) {
    if (constraints.maxWidth > 600) {
      _buildWideContainers();
    } else {
      _buildWideContainers();
    },
  },
);
Widget _buildNormalContainer() {
    return Center(
      child: Container(
        height: 100.0,
        width: 100.0,
        color: Colors.red,
      ),
    );
  }

  Widget _buildWideContainers() {
    return Center(
      child: Row(
        mainAxisAlignment: MainAxisAlignment.spaceEvenly,
        children: <Widget>[
          Container(
            height: 100.0,
            width: 100.0,
            color: Colors.red,
          ),
          Container(
            height: 100.0,
            width: 100.0,
            color: Colors.yellow,
          ),
        ],
      ),
    );
  }
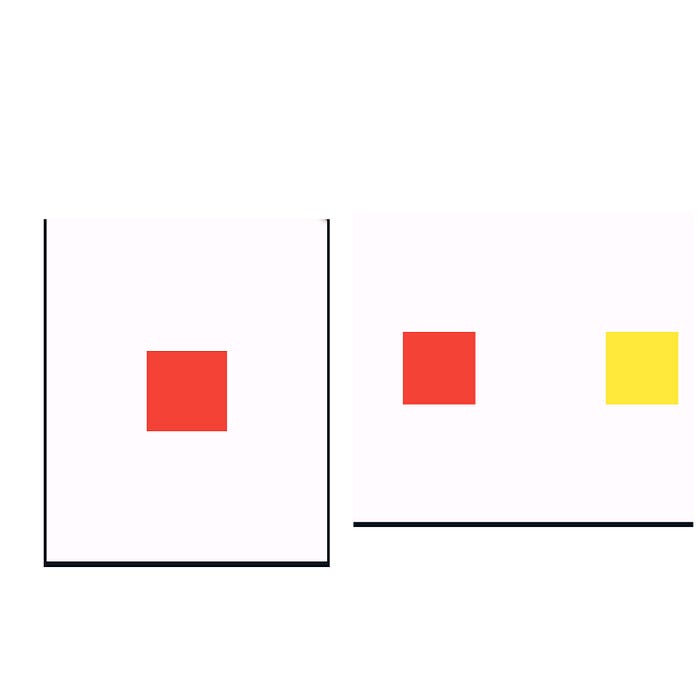
implementation for the above example: the left side is for width <600 and the right for width >600
4. Running the Web App
Now at this point, we have completed the above steps and coding required and are now ready to run our app to test it on Chrome browser.
To run your Flutter web app, use the following command in your terminal:
flutter run -d chrome
5. Testing and Debugging the Web App:
Once you are ready with your web app it is very crucial to test and debug it across mobile and desktop platforms to check whether it is functioning as expected across different device sizes. various tools are being laid out by Flutter like Flutter DevTools and device preview to help developers test and debug their web apps efficiently.
6. Deploying the Web App
Run the following command to generate a release build:
flutter build web
This command will generate a build/web directory containing optimized files for deployment. Flutter provides various deployment options for web apps, including hosting platforms like Firebase Hosting, GitHub Pages, and Netlify. you can deploy your Flutter web app and make it accessible to users through your chosen hosting platform.
A release build uses dart2js (instead of the development compiler) to produce a single JavaScript file
main.dart.js. You can create a release build using release mode (flutter run --release) or by usingflutter build web. This populates abuild/webdirectory with built files, including anassetsdirectory, which needs to be served together.
Adding Web Support to an existing app
To add web support to an existing project created using a previous version of Flutter, run the following command from your project’s top-level directory:
flutter create --platforms web .
Conclusion
Following along with this article you would’ve successfully got insights about creating your basic flutter web app. The article covered the reasons why you should consider Flutter to build your web app, its advantages and the basic procedure of creating a web app.
It covered working with various widgets we can choose to build desired layouts and UI for a responsive web app. Finally, you also learned about how to run, test, and prepare your app for release.
Subscribe to my newsletter
Read articles from NonStop io Technologies directly inside your inbox. Subscribe to the newsletter, and don't miss out.
Written by
NonStop io Technologies
NonStop io Technologies
Product Development as an Expertise Since 2015 Founded in August 2015, we are a USA-based Bespoke Engineering Studio providing Product Development as an Expertise. With 80+ satisfied clients worldwide, we serve startups and enterprises across San Francisco, Seattle, New York, London, Pune, Bangalore, Tokyo and other prominent technology hubs.