Integration of E2E Testing in a CI/CD Pipeline
 Tejas Kumar
E2E Testing
E2E Testing is a method to test a software from the consumer's perspective. It involves simulating real scenarios, including user interfaces, backend testing. The purpose of E2E testing is to validate the application’s overall behavior, including its functionality, reliability, performance, and security.
E2E Testing helps in identifying issues when one or more components interact with each other. It is usually done after integration testing, which tests individual component. Then E2E tests determines if the components interact well or not, which ensures that the application meets the user’s requirements.
For an in-depth comparison between system testing and integration testing, you can read the article titled "System Testing vs Integration Testing: Why They Matter?"
Automation Of E2E Tests with CI/CD Workflows
As your project grows, manual E2E Tests become less manageable. This is especially true of testing user interfaces, because a single action in a UI can lead to many other actions. This complexity makes automating tests essential. End-to-end tests can help automate user-interaction testing, saving valuable time.
With the speed software changes nowadays, automated tests have become absolutely necessary for developing a good software.
Once we have the parameters and test cases to work upon, we can implement it via code in a CI/CD Pipeline to run on every push event in a software repository. It helps you in identifying bugs earlier making a reliable software to use.
Steps to automate E2E Tests:
Analyse and make it clear on the aspects the application is supposed to be tested.
Setup test environment.
Analyse requirements and dependencies
List down what response should happen during the test.
Design test cases
Setup Workflow and define the events for the workflow to run(eg. on commit and push)
Run, test and revise
Challenges During Automated Testing
Here are the 3 most common test automation challenges that teams usually face while adopting automation testing:
Test Script Issues: Test scripts can be brittle, breaking with minor changes in the UI or API endpoints. This is especially true for tests that rely heavily on specific selectors or expected responses that are subject to change.
Test Code Duplication: Duplication in test scripts can lead to maintenance nightmares, where a change in the application requires updates in multiple places within the test suite.
Over-reliance on UI for Data Verification: Relying too much on UI elements for data verification can make tests slower and more prone to failure due to rendering issues or changes in the UI.
Unnecessary Noisy Data: Unnecessary noisy data in test scripts and test results can obscure important information, making it difficult to identify actual issues and understand the state of the application under test leading to flaky tests.
How Keploy solves these challenges:
A few months ago, I discovered Keploy, an open-source utility designed to transform user traffic into test cases and data stubs. Keploy simplifies the process of testing backend applications using authentic data by generating mocks and stubs, enhancing testing efficiency and accuracy.
Keploy streamlines the process of capturing and converting real-world user traffic into mocks and stubs for subsequent replay testing. It also introduces Test Deduplication, effectively eliminating redundant tests, thus addressing a significant challenge in the testing domain. Moreover, Keploy enhances its utility by offering native integration with leading testing frameworks, including JUnit, gotest, pytest, and Jest, further simplifying the testing workflow.
To demonstrate how Keploy works, let's outline a simplified workflow to illustrate its capabilities in capturing user traffic and converting it into test cases and data stubs for a backend application.
To install Keploy, run the following command:
curl -Ohttps://raw.githubusercontent.com/keploy/keploy/main/keploy.sh&& sourcekeploy.shkeploy
(On MacOS and Windows, additional tools are required for Keploy due to the lack of native eBPF support.)
You should see something like this:
       ▓██▓▄
    ▓▓▓▓██▓█▓▄
     ████████▓▒
          ▀▓▓███▄      ▄▄   ▄               ▌
         ▄▌▌▓▓████▄    ██ ▓█▀  ▄▌▀▄  ▓▓▌▄   ▓█  ▄▌▓▓▌▄ ▌▌   ▓
       ▓█████████▌▓▓   ██▓█▄  ▓█▄▓▓ ▐█▌  ██ ▓█  █▌  ██  █▌ █▓
      ▓▓▓▓▀▀▀▀▓▓▓▓▓▓▌  ██  █▓  ▓▌▄▄ ▐█▓▄▓█▀ █▓█ ▀█▄▄█▀   █▓█
       ▓▌                           ▐█▌                   █▌
        ▓

Keploy CLI

Available Commands:
  example         Example to record and test via keploy
  generate-config generate the keploy configuration file
  record          record the keploy testcases from the API calls
  test            run the recorded testcases and execute assertions
  update          Update Keploy

Flags:
      --debug     Run in debug mode
  -h, --help      help for keploy
  -v, --version   version for keploy

Use "keploy [command] --help" for more information about a command.
Clone this sample application and move to the application directory and download its dependencies using go mod download . (You would need Golang)
In the application directory, run the following command to start PostgresDB instance:
docker-compose up -d
Now, we will create the binary of our application:-
go build
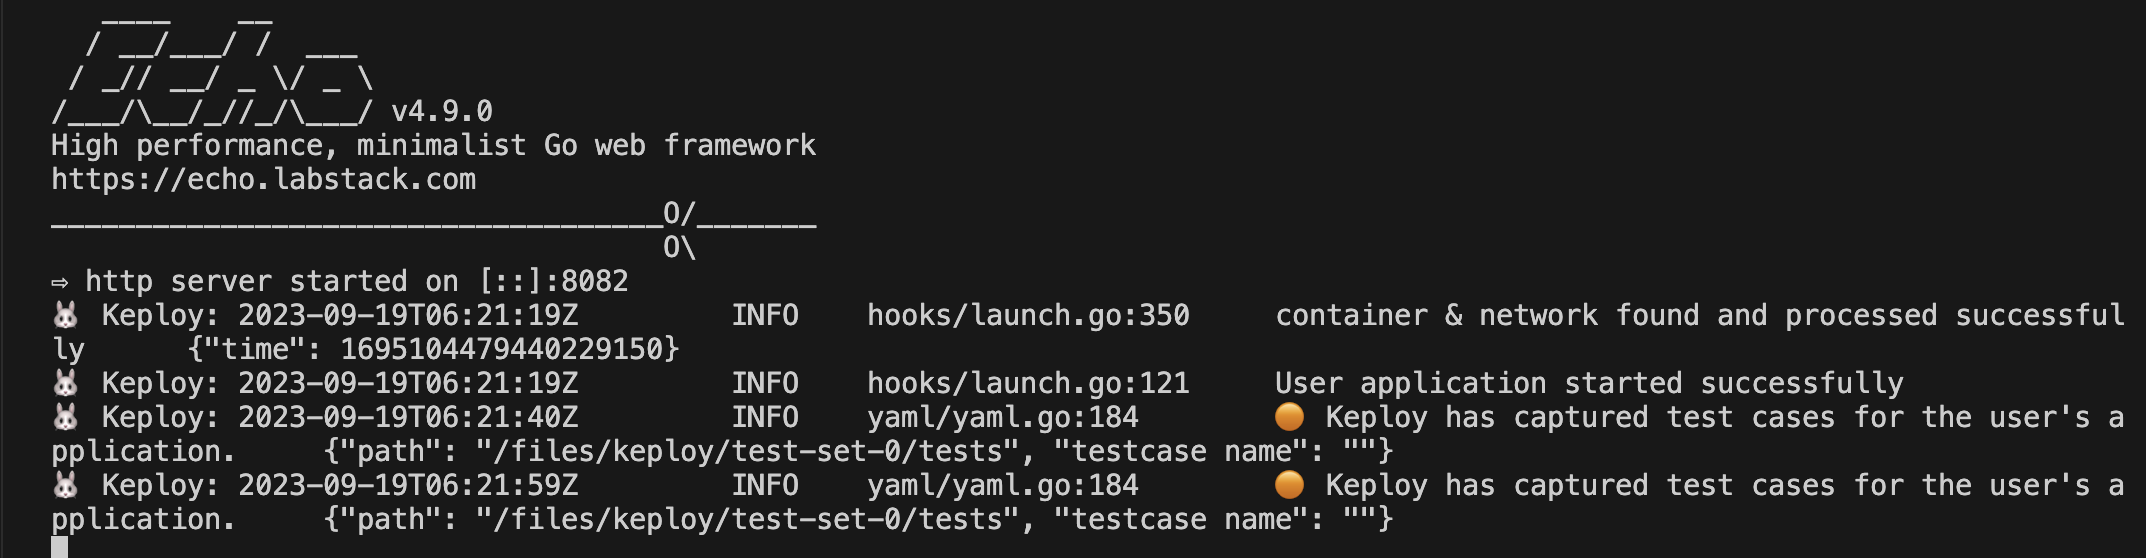
Now we are ready to record user-traffic to generate tests:
sudo -E PATH=$PATH keploy record -c "./echo-psql-url-shortener"
Generate testcases
To generate testcases we just need to make some API calls. You can use Postman, Hoppscotch, or simply curl:
curl --request POST \
  --url http://localhost:8082/url \
  --header 'content-type: application/json' \
  --data '{
  "url": "https://google.com"
}'
this will return the shortened url.
{
  "ts": 1645540022,
  "url": "http://localhost:8082/Lhr4BWAi"
}
GET Request:
curl --request GET \ --url http://localhost:8082/Lhr4BWAi
Now, let's see the magic! 🪄💫
Now both these API calls were captured as a testcase and should be visible on the Keploy CLI. You should be seeing an app named keploy folder with the test cases we just captured and data mocks created:
This is a single generated mock sample:
version: api.keploy.io/v1beta1
kind: Postgres
name: mock-0
spec:
    metadata:
        type: config
    postgresrequests:
        - identifier: StartupRequest
          length: 102
          payload: AAAAZgADAABkYXRhYmFzZQBwb3N0Z3JlcwB1c2VyAHBvc3RncmVzAGNsaWVudF9lbmNvZGluZwBVVEY4AGV4dHJhX2Zsb2F0X2RpZ2l0cwAyAGRhdGVzdHlsZQBJU08sIE1EWQAA
          startup_message:
            protocolversion: 196608
            parameters:
                client_encoding: UTF8
                database: postgres
                datestyle: ISO, MDY
                extra_float_digits: "2"
                user: postgres
          auth_type: 0
    postgresresponses:
        - header: [R]
          identifier: ServerResponse
          length: 102
          authentication_md5_password:
            salt: [217, 186, 178, 46]
          msg_type: 82
          auth_type: 5
    reqtimestampmock: 2024-03-30T00:14:05.937758635+05:30
    restimestampmock: 2024-03-30T00:14:05.938960021+05:30
connectionId: "0"
---
Run the captured testcases
Now that we have our testcase captured, run the generated tests:
sudo -E PATH=$PATH keploy test -c "./echo-psql-url-shortener" --delay 10
So no need to setup dependencies like Postgres, web-go locally or write mocks for your testing.
The application thinks it's talking to Postgres
We will get output something like this:
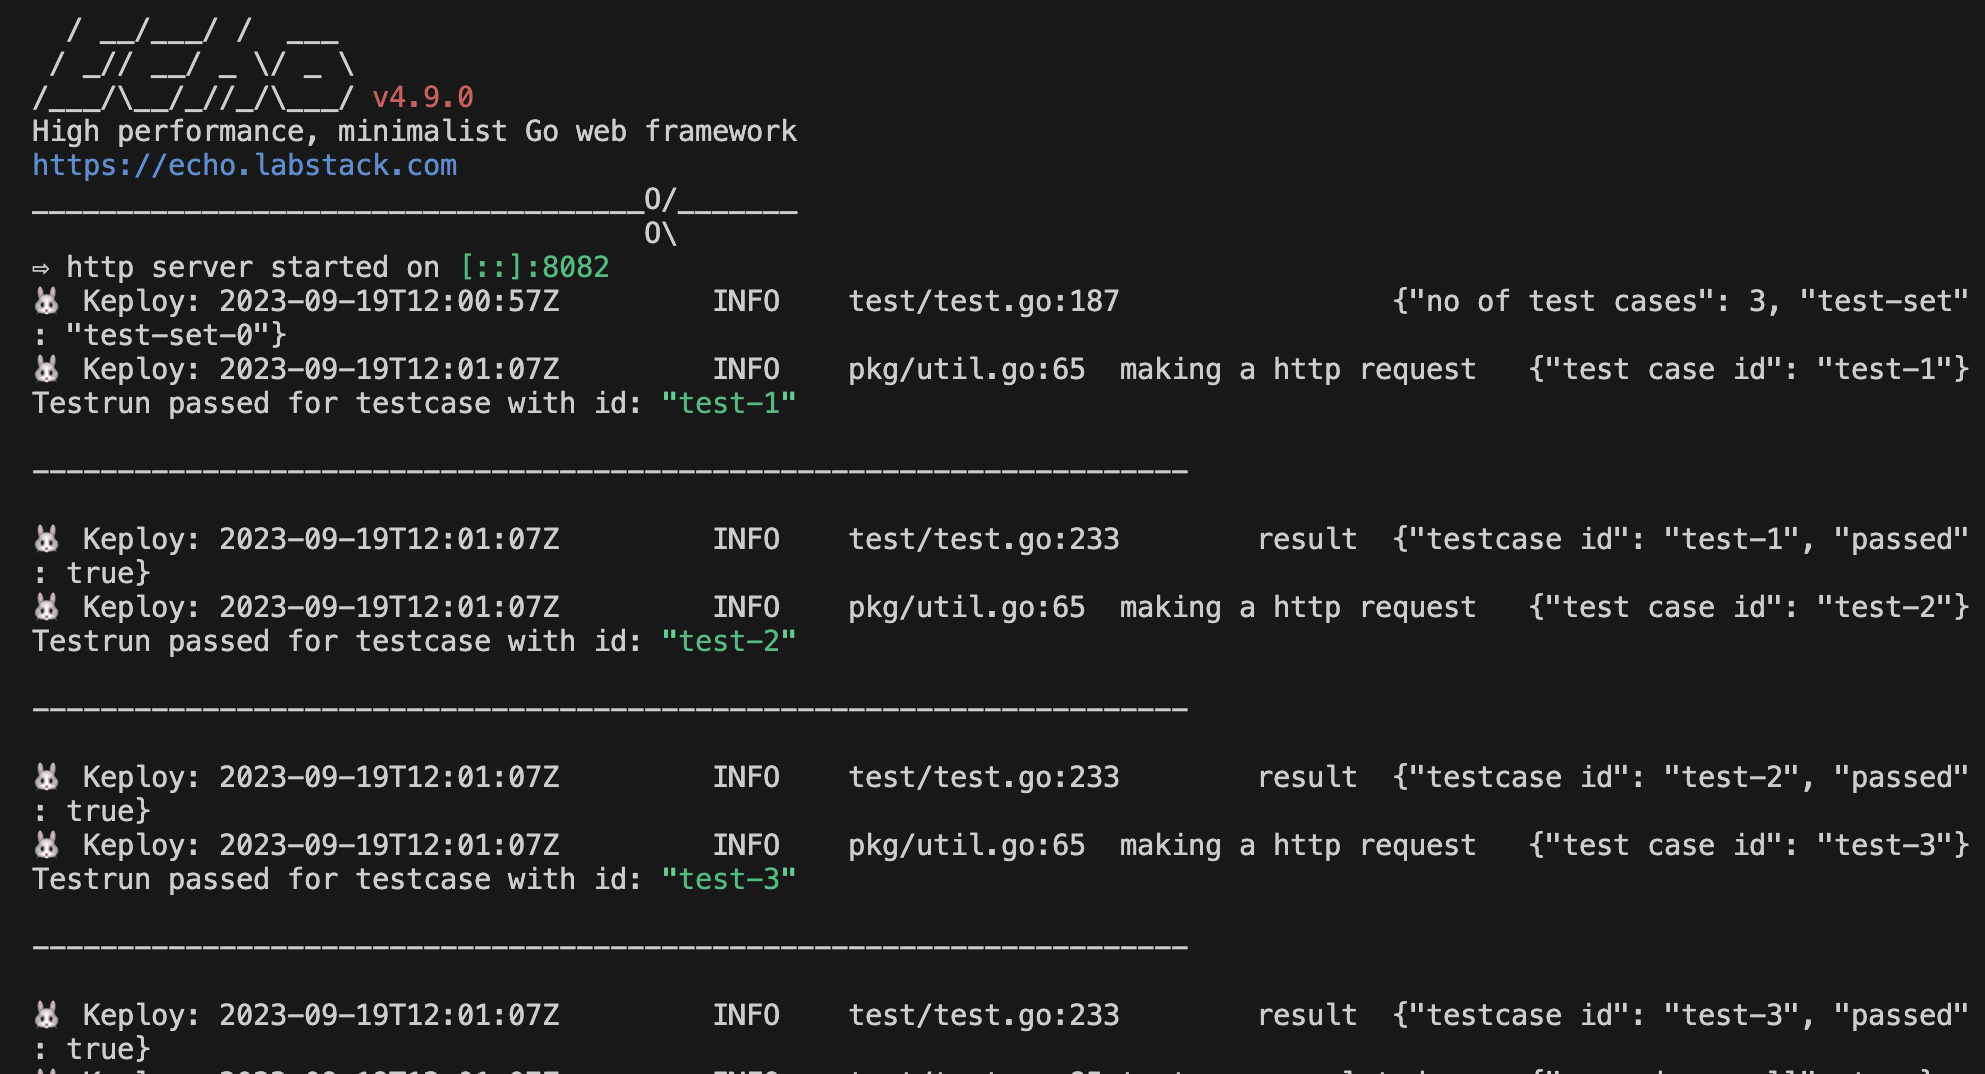
A reports folder will be generated in the Keploy directory to see the generated test results and it will look something like this :
version: api.keploy.io/v1beta1
name: test-set-0-report
status: PASSED
success: 1
failure: 0
total: 1
tests:
    - kind: Http
      name: test-set-0
      status: PASSED
      started: 1711738084
      completed: 1711738084
      test_case_path: /home/erakin/Desktop/samples-go/echo-sql/keploy/test-set-0
      mock_path: /home/erakin/Desktop/samples-go/echo-sql/keploy/test-set-0/mocks.yaml
      test_case_id: test-1
      req:
        method: POST
        proto_major: 1
        proto_minor: 1
        url: http://localhost:8082/url
        header:
            Accept: '*/*'
            Content-Length: "33"
            Content-Type: application/json
            Host: localhost:8082
            User-Agent: curl/8.2.1
        body: |-
            {
              "url": "https://github.com"
            }
        timestamp: 2024-03-30T00:14:20.849621269+05:30
      resp:
        status_code: 200
        header:
            Content-Length: "66"
            Content-Type: application/json; charset=UTF-8
            Date: Fri, 29 Mar 2024 18:44:20 GMT
        body: |
            {"ts":1711737860850126711,"url":"http://localhost:8082/4KepjkTT"}
        status_message: OK
        proto_major: 0
        proto_minor: 0
        timestamp: 2024-03-30T00:14:22.932135785+05:30
      noise:
        header.Date: []
      result:
        status_code:
            normal: true
            expected: 200
            actual: 200
        headers_result:
            - normal: true
              expected:
                key: Content-Length
                value:
                    - "66"
              actual:
                key: Content-Length
                value:
                    - "66"
            - normal: true
              expected:
                key: Content-Type
                value:
                    - application/json; charset=UTF-8
              actual:
                key: Content-Type
                value:
                    - application/json; charset=UTF-8
            - normal: true
              expected:
                key: Date
                value:
                    - Fri, 29 Mar 2024 18:44:20 GMT
              actual:
                key: Date
                value:
                    - Fri, 29 Mar 2024 18:48:04 GMT
        body_result:
            - normal: false
              type: JSON
              expected: |
                {"ts":1711737860850126711,"url":"http://localhost:8082/4KepjkTT"}
              actual: |
                {"ts":1711738084114782375,"url":"http://localhost:8082/4KepjkTT"}
        dep_result: []
test_set: test-set-0
Additionally, if writing Keploy's command, seems repetitive and boring, we can also leverage its configuration file to list everything in one-go.
Generate keploy-config:
keploy config --generate --path "./config-dir/"
Here is the keploy-config file:
path: ""
command: ""
port: 0
proxyPort: 16789
dnsPort: 26789
debug: false
disableTele: false
inDocker: false
containerName: ""
networkName: ""
buildDelay: 30s
test:
    selectedTests: {}
    globalNoise:
        global: {}
        test-sets: {}
    delay: 5
    apiTimeout: 5
    coverage: false
    coverageReportPath: ""
    ignoreOrdering: true
    mongoPassword: "default@123"
    language: ""
    removeUnusedMocks: false
record:
    recordTimer: 0s
    filters: []
configPath: ""
bypassRules: []
keployContainer: "keploy-v2"
keployNetwork: "keploy-network"

# Example on using tests
#tests:
#  filters:
#   - path: "/user/app"
#     urlMethods: ["GET"]
#     headers: {
#       "^asdf*": "^test"
#     }
#     host: "dc.services.visualstudio.com"
#Example on using stubs
#stubs:
#  filters:
#   - path: "/user/app"
#     port: 8080
#   - port: 8081
#   - host: "dc.services.visualstudio.com"
#   - port: 8081
#     host: "dc.services.visualstudio.com"
#     path: "/user/app"
    #
#Example on using globalNoise
#globalNoise:
#   global:
#     body: {
#        # to ignore some values for a field,
#        # pass regex patterns to the corresponding array value
#        "url": ["https?://\S+", "http://\S+"],
#     }
#     header: {
#        # to ignore the entire field, pass an empty array
#        "Date": [],
#      }
#    # to ignore fields or the corresponding values for a specific test-set,
#    # pass the test-set-name as a key to the "test-sets" object and
#    # populate the corresponding "body" and "header" objects
#    test-sets:
#      test-set-1:
#        body: {
#          # ignore all the values for the "url" field
#          "url": []
#        }
#        header: {
#          # we can also pass the exact value to ignore for a field
#          "User-Agent": ["PostmanRuntime/7.34.0"]
#        }
You can also filter out the noisy data(e.g Date) to have accurate tests
Now that you are aware of Keploy's capabilites, let's go ahead and see what else can it do!
Keploy Integration with native frameworks
As mentioned earlier, we can integrate Keploy with native frameworks like JUnit, go-test, pytest as well as Jest to do more stuff like Test Coverage etc.
For example, here is how we can integrate Keploy with Jest:
Pre-requisites
Get Keploy jest sdk
Install the latest release of the Keploy Jest SDK
npm i @keploy/sdk
Update package file
Update the package.json file that runs the application:
  "scripts": {
    //other scripts
    "test": "jest --coverage --collectCoverageFrom='src/**/*.{js,jsx}'",
    "coverage": "nyc npm test && npm run coverage:merge && npm run coverage:report",
    "coverage:merge": "mkdir -p ./coverage && nyc merge ./coverage .nyc_output/out.json",
    "coverage:report": "nyc report --reporter=lcov --reporter=text"
    //other scripts
  }
Usage
For the code coverage for the keploy API tests using the jest integration, you need to add the following test to your Jest test file. It can be called as Keploy.test.js.
const {expect} = require("@jest/globals");
const keploy = require("@keploy/sdk");
const timeOut = 300000;

describe(
  "Keploy Server Tests",
  () => {
    test(
      "TestKeploy",
      (done) => {
        const cmd = "npm start";
        const options = {};
        keploy.Test(cmd, options, (err, res) => {
          if (err) {
            done(err);
          } else {
            expect(res).toBeTruthy(); // Assert the test result
            done();
          }
        });
      },
      timeOut
    );
  },
  timeOut
);
Now let's run jest tests along keploy using command:-
keploy test -c "npm test" --delay 15 --coverage
To get Combined coverage:
keploy test -c "npm run coverage" --delay 10 --coverage
Integrating Keploy into workflows for automated testing
Keploy integration into CI/CD workflows enables automated testing by capturing API requests and responses during development. It generates test cases based on this captured data, allowing for continuous testing without manual intervention. This ensures that any changes in the codebase are automatically validated, enhancing the reliability and efficiency of the development process.
Let's perform a simple demonstration for automated testing using Keploy:
In this demo, we are going to run Keploy with a sample go application using echo framework and Postgres.
This is the Github workflow I created:
name: Golang On Linux

on: [push]

jobs:
  golang_linux:
    runs-on: ubuntu-latest

    steps:
    - name: Checkout repository
      uses: actions/checkout@v2

    - name: Set up Go
      uses: actions/setup-go@v2
      with:
        go-version: '^1.16'

    - name: Clone Keploy repository
      run: git clone https://github.com/keploy/keploy.git

    - name: Build Keploy from source
      run: |
        cd keploy
        go build -o keploy
      env:
        GO111MODULE: on

    - name: Move Keploy binary to accessible location
      run: sudo mv ./keploy/keploy /usr/local/bin

    - name: Verify Keploy installation
      run: keploy

    - name: Run shell script for application setup and testing
      run: |
        chmod +x ./.github/workflows/test_workflow_scripts/golang-linux.sh
        ./.github/workflows/test_workflow_scripts/golang-linux.sh
Along with a script:
#!/bin/bash

# Ensure the script stops on any error
set -e

# Assuming .github/workflows/test_workflow_scripts/test-iid.sh is executable and has the needed shebang
sudo bash ./.github/workflows/test_workflow_scripts/test-iid.sh

# Start a MongoDB container for the application's database needs
docker-compose up -d

# Clean existing Keploy configuration if present

# Generate a new Keploy configuration file
# Ensure keployv2 binary is in the PATH or provide an absolute path
keploy config --generate

# Update Keploy configuration for test specifics
sed -i 's/global: {}/global: {"body": {"ts":[]}}/' "./keploy.yml"
sed -i 's/ports: 0/ports: 5432/' "./keploy.yml"

# Remove old Keploy test data to start fresh
rm -rf ./keploy/

# Build the application binary
go build -o echoSql

# Record test cases and mocks with Keploy, adjusting for the application's startup
for i in {1..2}; do
  # Ensure Keploy and the application are available in the PATH or use absolute paths
  sudo keploy record -c "./echoSql" &
  sleep 10 # Adjust based on application start time

  # Make API calls to record
curl --request POST \
  --url http://localhost:8082/url \
  --header 'content-type: application/json' \
  --data '{
  "url": "https://google.com"
}'
curl --request GET \
  --url http://localhost:8082/Lhr4BWAi

  sleep 5 # Allow time for recording
  sudo kill $(pgrep echoSql)
  sleep 5
done

# Run recorded tests
# Ensure Keploy is in the PATH or use an absolute path
sudo keploy test -c "./echoSql" --delay 7

# Process test results for CI/CD feedback
report_file="./keploy/reports/test-run-0/test-set-0-report.yaml"
test_status1=$(grep 'status:' "$report_file" | head -n 1 | awk '{print $2}')
report_file2="./keploy/reports/test-run-0/test-set-1-report.yaml"
test_status2=$(grep 'status:' "$report_file2" | head -n 1 | awk '{print $2}')

if [ "$test_status1" = "PASSED" ] && [ "$test_status2" = "PASSED" ]; then
    echo "Tests passed"
    exit 0
else
    echo "Some tests failed"
    exit 1
fi
The workflow activates upon a push event to the repository. Here's the sequence it follows:
The code is built.
A Postgres instance is initiated.
The applications run, with Keploy recording all API calls.
Test sets are executed to validate the changes.
A report file is generated and reviewed to conclude the workflow.
This process is easily replicable on GitHub by cloning the repository and re-triggering the workflows using GitHub Runners. Similarly, this workflow can be adapted and implemented with other CI/CD tools like Jenkins and CircleCI, ensuring broad compatibility and flexibility for automated testing and integration.
Conclusion
In conclusion, automating End-to-End (E2E) testing within CI/CD workflows represents a pivotal advancement in the realm of software development and quality assurance. By leveraging tools like Keploy, developers can overcome traditional challenges associated with manual testing, such as inefficiency, inaccuracy, and the inability to keep pace with rapid development cycles. Keploy, with its innovative approach to generating test cases and data stubs from real user traffic, not only simplifies the testing process but also significantly enhances its effectiveness and reliability. Integrating such automation into CI/CD pipelines ensures that applications are rigorously tested from the end user's perspective, guaranteeing that each component functions harmoniously within the broader system. This shift towards automated E2E testing facilitates the delivery of high-quality software that meets user requirements and withstands the demands of the modern digital landscape, ultimately leading to more reliable, secure, and user-friendly applications.
Faq’s
1. What is E2E testing in the context of CI/CD pipelines?
End-to-end (E2E) testing verifies the entire application flow from frontend to backend. It ensures all integrated parts work as expected before deployment. In CI/CD, E2E tests run automatically during builds or pre-deployment stages.
This helps catch bugs early and avoid post-release issues.
2. Why should E2E tests be integrated into the CI/CD pipeline?
Integrating E2E tests ensures your application works as a whole before going live. It reduces manual testing effort and increases deployment confidence. Bugs are caught earlier in the development lifecycle. This leads to faster releases and higher-quality software.
3. When should E2E tests be triggered in a CI/CD pipeline?
E2E tests are typically run after unit and integration tests pass. They are often triggered in staging or pre-production environments. Running them before deployment prevents faulty code from reaching users.
You can also schedule nightly runs for broader regression coverage.
4. What tools can help run E2E tests in CI/CD pipelines?
Popular tools include Cypress, Playwright, Selenium, and Keploy for API-based E2E. CI platforms like GitHub Actions, GitLab CI, and Jenkins integrate easily with them. Docker or Kubernetes can be used to mimic production environments. Choose tools that support automation and parallel execution.
5. What are common challenges in E2E testing in CI/CD, and how to solve them?
Challenges include flakiness, long test durations, and environment inconsistency. Use stable test data, mocks, and retry logic to reduce flakiness. Parallelization and test prioritization speed up pipelines.
Containerized environments ensure reliable test execution.
Subscribe to my newsletter
Read articles from Tejas Kumar directly inside your inbox. Subscribe to the newsletter, and don't miss out.
Written by