Git Handbook
 Tuan Tran Van
Table of contents
- Repository, revision, commit… Some vocabulary
- Git Advanced Concepts
- Git Flow
- Comparing Git Branching Strategies
- Automated App Versioning
- Git Merge vs Git Rebase
- Undoing Commits & Changes
- The difference between git pull and git fetch
- The difference between HEAD^ and HEAD~ in Git
- Squash Commits
- Modern Git Commands
- git push origin HEAD
- Check Your Branch’s Upstream Status
- Quick Commit Fix
- Cherry-Picking Commits
- Blame a Line of Code
- Tagging a Commit
- View All Git Operations
- Squash Commits
- See a Graph of Your Branches
- Git Best Practices
- Conclusion
- References

When developing software, we find ourselves with the need to manage the changes that are being made in the code, and when working as a team, all team members always have a copy of this code in which they can work and, later, integrate these changes. To facilitate this work, we have version control systems, which allow us to track and manage changes that occur in the code over time: for this, we are going to see the use of and the workflow with GitFlow.
Git is a version control software developed by Linus Torvarlds (the creator of Linux), in order to coordinate the work with his collaborators.
Keep in mind that Git has a distributed architecture, so instead of the code being in a single place, when a developer makes a working copy of this code, it generates a repository that can contain the full history of changes that have been made in that code.
Repository, revision, commit… Some vocabulary
When working with Git and version control, we come across a series of terms that it is necessary to know what they are.
Branch: A branch is a separate line of development in your project. It allows you to work on new features or fixes without affecting the main codebase.
Checkout: The
git checkoutcommand is used to switch between branches or restore files to a previous state.Clone:
git clonecreates a full local copy of a remote repository, including its history, branches, and files.Commit: A commit is a snapshot of your changes. It includes a message describing what was done, along with metadata like author and date.
Conflict: A conflict happens when Git cannot automatically merge changes from different sources. You'll need to manually resolve these.
Diff (Difference): A diff shows what has changed between two versions of a file or set of files — additions, deletions, or modifications.
HEAD:
HEADrefers to the latest commit on the current branch you're working on.Merge:
git mergeintegrates changes from one branch into another. Often used to bring feature branches into the main branch.Pull:
git pullfetches and merges updates from a remote repository into your local branch.Pull Request (PR): A request to merge your changes into another branch, often reviewed before approval. Commonly used in collaborative workflows.
Push:
git pushuploads your local commits to a remote repository to share with others.Repository (Repo): A storage location for your project code and history. Can be local or remote (e.g., GitHub).
Tag: A tag marks a specific point in your project’s history, often used for releases (e.g.,
v1.0.0).Staging Area (Index): The place where files go when you run
git add. Only staged files are included in the next commit.Fork: A personal copy of someone else's repository, typically used to propose changes or contribute to the original project.
Rebase:
git rebasemoves or combines commits to a new base commit. Helps keep a clean, linear project history.Revert:
git revertcreates a new commit that undoes the effects of a previous commit.Reset:
git resetchanges your current branch’s history. It can remove commits or unstage files depending on the flags used.Stash:
git stashtemporarily saves uncommitted changes so you can work on something else, then come back to them later.Origin: The default name for the remote repository you cloned from. Used to refer to it in Git commands (e.g.,
git push origin main).Blame:
git blameshows which commit and author last modified each line of a file. Useful for tracking down when and why a line was changed.Cherry-pick:
git cherry-pickallows you to apply a specific commit from one branch onto another. Helpful when you want to copy just one change instead of merging everything.Hook: Git hooks are scripts that run automatically before or after certain events (like committing or pushing). Used for tasks like code formatting, testing, or enforcing rules.
Submodule: A Git repository inside another Git repository. Useful for managing dependencies or separate components in a project.
Upstream: Refers to the remote branch that your local branch is tracking. For example, if you're working on a feature branch that is based on
origin/main, thenorigin/mainis the upstream.Detached HEAD: A state where your
HEADpoints to a specific commit instead of a branch. You're not on any branch, so commits won’t be saved to any branch unless you explicitly create one.Fast-forward Merge: A type of merge that doesn’t require a merge commit. Git just moves the pointer forward because there were no divergent changes.
Squash: The process of combining multiple commits into one. Often used before merging to keep history clean.
Tracking Branch: A local branch that is set to track a remote branch. This allows you to easily pull/push without specifying the remote and branch name every time.
Worktree: A working tree (or worktree) is a directory with a checkout of a branch. Git allows multiple worktrees linked to one repository—useful for working on multiple branches at once.
Git Advanced Concepts
https://github.com/mike-rambil/Advanced-Git
Git Flow
Git Flow was created by Vincent Driessen in 2010, It is tailor-made for projects that thrive on structure, such as those with strict release cycles or large teams juggling multiple features. It provides a clear roadmap, guiding teams through development, testing, and production with ease. This structure helps everyone stay aligned and focused, avoiding confusion along the way.
What makes Git Flow truly special is its use of different types of branches, each with a unique role in the development journey. Think of it like roles in a movie: some branches are the stars, others work behind the scenes, but together, they create a masterpiece.
Why Use Git Flow?
Git Flow offers a high level of organization for managing software projects. Here are some reasons why teams might adopt Git Flow:
Clear Branching Model: It separates different types of work (features, releases, hotfixes), making it easier for teams to collaborate and understand what’s happening at each stage of the development process.
Easy to Scale: Git Flow works well for large teams and projects where multiple developers need to work on features independently while maintaining a stable main branch.
Release Management: It integrates well with release cycles and provides a clear path for creating and managing releases, from development to production.
Supports Hotfixes: The hotfix strategy provides that urgent bugs can be addressed without disrupting the ongoing work in development.
Core Branches in Git Flow
Git Flow revolves around two primary branches that serve as the foundation of the repository. These branches represent the stable, ongoing development process and the production-ready codebase.
- Main (or Master) Branch
This branch contains the stable production-ready code. It’s where the latest production releases are tagged, and it should always reflect the state of the project that is live in production. You should only merge into the main branch when you’re deploying to production. All releases are tagged with version numbers here (e.g., v1.0.0, v1.1.0). Typically, it’s named main or master, depending on your preference or the Git provider’s default.
- Develop Branch
This branch serves as the integration branch for ongoing development. It holds all the code that’s been merged and tested and is considered the most up-to-date version of the next release. Developers commit their changes to feature branches, and once they are finished, they merge them into develop. When the code in develop is stable and ready for release, it will be merged into the main branch. By default, this branch is named develop.
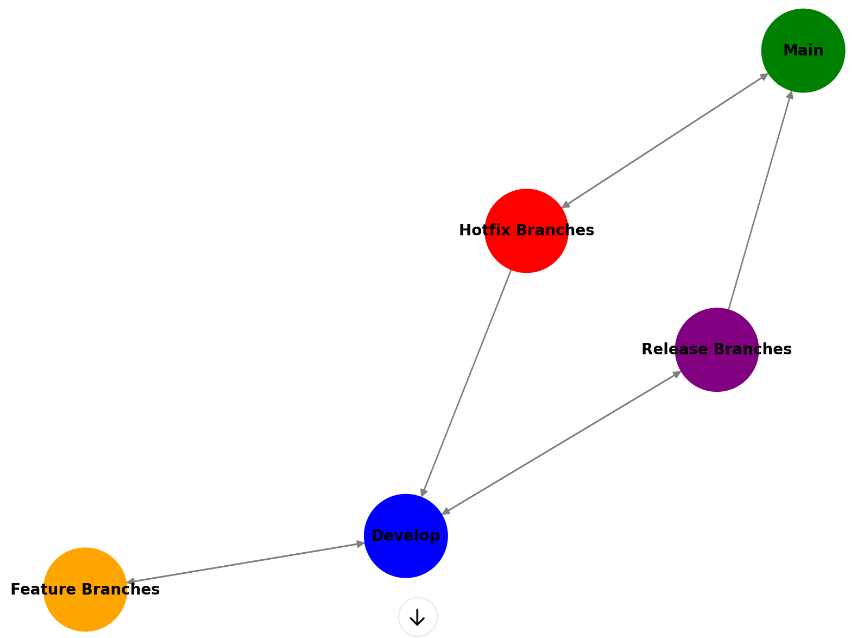
Supporting Branches in Git Flow
Git Flow also uses supporting branches to manage specific tasks like new features, releases, and hotfixes. These are where most of the action happens during the development cycle.
- Feature Branches
These branches are used to develop new features or changes. Feature branches are typically created off the develop branch and are merged back into develop once the feature is complete. Feature branches are named according to the feature being developed, e.g., feature/user-authentication or feature/payment-gateway. This helps easily identify the purpose of each branch.
When starting a new feature, create a branch from
develop.Work on the feature and commit changes regularly.
Once complete, merge the feature back into the
developbranch.
After a feature is merged, it is important to rebase the feature branch with develop to guarantee there are no conflicts.
- Release Branches
When a certain set of features is ready for release, but additional testing, bug fixes, or preparation for deployment is needed, a release branch is created. This branch helps isolate the final stages of development from ongoing feature work in develop. Typically named release/1.0.0, release/2.0.0, etc., based on the version number of the release.
When
developis stable and ready for release, a release branch is created.The release branch is used for last-minute fixes, preparing documentation, and adjusting configuration files.
After testing, the release branch is merged into both
main(for deployment) anddevelop(to ensure any final changes are reflected in future development).
Once the release is completed and merged into main, it’s tagged with the release version (e.g., v1.0.0). It is then merged back into develop to provide any changes made during the release process are incorporated into the ongoing development.
- Hotfix Branches
Hotfixes are used to quickly patch bugs in production. When critical issues are discovered in the main branch (e.g., security vulnerabilities or bugs affecting users), a hotfix branch is created from main to address the issue immediately. Typically named hotfix/bug-fix, e.g., hotfix/security-patch.
A hotfix is created directly from the
mainbranch.The necessary changes have been made and committed to the hotfix branch.
Once the fix is complete, the hotfix branch is merged back into both
main(for deployment) anddevelop(to secure future development, includes the fix.)
Hotfixies are typically fast, providing a quick fix without disturbing ongoing feature development. Once merged, the hotfix branch is deleted.
Git Flow Workflow in Action
Here is an example of how a typical Git Flow workflow would unfold:
Start with a
developbranch: This is the main development branch. All work begins here, with new features being developed in their own branches.Create a feature branch from
developfor each new feature: Developers work on isolated branches for individual features or changes. Each branch is frequently merged back intodevelopafter completing a feature.Create a release branch when
developis stable and ready for release. This branch prepares the code for production. It is used for final testing, bug fixes, and release-related tasks.Merge the release branch into
mainand tag it: Once the release branch is stable, it is merged intomain, tagged with a version, and deployed.Create hotfixes if needed: If bugs are found in production, a hotfix branch is created directly from
mainto fix them.
Git Flow provides clear guidelines for how to work on different types of changes and helps to ensure that the master branch always contains stable, tested code.
It’s important to note that Git Flow is one of the many branching models that can be used with Git, and it may not be the best fit for every team or project. It’s a great starting point for teams new to Git, but as the team and the project grow, it’s important to re-evaluate and see if it still fits the team’s needs.
Comparing Git Branching Strategies
Git is a powerful control system widely known for its flexibility and used in virtually every software development project. But with great flexibility comes the challenge of managing multiple code versions efficiently. That’s where branching models come in.
Centralized Workflow
The centralized workflow is the simplest Git model, where a central repository contains the main branch. Every team member works on this branch, committing their changes directly. While straightforward, it lacks structure, making it difficult to manage complex projects with many collaborators.
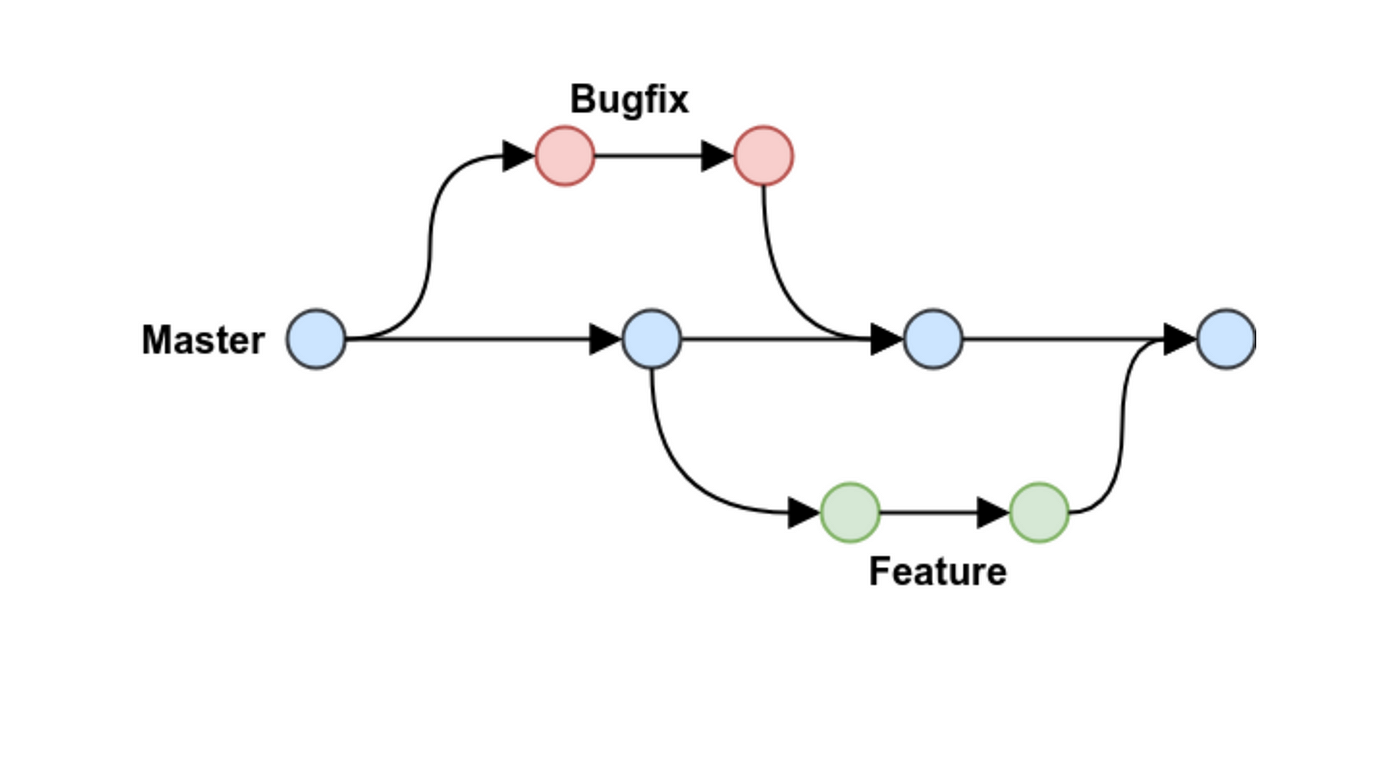
Feature Branch Workflow
In the Feature Branch Workflow, each developer creates a new branch to work on individual features. Once completed, these branches are merged into the main branch, ensuring a cleaner, more organized commit history. It’s ideal for feature-focused development, but doesn’t define strict rules for managing releases.
Github Flow
Github Flow is a lightweight workflow designed for simplicity. It relies on a single main branch, where developers create short-lived branches for features or fixes and then merge them back into the main branch through pull requests. This model works well for smaller teams and projects that require fast iterations, but it lacks the structured release management found in other models.
GitLab Flow
GitLab Flow builds on GitHub Flow, integrating it more tightly with CI/CD pipelines. It adds a more structured approach for teams using GitLab’s continuous deployment tools. While useful for DevOps-driven projects, it is less suitable for teams that need a structured release process.
Trunk-Based Development

Trunk-Based Development emphasizes continuous integration, where all developers commit to a shared main branch (trunk). This model encourages rapid iteration, making it a great fit for projects requiring frequent updates. However, without dedicated release branches, managing stable production code can become difficult.
Git Flow
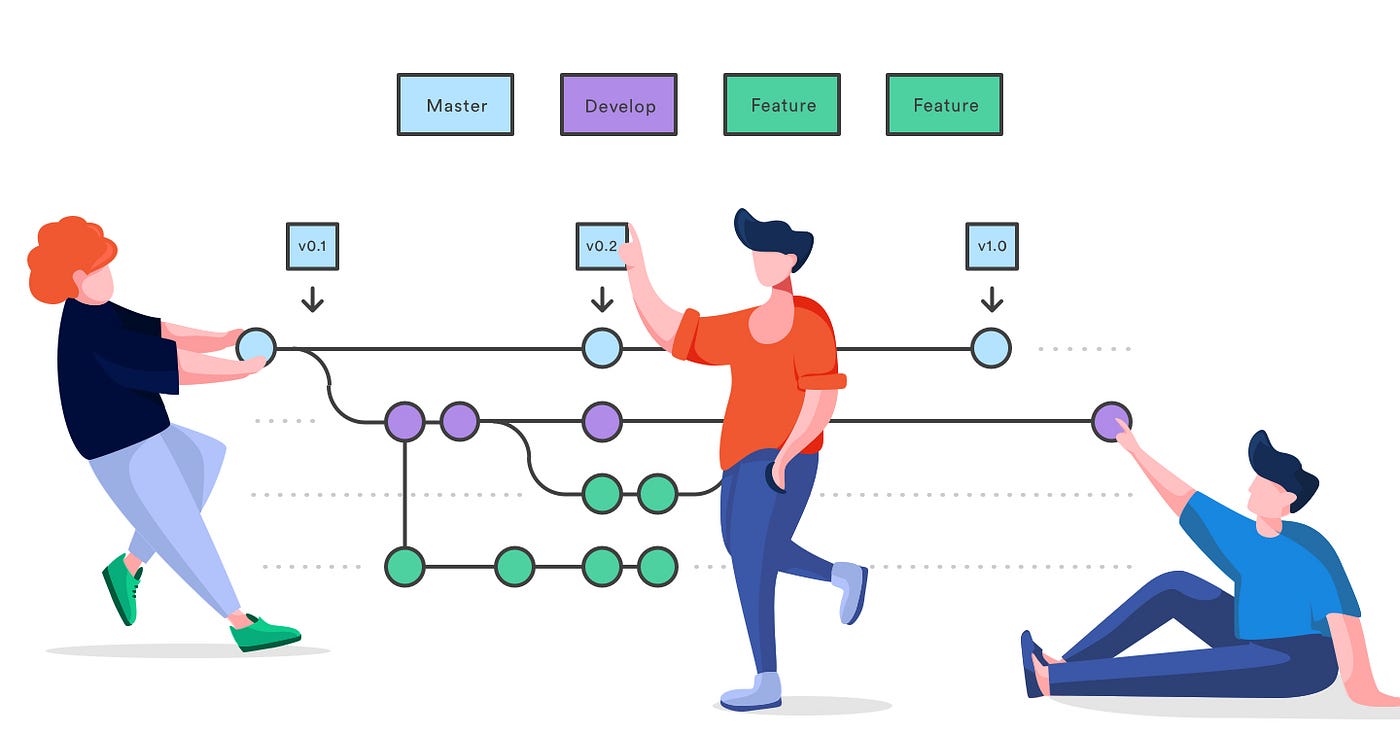
Git Flow is a branching model that originated in 2010 by Vincent Driessen. It is a comprehensive workflow designed to handle larger projects with multiple developers by providing a clear guideline on how to manage features, releases, and bug fixes.
Git Flow stands out because it brings structure to Git. It creates a disciplined process that’s especially useful for continuous collaboration and iterative development. Git Flow adds additional branches beyond the typical master/main branch, making it easier to keep track of multiple stages of your project.
Comparing Git Flow with Other Models
Vs. Centralized Workflow: Git Flow provides much more structure, ensuring stable releases by separating production code from in-development features.
Vs. GitHub Flow: While GitHub Flow is simpler, Git Flow offers better release management, making it ideal for projects where stability is crucial.
Vs. GitLab Flow: Git Flow focuses more on branch organization, whereas GitLab Flow is tailored to continuous deployment environments.
Vs. Trunk-Based Development: Git Flow’s dedicated release branches make it easier to manage stable releases in complex projects compared to Trunk-Based Development’s fast-paced nature.
For more detailed explanations about the difference between those branching strategies. Check out those articles: Comparing Git Branching Strategies, Collaborative Git Workflows
Automated App Versioning
Imagine a software without versioning, any change to an application would be a chaotic leap into the unknown. Developers wouldn’t know if a new feature was added, a bug fixed, or if the application would ever run properly. Versioning provides clarity and structure, offering a roadmap for both developers and users.
In the intricate dance of versioning, each number tells a story, a story that extends beyond development and seamlessly interwines with the software testing cycle.
Application versioning isn’t just a formality; it’s a strategic guide through the intricate phases of the software testing cycle. From alpha to release candidates (RC) and hotfixes, versioning ensures systematic testing and meticulous tracking of changes.
Why does versioning matter?
Versioning serves as a critical foundation for a seamless and organized workflow. Here’s why it matters:
Traceability: Versioning provides a clear trail of changes, allowing teams to trace back and understand the evolution of the software.
Communication: Clear version numbers act as a universal language, facilitating communication among developers, testers, and stakeholders.
Coordination: Acts as a coordination mechanism, ensuring everyone involved is on the same page regarding the current state of the software.
Testing Efficiency: In the testing lifecycle, versioning enables efficient testing by distinguishing between alpha, beta, and release candidates.
Bug Tracking: Facilitates effective bug tracking, making it easier to identify when an issue was introduced and which changes are associated.
Stability Assurance: Versioning helps ensure the stability of releases by clearly indicating backward-compatible and incompatible changes.
Versioning, therefore, is not just a matter of differentiation between what is in the release and what is already deployed to production. It’s a strategic necessity in the ever-evolving realm of software development. It provides clarity, promotes collaboration, and enhances the overall efficiency of the development cycle.
Semantic Versioning (SemVer) Explained
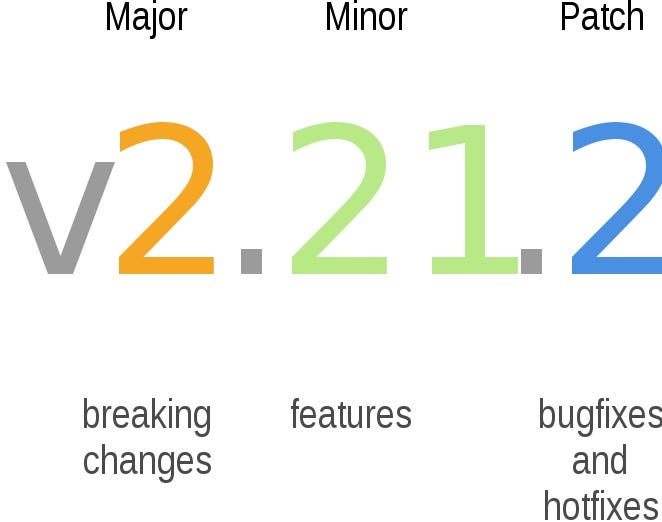
Semantic Versioning (SemVer) is a standardized versioning system that precisely communicates changes in the software release. The version number in SemVer comprises three segments: Major, Minor, and Patch.
Major Version (X.0.0): Significant, backward-incompatible changes. Incremented for breaking changes.
Example: Current version: 1.2.3, After breaking change: 2.0.0
Minor Version (X.Y.0): Backward-compatible additions or enhancements. Incremented for new features.
Example:Current version: 1.2.3, After adding a feature: 1.3.0
Patch Version (X.Y.Z): Backward-compatible bug fixes. Incremented for bug patches.
Example:Current version: 1.2.3, After fixing a bug: 1.2.4
Pre-release Version: Identified by appending a hyphen and a series of dot-separated identifiers following the patch version. Denoted as “alpha,” “beta,” etc.
Example: Alpha release: 1.2.3-alpha.1, Beta release: 1.2.3-beta.2
Numeric Metadata: Identified by appending a plus sign and a series of dot-separated numeric identifiers following the patch or pre-release version.Not considered for version precedence.
Example: With numeric metadata: 1.2.3-alpha.1+42 . Basically used as a build number.
Semantic Versioning enables clear communication about the nature of changes in the release, fostering predictability and ensuring compatibility across different versions of a software project.
Understanding Semantic Versioning aids in transparently conveying changes within a project. Now, check out this article to explore how to seamlessly integrate SemVer into the Git Workflow using GitVersion.
Git Merge vs Git Rebase
When navigating the Git universe for version control, grasping the art of choosing between git merge and git rebase is pivotal for streamlining and organizing code management. Both wield considerable merging prowess, yet appropriateness and impact shimmer in distinct scenarios.
Git Merge
git-merge is a non-destructive operation designed to weave changes from two branches into a harmonious tapestry. It forges a connection between the histories of these branches by crafting a brand new “merge commit“.
Advantages
Preserve Historical Integrity: The merge operation reverently preserves the authentic history of both branches, leaving no tale untold.
Simple and Intuitive Merge: This approach is a friendly gateway for Git novices, offering simplicity and clarity in its operation.
Scenarios To Be Used
git merge shines brightest in team collaborations, where safeguarding a comprehensive history and delineating clear merge points is deemed invaluable.
Git Rebase
git rebaseperforms a graceful dance, placing changes from one branch atop the freshest alterations on another. This intricate process often involves a rhythmic rewriting of the commit history, sculpting it into a more linear narrative.
Advantages
Clean Linear History 📜: Rebase choreographs a symphony of commits, resulting in a pristine and linear project history.
Avoid Redundant Merge Commits🚫🔄: It’s the maestro of minimizing unnecessary merge commits, keeping the melody of your project smooth.
Scenarios to be Used
rebase is the virtuoso when it comes to refining commits on a personal branch or updating a feature branch before unveiling changes to the entire team.
The Golden Rule of Git Re-basing
👑 “Never use git rebase on public branches.” This royal decree stands firm to prevent historical dissonance among team members, averting the cacophony of confusion that may arise from altered histories.
Choosing Between Git Merge and Git Rebase
When faced with the decision of git merge versus git rebase, thought consideration of your work environment and the team’s workflow is key:
For private or nascent feature branches, opting for
git rebasecan be akin to tidying up the stage before a grand performance. It helps maintain a clear and uncluttered history, especially when preparing for a pull request.On the public branch in team collaborations, embracing
git mergeis like choosing the steady path. It’s a safer change, retaining a comprehensive historical record that’s effortlessly comprehensible and traceable for all team members.
https://www.atlassian.com/git/tutorials/merging-vs-rebasing
Undoing Commits & Changes
Git Revert, Checkout, and Reset
These three commands have entirely different purposes. They are not remotely similar.
git revert
This command creates a new commit that undoes the changes from a previous commit. This command adds a new history to the project (it doesn’t modify the existing history).
git checkout
This command checks out content from the repository and puts it in your worktree. It can also have other effects, depending on how the command was invoked. For instance, it can also change which branch you are currently working on. This command doesn’t make any changes to the history.
git reset
This command is a little more complicated. It actually does a couple of different things depending on how it is invoked. It modifies the index (the so-called "staging area"). Or it changes which commit a branch head is currently pointing at. This command may alter existing history (by changing the commit that a branch references).
Using these commands
If a commit has been made somewhere in the project’s history, and you later decide that the commit is wrong and should not have been done, then git revert is the tool for the job. It will undo the changes introduced in the bad commit, recording the “undo“ in the history.
If you have modified a file in your working tree, but haven't committed the change, then you can use git checkout to check out a fresh-from-repository copy of the file.
If you have made a commit, but haven't shared it with anyone else, and you decide you don't want it, then you can use git reset to rewrite the history so that it looks as though you never made that commit.
These are just some of the possible usage scenarios. There are other commands that can be useful in some situations, and the above three commands have other uses as well.
The difference between git pull and git fetch
In the simplest terms, git pull does a git fetch followed by a git merge.
git fetch updates your remote-tracking branches under refs/remotes/<remote>/. This operation is safe to run at any time since it never changes any of your local branches under refs/heads.
git pull brings a local branch up-to-date with its remote version, while also updating your other remote-tracking branches.
From the Git documentation for git pull:
git pullrunsgit fetchwith the given parameters and then depending on configuration options or command line flags, will call eithergit rebaseorgit mergeto reconcile diverging branches.
The difference between HEAD^ and HEAD~ in Git
<rev>~<n>goes backward n parents from rev, selecting the first parent each time.Use
<rev>^<n>to select the n-th immediate parent of the merge commit rev.Use
~most of the time, to go back a number of generations and always choose the first parent of merge commits, commonly what you want.Use
^on merge commits — because they have two or more immediate parents.In my experience, selecting a particular immediate parent of a merge commit by its index order, e.g.,
B^3, is rare. It’s also error-prone. Just use a hash when you can.NOTE:
HEAD~3is equivalent toHEAD~~~andHEAD~1~1~1— butHEAD^2is not equivalent toHEAD^^.
Mnemonics:
Tilde
~is almost linear in appearance and wants to go backward in a straight line.Caret
^suggests a merge commit: an interesting segment of a tree or a fork in the road.
Squash Commits
When you squash commits, you combine 2 or multiple commits into a single commit. This is useful when you have multiple small commits that are related to the same feature or fix, and you want to simplify your commit history. Squashing commits also makes it easier to review your changes and to track down bugs.
How to Squash Commits
Here are the steps to squash commits in a git repository using the git CLI:
Determine how many commits you want to squash. You can use the
git logcommand to see a list of your commits and their hashes.Use the
git rebase -i HEAD~Ncommand to open the interactive rebase tool, whereNis the number of commits you want to squash.In the text editor that opens, replace “pick” with “squash” or “fixup” for each commit you want to squash. “Squash” will combine the commit with the one before it, while “fixup” will combine the commit and discard its commit message.
Save and exit the editor by pressing
Ctrl + X, thenY, and finallyEnter.If you have conflicts, resolve them by editing the conflicted files, staging the changes with
git add, and then runninggit rebase --continue.Force push the changes to the remote branch with
git push -f.
Modern Git Commands
Git, however, introduced many features since then, and using them can make your life so much easier, so let’s explore some of the recently added, modern git commands that you should know about.
Switch
New since 2019, or more precisely, introduced Git version 2.23, is git switch which we can use to switch branches:
git switch other-branch
git switch -  # Switch back to previous branch, similar to "cd -"
git switch remote-branch  # Directly switch to remote branch and start tracking it
Well, that’s cool, but we’ve been switching branches in Git since forever using git checkout, why the need for a separate command? git checkout is a very versatile command - it can (among other things) check out or restore specific files or even specific commits, while the new git switch only switches the branch. Additionally, switch performs extra sanity checks that checkout doesn't, for example, switch would abort operation if it would lead to loss of local changes.
Restore
Another new subcommand/feature added in Git version 2.23 is git restore, that we can use to restore a file to the last committed version:
# Unstage changes made to a file, same as "git reset some-file.py"
git restore --staged some-file.py

# Unstage and discard changes made to a file, same as "git checkout some-file.py"
git restore --staged --worktree some-file.py

# Revert a file to some previous commit, same as "git reset commit -- some-file.py"
git restore --source HEAD~2 some-file.py
The comments in the above snippet explain the workings of various git restore. Generally speaking git restore replaces and simplifies some of the use cases of git reset and git checkout which are already overloaded features. See also this docs section for comparison of revert, restore and reset.
Sparse Checkout
The next one is git sparse-checkout, a little more obscure feature that was added in Git 2.25, which was released on January 13, 2020.
Let’s say you have a large monorepo, with microservices separated into individual directories, and commands such as checkout or status are super slow because of the repository size, but maybe you really just need to work with a single subtree/directory. Well, git sparse-checkout to the rescue:
$ git clone --no-checkout https://github.com/derrickstolee/sparse-checkout-example
$ cd sparse-checkout-example
$ git sparse-checkout init --cone  # Configure git to only match files in root directory
$ git checkout main  # Checkout only files in root directory
$ ls
bootstrap.sh  LICENSE.md  README.md

$ git sparse-checkout set service/common

$ ls
bootstrap.sh  LICENSE.md  README.md  service

$ tree .
.
├── bootstrap.sh
├── LICENSE.md
├── README.md
└── service
    ├── common
    │   ├── app.js
    │   ├── Dockerfile
    ... ...
In the above example, we first clone the repo without actually checking out all the files. We then use git sparse-checkout init --cone to configure git to only match files in the root of the repository. So, after running checkout, we only have 3 files rather than the whole tree. To then download/checkout a particular directory, we use git sparse-checkout set ....
As already mentioned, this can be very handy when working locally with huge repos, but it’s equally useful in CI/CD for improving the performance of a pipeline, when you only want to build/deploy part of the monorepo and there’s no need to check out everything.
For a detailed write-up about sparse-checkout see this article.
Worktree
It’s not uncommon that one might have to work on multiple features in a single application (repository) at the same time, or maybe a critical bug comes in while you’re in the middle of working a feature request.
In those situations, you either have to have multiple versions/branches of the repository cloned, or you need to stash/discard whatever you’ve been working on at the time. The answer to these situations is git worktree, released on September 24, 2018:
git branch
# * dev
# master

git worktree list
# /.../some-repo  ews5ger [dev]

git worktree add -b hotfix ./hotfix master

# Preparing worktree (new branch 'hotfix')
# HEAD is now at 5ea9faa Signed commit.

git worktree list
# /.../test-repo         ews5ger [dev]
# /.../test-repo/hotfix  5ea9faa [hotfix]

cd hotfix/  # Clean worktree, where you can make your changes and push them
This command allows us to have multiple branches of the same repository checked out at the same time. In the example above, we have 2 branches dev and master. Let's say we're working on a feature in the dev branch, but we're told to make an urgent bug fix. Rather than stashing the changes and resetting the branch, we create a new worktree in the ./hotfix subdirectory from the master branch. We can then move to that directory, do our changes, push them, and return to the original worktree.
For a more detailed write-up, see this article.
Bisect
Last but not least, git bisect, which isn't so new (Git 1.7.14, released on May 13, 2012), but most people are using only git features from around 2005, so I think it's worth showing anyway.
As the docs page describes it: git-bisect - Use binary search to find the commit that introduced a bug:
git bisect start
git bisect bad HEAD  # Provide the broken commit
git bisect good 479420e  # Provide a commit, that you know works
# Bisecting: 2 revisions left to test after this (roughly 1 step)
# [3258487215718444a6148439fa8476e8e7bd49c8] Refactoring.

# Test the current commit...
git bisect bad  # If the commit doesn't work
git bisect good # If the commit works

# Git bisects left or right half of range based on the last command
# Continue testing until you find the culprit

git bisect reset  # Reset to original commit
We start by explicitly starting the bisection session with git bisect start, after which we provide the commit that doesn't work (most likely the HEAD) and the last known working commit or tag. With that information, git will check out a commit halfway between the "bad" and "good" commit. At which point we need to test whether that version has the bug or not, we then use git bisect good to tell git that it works or git bisect bad that it doesn't. We keep repeating the process until no commits are left and git will tell us which commit is the one that introduced the issue.
I recommend checking out the docs page that shows a couple more options for git bisect, including visualizing, replaying, or skipping a commit.
git push origin HEAD
We can use “git push origin HEAD” over “git push origin longass_branch_name”
When we work on a feature, we usually work on a branch. This way, if we accidentally screw up, we screw up only our branch, and not the master branch.
Branch names can get pretty long in larger projects. For instance:
- JIRAPROJECT18001_refactor_this_certain_feature_for_reasons
To push our changes to this branch, we can simply do:

Instead of:

This is just a pain to type out
Check Your Branch’s Upstream Status
This command fetches all updates from the remote and prunes (deletes) references to branches that have been removed from the remote.
git fetch --all --prune
It keeps your local environment clean and up-to-date, without having to manually delete old branches.
Run this periodically to avoid clutter in your branch list, especially when working in a large team.
Quick Commit Fix
Forgot to add a file or made a typo in your commit message? git commit --amend lets you update the commit without creating a new one.
git commit --amend
You can fix mistakes instantly without cluttering your commit history.
This is great for squashing small mistakes without polluting your Git log with unnecessary commits.
Cherry-Picking Commits
Need a specific commit from another branch? Cherry-picking lets you apply it to your current branch without merging the entire branch.
How to use it:
git cherry-pick <commit-hash>
Why it’s cool:
It gives you the flexibility to bring in individual features or fixes without merging all the other changes from the source branch.
Pro tip:
This is especially useful when you need to backport bug fixes or small features.
Blame a Line of Code
Want to know who wrote a specific line of code? git blame gives you a line-by-line history of who changed what in a file.
How to use it:
git blame <filename>
Why it’s cool:
It’s an easy way to track down who made a change and when, especially when debugging issues.
Pro tip:
Combine this with git log -- <file> to get a more detailed history of changes.
Tagging a Commit
Tags are useful for marking specific points in your Git history, such as releases.
How to use it:
git tag -a v1.0 -m "Version 1.0 release"
Why it’s cool:
It helps in marking important milestones, making it easy to jump back to a particular version later.
Pro tip:
Use lightweight tags (git tag <tagname>When you don’t need additional metadata.
View All Git Operations
If you’ve ever messed up your Git history, git reflog is your safety net. It shows a log of all operations on your repository, allowing you to recover lost changes.
How to use it:
git reflog
Why it’s cool:
It’s a history of your Git history, giving you a way to find lost commits and operations.
Pro tip:
Use this when you think all hope is lost after a bad reset or rebase!
Squash Commits
Want to clean up your commit history before pushing? Squashing commits lets you combine several into one for a neater history.
How to use it:
git rebase -i HEAD~<number-of-commits>
Why it’s cool:
Squashing makes your commit history look polished and professional, especially when you’re sharing with a team.
Pro tip:
This is ideal for combining multiple small fixes into one clear commit before pushing.
See a Graph of Your Branches
This command gives you a visual overview of your branch history, making it easier to see merges, branches, and commits.
How to use it:
git log --graph --oneline --all
Why it’s cool:
It’s an at-a-glance view of your project’s structure, especially helpful for understanding complex branch setups.
Git Best Practices
The use of the Git tool is crucial for the development process of an application, whether working in a team or individually. However, it’s common to encounter messy repositories, commits with unclear messages that don’t convey useful information, and misuse of branches, among other issues. Knowing how to use Git correctly and following good practices is essential for those who want to excel in the job market.
https://github.com/git-tips/tips
Perfect Git Commit Messages
Commit serves as the tangible building blocks of a programmer’s craft. They act as the icing on the cake of code, and when written correctly, they bring substantial value. A well-written commit message becomes indispensable because it provides context; otherwise, a commit message wouldn’t be needed in the first place.
A good commit shows whether a developer is a good collaborator.
A common mistake among developers is treating the Git repository is a backup system. Randomly committing to capture the current state of code can impede your ability to comprehend past changes when checking out the codebase in the future. Commit messages like “WIP”, “Off for lunch”, “End of code for today”, “I am tired AF”, “Happy Weekend Team”, and “First to commit” will only clutter your Git log, making it too difficult to understand the essential commits you have made because none of these messages consists of any additional value.
8 Standard Rules for Writing a Perfect Commit Message
These rules provide guidelines and best practices that ensure your commit messages are properly formatted and convey clear information. While the specific rules may vary based on different resources, the general aim is to enhance the readability and understandability of the commit message within the Git version control system.
- Limit Subject to 50 Characters (Max)
When crafting the subject line of a commit message, it’s advisable to keep it concise and focused. The subject line serves as a quick summary of the commit’s purpose and should ideally be limited to a maximum of 50 characters.
Struggling to fit within the 50-character limit can be indicative of a lack of clarity about the commit’s intent. Commit messages should be concise, clear, and easy to understand on their own. By adhering to this character limit, you are forced to prioritize the most critical information, making it easier for your team and your future self to understand the nature of the change at a glance.
- Capitalize only the first letter of the subject line
When composing a commit message, employ title case by capitalizing the first letter of the subject line, just like writing a concise sentence. Leave the rest of the message, including any additional details, in lowercase.
- Don’t put a period at the end of the subject line
The reason for not ending the subject line with a period is partly historical and partly to maintain a consistent style. The convention is to treat the subject line as the title or the command, which is why it’s written in the imperative mood (e.g., “Add feature” or “Fix bug” rather than “Added feature” or “Fixed bug”). Omitting the period at the end helps reinforce this convention and keeps subject lines concise.
git commit -v -m "Create the Cart Feature with a Nice Animation"
- Put a blank line between the Subject line and the body
While this guideline might appear unusual, it’s rooted in practicality. Many developers employ command-line interfaces for Git, which often lack automatic word wrapping. Consequently, intentional formatting rules have been introduced to ensure consistent and legible commit messages.
git commit -v -m "Create the Cart Feature with a Nice Animation

Body...
"
- Wrap Lines at 72 Characters for the Commit Body
It’s important to clarify that adhering to this guideline isn’t about traditional word wrapping, instead, this practice arises in the consideration that command-line users might experience truncated commit bodies beyond 72 characters.
Most of the time, your message will exceed 72 characters in length. In such cases, it’s advisable to break the text and continue your sentence on the next line, as demonstrated in the commit message below:
git commit -v -m "Create the Cart Feature with a Nice Animation

Enhanced the CSS layout of the cart section, addressing text
alignment issues and refining the layout for improved aesthetics
and readability."
In conclusion, a standard practice for denoting bullet points involves using a hyphen or asterisk, followed by a single space. Additionally, it’s important to maintain a hanging indent to enhance organizational clarity.
- Use the imperative mood
A valuable practice involves crafting commit messages with the underlying understanding that the commit, when implemented, will achieve a precise action. Construct your commit message in a manner that logically completes the sentence “If applied, this commit will…”. For instance, rather than,git commit -m "Fixed the bug on the layout page" ❌, use this git commit -m "Fix the bug on the layout page" ✔
- Explain “What“ and “Why“, but not “How“
Limiting commit messages to “what“ and “why“ creates concise yet informative explanations of each change. Developers seeking to understand how the code was implemented can refer directly to the codebase. Instead, highlight what was altered and the rationale for the change, including what component or area was affected
- Angular’s Commit Message Practices
Angular stands as a prominent illustration of effective commit messaging practices. The Angular team advocates for the use of specific prefixes when crafting commit messages. These prefixes include “chore: ,” “docs: ,” “style: ,” “feat: ,” “fix: ,” “refactor: ,” and “test: .”. By incorporating these prefixes, the commit history becomes a valuable resource for understanding the nature of each commit.
Naming Conventions for Git Branches
When you are working with code versioning, one of the main good practices that we should follow is using clear, descriptive names for branches, commits, and pull requests. Ensuring a concise workflow for all team members is essential. In addition to gaining productivity, documenting the development process of the project historically simplifies teamwork. By following these best practices, you will see benefits soon.
Based on it, the community created a branch naming convention that you can follow in your project. The use of the following items below is optional, but they can help to improve your development skills.
1. Lowercase: Don't use uppercase letters in the branch name, stick to lowercase.
2. Hyphen separated: If your branch name consists of more than one word, separate them with a hyphen. following the kebab-case convention. Avoid PascalCase, camelCase, or snake_case;
3. (a-z, 0-9): Use only alphanumeric characters and hyphens in your branch name. Avoid any non-alphanumeric character;
4. Please, don't use continuous hyphens (--). This practice can be confusing. For example, if you have branch types (such as a feature, bugfix, hotfix, etc.), use a slash (/) instead;
5. Avoid ending your branch name with a hyphen. It does not make sense because a hyphen separates words, and there's no word to separate at the end.
6. This practice is the most important: Use descriptive, concise, and clear names that explain what was done on the branch.
Wrong branch names
fixSidebarfeature-new-sidebar-FeatureNewSidebarfeat_add_sidebar
Good branch names
feature/new-sidebar
add-new-sidebar
hotfix/interval-query-param-on-get-historical-data
Always git pull before working on a new feature
Do this to avoid merge conflicts as much as possible.
Merge conflicts happen when:
2 people are working on the same code in the same file
1 person pushes their code first
When the 2nd person tries to push their code, it conflicts with the code from the first person
In this case, git doesn’t know how to resolve this conflict in changes, and doesn’t want to for fear of causing either one developer to lose progress
As such, git causes a merge conflict — essentially asking the developers to handle the conflicting code themselves
Advantages of running “git pull“ before working on a new feature:
There might still be merge conflicts, but they are likely to contain smaller changes and be more manageable.
You ensure that your local codebase is up to date when you start working on something.
Remember to delete branches after you merge them
In a large project, chances are that devs are expected to create a new branch to work on a new feature. Which is good practice, as this acts as an additional layer of defence against devs accidently screwing up the master branch.
But when you forget to delete their branches after merging, these branches pipe up more and more.
Note — git stores your branches locally in the directory .git/refs/heads
So, what happens when we forget to delete 1000 branches? Git now has 1000 additional unused folders inside .git/refs/heads, which clogs things up and slows things down.
Verdict — remember to delete your branches after you merge them successfully
Best Git GUIs Compared
Git is a version control system (VCS) that allows you to track the development of a project over time. At the time of Git’s inception in 2005, developers had to use the command line interface (CLI) to manage Git. Learning and using a command line is often extremely difficult task for many developers and in some cases represents a significant barrier of entry for those seeking to leverage the power of Git.
Enter the graphical user interface (GUI), also referred to as a Git Client. A Git GUI is a tool that helps developers visualize their Git repositories and run Git actions with a few simple mouse clicks or keyboard shortcuts.
It’s common for new and seasoned developers to leverage Git UI in their regular workflow. As you learn more about Git and interact in related communities, you will likely notice that some people have very strong opinions about using a GUI vs the CLI. Both tools have significant benefits, and it’s important to remember that you should select the tools that help you write code you are proud of. Millions of developers around the world use Git GUIs to make their lives easier and level up their coding.
Check out this article to figure out which is the best Git GUI.
Conclusion
In conclusion, by integrating these modern command-line tools and applying best practices of Git into your workflow, you can enhance your productivity and focus on crafting software that creates real business value.
References
https://levelup.gitconnected.com/git-and-workflow-with-gitflow-5f9f76530835
https://medium.com/@Adem_Korkmaz/git-flow-a-detailed-overview-24e0dfa28f7a
https://medium.com/thecapital/understanding-git-workflows-and-why-git-flow-is-the-best-0e5f4c4f36c3
https://www.freecodecamp.org/news/how-to-write-better-git-commit-messages/
https://dev.to/basementdevs/be-a-better-developer-with-these-git-good-practices-2dim
https://levelup.gitconnected.com/top-30-git-commands-you-should-know-to-master-git-cli-f04e041779bc
https://levelup.gitconnected.com/14-git-things-i-regret-not-knowing-earlier-20956c192b2b
https://blog.stackademic.com/20-git-command-line-tricks-every-developer-should-know-bf817e83d6b9
https://medium.com/@jake.page91/the-guide-to-git-i-never-had-a89048d4703a
https://gist.github.com/eashish93/3eca6a90fef1ea6e586b7ec211ff72a5?ref=dailydev
Subscribe to my newsletter
Read articles from Tuan Tran Van directly inside your inbox. Subscribe to the newsletter, and don't miss out.
Written by
Tuan Tran Van
Tuan Tran Van
I am a developer creating open-source projects and writing about web development, side projects, and productivity.