Linux Basics
 Neha Sawant
History of Linux:
Linux came from a Unix family, Linux is a free and open-source software operating system, which Linus Torvalds developed in September 1991.
In 1991, Linus Torvalds was a student at the University of Helsinki, Finland, USA. He developed the first code of Linux 0.01 and post it on the Minix newsgroup on 17 Sep 1991, his code become so popular people encouraged him to develop new code and he was led to develop new code and release the first “official” version of Linux, version 0.02 on October 5, 1991.
Today many year pass and Linux become one of the most popular operating systems. Today 90% fastest Supercomputers out of 500 run on Linux variants including the top 10.
Some ways to install linux:
Here are several ways to install Linux on a system, depending on your preferences, hardware setup, and the distribution (distro) you want to use. Here are some common methods:
1. Installation via Bootable USB Drive (Recommended for Beginners)
Create a bootable USB:
Download the ISO file of the Linux distribution you want (e.g., Ubuntu, Fedora, Debian).
Install Linux: Once the system boots from the USB, follow the on-screen prompts to install Linux. You’ll be able to set up partitions, choose your timezone, and create a user account.
2. Installation via DVD (Older Method)
Burn the ISO: Burn the Linux distribution ISO to a DVD.
Boot from the DVD: Insert the DVD into your system and restart it.
Follow the Installation Steps: Similar to the USB method, boot from the DVD and follow the installation instructions.
3. Using Virtual Machines
Install a Virtual Machine (VM): Use software like VirtualBox, VMware, or Hyper-V to create a virtual machine on your existing OS (Windows, macOS, or Linux).
Install Linux on the VM: Mount the Linux ISO in the VM and follow the installation steps. This method doesn’t affect your primary OS and is useful for trying out Linux without making changes to your system.
4. Installing via Linux Container (WSL for Windows 10/11)
- Windows Subsystem for Linux (WSL): If you’re on Windows 10 or 11, you can install a Linux distribution through WSL. This lets you run a Linux environment directly inside Windows without the need for dual-booting or a VM.
5. Installing Linux Using Cloud or Remote Server
- If you're looking to install Linux on a server or cloud platform, most cloud providers (like AWS, Google Cloud, or Azure) offer one-click Linux installations for a variety of distros.
Each method has its pros and cons, depending on your use case and experience level. For beginners, using a USB installation with the option to dual boot with Windows is usually the best way to get started. If you're just experimenting or want to try Linux without making changes to your system, a virtual machine or remote server.
Linux File System Hierarchy:
In Linux everything is represented as a file including a hardware program, the files are stored in a directory, and every directory contains a file with a tree structure.
That is called File System Hierarchy. Linux uses single rooted, inverted tree-like structure. Root Directory represents with / (forward slash) It is a top-level directory in Linux.

/
The base of the Linux directory is the root. This is the starting point of FSH. Every directory arises from the root directory. It is represented by a forward slash (/). If someone says to look into the slash directory, they refer to the root directory.
/root
It is the home directory for the root user (superuser).
/bin
User Binaries Contains binary executable. Common Linux commands you need to use in single-user modes are located under this directory. Commands used by all the users of the system are located here.
/sbin
SystemBinaries Just like /bin, /sbin also contains binary executables. But, the linux commands located under this directory are used typically by system aministrator, for system maintenance purpose. For example: iptables, reboot, fdisk, ifconfig, swapon
/dev
Device Files it contains hardware device files, Contains device files. These include terminal devices, usb, or any device attached to the system. For example: /dev/tty1, /dev/usbmon0
/var
Variable Files The variable data files such as log files are located in the /var directory. File contents that tend to grow are located in this directory. > This includes
/var/log: System log files generated by OS and other applications.
/var/lib: Contains database and package files.
/var/mail: Contains Emails.
/var/tmp: Contains Temporary files needed for reboot.
/mnt
Mount Directory This directory is used to mount a file system temporarily.
/media
Removable Media Devices The /media directory contains subdirectories where removable media devices inserted into the computer are mounted.
/usr
User Binaries The /usr directory contains applications and files used by users, as opposed to applications and files used by the system.
/etc
Configuration files It contains all configuration files of server The core configuration files are stored in the /etc directory. It controls the behavior of an operating system or application. This directory also contains startup and shutdown program scripts that are used to start or stop individual programs.
/boot
Boot Loader Files The /boot directory contains the files needed to boot the system the GRUB boot loader's files and your Linux kernels are stored here.
/opt
Optional Applications The opt directory is used for installing the application software from third party vendors that are not available in the Linux distribution. Usually, the software code is stored in the opt directory and the binary code is linked to the bin directory so that all users can run that software.
/home
Home Directory It contains secondary users home directory.
/tmp
Temporary Files Directory that contains temporary files created by system and users.
Files under this directory are deleted when system is rebooted.
Difference between Linux and windows:
1. Kernel
Linux: Linux uses the Linux kernel, which is open-source and freely available. It allows users to modify and distribute the OS as they see fit.
Windows: Windows uses a proprietary kernel developed by Microsoft. It is not open-source, and users cannot modify it.
2. Security
Linux: Linux is generally considered more secure out-of-the-box due to its strict user permission model and lower rate of being targeted by malware. It’s also less susceptible to viruses and other forms of malware.
Windows: Windows has historically been a bigger target for malware and viruses due to its larger user base. However, Microsoft has significantly improved security in recent years with features like Windows Defender and frequent security patches
3. Cost
Linux: Free and open-source. You can download, install, and distribute it without any cost.
Windows: Typically requires purchasing a license, though it may come pre-installed with a computer.
4.Software Updates
Linux: Software updates in Linux are often managed through the system's package manager, and updates can be installed more easily without restarting the system.
Windows: Windows has its update system, and while updates are automatic, they can be intrusive and sometimes require restarting the computer.
Architecture of Linux:
1. Hardware Layer
- This is the physical hardware of the system, including components like the CPU, RAM, hard drives, network interfaces, and more. Linux interacts with this layer through drivers and other kernel components.
2. Kernel
- The core component of Linux is the kernel, which is responsible for managing system resources, hardware communication, process management, memory management, file systems, and device drivers. The kernel acts as a bridge between the hardware and software applications.
3.Shell
- The Shell is a command-line interface (CLI) that allows users to interact with the Linux system. The shell interprets user commands and passes them to the kernel for execution. It is the intermediary between the user and the operating system.
4.Application
- User Applications run on top of the Linux operating system, utilizing the system resources managed by the kernel. These are the programs that users interact with directly, such as web browsers, text editors, media players, office suites, etc.
Linux Practicals:
You can connect linux instance by using ‘Ec2 Instance connect‘ and ‘SSH Client‘
Practical 1: Connect Linux Instance on AWS through EC2 Instance connect.
Create AWS Account.
Login your newly created AWS account.
Once you login you will see the home page as below:

Search EC2. Click on ‘Launch Instance’ button.
Enter details:
Name: Enter any name
Select Application and OS image: Ubuntu
Instance type: t2.micro (free tier)
Key pair: create any key pair for security purpose. Once you create the key it will get download on system.
Launch the instance.
I have created this instance. (linuxfordevops)

Select the instance. and click on connect.

9. You will see this window:

Now you are ready to practice.
Practical 2: Connect Linux Instance on AWS through SSH Client.
- select instance click on connect. select SSH. DO all this on local cmd.

Check if SSH is available locally or not using ssh command. Check if the SSH key is downloaded locally. SSH keys are typically stored in the downloads. List the contents of the downloads using ls command.


enter this command:
chmod 400 "linux.pem"
linux.pem: is a key of instance
Enter this command cmd:
ssh -i "linux.pem" ubuntu@ec2-3-137-185-213.us-east-2.compute.amazonaws.com type yes.

It will connect to remote
This is how from your linux local machine you can connect to instance which is aws/remote.
Note: If you want to connect Windows to any other remote server, you can use Putty
Practical 3: Practice Basic Commands
Note: I have used EC2 console for practice.
#pwd → stands for Print Working Directory. It is used to display the current directory you are in.
Example:

#ls → is used to list directory contents. It’s one of the most commonly used commands for navigating and managing files and directories
#ls -a → to find all details
Example:

#uname → It provides details about the operating system, kernel, and hardware.
Example:

#uname -r → it shows version of the kernel
Example:

#mkdir → to create directory
#mkdir dir1 dir2 dir3 → Can create multiple directories.
#touch /dir{1..10} → Can create number of files.
Example:

#cd → stands for Change Directory. It is used to navigate between directories in the filesystem.
Example:

#clear → used to clear the terminal screen
#history → used to display the list of commands that have been entered in the terminal. This can be very useful for reviewing past commands
Example:

#date → it shows time and date
Example:

#cd .. → is used to move up one directory level from your current location
Example:

#touch → to create empty file.
#touch file1 file2 file3 →Can create multiple files.
#touch files{1..10} → Can create number of files.
Example:

#echo → to print data
#cat → used to display the contents of files.
Example:

#echo “Linux practise” > file1.txt → we print data in file1.txt file
#rm → to remove file
Example:

#rmdir → to remove directory
Example:

#head → it shows the first 10 lines of a file.
#tail → it shows the last 10 lines of a file
#tail -f → used to follow the contents of a file in real-time. This is particularly useful for monitoring log files as they are being updated.
Ctrl + c → to exit from file.
#Cut Command:
- used to extract sections from each line of input, typically from files.
Syntax: cut [OPTION]... [FILE]...
Options:
-b: Selects bytes.-c: Selects characters.-f: Selects fields, separated by a delimiter.
Example:

#Tee command:
- It is useful for logging or saving command outputs while still displaying them on the terminal.
Syntax: command | tee [OPTION][FILE]
Example:

#diff:
- It outputs the differences between the files, which is useful for identifying changes or discrepancies.
Syntax: diff [OPTION] FILES1 FILE2
Example:

#wc → count the words from file.
Example:

#vi editor:
- to edit file.
Syntax: vi file.txt
Note: create file using vi command. To enter data follow below commands:
i - insert, esc - escape from insert operation, :wq - to come out from file
Example:

#sort
- is used to sort lines of text files
Syntax: is used to sort lines of text files
Options
-n: Sort numerically.-r: Reverse the order of the sort.-k: Sort based on a specific key (column).-t: Specify a delimiter.-u: Output only unique lines.
Example:

Practical 4: Copy Command: Create copythisfile.txt and paste in cloud and devops directory.
Cp
- cp command is used for copy and paste file or directory
Syntax: #cp <options> <source> <destination>
create copythisfile.txt using touch command
check all files using ls
copy copythifile.txt paste in devops directory
go to devops directory and check using ls command, file is copied or not. after checking come back in root folder using cd .. command.
copy copythifile.txt paste in cloud directory
go to cloud directory and check using ls command, file is copied or not. after checking come back in root folder using cd .. command.
Example:

When you are out of the directory still you can copy the file from directory and paste in another directory by using path.
Example:

Copied cloud directory to devops directory

Practical 5: Move command- Create file1.txt inside devops directory and move that text file to cloud directory.
- to transfer file from source to destination.
1. We have files and folders. We created file1.txt file in devops directory using touch command.
2.Then we move file from devops folder to cloud folder using mv command.
Example:

Practical 6: Rename file- devops to Linux_for_dev using mv command
Syntax: mv existing_folder new_name
Example:

Practical 7: Softlink & Hardlink- Create softlink for Soflinkpractise.txt file which is in linux_for_dev directory.
Create SoftLink for soflinkpractise.txt and this file is placed inside linux_for_dev folder.
Example:

Check softlink path using pwd command. and create softLink
syntax: ln -s location_of file give_name_to_softlink
Example:

Note: don’t make SoftLink inside location create softlink at root directory.
Now you can change content into file by using SoftLink directly.
Example:

SoftLink will be deleted if source location is deleted. It will be in red color.
Example:

Hardlink:
Note: HardLink will be not deleted if source location is deleted.
- In this example me made demo.txt as HardLink.
syntax: ln location_of_file give_name_to_hardlink
Example:

Practical 8: Disk Usage Commands
#df and df -h
- This command shows the amount of disk space used and available on the mounted filesystems.
Syntax: df [OPTION]... [FILE]...
Options:
-h: Print sizes in human-readable format (e.g., 1K, 234M, 2G).

du: disk utility
- to know about specific folder
Syntax: du [OPTION] [FILE]
Options:
-h: Print sizes in human-readable format.-s: Display only a total for each argument.
Example:

ps:
- Reports a snapshot of current processes.
Syntax: ps [OPTIONS]
Options:
-f: Full-format listing
-u: User-oriented format
Example:

top:
Displays Linux tasks.
Syntax:
top [OPTIONS]Options:
-d: Delay time interval-n: Number of iterations
Example:

fuser
- Identifies processes using files or sockets.
Syntax: fuser [OPTIONS] FILE
Options:
-k: Kill processes accessing the file
-m: Name specifies a file on a mounted file system
Example:

kill:
- Sends a signal to a process.
Syntax: kill [options] pid
Options:
-9: Forcefully kill the process-15: Gracefully terminate the process
Example:

free and free -h:
- Displays the amount of free and used memory in the system.
Syntax: free [OPTIONS]
Options:
-h: Human-readable format (e.g., 1K, 234M, 2G)
Example:

nohup:
- Runs a command immune to hangups, with output to a non-tty.
Syntax: nohup COMMAND [ARG]
Example:

also you can use
#head -n 5 nohup - to print top 5 lines
#tail -n 5 nohup - to print last 5 lines
vmstat and vmstat -a:
Reports virtual memory statistics.
Syntax: vmstat [OPTIONS] [DELAY [COUNT]]
Options:
-a: Displays active and inactive memoryExample:

Practical 9: User and File Management:
System Level Command:
uptime:
- Tells how long the system has been running.
Syntax: uptime
who:
- Shows who is logged on.
Syntax: who [OPTIONS]
-b: Time of last system boot
-u: Display idle time
Example:

whoami:
Prints the current user ID.
Example:

Which:
- Locates the executable file associated with a given command.
Syntax: which COMMAND
Example:

id:
id of user or groups
Example:

/etc/passwd:
This is a file that contains user account information.
Example:

sudo:
- Executes a command as another user, typically the superuser.
Syntax: sudo COMMAND
Example:

apt:
- A command-line interface for package management.
syntax: apt [OPTIONS] COMMAND
Example:


if you not able to download it you have to take it from web browser. so for that use below command:
sudo apt-get:
- A command-line tool for handling packages.
Syntax: apt-get [OPTIONS] COMMAND
Example:

sudo apt-get update
and your system will be up to date.
and then you can proceed further to install application.
sudo apt remove docker.io
- is used to uninstall packages from your system
Syntax: sudo apt remove [PACKAGE_NAME]
Example:

Note: command for different linux versions:
yum - centos
dnf- fedora
rpm- redhat
Man:
- Displays the manual pages for commands.
Syntax: man COMMAND
Practical 10: User and Group Management commands
useradd:
- Creates a new user and a home directory for them.
Syntax: sudo useradd -m [USERNAME]
Example:

passwd:
- Sets or changes the password for a user.
Syntax: sudo passwd [USERNAME]
Example:

su:
to switch user. and to exit from secondary user to primary enter exit.
Example:

userdel:
- is used to delete a user account.
syntax: sudo userdel username
Example:

cat /etc/group
- to check list of all users.It is used to define the groups to which users belong
groupadd
- Creates a new group.
Syntax: sudo groupadd [GROUPNAME]
Example:

gpasswd:
- Adds a user to a group.
Syntax: sudo gpasswd -a [USERNAME] [GROUPNAME]
Example:


groupdel:
- Deletes a group.
Syntax: sudo groupdel [GROUPNAME]
Example:

Practical 11: File Permissions Commands
ls -l
- Lists files and directories in long format, showing detailed information.
Example:

Note: at starting d is mentioned. it means directory
and in second line - is mentioned means it can’t be directory.
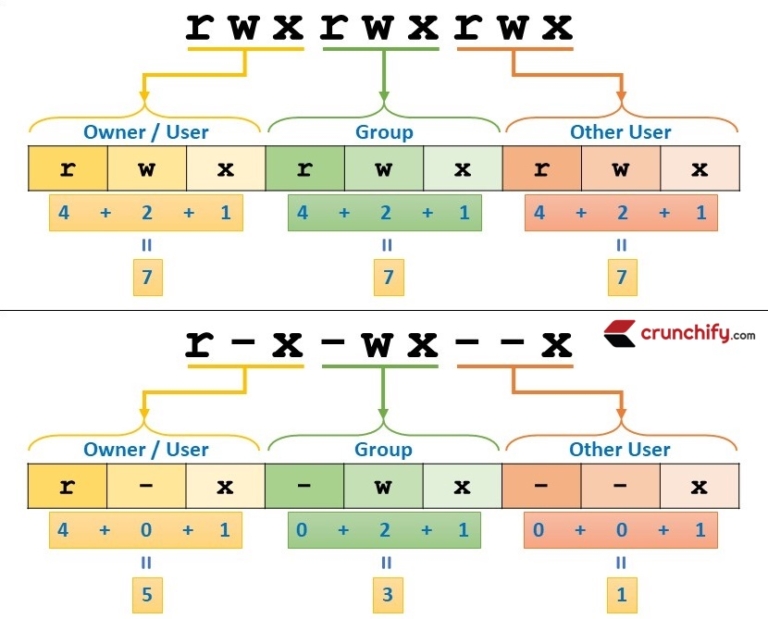

chmod:
- Changes file permissions.
Syntax: chmod [options] mode file
Options:
-R: Recursively change permissions.u,g,o: User, group, others.+,-,=: Add, remove, set permissions.
Note: to change permission for directory. eg. chmod 770 cloud
Example:

umask
- Sets default file creation permissions.
Syntax: umask [options] [mask]
Note: every system has default file permissions. If you create new file and check umask you will see some permission given.

Example:


0002: rw-rw-r—
chown:
- Changes file owner and group.
Syntax: chown [options] owner[:group] file
Options:
-R: Recursively change ownership.
Example:

chgrp
- Changes group ownership of a file.
Syntax: chgrp [options] group file
Options:
-R: Recursively change group ownership.
Example:

zip:
- Compresses files into a ZIP archive.
Syntax: zip [options] archive.zip file
Options:
-r: Recursively add files.-e: Encrypt the archive.
Example:

unzip:
- Extracts files from a ZIP archive.
Syntax: unzip [options] archive.zip
Options:
-l: List contents of the archive.-d: Specify directory to extract to.
Example:
Create folder inside cloud folder
created zip file at root location.
copy that zip file to new location
unzip that file.

tar:
- Archives files into a tarball.
Syntax: tar [options] -f archive.tar file
Options:
-c: Create a new archive.-x: Extract files from an archive.-v: Verbose output.-z: Compress with gzip.
Example:

tar -xvzf file.tar.gz
Example:

Practical 12: Transfer Commands
Scp:
To copy files from your local machine to a remote server using scp (secure copy),
a. From local to server
First create file eg secret_file.txt, enter data and then use scp command.

Enter content in file.

Data: File from local.
Do ssh on local(windows cmd).

Do scp on local.

Syntax: scp [options] “key_location” source_file “username@remote_host:remote_directory”
Explanation:
I am using windows command promt.
key_location → whenever we create instance on aws, key will get download on local that key location
source_file → we have created file which is secret_file.txt
username@remote_host:remote_directory → destination path/server location
Key_location will be: “\users\archana\downloads\linux2.pem"
destination path / server location will be: ubuntu@ec2-3-133-124-129.us-east-2.compute.amazonaws.com:/home/ubuntu
Go to aws. connect the instance. list out all file using ls command. You will see file is present on server just because we used scp on local.

And you can view the file on server.

Server to local
Now we want to copy folder from server to local. First we will make one folder on server. i.e. Devops.
and we will copy this folder to local.

Do scp on local.

Syntax: scp [options] “key_location” -r username@remote_host:remote_directory .
Explanation:
Key_location → whenever we create instance on aws, key will get download on local that key location
source_file → we have created folder on server which is Devops
username@remote_host:remote_directory → destination path/server location/file location
-r → Because we are copying folder.
. → copy to present location in local.
Key_location will be: “\users\archana\downloads\linux2.pem"
destination path / server location will be: ubuntu@ec2-3-133-124-129.us-east-2.compute.amazonaws.com:/home/ubuntu/Devops
Check folder is copied to local or not.

rsync:
- for synchronizing files and directories between two locations over a network or locally. It is commonly used for backups and mirroring.
- On local. Do ssh. I used Linux shell.

Syntax: rsync -e "ssh -i \Users\Archana\Downloads\linux2.pem" -avz Devops ubuntu@ec2-3-133-124-129.us-east-2.compute.amazonaws.com:/home/ubuntu/Devops
Explanation:
rsync -e → to sync
ssh i /users/shubham/downloads/linux-for-devops-key.pem → do ssh
-avz → archieve, compress,zip
ubuntu@ec2-3-148-172-197.us-east-2.compute.amazonaws.com:/home/ubuntu/linux_for_devops → path to local folder
check both side.
Practical 13: Networking Commands
ping
- Used to check the connectivity to a host.
Syntax: ping [options]
Options:
-c <count>: Number of packets to send.-i <interval>: Interval between packets.
Example:

netstat
- useful command for displaying network connections, routing tables, interface statistics, masquerade connections, and multicast memberships.
Synatx: netstat [options]
Options:
-a: Show all connections (listening and non-listening).-t: Display TCP connections.-u: Display UDP connections.
Example:

net-tools
- Net-tools is a collection of programs for controlling and monitoring network settings in Unix-like operating systems.
Syntax: sudo apt install net-tools
Example:

ifconfig
- Displays or configures network interfaces.
Syntax: ifconfig [interface] [options]
Options:
up: Activate an interface.down: Deactivate an interface.
Example:

traceroute
- Traces the route packets take to a network host.
Syntax: traceroute [options]
Options:
-m <max_ttl>: Maximum number of hops.-n: Do not resolve hostnames.
Example:

tracepath
- Similar to
traceroute, but does not require superuser privileges.
Syntax: tracepath hostname/ip
Example:

mtr
- Combines ping and traceroute functionalities.
Syntax: mtr [options]
Options:
-r: Generate report.-c <count>: Number of pings.
Example:

nslookup:
- Queries DNS to obtain domain name or IP address mapping.
syntax: nslookup [options]
Example:

Telnet google.com 80
- to connect with port, Used for remote login.
Syntax: telnet hostname/ip [port]
Example:

hostname:
- Displays or sets the system's hostname.
Syntax: hostname [new_hostname]
Example:

cat /etc/hosts
- to check all host names
Example:

ip address show
- Displays IP addresses assigned to all network interfaces.
Syntax: ip address show [interface]
Example:

iwconfig
- Configures wireless network interfaces.
Syntax: iwconfig [interface] [options]
Options:
essid <SSID>: Set network name.key <key>: Set WEP key
Example:

sudo apt install wireless-tools

ss
- same as netstat
Example:

dig google.com
- Queries DNS servers.
Syntax: dig [options] hostname/ip
Options:
@<server>: Specify DNS server.+short: Short output.
Example:

whois google.com
- Retrieves information about domain registration.
Syntax: whois domain_name
Example:

arp
- Displays or modifies the ARP table.
Syntax: arp [options]arp [options]
Options:
-a: Display all entries.-d <hostname>: Delete an entry.
Example:

ifplugstatus:
- Checks the link status of network interfaces.
Syntax: ifplugstatus [interface]
Example:

curl:
- to call api endpoints, jq is for design purpose, Transfers data from or to a server.
Syntax: curl [options]
Options:
-O: Save to file.-d <data>: Send data.
Example:

wget link
- Downloads files from the web.
Syntax: wget [options] url
Options:
-O <file>: Save as file.-q: Quiet mode.
Example:

watch
- Runs a command repeatedly, displaying its output.
Syntax: watch [options] command
Options:
-n <interval>: Interval between executions.-d: Highlight changes.
Example:
watch mtr google.com

nmap
- Network exploration tool and security scanner.
Syntax: nmap [options]
Options:
-sS: TCP SYN scan.-O: OS detection.
Example:

route
- It will show ip address and their gateway, Displays or modifies the IP routing table.
Syntax: route [options]
Options:
add: Add a route.del: Delete a route.
Example:

Practical 14: Advanced linux commands: awk, sed, grep
1.awk
Used to manipulate and analyze text, typically in columnar data. It allows you to select specific columns, modify data, perform calculations, and much more.
- Create a directory, create a text file (app.log) and add content.

- You can see content of file using head command.

a. To print anything you can use ‘{print}‘
Syntax: awk 'pattern {action}' input_file
pattern: The condition (pattern) to match (optional). If not specified, awk processes all lines.
action: What to do when a line matches the pattern. The action is written in curly braces
{}.input_file: The file to process (optional if using input from a pipe). eg. app.log
Example: awk ‘{print}‘ app.log

b. Print Specific Columns. Here you can use $ to specify column
Example: awk '{print $1, $2}' input_file

c. You can find particular word from file.
Syntax: /word/
eg. In this snip, I am finding total reg_process word in column1 and 2 from entire file.

and now I am storing output different file which is new.txt.

In this snip, you can print total count of how many times reg_process occurs.
Here I used {count++}: It is action — increments the variable count for each match
END {print count}': After processing all lines, print the final value of count.

d. Print column in mention range.

Explanation:
Checks if the second column ($2) is a time between “08:51:01" and $2 <= "08:51:03”
If yes, it prints the 2nd, 3rd, and 4th columns from those lines.
sed
- super useful for finding, replacing, deleting, and transforming text in files or input streams, -n used for exact match.
Syntax: sed [OPTIONS] 'command' input_file
Options:
-e– Add multiple commands
-f – Read sed commands from a file
-i – Edit file in-place
-n – Only print what's explicitly told to
a. we print reg_process from app.log file
p: This means "print the line" when the pattern reg_process is found.

b. we need to replace “reg_process” with “Info” word.
Explanation:
's/reg_process/Info/g':
s: Stands for substitute.reg_process: The pattern (or word) you're looking for.Info: The replacement string. This will replace reg_process wherever it appears in the text.g: This stands for global. It means replace all occurrences of reg_process in each line. Without g, only the first occurrence on each line would be replaced.

c. We need to change reg_process to log from line 1 to 12
Explanation:
'1,12 s/reg_process/log/g':
1,12: This specifies the range of lines to apply the substitution to.s: Stands for substitutereg_process: The pattern (or word) you're searching for.log: The replacement string. Whereverreg_processis found, it will be replaced bylog.g: This stands for global. It ensures that all occurrences ofreg_processin each of those lines will be replaced (not just the first occurrence).

grep
- It stands for Global Regular Expression Print, It searches for lines that match a pattern and prints them
Syntax: grep [OPTIONS] PATTERN [FILE]
Options:
-i case sentitive
-n Show line numbers with matching lines
a. To find word “address “

b. Total count for address word.
-c: It returns the number of lines that contain the pattern/word.

Linux Volume Management

Logical Volume Management (LVM) is a system for managing disk storage in a flexible and efficient way. Here’s a simple breakdown:
Key Components
Physical Volumes (PVs): These are the actual hard drives or partitions.
Volume Groups (VGs): Collections of physical volumes combined into one large storage pool.
Logical Volumes (LVs): Virtual partitions created from the volume group, which can be resized and managed easily.
How It Works
Create Physical Volumes: Convert hard drives or partitions into physical volumes.
Create Volume Groups: Combine these physical volumes into a volume group.
Create Logical Volumes: Make flexible storage spaces from the volume group.
AWS Elastic Block Store (EBS)
Amazon EBS provides scalable, high-performance block storage for use with Amazon EC2 instances. Key features include:
- EBS Volumes: Attach these to EC2 instances to store data, similar to a local hard drive.
when any volumn means xvda is get attached to ec2 or system it becomes /dev/xvda. And we get starting point that is mount “/“.
mounting refers to the process of making a filesystem accessible at a certain point in the directory tree. When you mount a storage device (like a hard drive or USB stick), you attach its filesystem to a directory (known as a mount point) so that you can access its contents.
It looks like as below:


Practical 15: To check disk space, create EBS volumn and attach to instance
1. create ec2 instance with 8gb storage. connect it via console or via ssh.
Try this command and check disk space details.
a. check disk space.
1.lsblk
In Linux, /dev/xvda refers to a Xen Virtual Block Device. This naming convention is used for storage devices in virtualized environments. xvda1, xvda14, xvda15 these are partition of disk

2.df -h
How much disk space is left.

b. create EBS volumes
EC2→ volumes → create volume for **10,12,14gb. (8gb is original when we created ec2 instance.)**You You can see in below image:

While creating volume select /dev/sdf. Do not select /dev/sda because it is already in use.

12gb volume-/dev/sdg
14gb volume-/dev/sdh
10gb volume - /dev/sdf
check if its attached or not through lsblk command.

You can see xvdf, xvdg, xvdh are disk and attached.
Practical 16: LVM, Create physical volume, volume group, logical volumn
If you want to do anything in LVM you have to be root user.

We have created 3 volumes xvdf, xvdg, xvdh in last practical. Now we will make them as physical volume.
Syntax: pvcreate [options] devices
Options:
--force: Forces the creation of a physical volume--verbose: Show detailed output while creating the VG.
check physical volume using pvs command.

Create volume groups.
Syntax: vgcreate [OPTIONS] <volume_group_name> <physical_volume_path> [additional_PVs]
Options:
--force: Forces the creation of a physical volume--verbose: Show detailed output while creating the VG.To check newly created volume groups enter vgs command

Create logical volume.
Syntax: lvcreate [OPTIONS] -l -n <lv_name> <vg_name>
Options:
-L <size>: Specifies the size of the logical volume (e.g.,10G,500M)-l <extents>: Specifies the size in extents (e.g.,100%FREE,50%VG)
to check physical volume details, use pvdisplay lvdisplay vgdisplay.
to come out from lvm enter exit.

Practical 17: How to do mounting of newly created volumes and groups and logical volume.
Create a Mount Point Directory
Syntax: mkdir -p /mnt/lvmount
Format the Logical Volume with a Filesystem
Syntax: mkfs.ext4 /dev/vgnew/lvnew

Mount the Logical Volume.
Syntax: mount /dev/my_vg/my_lv /mnt/lvmount
your logical volume is accessible at /mnt/lvmount.
Verify the Mount using df -h

- Now you can go to mount location and you can make directories and files. and you can access from root directory by entering path of text file.


You can unmount the directory.
Syntax: umount /mnt/lvmount

Practical 18: How to mount directly made ebs volume.
Identify the EBS volume
lsblk
Check if it’s formatted.
sudo file -s /dev/xvdh (we already made extra volumn in practical 17)
If it says: /dev/xvdh: data That means the disk is not formatted yet.
Create directory disk_mount
mkdir /mnt/disk_mount
Format the EBS Volume
sudo mkfs.ext4 /dev/xvdh

Mount the EBS Volume.
Syntax: sudo mount /dev/xvdh /mnt/disk_mount/

Practical 19: If we create logical volumn of 10gb we can expand it to 15gb.
Check Current Size
Syntax: lvdisplay /dev/my_vg/my_lv or df -h /mnt/mydata
Resize the Logical Volume to 15G
Syntax: sudo lvextend -L 15G /dev/vgnew/lvnew
Exit from lvm
Verify the New Size using lsblk.
You can see xvdh is now 14gb.

Subscribe to my newsletter
Read articles from Neha Sawant directly inside your inbox. Subscribe to the newsletter, and don't miss out.
Written by