How to Host a WordPress Website on AWS EC2 (Ubuntu 24.04) — Step-by-Step Guide
 NonStop io Technologies
WordPress is a powerful and versatile content management system (CMS) that enables users to build and manage websites efficiently. Hosting WordPress on a cloud instance such as AWS EC2 or a local VirtualBox VM ensures flexibility, scalability, and control over your website. This guide walks you through setting up WordPress on a fresh VM, configuring a LAMP stack (Linux, Apache, MySQL, PHP), and ensuring the configurations for a fully functional WordPress website.
1. Create a Virtual Machine
create a VM on AWS EC2, VirtualBox, or VMware as per your requirements.
Update the server packages to the latest version
sudo apt update && sudo apt upgrade -y
Set hostname as per your naming conventions
hostnamectl set-hostname ns-site1-vm
2. Install Apache Web Server
Apache is the web server that will serve your WordPress site. We need to install and enable it to run automatically when the system starts.
Install the latest version of the Apache web server
sudo apt install apache2
Enable and start the Apache Server
sudo systemctl enable apache2
sudo systemctl start apache2
3. Install PHP and Required Plugins
PHP is the scripting language required for WordPress to function. We also install necessary extensions that WordPress relies on.
To install the latest version of PHP and its extensions on Ubuntu, follow these steps:
Add the Repository (For Latest PHP Versions)
sudo apt install software-properties-common ca-certificates lsb-release apt-transport-https -y
sudo add-apt-repository ppa:ondrej/php -y
sudo apt update
Install PHP Version 8.0 for better compatibility with WordPress.
You can refer to the documentation
sudo apt install php8.0 php8.0-cli php8.0-common php8.0-mysql php8.0-curl php8.0-gd php8.0-intl \
php8.0-mbstring php8.0-soap php8.0-xml php8.0-xmlrpc php8.0-zip libapache2-mod-php8.0 -y
Verify Installation
php -v
This should display the installed PHP version.

4. Install and Configure MySQL
MySQL is the database management system that stores all of WordPress's data, including posts, users, and settings.
Install MySQL server:
sudo apt install mysql-server
Enable and start the MYSQL server
sudo systemctl enable mysql.service
sudo systemctl start mysql.service
Do MySQL secure installation
mysql_secure_installation
Create a new user with restricted permissions for security
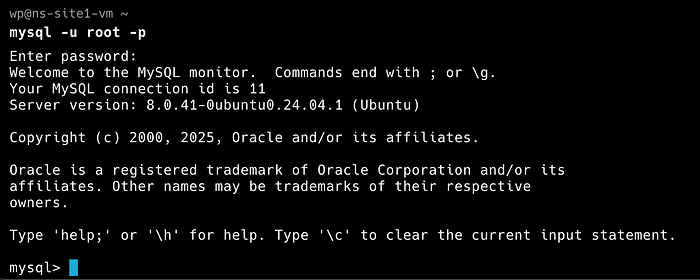
To access your MySQL prompt, use the below command
mysql -u root -p
First, we need to create a database that will be restricted to the specific user only
CREATE DATABASE site1_ns_db;

Create a user
CREATE USER 'site1_ns_user'@'localhost' IDENTIFIED WITH mysql_native_password BY '@MySecurePass123';

When creating a new user with CREATE USER, you provide a username followed by an @ symbol and the hostname from which the user will connect.
Change <password> with your desired password.
Grant Privileges to the User for the database we created
GRANT ALL PRIVILEGES ON site1_ns_db.* TO 'site1_ns_user'@'localhost';

Apply Changes
FLUSH PRIVILEGES;

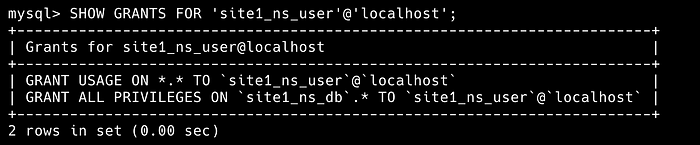
Verify the Privileges
SHOW GRANTS FOR 'site1_ns_user'@'localhost';
5. Install and Configure WordPress
We are deploying WordPress, a content management system (CMS). This step involves downloading and configuring WordPress to work with our web server and database.
You can create a separate directory for WordPress if needed. Recommended installation path: /var/www/html/yoursite
mkdir -p /var/www/html/ns.site1.com
Set the correct ownership and permissions
sudo chown -R www-data:www-data /var/www/html/ns.site1.com/public_html
sudo chmod -R 755 /var/www/html/ns.site1.com/public_html
Download WordPress
cd /var/www/html/ns.site1.com
wget https://wordpress.org/latest.tar.gz
Unzip the package
tar -xvf latest.tar.gz
Change the name of the WordPress directory to public_html
mv wordpress public_html
Update the WordPress configuration file
cd /var/www/html/ns.site1.com/public_html
nano wp-config.php
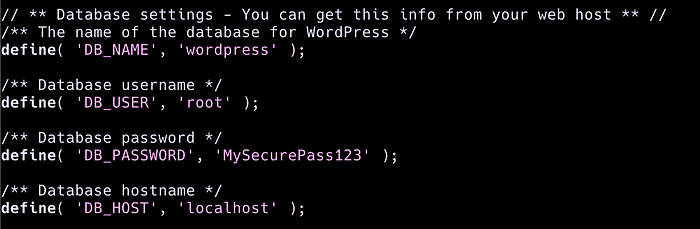
Modify the database settings in wp-config.php to match your MySQL setup.
6. Configure Apache Virtual Host
A virtual host is required to tell Apache how to serve your WordPress site. This configuration ensures that requests to your domain or IP address are properly handled.
Navigate to the Apache configuration directory:
cd /etc/apache2/sites-enabled/
First, delete the default configuration files that are already there:
sudo rm /etc/apache2/sites-enabled/*
To store the log files for Apache, we’ll be creating a separate directory and files
mkdir -p /var/log/apache2/site1.ns.com/
sudo touch /var/log/apache2/site1.ns.com/error.log
sudo touch /var/log/apache2/site1.ns.com/access.log
Create a new configuration file
sudo vi ns-site1.com.conf
Refer to the following configuration
<VirtualHost *:80>
   ServerAdmin webmaster@localhost
   DocumentRoot /var/log/apache2/site1.ns.com/public_html
   ErrorLog /var/log/apache2/site1.ns.com/error.log
   CustomLog /var/log/apache2/site1.ns.com/access.log combined
   <Directory </var/log/apache2/site1.ns.com/public_html>
       Options Indexes FollowSymLinks
       AllowOverride All
       Require all granted
   </Directory>
</VirtualHost>
To enable the config, use the soft link
ln -s /etc/apache2/sites-available/ns-site1.com.conf /etc/apache2/sites-enabled/ns-site1.com.conf
sudo a2ensite example
Check that the configuration is correct
apache2ctl -t
Enable necessary Apache modules
sudo a2enmod rewrite
sudo a2enmod proxy
sudo a2enmod proxy_http
Set up Apache server timezone to Asia/Kolkata
sudo timedatectl set-timezone Asia/Kolkata
timedatectl
Configure Apache to Use the System Time zone
SetEnv TZ Asia/Kolkata
Restart Apache
sudo systemctl restart apache2
8. Additional Configuration
Access the WordPress setup page from a web browser
Additionally, you can set up a local domain to access
The host file is where you can map domain names to IP addresses. This file exists on both Linux and Windows systems.
Edit the host file
sudo nano /etc/hosts
Add a line that maps your local domain to your server’s IP
<VM ip> ns-site1.com
Modify the Apache configuration file
<VirtualHost *:80>
   ServerAdmin webmaster@localhost
   DocumentRoot /var/log/apache2/ns-site1.com/public_html
    ServerName ns-site1.com #Add ServerName
   ErrorLog /var/log/apache2/ns-site1.com/error.log
   CustomLog /var/log/apache2/ns-site1.com/access.log combined
   <Directory <Wordpress installation path>>
       Options Indexes FollowSymLinks
       AllowOverride All
       Require all granted
   </Directory>
</VirtualHost>
Enable the Site and Restart Apache
sudo a2ensite ns-site1.com.conf
sudo systemctl reload apache2
Try to access it by using the DNS you mapped to your server’s IP
Step 5: Install SSL using Certbot
If you are using any DNS, you can secure your site by installing SSL using certbot
- Install Certbot
sudo apt install certbot python3-certbot-apache -y
2. Generate an SSL certificate
sudo certbot --apache -d ns-site1.com
Conclusion
By following this guide, you have successfully hosted a WordPress website on an EC2 instance or a VirtualBox VM. Your LAMP stack is fully configured, and your WordPress installation is ready for use. You can now access the WordPress setup page from a web browser and proceed with site configuration.
This setup provides you with complete control over your WordPress hosting, allowing for scalability, customization, and enhanced security.
Happy Hosting!
Subscribe to my newsletter
Read articles from NonStop io Technologies directly inside your inbox. Subscribe to the newsletter, and don't miss out.
Written by
NonStop io Technologies
NonStop io Technologies
Product Development as an Expertise Since 2015 Founded in August 2015, we are a USA-based Bespoke Engineering Studio providing Product Development as an Expertise. With 80+ satisfied clients worldwide, we serve startups and enterprises across San Francisco, Seattle, New York, London, Pune, Bangalore, Tokyo and other prominent technology hubs.