How to Share Your Local Next.js App Online Using Pinggy
 Lightning Developer
During web development, it's common to run applications locally on your machine using localhost. However, there are many scenarios where you might need to share your in-progress app with someone outside your network — such as a teammate, client, tester, or mentor. Setting up a cloud deployment just to show your local work can be overkill, especially if the goal is quick feedback or a temporary demo.
This is where tunneling tools become useful. They let you securely expose your local web server to the internet without having to configure DNS, buy hosting, or open firewall ports. In this guide, we’ll walk through using Pinggy, a lightweight SSH-based tunnel, to expose your local Next.js app so it's accessible via a public URL.
What is Next.js?
Next.js is a popular open-source React framework developed by Vercel. It enhances React development by offering:
Static Site Generation (SSG) – Pre-renders pages at build time for performance and SEO.
Server-Side Rendering (SSR) – Generates pages on request for dynamic content.
Incremental Static Regeneration (ISR) – Allows updating static content without rebuilding the entire site.
Built-in Routing & API Support – Eliminates the need to configure routing separately.
Optimizations – Includes image optimization, code splitting, font loading, internationalization, and analytics integration.
Next.js is suitable for everything from simple landing pages to complex web applications.
Problem: Localhost Isn't Public
By default, your app is accessible only from your machine (http://localhost:3000). Anyone outside your local network can’t access it. This is due to:
Firewall and NAT restrictions
Private IP addressing
No DNS resolution to your local server
Traditional Solution
You could deploy your app using a platform like Vercel or Netlify, but that often means:
Writing extra deployment configs
Waiting for builds
Managing preview environments
Introducing potential security risks if incomplete features go live
A Lightweight Alternative
Tunneling tools like Pinggy allow you to temporarily and securely expose your local environment without making permanent infrastructure changes.
Prerequisites
Before getting started, make sure you have the following:
Node.js and npm installed
SSH client:
macOS/Linux: comes pre-installed
Windows: install OpenSSH via Settings → Apps → Optional Features, or use Git Bash
Pinggy (no account required for basic use)
Basic command-line knowledge
Step 1: Create and Run a Next.js App
If you don’t already have a project, start one with:
npx create-next-app@latest my-app
cd my-app
npm run dev
Your app will now be running at http://localhost:3000.


Step 2: Expose the App Using Pinggy
Now let’s make your app accessible via a public URL.
In a new terminal window, run:
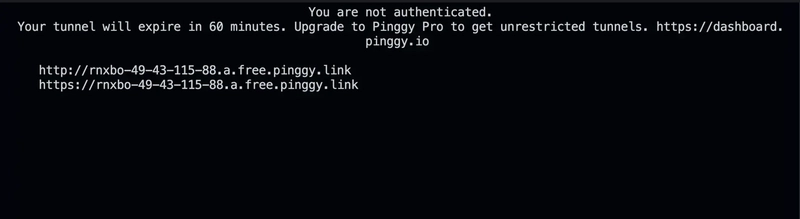
ssh -p 443 -R0:localhost:3000 a.pinggy.io
You may be prompted to enter a token or see a message with your generated public URL, like:
https://your-app-name.pinggy.link
You can now share this link with anyone — no deployment required.

Command Breakdown
ssh -p 443: Connect to Pinggy’s server via port443(commonly open on most networks)-R0:localhost:3000: Reverse tunnel from your local machine’s port3000a.pinggy.io: Pinggy’s public SSH gateway
The tool assigns a random subdomain under pinggy.link, forwarding traffic directly to your local app.
Step 3: (Optional) Customize Your Tunnel
Pinggy offers additional functionality for more professional or secure use cases:
Use a Custom Domain
Instead of the default pinggy.link subdomain, you can map your tunnel to a custom domain that you own.
Add Password Protection
Restrict access to your app by requiring a password to view the site — useful when sharing work-in-progress or sensitive content.
Check Pinggy’s documentation for details on advanced flags and options.
Common Issues and Fixes
1. Port Already in Use
If you see an error like "address already in use," make sure nothing else is occupying port 3000, or update the command:
ssh -p 443 -R0:localhost:<your-port> a.pinggy.io
2. SSH Command Not Found
On macOS/Linux: SSH is built-in.
On Windows: Install OpenSSH or use Git Bash to access the
sshcommand.
3. Connection Refused or Timeout
Some firewalls or networks block outgoing SSH traffic. Port 443 is often allowed, but if it still fails, try switching to a different network or hotspot.
Why Use Pinggy for Next.js Development?
No deployment needed — Ideal for local demos or client feedback
No DNS or hosting configuration
Works behind firewalls and NAT
Secure and temporary — No lingering changes after you're done
When to Use This Setup
This workflow is great for:
Remote code reviews
UI demos with real-time feedback
Mobile/browser compatibility testing across devices
Temporary testing environments for APIs
Conclusion
Sharing your local Next.js app doesn’t have to be complicated or involve full cloud deployments. By using a tool like Pinggy, you can quickly expose your development environment with minimal setup. It’s an efficient solution for testing, feedback, and collaboration — perfect for individual developers, small teams, or anyone needing quick access to a local app from the outside world.
References:
Subscribe to my newsletter
Read articles from Lightning Developer directly inside your inbox. Subscribe to the newsletter, and don't miss out.
Written by