HTTP 201 vs 202, 401 vs 403, and 400 vs 422: When to Use Which and Why
 Muyiwa Olayinka
Introduction to Status Codes
As a web developer, chances are you have come across HTTP status code — whether you’re building APIs on the backend or consuming them on the frontend. They are one of the primary ways we understand what happened with a request: Was it successful? Did something break? Or is your app throwing errors for no apparent reason?
Using the right status code is more than just good practice — it can prevent bugs, miscommunications between services, and hours of annoying debugging. This is especially important when working with external packages or third-party APIs that expect specific response codes.
So why focus on just a few of them? Out of the 60+ HTTP status codes listed on MDN, many are pretty straightforward. But a few are commonly misunderstood or even used interchangeably — like 201 vs 202, 400 vs 422 and 401 vs 403. The subtle differences can have real consequences in production code.
In this post, we’ll break down these confusing pairs and show you when to use each correctly — with clear examples to back it up.
HTTP 201 vs 202: Created vs Accepted
When handling HTTP responses in an API, it’s easy to assume that anything in the 2xx range means “success” and move on But not all successes codes are created equal.
Let’s take a look at 201 Created and 202 Accepted, because although they both signal success, they tell very different stories.
✅ 201 Created
The 201 Created status code is used when a new resource has been successfully created. This is commonly returned in response to a POST request. When a client receives a 201 , they can be confident that:
The request was successful
A new resource was created as a result
Use 201 Created when:
A user signs up successfully.
A new order, message, comment, post is created.
A resource is inserted into your database, and creation is confirmed.
Example:
The Request:
POST /api/users HTTP/1.1
url: http://localhost:4000/api/v1/users
Content-Type: application/json

{
  "username": "Ng1n3",
  "email": "code.with.muyiwa@gmai.com",
  "password": "testingStatus_201"
}
The Response:
HTTP/1.1 201 Created
Content-Type: application/json
url: http://localhost:4000/api/v1/users
Date: Mon, 27 May 2025 10:30:45 GMT

{
  "status": "successful",
  "message": "User created successfully",
  "data": {
    "access_token": "yJhbGciOiJIUzI1NiIsInR5cCI6IkpXVCJ9.eyJzdWIiOiIxMjMiLCJlbWFpbCI6InVzZXJAZXhhbXBsZS5jb20iLCJleHAiOjE3Mjg4MzQ2NDV9.4j5X9v2J7Q8qY1n3Z6Wx0cP5rT7sA2B4C6D8E9F0G1H",
    "refresh_token": "eyJhbGciOiJIUzI1NiIsInR5cCI6IkpXVCJ9.eyJzdWIiOiIxMjMiLCJ0b2tlbl90eXBlIjoicmVmcmVzaCIsImV4cCI6MTczMTQyNjY0NX0.7K8L9M0N1O2P3Q4R5S6T7U8V9W0X1Y2Z3A4B5C6D7E"
  }
}
⏳ 202 Accepted
The 202 Accepted status code means that the server has received the request and it is valid, but the actual processing is happening asynchronously — could be another service is now working on it.
This is useful in microservices and event-driven architectures where the service receiving the request doesn’t do the work itself but passes it along.
Use 202 Accepted when:
You’re handling off work to a background job or worker queue
The request kicks off a long-running task like video editing or a distributed process.
You want to acknowledge receipt without guaranteeing immediate success.
Use 202 Accepted when
User finishes a tests as the winner and a video is to be generated(long-running task)
User sends a request to get total expenses for the past 4 years in an Account application.(This can involve calling two to three other microservices)
Example:
The Request
POST /api/tests/t-5a7b3c/complete HTTP/1.1
Host: pro-gamers-league.com
Content-Type: application/json
Authorization: Bearer <user_auth_token>

{
  "userId": "usr-9f8d6c",
  "finalScore": 9850,
  "completionTime": "2m35s"
}
The Server’s response
HTTP/1.1 202 Accepted
Content-Type: application/json
Date: Tue, 27 May 2025 17:11:55 GMT

{
  "status": "processing",
  "message": "Congratulations on winning! Your personalized video is now being generated.",
  "jobId": "vid-gen-a1b2c3d4-e5f6",
  "checkStatusUrl": "/api/videos/status/vid-gen-a1b2c3d4-e5f6"
}
HTTP 400 vs 422: Bad Request vs Unprocessable content
We’ve all been there! trying to send a payload from the frontend and then realizing that a comma is missing in the JSON object or the expected fields are incomplete or you’re sending the wrong action type. All these are client-side errors which aren’t supposed to send the same status code. Let’s dive deep
🚫 400 Bad Request
Seeing this error means that your payload from the client is malformed or broken — missing something important or incorrectly structured.
Use 400 Bad Request when:
required fields are missing.
The JSON is invalid.
Query parameters are malformed.
Wrong character types, number is provided where string is expected.
Example:
The Request
POST /api/users HTTP/1.1
url: http://localhost:4000/api/v1/users
Content-Type: application/json

{
  "username": "",                         // <-- cannot be empty
  "email": "code.with.muyiwa@gmail.com",
  "password": "testingStatus_400"
}
The Response
HTTP/1.1 400 Bad Request

{
  "error": "username is required to create a new user"
}
❌ 422 Unprocessable content
This simply means that your JSON is fine, the syntax is correct but now, the content is semantically invalid, meaning that the data sent doesn’t make sense. It’s very easy to confuse this with a Bad request error.
Use 422 Unprocessable content when:
A password is too short or weak(e.g., must be 8 characters, must have a number)
The email given is correct but has been taken
The date sent is in the past when it should be in the future
Example
The Request
POST /api/users HTTP/1.1
url: http://localhost:4000/api/v1/users
Content-Type: application/json

{
  "username": "Ng1n3",
  "email": "already_taken@gmail.com",    // <-- Email has already been taken
  "password": "testingStatus_422"
}
The Response
HTTP/1.1 422 Unprocessable Content

{
  "error": "this email has already been taken."
}
HTTP 401 vs 403: Unauthorized vs Forbidden
You’ve certainly encountered these errors when building secure APIs. They both deal with access control, but they mean very different things.
Understanding the difference is crucial for authentication(who you are) and authorization(what you’re allowed to do). Let’s dive deep.
🔐 401 Unauthorized
The 401 Unauthorized status code means the request lacks valid authentication credentials. In simpler terms, the request doesn’t have an expected token or the token has expired. In this case, the client cannot access protected resources at all.
Use 401 Unauthorized when:
No authentication token is provided
The token provided is invalid or expired
the user is not logged in at all
Example
The Request:
GET /v1/api/products/b82eaf8d-3b10-40ad-9ee4-db787b82d224 HTTP/1.1
Authorization: Bearer <missing_token>
The server’s Response:
HTTP/1.1 401 Unauthorized
Content-Type: application/json

{
  "error": "Missing auth token. Please log in."
}
🛑 403 Forbidden
The 403 Forbidden status code means the client is authenticated, but lacks the privilege to view the requested resource. Meaning that this client is logged in, but still cannot get the resource due to permission or role level.
Use 403 Forbidden when:
an authenticated user wants to access an admin only resource
the resource/action requires an elevated privilege
Example:
The Request:
Patch /v1/api/products/b82eaf8d-3b10-40ad-9ee4-db787b82d224 HTTP/1.1
Host: app.example.com
Authorization: Bearer <valid_token_for_non_admin_user>
The Response:
HTTP/1.1 403 Forbidden
Content-Type: application/json

{
  "error": "You do not have permission to perform this action."
}
Summary
If you are in hurry, here’s a table to summarize the whole article
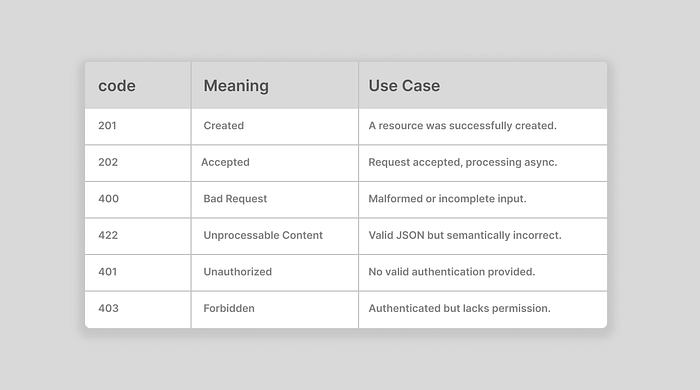
quick summary of the Status codes and use cases.
Conclusion
I hope I have been able to clear any doubts about these status codes. Thanks a lot for your time. Please follow me here for more articles like this. I am working on another one; “JWT Authentication using Private and Public Keys” I’m sure you would love it too.
Subscribe to my newsletter
Read articles from Muyiwa Olayinka directly inside your inbox. Subscribe to the newsletter, and don't miss out.
Written by