How To Take Product Photos With Phone: Pro Results At Home
 ProdShot Creator
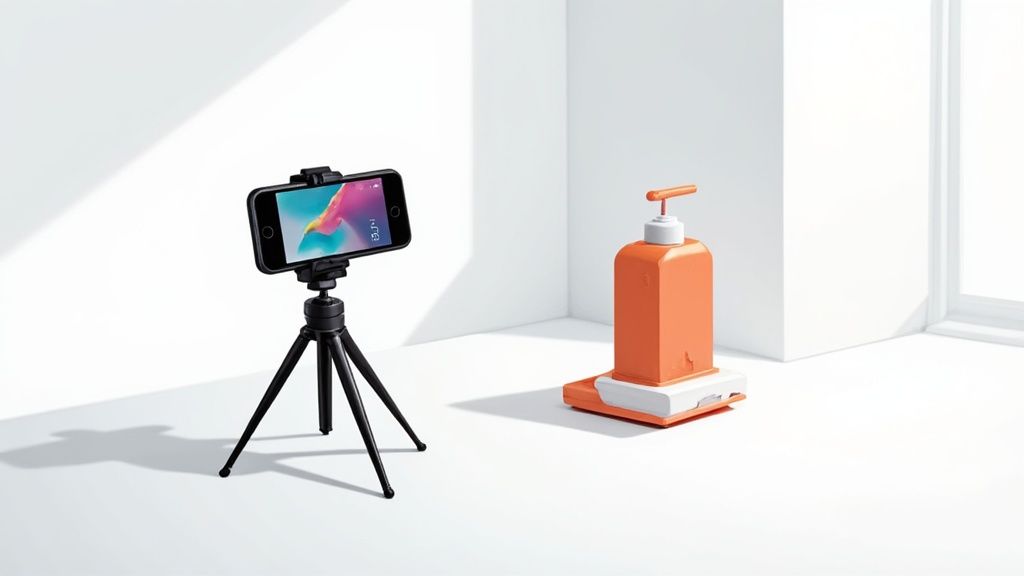
Why Your Smartphone Is The Perfect Product Photography Tool
Forget the idea that professional product photography demands pricey equipment. Your smartphone is a pocket-sized studio, brimming with technology that can rival dedicated cameras. This puts striking, sales-boosting product photos within everyone's grasp.
The Power In Your Pocket
Modern smartphones have made professional-quality photography accessible to everyone. Advanced computational photography techniques, like HDR and AI-driven image processing, automatically enhance your pictures, correcting lighting and improving clarity. Built-in editing tools simplify your process, letting you tweak brightness, contrast, and color on the spot. This makes taking great product photos with your phone simpler than ever.
Advantages of Smartphone Product Photography
The portability of smartphones changes the game. You can quickly set up a shoot anywhere, at any time, without carrying heavy gear. This is especially helpful for entrepreneurs on the move and small business owners. Imagine needing to grab some new product shots for an online promotion while at a conference. Your smartphone lets you respond instantly, taking advantage of opportunities as they arise.
Plus, instant editing allows you to review and perfect your images right away, giving you an advantage in today’s fast-paced market. You can post polished images on social media or refresh your online store within minutes of snapping a picture.
Shooting product photos with a phone is gaining popularity, thanks to the high-quality cameras on the latest models. In fact, by 2025, smartphones are projected to take over 92.5% of all photos, leaving only 7.5% taken with traditional cameras. This trend is driven in part by the ease and portability of smartphones, which makes them perfect for product photography on the go. Find more detailed statistics here.
Specific Advantages For Product Photography
Smartphone cameras are especially well-suited for product photos. Their compact size helps you take detailed close-ups, ideal for highlighting intricate textures and fine details. Many phones now offer a dedicated macro mode, further boosting this ability.
Furthermore, options like portrait mode produce a professional-looking blurred background (known as bokeh), focusing attention on your product and adding a touch of elegance. This means that even without extensive photography skills, you can get professional results.

Essential Setup That Transforms Any Space Into A Studio
Creating professional product photos doesn't require a dedicated studio or expensive equipment. You can achieve stunning results with a simple setup at home. Many online sellers capture high-quality images in spare rooms, on kitchen tables, or even inside closets. This section explores affordable accessories and DIY alternatives that can elevate your product photography without emptying your wallet.
Building Your Home Studio
First, select a space with ample natural light. A large window is ideal, providing soft, diffused light. The infographic below illustrates a basic yet effective setup using natural window light, a mini tripod, and a minimalist backdrop. Positioning your product near the window creates softer shadows. Moving it farther away results in sharper, more defined shadows.
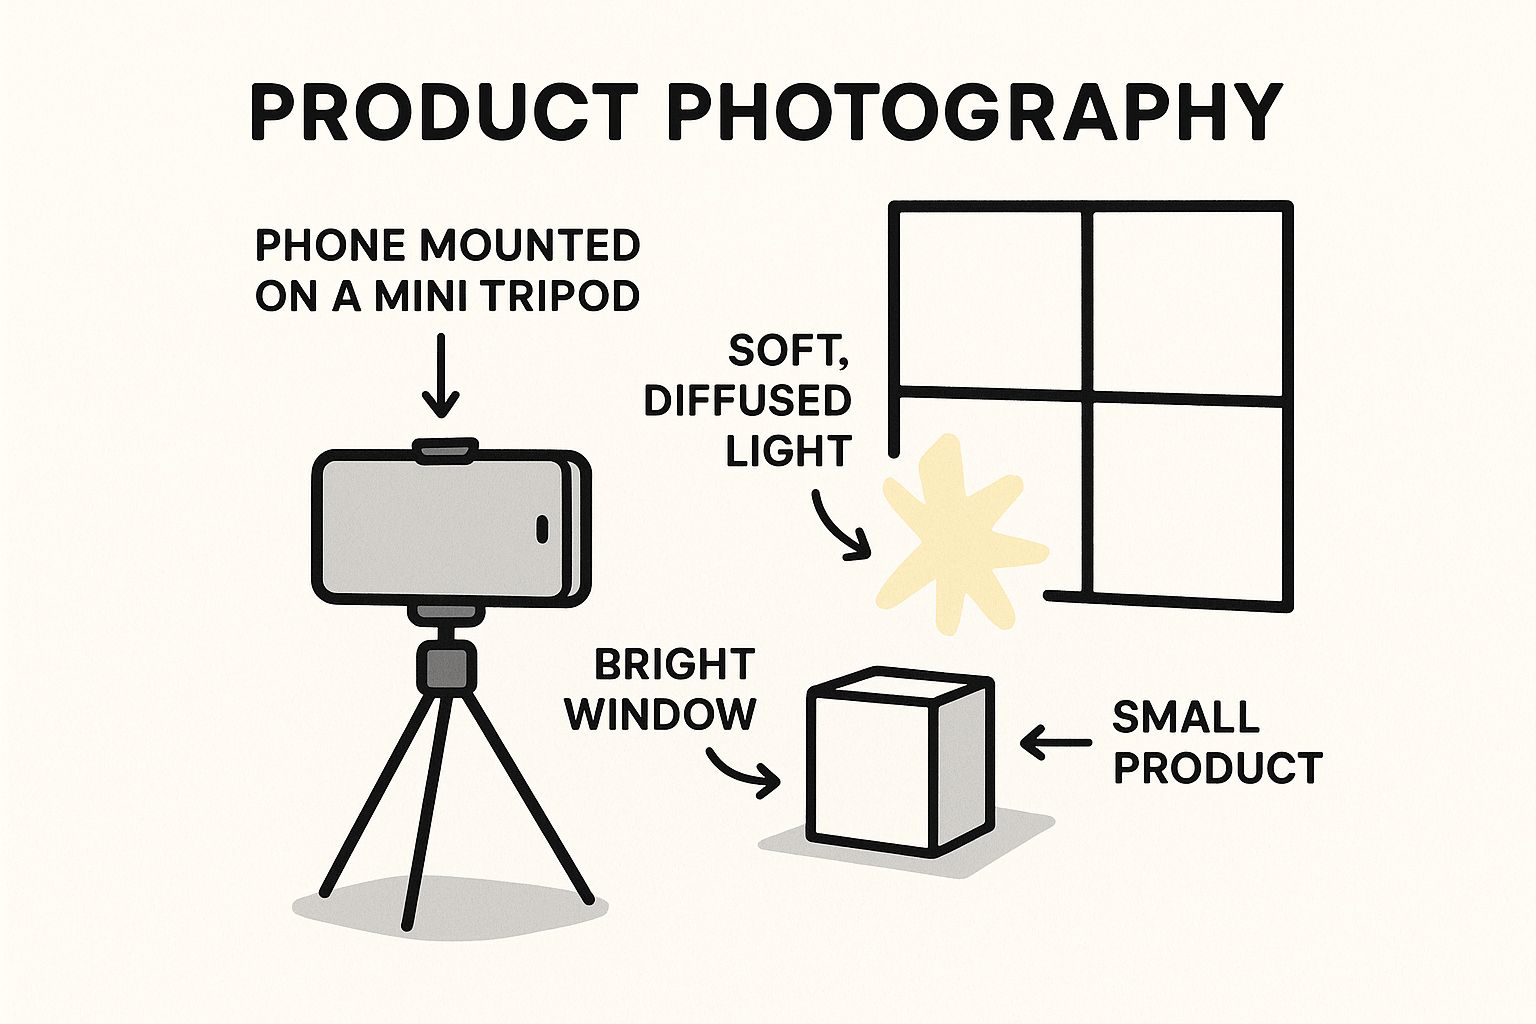
This simple setup shows how minimal equipment can create effective product photos with your phone. The key is using natural light to your advantage. Stabilize your phone for clear, focused images.
Next, consider backgrounds. A simple white backdrop is often best for product photography. It keeps the focus on your product and reflects light evenly. A white poster board or a roll of seamless paper works well. You can find these at most craft stores. For larger products, you might find this helpful: How to master professional Amazon product photography.
Essential Tools and Accessories
A tripod is a worthwhile investment, even on a budget. It stabilizes your phone, eliminating blurry images and ensuring consistent angles. Reflectors, like white foam boards, can bounce light onto your product, minimizing harsh shadows. These simple tools dramatically improve the quality of your product photos.
For challenging products like jewelry or glass, a light tent can be incredibly useful. This portable enclosure diffuses light, minimizing reflections and creating soft, even illumination. Many DIY solutions achieve a similar effect. You can use sheer curtains or even tissue paper to diffuse the light.
To help illustrate the different options available for smartphone product photography, let's take a look at the following comparison:
Essential Phone Photography Equipment Comparison: Comparison of budget-friendly vs premium accessories for smartphone product photography
| Equipment Type | Budget Option | Premium Option | Price Range | Best Use Case |
| Backdrop | White poster board | Seamless paper roll | $5 - $30 | General product photography |
| Tripod | Mini flexible tripod | Professional tripod with phone mount | $10 - $100 | Stabilizing phone for sharp images |
| Reflector | White foam board | Foldable reflector with multiple surfaces | $15 - $75 | Minimizing shadows and bouncing light |
| Light Tent | DIY enclosure with tissue paper | Professional light tent kit | $10 - $200 | Shooting reflective products |
As you can see, there are budget-friendly and premium options available for all essential equipment. Choose the tools that best suit your needs and budget.
Finally, don’t forget about software. Built-in phone editing tools can be useful for quick adjustments. Exploring dedicated photo editing apps like Adobe Photoshop Express can further enhance your images. These apps offer more advanced features, like precise color correction and background removal. Mastering these tools will help you create polished, professional product photos that will attract customers.
Lighting Techniques That Make Products Look Irresistible
Great lighting is the key to captivating product photos that truly sell. This section explores professional lighting techniques you can easily adapt for your smartphone, elevating your simple snapshots into compelling product displays.
Harnessing Natural Window Light
Natural light from a window is a readily available and surprisingly effective light source. Positioning your product near a window provides soft, diffused light that minimizes harsh shadows. For a more dramatic look with defined shadows, simply move the product further from the window. Experimenting with different times of day yields interesting results. Overcast days offer soft, even light, perfect for products with intricate details, while sunny days can create depth and a touch of drama.
Creating Dramatic Shadows and Depth
Shadows, when used effectively, can add dimension and intrigue to your product photos. Rather than eliminating shadows entirely, learn to control them. Reflectors, such as white foam boards, can bounce light back onto your product, filling in dark areas. For instance, if your window light comes from the left, placing a reflector on the right balances the light, illuminating the product's right side.
Avoiding Common Lighting Mistakes
A frequent mistake is relying on your phone's flash. Flash often creates harsh, unnatural light, washing out colors. Direct sunlight should also be avoided, as it results in overly bright highlights and deep shadows. This high contrast obscures the product's true colors and textures. Smartphones, now significant tools even in professional photography, are projected to capture over 2 trillion photos each year by 2025. This growth is driven by their continuously improving image quality, rivaling traditional cameras. Explore this topic further.
Photographing Challenging Products
Reflective products, such as jewelry or glass, require a different approach. A light tent diffuses light evenly, minimizing reflections and producing a soft, even glow. For a DIY solution, tissue paper or sheer curtains can create a similar effect. This diffused lighting accurately captures colors and details without harsh glare.

Consistent Lighting Setups for Any Time of Day
By understanding these lighting techniques and tailoring them to your specific products and environment, you can achieve professional-looking product photos using only your phone, regardless of the weather or time of day. Consistent lighting ensures a cohesive and professional brand image across all your product photography. This reinforces your brand identity and ultimately builds customer trust.
Camera Settings And Shooting Techniques That Actually Work
Ditch the auto mode and unlock your phone's true photographic power. Mastering manual controls and professional shooting techniques can dramatically improve your product photos. This section explores specific camera settings tailored to different products, ranging from macro photography to portrait mode, and introduces fundamental composition rules. We’ll also cover practical techniques for capturing textures, managing reflections, and ensuring consistent color accuracy across your product shots.
Mastering Manual Camera Controls
While auto mode offers convenience, manual controls provide significantly more flexibility and control. This allows you to fine-tune settings for your specific product and lighting conditions. A critical setting to understand is ISO, which determines your camera's sensitivity to light. A lower ISO, such as 100, is best for bright environments and results in cleaner images. Conversely, a higher ISO, like 800 or above, is necessary for low-light scenarios but can introduce noticeable grain.
Another important setting is white balance. This feature corrects colors to appear natural, regardless of the light source. For instance, when shooting under warm incandescent lighting, selecting the "incandescent" white balance preset will neutralize the yellow cast. Experimenting with these settings is crucial for achieving accurate colors.
Focus and Composition Techniques That Elevate Your Product Shots
Sharp focus is paramount for showcasing product details. Tap the screen to set the focus point precisely on your product. For items with intricate details, use your phone's macro mode to capture impressive close-ups. Many smartphones offer a grid overlay feature. Activate this in your camera settings to utilize the rule of thirds. This composition principle suggests positioning key elements along the gridlines or at their intersections for a more balanced and visually appealing image.
For products that benefit from a blurred background, use portrait mode. This creates a shallow depth of field, keeping your product sharp while the background softens. This technique is particularly effective for highlighting jewelry or handcrafted items.
Practical Challenges and Creative Workarounds
Capturing fine textures requires attention to lighting and focus. Side lighting effectively emphasizes textures, while a tripod can eliminate camera shake for increased sharpness. To manage reflections on shiny surfaces, try to avoid direct lighting. Diffuse your light source with a softbox or even a thin white sheet. Strategically placed white reflectors around your product can further minimize reflections and create more even lighting.
Maintaining consistent color across multiple shots is essential for a professional look. Shooting in consistent lighting conditions is helpful, as is using a color checker card. This tool provides a color reference for accurate correction during editing. These practical solutions can transform simple phone photos into polished, professional results. Combining these techniques with image editing best practices elevates your brand’s online presence and makes your product photos truly shine. For even more professional results, explore specialized AI-powered solutions like ProdShot, which simplifies the process of turning phone snapshots into high-quality product images. This empowers sellers to present their products in the best possible way, regardless of their photography skills.
Post-Processing Magic With Mobile Editing Apps
The journey from a good product photo to an exceptional, sales-driving image often involves post-processing. This crucial step adds the final polish, making your products truly stand out. This section explores the power of mobile editing apps, revealing how to transform ordinary product photos into captivating visuals. We'll cover enhancing colors, removing backgrounds, and adding subtle effects that elevate your product's perceived value.
Essential Editing Techniques for Striking Product Photos
Post-processing is like adding the finishing touches to a masterpiece. Just as a painter adds layers of detail, you refine your photos to perfection. Color correction is a fundamental technique. This involves adjusting the white balance, brightness, and contrast to ensure accurate and vibrant product colors. For instance, if indoor lighting casts a yellow tint on your product, color correction neutralizes this, restoring true colors.
Background removal is another powerful tool. This isolates your product against a clean, white backdrop, removing distractions and focusing attention on your offering. This is especially useful for online marketplaces like Amazon and Shopify, which often require white backgrounds for product images. Selective adjustments can further enhance specific product areas. You could brighten jewelry to emphasize its sparkle or sharpen a gadget's edges to showcase its sleek design.
Top Mobile Editing Apps For Product Photography
Several mobile apps offer powerful editing tools at your fingertips. The following table compares some leading options, outlining their key features, pricing structures, ideal use cases, and ease of use.
To help you choose the right mobile editing app for your product photography needs, we've compiled a comparison table highlighting the strengths of each platform.
| App Name | Key Features | Pricing | Best For | Ease of Use |
| Adobe Lightroom Mobile | Advanced color grading, presets, cloud sync | Free & Paid | Professional editing | Intermediate |
| Snapseed | Precise selective adjustments, healing tools | Free | All-around editing | Beginner-friendly |
| VSCO | Film-inspired filters, community features | Free & Paid | Stylized edits | Beginner-friendly |
| Picsart | Collage maker, graphic design tools | Free & Paid | Creative projects | Intermediate |
| Pixlr | Basic adjustments, quick fixes | Free & Paid | Simple edits | Beginner-friendly |
This table offers a quick overview of some popular mobile editing apps. Experiment to find the one that best aligns with your workflow and product requirements.
Mastering Editing Workflows for Different Product Categories
Different products demand different editing approaches. Jewelry benefits from enhanced sparkle and shine, achieved with the sharpening and brightness tools, and selective adjustments highlighting facets and reflections. Food photography thrives on warm colors and rich textures. For clothing, focus on accurately representing the fabric’s texture and color. For more in-depth information on product photo editing, check out this helpful resource: How to master product photo editing and take your images to the next level.
Maintaining Brand Consistency and Avoiding the Over-Edited Look
Consistency is crucial for a strong brand identity. Establish a consistent editing style for all your product photos to ensure a cohesive and professional look. Avoid over-editing, which can create an artificial appearance and detract from the product. Subtle enhancements are often more effective than dramatic changes. Think of editing as enhancing your product's natural beauty, not creating something entirely new. Mastering these post-processing techniques lets you present your products in the best light, capturing attention and driving sales. This attention to detail elevates your brand and builds trust with your audience.
Common Mistakes That Sabotage Your Product Photos
Even with top-notch equipment and techniques, small mistakes can severely impact your product photography and, consequently, your sales. This section acts as a quality control checklist, highlighting common issues and offering solutions for capturing compelling, sales-driven images.
The Pitfalls of Poor Color Representation
One of the most detrimental errors is inaccurate color representation. If your product photos don't accurately reflect the true colors of your product, customers may doubt the quality or be disappointed upon receiving an item that looks different. This can result in more returns and negative reviews. Ensure correct white balance settings on your phone’s camera to counteract color casts introduced by your light source. Also, avoid filters that dramatically change colors. Minor adjustments in Adobe Photoshop or similar photo editing software can enhance colors, but always prioritize accuracy. The vibrancy on screen needs to match the product's real vibrancy.
Distracting Backgrounds: A Competition for Attention
Another frequent mistake is a distracting background. A cluttered backdrop competes with your product, hindering potential customers from focusing on what you're selling. Choose a clean, simple background, ideally white or a neutral color. This makes the product the focal point. A clean background also makes it easier to remove it entirely during post-processing, if desired. For professional results, especially with more complex items, consider using a sweep or a light tent to create a seamless backdrop. Learn more in our article about how to master electronics product photos.
Unflattering Angles: Hiding Your Product's Best Features
Selecting unflattering angles can obscure your product’s best features, making it less attractive. Think about which angles best showcase its shape, texture, and details. Experiment with different views, including eye-level, high-angle, and low-angle shots. For instance, a high-angle shot works well for a flat item like a book, while a low-angle shot suits something with height, like a vase. Multiple angles offer a complete picture and help customers visualize the product in their own hands. You might be interested in: How to master professional product photos with just your phone and ProdShot.
Troubleshooting Challenges With Specific Products
Some products pose unique challenges. Reflective surfaces, like jewelry or electronics, can create unwanted glare. Use diffused lighting and avoid direct light to lessen these reflections. Dark-colored items can be tough to capture clearly, demanding careful attention to lighting and exposure. Use reflectors to bounce light onto the product and minimize shadows. By understanding these common issues and their fixes, you can dramatically improve your product photos using just your phone. This attention to detail projects professionalism, builds customer trust, and ultimately boosts sales.
Turning Great Photos Into Measurable Business Results
Understanding the link between high-quality photos and your business's success is critical in today’s visually-driven market. Great product photography isn't just about looking good; it's a powerful tool that can boost sales, minimize returns, and build a loyal customer base. This section explores how optimizing your images for various platforms, from your online store to your social media presence, can lead to real business growth.
Optimizing Your Images for Different Platforms
Different platforms call for different image optimization techniques. For e-commerce sites like Amazon and Shopify, clean product images on a white background are key. This professional and consistent presentation puts the spotlight directly on the product, eliminating distractions. High-resolution images are also essential, allowing customers to zoom in and see all the details, which can significantly impact purchasing decisions, especially for items with intricate designs or unique textures.
However, on social media platforms like Instagram and Facebook, the focus shifts to lifestyle imagery and visual storytelling. Capturing your product in action, even using simple how-to-take-product-photos-with-phone strategies, helps create a deeper emotional connection with potential customers. These lifestyle shots should be visually engaging and effectively communicate the value and benefits of your product.
Creating Photo Sets That Tell a Story
Instead of a single image, think about creating a collection of photos that showcases your product from different angles and in various situations. This helps address potential customer questions, highlight key features, and tell a more compelling product story. For example, a clothing brand might include close-ups of the fabric, images of the garment on a model, and lifestyle photos of someone wearing the outfit out and about. This provides potential buyers with a wealth of information, increasing confidence and encouraging purchases.
The impact of quality visuals on consumer behavior is undeniable. Content featuring images or videos receives up to 94% more views than text-only content. This highlights the importance of visuals in grabbing attention. Furthermore, high-quality product photos are a major deciding factor for 60% of online shoppers, demonstrating the direct correlation between compelling visuals and increased sales. For a deeper dive into these statistics, check out this resource: Photography Industry Statistics.
From Photography Skills to Business Success
Improving your product photography isn’t just about aesthetics; it’s a smart investment that can deliver measurable results. High-quality images boost conversion rates, turning browsers into buyers. They also contribute to fewer returns by accurately representing the product and minimizing the likelihood of customer disappointment. Finally, compelling visuals enhance customer satisfaction by creating a positive and engaging shopping experience.
By using these strategies, businesses can harness the power of compelling product photography to achieve tangible business outcomes. Turning simple phone photos into professional-quality images has never been easier, thanks to tools like ProdShot. Learn more about how to take product photos with phone and elevate your product photography effortlessly with ProdShot, an AI-powered tool that simplifies the creation of stunning, conversion-optimized images.
Article created using Outrank
Subscribe to my newsletter
Read articles from ProdShot Creator directly inside your inbox. Subscribe to the newsletter, and don't miss out.
Written by