Limiting Data Egress: Challenges, Solutions, and Best Practices
 Chris Zhang
Long story Short or simply put - Introduction
In today's interconnected digital landscape, data flows freely across borders, networks, and platforms, driving innovation, powering economies, and shaping industries. However, amid this digital renaissance, data egress emerges as a critical consideration for businesses navigating the complex terrain of data management and compliance.
Generally speaking, data egress, which is the movement of data out of a controlled environment, poses multifaceted challenges and opportunities for organizations across various sectors. From ensuring regulatory compliance to safeguarding intellectual property and maintaining data sovereignty, the implications of data egress are far-reaching and demand meticulous attention.
To address these challenges, we will use the Health Data Nexus as an example of a strategy we have implemented for the Temerty Centre for Artificial Intelligence Research and Education in Medicine (T-CAIREM) at the University of Toronto.
What is Health Data Nexus?
The Health Data Nexus is the infrastructure deployed to manage the data and analytical environments for advancing health through AI at T-CAIREM. The platform itself stores de-identified data provided by various parties to help facilitate new advancements in healthcare.
While we could just share de-identified medical data by sending files to the parties that would like to do research on them, it is not the best approach. In such a scenario, we would not have much control over the files themselves. Instead, we have decided to build a platform deployed to Google Cloud, that allows credentialed users to access and work on the data but only within the boundaries that are being set by cloud environments that we provide. That approach, besides making it easier for us to manage the process more efficiently, also makes it possible to introduce additional security measures against malicious actions taken on data.
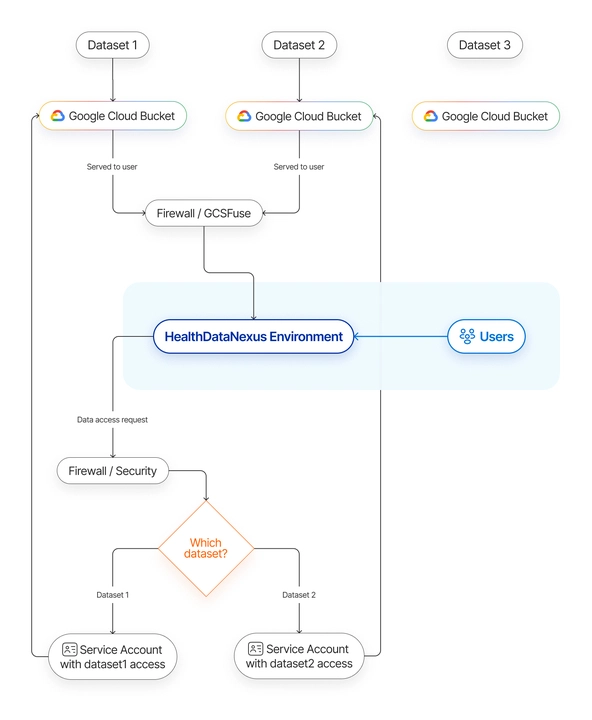
From the user’s perspective, accessing the datasets is really simple - they go to the web platform, request for access to data, then spin up a dedicated server in the cloud for their research. That server gives a limited Jupyter/RStudio interface that also implements access controls. The user then gets access to the data via a web interface and can execute their own scripts that use the dataset.
When the workbench with a predefined environment is up and ready, all the data is being fused into the working space directly from a cloud storage service. At that point, the user has access to the health data that is stored by the service itself. With great power comes great responsibility, one would say.
While we trust the users of our platform to have good intentions, and even if the aforementioned data is anonymized, we would like to minimize the possibility of the data getting outside of the platform. A merely accidental leakage of data may happen during work, for instance with a remote version controls by committing the files to a public repository.
With that in mind, let’s see what are the solutions that we can implement to limit the risk of data leaking outside of the platform.
General solution graph:
Easy, not so reliable, a little bit hacky but still worth mentioning
There are a few simple, rather obvious, but easily overlooked ways to attempt to prevent data leakage, but overall speaking, they can be bypassed with some knowledge and are not the cleanest solutions.
The first one would be setting proper permissions for the files that are said to have crucial data inside.
When fusing/adding those files to the container itself, we can set only read permissions to them(either setting those on the data container/bucket that the data is being stored in or by changing the default unix permissions on a profile to 744 - read only to group and others) and disabling root access by switching its shell from /bin/bash or /bin/sh (or any other shell that permits user login) to /sbin/nologin, in the /etc/passwd file. That will definitely lower the chance to easily modify the data or execute some script on them that will spread the data to the internet.
Another approach - that can and should be combined with previous one - would be to configure tools like RStudio or Vertex AI to prevent file downloads in their UI - such a simple change may reduce risks when not as experienced users will use our environment. Unfortunately, since the users can execute arbitrary code in the IDE, we cannot stop here.
Egress Prevention based on Google Cloud Platform
Google Cloud Platform, same as AWS or Azure - has a few out-of-the-box ways to secure a web interface, and hence prevent unauthorized persons from accessing it. We can archive that by using IAP (Identity-Aware Proxy), which is integrated with Google’s Cloud Identity. By having it connected to Google we can use Cloud Permissions systems consistently. When I first had to integrate security measures I assumed it would be a few simple firewall policy rules, but going through the implementation it is much more complex - adding IAP to non native environment makes the process quite complicated, the whole process will be described later. In addition to that “adding a few simple firewall rules” will not cover all edge cases so we need to actually add quite complex configuration, which also will not limit the user itself - quite interesting examples will be shown later.
Going to the point, which is IAP since we need to add a layer of authentication before accessing the internet exposed endpoint. In the case of GCP there are several ways to achieve that. The easiest one is using AppEngine environments that are under the hood based on virtual machines but are restricted in some areas - one of those is not having access to persistent storage. Going straight to code, a simple App Engine with IAP can be created using Terraform:
resource "google_app_engine_application" "app" {
  project = google_project.my_project.project_id
 location_id = "us-central"
  iap {
   enabled = true
   oauth2_client_id = var.oauth2_client_id
   oauth2_client_secret = var.oauth2_client_secret
  }
}
Now, this only covers a simple AppEngine setup. What if our application is more complex, and we would like to have access to a more customisable environment to which persistent storage can be attached - in such case we will need to create everything that AppEngine is providing us out of the box, which is a point of connection to the environment itself. Starting from the top - to add IAP to the environment we need a FQDN that has SSL certificate attached to it, that means we need to add a dns entry. In addition to that load balancer is needed to separate the internet facing part and backend part of our configuration. With such a setup we have all the basic requirements fulfilled to enable IAP, the only part missing is an actual connection between IAP config and the environment itself.
The last part in our case would be adding a network endpoint which is connected to designated vm and also attached to previously mentioned load balancer. There is also one hidden advantage of using a load balancer to access our environment - it serves as proxy and by default most of the cloud services provide out of the box traffic filtering and ddos attacks prevention.
resource "google_compute_address" "frontend-ip" {
  name = "${var.name}-ipv4-address-frontend"
}

resource "google_dns_record_set" "a" {
  name = "${var.dns_name}"
  type = "A"
  managed_zone = var.dns_zone
 ttl = 180
  rrdatas = [module.lb-http.external_ip]
  project = var.dns_project
}

resource "google_compute_instance" "instance" {
 name = var.name
 zone = var.zone
 machine_type = var.machine_type
 allow_stopping_for_update = true

 boot_disk {
    initialize_params {
      image = var.vm_image
      type = "pd-standard"
      size = 100
  }
  }

  attached_disk {
    source = google_compute_disk.persistent.name
    device_name = google_compute_disk.persistent.name
  }

  network_interface {
    network = var.network_name
    subnetwork = var.region
    access_config {
      nat_ip = google_compute_address.static-ip.address
      }
  }

  metadata = {
   terraform = "true"
   }
  tags = ["ssh"]
  service_account {
    email = "${var.service_account_name}@${var.project_id}.iam.gserviceaccount.com"
  }
  scheduling {
    on_host_maintenance = "TERMINATE"
  }
}

resource "google_compute_global_network_endpoint_group" "neg" {
  name = "neg-${var.name}"
  network_endpoint_type = "INTERNET_IP_PORT"
  default_port = var.default_neg_port
}

resource "google_compute_global_network_endpoint" "endpoint" {
 global_network_endpoint_group = google_compute_global_network_endpoint_group.neg.id
 ip_address = google_compute_address.static-ip.address
 port = google_compute_global_network_endpoint_group.neg.default_port
}

resource "google_iap_client" "oauth-client" {
  display_name = "${var.name}-client"
  brand = var.brand_name
}

resource "google_iap_web_iam_member" "access-role" {
  member = "user:${var.emailid}"
  role = "roles/iap.httpsResourceAccessor"
}

module "lb-http" {
 project = var.project_id
 source = "terraform-google-modules/lb-http/google//modules/serverless_negs"
 name = var.name
 ssl = true
 create_ssl_certificate = true
 private_key = var.private_key
 certificate = var.certificate
 address = google_compute_address.frontend-ip.address

 backends = {
    default = {
      load_balancing_scheme = "EXTERNAL_MANAGED"
  name = "backend-${var.name}"
  enable_cdn = false
  timeout_sec = var.lb_timeout
  connection_draining_timeout_sec = var.lb_connection_drain

  iap_config = {
    enable = true
    oauth2_client_id = google_iap_client.oauth-client.client_id
    oauth2_client_secret = google_iap_client.oauth-client.secret
  }

      log_config = {
        enable = false
  }

      groups = [
        {
          group = google_compute_global_network_endpoint_group.neg.id
  }
      ]
    }
  }
}
We cannot trust that a wrong person will not know our IP or FQDN (fully qualified domain name). Having such a setup, which will prevent them from doing malicious actions, is an obvious thing to do to protect user environments.
VPC, Firewall rules and policies
Another option to make an instance more secure is creating a VPC network with subnets and defined firewall rules. With VPC in place, we can now proceed with adding rules and policies that will be our shield.
Firewall rules in GCP are configurations that control the traffic to and from resources based on specified criteria, such as IP addresses, protocols, and ports. Firewall policies offer a higher level of control and standardization, enabling customization on FQDN and geolocalization. Furthermore, policies are coupled with a few out-of-the-box rules that should exclude threats that are widely known. The downside of the higher standardization is that it has to be used on a larger resource pool, like a project or even organization. On the other hand, each Firewall rule can be applied to a single resource like a VM.
Using a simple terraform script, it can be done in seconds.
resource "google_compute_network" "vpc" {
  project                 = google_project.project.project_id
  name                    = var.network_name
  auto_create_subnetworks = "false"
  routing_mode            = "GLOBAL"
}

//Subnet
resource "google_compute_subnetwork" "subnet" {
  depends_on    = [google_compute_network.vpc]
  project       = google_project.project.project_id
  name          = var.subnet_name
  ip_cidr_range = var.subnet_ip
  network       = var.network_name
  region        = var.region
}
A firewall rules can be created by using terraform:
resource "google_compute_firewall" "sample_rule" {
 project       = google_project.project.project_id
 name          = var.rule_name
 network       = var.network_name
 source_ranges = ["0.0.0.0/0"]

 allow {
   protocol = "tcp"
   ports    = ["8888", "8787", "80"]
 }
 target_tags = ["http"]
}
By creating a proper setup of Firewall rules we can allow only IPs that are associated with a specific user and therefore block anyone else from accessing them; furthermore, by doing that, most of the egress points will be blocked. Using policy rules would be a little bit more convenient since we do not always know what IP address the end user will be using and we would spare the need to adjust the rules whenever the IP changes. Creating a simple policy rule can be also accomplished by a Terraform script:
resource "google_compute_firewall_policy_rule" "primary" {
  firewall_policy = google_compute_firewall_policy.default.name
  description     = "Resource created for Terraform testing"
  priority        = 9000
  enable_logging  = true
  action          = "allow"
  direction       = "EGRESS"
  disabled        = false
  match {
    layer4_configs {
      ip_protocol = "tcp"
      ports = [8080]
    }
    dest_ip_ranges = ["0.0.0.0/0"]
    dest_fqdns = []
    dest_region_codes = ["US"]
    dest_threat_intelligences = ["iplist-known-malicious-ips"]
    src_address_groups = []
    dest_address_groups = [google_network_security_address_group.basic_global_networksecurity_address_group.id]
  }
  target_service_accounts = ["my@service-account.com"]
}
Limiting Outbound Connections
Theoretically speaking we should be able to block outbound connections on the firewall level and allow the application itself to respond to incoming ones, which in our case would be users connecting to the Web UI. In most cases that is the course of actions that should be pursued, but in case anyone would like to use Vertex AI Workbenches it is not archivable easy way. Vertex AI Workbenches are heavily reliant on GCP itself so they need to have access to making outbound connections, to be precise we need to enable access to both private and restricted GCP IP pools or the environment will try to boot up infinitely.
In addition to that when the user is trying to connect the environment itself is adding custom elements to the UI so for that brief moment it needs to connect to the internet, but all is not lost yet - if the user is already connected there is no more need for such requests so we can modify our firewall policies “on the fly”.
The flow is quite simple: an environment is being created with an IP open for the user, the user itself starts establishing connection to the Vertex AI workbench, then the moment connection succeeds we initiate a process to modify our policy rules to block that point of connection. Since the user is already in he/she will be able to use that workbench but we will be protected from other connections. Having such a setup is hard to make but definitely would serve its purpose.
On the other hand combining a few policies - including those that exclude typical egress points like github, pastebin, pip and other data storage services - can create a solid shield for data which is much more maintainable. Excluding pip is a bit troublesome since the user will not be able to install packages but that can be addressed by pre installing those libraries on environment start or providing a private pip cache server that will be allowed to connect.
Conclusion
In today's data-driven world, safeguarding data egress is crucial for organizations. Implementing proper permissions, leveraging built-in egress prevention tools, and using advanced configurations like load balancers with IAP and VPC networks are essential steps in securing data environments. These measures help prevent accidental leaks, data reidentification, and malicious activities, but are not definitely foul proof and those accidents can still occur, so keep in mind that we also should have some steps to proceed prepared for such scenarios. On the other hand, keep in mind it is always a tradeoff between security and usability. The more secure the environment, the less the user can do and experiment on. Having a proper balance between those two can create a user-friendly space.
Disclaimer: This article was originally written by Upside Lab.
Subscribe to my newsletter
Read articles from Chris Zhang directly inside your inbox. Subscribe to the newsletter, and don't miss out.
Written by