You Need To Learn Docker Right Now : Part 2
 Suraj
Suraj
Introduction
Docker is a powerful containerization platform that streamlines application development, deployment, and scaling of containerized applications. In this blog I’ll covers important Docker concepts like networking, Volumes, writing compose file in docker, difference in Docker and Kubernetes, Multi-Stage build in dockerfile with practical insights for developers and DevOps engineers.
Docker Networking
Docker Networking enables communication between containers, the Docker host, and the external world. When a container is running, it is attached to a virtual network. This network determines how the container can talk to other containers, services, or the internet. Docker uses network drivers to abstract different networking strategies. Understanding these drivers helps optimize performance, security, and communication within your containerized environments.
Docker provides three primary network drivers but there are more according to the usecases:
Bridge (Default Driver)
If you're running containers on a single host and want them to talk to each other, Bridge is your go-to.
How it works: Creates an internal network and assigns IP addresses to containers.
Use case:
You’re running a Node.js API and a MongoDB container on your laptop. Both need to talk to each other. Use the default bridge network.
Practical Example:
docker network create --driver bridge my_bridge
docker run -d --name db --network my_bridge mongo
docker run -d --name api --network my_bridge node-app
apican now connect to MongoDB usingmongodb://db:27017.
So see which containers are connected with the same network on bridge driver use this command:
# To see the detailed information on one or more networks
docker network inspect bridge
Host
Remove network isolation between the container and the Docker host, and use the host's networking directly.
How it works:
The container shares the host’s network stack — it has no separate IP.
Ports on the container are directly exposed on the host.
Use case:
Running an Nginx container on port 80 without port mapping, for better performance.
Practical Example:
docker run --rm --network host nginx
Nginx is now accessible directly at
http://localhostwithout needing-p 80:80.
The flag --rm means:
Automatically remove the container when it exits.
None
You want a container completely cut off from all networks? Use this.
How it works:
No network interface is created.
Only useful for extreme isolation or containers communicating via files/mounted volumes only.
Use case:
Highly secure containers for background data processing with no need for communication.
Practical Example:
docker run --network none your_image
Want to learn more network drivers you can follow the official documentation of docker itself.
Difference Between Bridge and Host Network

How To Create Custom Networks In Docker
When you use Docker, containers by default get attached to the bridge network unless you specify otherwise. But for more control, better architecture, and easier service-to-service communication, custom networks are the way to go.
Practical Example:
# Step 1: Create a custom network
docker network create my_custom_net

# Step 2: Run Redis container on that network
docker run -d --name redis --network my_custom_net redis

# Step 3: Run backend app on the same network
docker run -d --name backend --network my_custom_net myapp
Now the backend container can reach the redis container using:
redis:6379
No need to figure out IP addresses. Docker’s DNS handles the resolution automatically.
Benefits of creating your own network
Automatic container name resolution
Better network isolation
Cleaner communication between services
Docker Volumes
By default, Docker containers are ephemeral — meaning, when a container is deleted, all the data inside it is also lost. This is a big problem for things like:
Databases (e.g., PostgreSQL, MongoDB)
Log files
User-generated content (uploads, configs)
To solve this, Docker provides volumes, which are persistent storage locations managed by Docker.
How to Use Docker Volumes
# Step 1: Create a Docker volume
docker volume create my_data

# Step 2: Mount the volume into a container
docker run -v my_data:/data my_image
This mounts the my_data volume into the container’s /data directory.
Benefits of Docker Volumes
Persistence
Data remains intact even if the container is removed, restarted, or recreated.Managed by Docker
Volumes live outside the container filesystem and are managed in a secure and efficient way by Docker.Decouples Data from Containers
You can attach the same volume to different containers (great for backup jobs, logs, etc.)Supports Named Volumes and Bind Mounts
Named volumes: managed by Docker (
my_data)Bind mounts: link to a host path (
/home/user/data:/data)
Efficient Caching in Layers
Every command in your Dockerfile creates a layer. These layers are cached and reused by Docker to avoid rebuilding the entire image every time — this is known as layer caching.
A well-structured Dockerfile improves build time significantly. Why? Because Docker will reuse unchanged layers from cache instead of rebuilding them.
You’ll much understand Via this example:
Here we have the sample dockerfile and below I have given you a diagram in which you can see arranging the layers carefully can save the time everytime you build your dockerfile but in the first build it takes time much longer then the rebuild you do further.
# Build dependencies using lightweight Node.js base image
FROM node:18-alpine

# Set the working directory inside the container
WORKDIR /app

# Only copy dependency descriptor files (changes infrequently)
COPY package*.json ./

# Install only production dependencies (skips devDependencies)
RUN npm ci --only=production

# Copy the rest of the application source code (changes frequently)
COPY . .

# Define the command to run the app
CMD ["npm", "start"]
When you build a Docker image, each line in your Dockerfile creates a layer. Docker tries to reuse (cache) these layers in future builds to save time — especially when files or steps haven’t changed.

Benefits of Efficient Layer Caching
Faster builds — Only changed layers are rebuilt.
Smaller image layers — Cached intelligently.
Repeatable builds — Fewer surprises and cleaner CI/CD.
Docker Multi-Stage Builds
Multi-stage builds allow you to use multiple FROM instructions in one Dockerfile. This helps you separate the build environment (where dependencies and tools are needed) from the production image (where only final code/artifacts go).
This results in:
Smaller images 📦
More secure builds 🔐
Faster CI/CD deployment ⚡
So here I’m showing you one of my project’s multi-stage build Dockerfile
# Stage 1: Builder with full Node.js environment
FROM node:18-alpine AS builder

WORKDIR /app

# Copy package files first for optimal caching
COPY package.json package-lock.json ./

# Install all dependencies (including devDependencies)
RUN npm ci --no-audit --prefer-offline

# Copy source files
COPY . .

# Build the application
RUN npm run build

# Stage 2: Production image
FROM node:18-alpine

WORKDIR /app

# Copy built assets and dependencies
COPY --from=builder /app/.next ./.next
COPY --from=builder /app/public ./public
COPY --from=builder /app/node_modules ./node_modules
COPY --from=builder /app/package.json ./package.json

# expose the port
EXPOSE 3000

# Start the application
CMD ["npm", "start"]
Best practices to write a good multi-stage dockerfile
Use small base images like
node:18-alpineornginx:alpine.Name your stages (
AS builder) for readability.Avoid copying unnecessary files (use
.dockerignore).Keep the final image minimal (no build tools, dev dependencies).
Use multi-stage even for simple projects to keep the image lean and clean.
Docker Compose
Docker Compose is a tool used to define and run multi-container Docker applications using a YAML file (docker-compose.yml or compose.yml or docker-compose.yaml). You describe the services, their images/build context, ports, environment variables, volumes, and networks — all in one place.
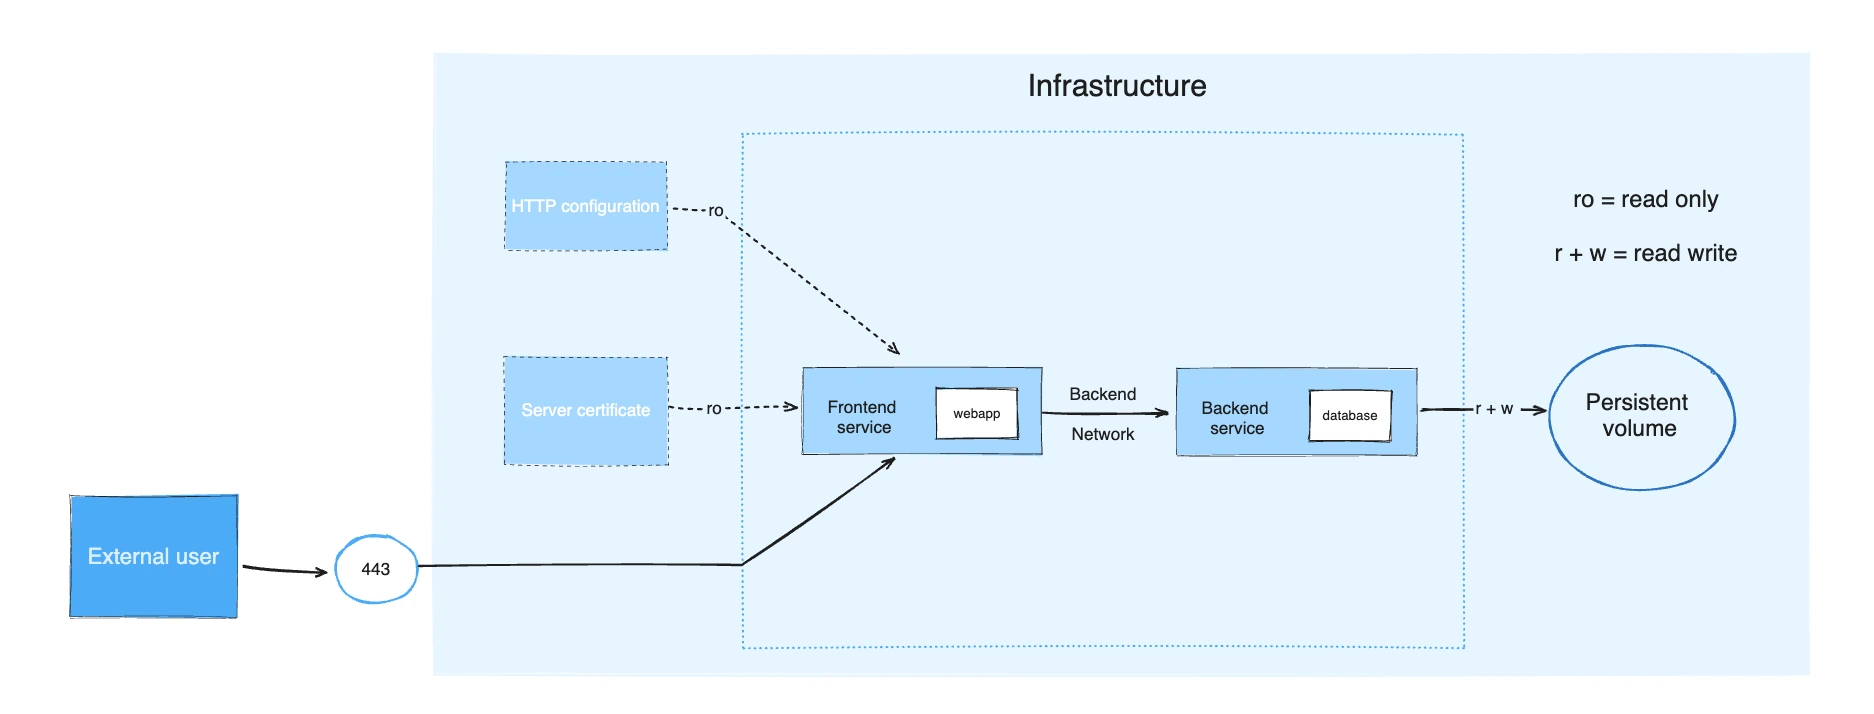
Understanding with Architecture diagram:
Consider an application split into a frontend web application and a backend service.
The frontend is configured at runtime with an HTTP configuration file managed by infrastructure, providing an external domain name, and an HTTPS server certificate injected by the platform's secured secret store.
The backend stores data in a persistent volume.
Both services communicate with each other on an isolated back-tier network, while the frontend is also connected to a front-tier network and exposes port 443 for external usage.
This is how you write a docker-compose.yml file:
version: '3.8'  # Specify Compose file version for compatibility

services:
  frontend:
    image: example/webapp                    # Frontend web application image
    ports:
      - "443:8043"                          # Map host port 443 to container port 8043 for HTTPS access
    networks:
      - front-tier                         # Connect to front-tier network (public-facing)
      - back-tier                          # Connect to back-tier network to talk to backend securely
    configs:
      - source: httpd-config               # Use external Apache HTTPD config
        target: /etc/httpd/conf/httpd.conf
    secrets:
      - server-certificate                 # Use external TLS/SSL certificate secret

  backend:
    image: example/database                 # Backend database service image
    volumes:
      - db-data:/etc/data                   # Persist database data in a named volume
    networks:
      - back-tier                         # Only expose backend internally on back-tier network

volumes:
  db-data:
    driver: flocker                        # Volume driver for data persistence
    driver_opts:
      size: "10GiB"                       # Allocate 10GB storage for DB data volume

configs:
  httpd-config:
    external: true                        # Reference an externally created config

secrets:
  server-certificate:
    external: true                       # Reference an externally managed secret (TLS cert)

networks:
  front-tier: {}                         # Define front-tier network (default bridge network)
  back-tier: {}                          # Define back-tier network (default bridge network)
Key commands
To start all the services defined in your compose.yaml or docker-compose.yml file:
docker compose up
To run the services in the background:
docker compose up -d
To rebuild Docker images and start containers:
docker compose up --build
To run the services in the background:
docker compose up --build -d
To stop and remove the running services:
docker compose down
If you want to monitor the output of your running containers and debug issues, you can view the logs with:
docker compose logs
To list all the services along with their current status:
docker compose ps
# or
docker ps
To list all the services along with stopped/exited:
docker compose ps -a
# or
docker ps -a
To watch the docker services current status continuously:
watch docker ps
To access shell inside a running container:
docker compose exec -it <container-id or container-name> sh
# or
docker compose exec -it <container-id or container-name> bash
Docker Swarm
Docker Swarm is Docker’s built-in clustering and orchestration tool. It allows you to combine multiple Docker hosts (nodes) into a single cluster called a swarm, making it easier to deploy and manage containerized applications at scale.
How it works:
Cluster Setup: You start by initializing a swarm on one machine, which becomes the manager node.
Node Management: Other Docker hosts can join this swarm as worker nodes.
Service Deployment: You deploy your application as a service instead of individual containers.
Scaling: You specify how many replicas (instances) of a service you want, and Swarm handles scheduling those across available nodes.
Load Balancing: Swarm automatically distributes incoming requests among service replicas, balancing load and improving availability.
Steps to do to work with swarm:
docker swarm init
after initializing you’ll see this message:
Swarm initialized: current node (7ns53yw3fvsy1bvoma6tkyf8v) is now a manager.

To add a worker to this swarm, run the following command:

    docker swarm join --token SWMTKN-1-5r4ya9ic9x3rducjym1i4dxgg01rtydnmtuh9bq2k2khllnyt4-0jbi2g5s5kzon0drl65pux8jc 192.168.65.3:2377

To add a manager to this swarm, run 'docker swarm join-token manager' and follow the instructions.
Initializes the current Docker host as a swarm manager node.
This sets up the cluster control plane.
docker service create --replicas 3 --name web nginx
After running above command you’ll this:
tzgrg9wjm0xunznt04zti2qd4
overall progress: 3 out of 3 tasks
1/3: running   [==================================================>]
2/3: running   [==================================================>]
3/3: running   [==================================================>]
verify: Service tzgrg9wjm0xunznt04zti2qd4 converged
Creates a new service named
webusing thenginximage.Runs 3 replicas of the
nginxcontainer distributed across the swarm nodes.Swarm automatically schedules these replicas on different nodes (if available) and manages their lifecycle.
docker ps
After running the dcoker ps command you’ll these logs:
CONTAINER ID   IMAGE          COMMAND                  CREATED          STATUS          PORTS     NAMES
2069f48eecbd   nginx:latest   "/docker-entrypoint.…"   16 seconds ago   Up 15 seconds   80/tcp    web.3.m3mtwuonvph1krfn0uvxe325r
9d52e9929221   nginx:latest   "/docker-entrypoint.…"   16 seconds ago   Up 15 seconds   80/tcp    web.2.5xzbt400wks7f7j55lqxi5ahe
4066263b7592   nginx:latest   "/docker-entrypoint.…"   16 seconds ago   Up 15 seconds   80/tcp    web.1.tv76fhg177h0zyo3zvf74gaii
Why use Docker Swarm?
Simple to set up: Native Docker CLI commands manage the cluster.
Built-in load balancing and scaling.
High availability: Services automatically recover from node failures.
Declarative service model: Define how many replicas and Docker manages the rest.
To clean up everything you've done with Docker Swarm, you need to:
1. Remove Services
First, remove any running services you created in the swarm:
docker service ls                 # List all services
docker service rm <service-name> # Remove each service
2. Remove the Swarm (Leave the Cluster)
If you're on a worker node, leave the swarm with:
docker swarm leave
If you're on the manager node, force it to leave (and dissolve the swarm):
docker swarm leave --force
Docker Vs Kubernetes
Docker:
Docker operates at the individual container level on a single operating system host. You must manually manage each host and setting up networks, security policies, and storage for multiple related containers can be complex.
Kubernetes:
Kubernetes operates at the cluster level. It manages multiple containerized applications across multiple hosts, providing automation for tasks like load balancing, scaling, and ensuring the desired state of applications.
In short, Docker focuses on containerization and running containers on individual hosts, while Kubernetes specializes in managing and orchestrating containers at scale across a cluster of hosts.
| Docker | Kubernetes |
| 🔸 A containerization platform. | 🔸 A container orchestration system. |
| 🔸 Packages applications and dependencies into containers. | 🔸 Manages containerized applications at scale. |
| 🔸 Ensures portability across environments. | 🔸 Handles deployment, scaling, and networking. |
| 🔸 Runs containers on a single host. | 🔸 Distributes workloads across multiple nodes. |
| 🔸 Used in CI/CD pipelines for deployment automation. | 🔸 Optimized for microservices and cloud-native applications. |
With this diagram you’ll understand what we have talked above.

Wrapping up with Demo:
If you want to try out yourself this demo you can use this project:
So, now let’s do it practically what we have learned so far. In the above repository i have give you the Dockerfile for frontend and the backend.
And you also have the docker-compose.yml file in this repo.
So now you just have to do these steps in order to spin up the frontend and the backend containers simultaneously.
version: '3.8'

services:
  frontend:                                    # This is frontend service
    build: ./front-end-nextjs                  # Build from Dockerfile in this directory
    working_dir: /app                          # Set working directory inside container
    command: sh -c "npm run build && npm start" # Build once container starts, then run app
    ports:
      - "3000:3000"                            # Expose frontend on port 3000
    volumes:
      - ./front-end-nextjs:/app               # Mount local code for dev hot-reload
    environment:
      - NODE_ENV=production                   # Env variable for production setup
    depends_on:
      - backend                               # Ensure backend starts first
    networks:
      - app_network                           # Join the shared network

  backend:                                    # This is backend service
    build: ./backend                          # Build backend service from its Dockerfile
    ports:
      - "8000:8000"                           # Expose backend API on port 8000
    env_file:
      - ./backend/.env                        # Load sensitive config like DB URL, secrets
    volumes:
      - ./backend:/usr/src/app                # Mount backend code for live updates (dev)
    environment:
      - FASTAPI_ENV=production                # Custom variable for backend environment
    networks:
      - app_network                           # Same network to talk with frontend

networks:
  app_network:
    driver: bridge                            # Default bridge network for isolated common
To build and start the services in our above compose file:
docker compose up

CONTAINER ID   IMAGE                    COMMAND                  CREATED          STATUS          PORTS                    NAMES
0a771b5eaf4c   devops-url2qr-frontend   "docker-entrypoint.s…"   21 minutes ago   Up 21 minutes   0.0.0.0:3002->3000/tcp   devops-url2qr-frontend-1
d379bafbbd41   devops-url2qr-backend    "uvicorn main:app --…"   23 minutes ago   Up 21 minutes   0.0.0.0:8000->8000/tcp   devops-url2qr-backend-1
And after successful build and run the service you can access them, for this application we are running you can find the:
Fronetend Running on:
Backend Running on:
DockerHub:
Docker Hub is a cloud-based repository where you can store, share, and manage Docker container images.

This is the workflow if you want to push your docker image to DockerHub:
# Login to Docker Hub
docker login

# Tag your image
docker tag myapp:latest username/myapp:1.0

# Push it to Docker Hub
docker push username/myapp:1.0

# Pull it from Docker Hub (any machine)
docker pull username/myapp:1.0
If you're working in production or need tighter access control, you might consider private registries like:
AWS Elastic Container Registry (ECR),
Azure Container Registry (ACR)
Google Container Registry (GCR)
GitHub Container Registry
GitLab Container Registry
Harbor
Subscribe to my newsletter
Read articles from Suraj directly inside your inbox. Subscribe to the newsletter, and don't miss out.
Written by
Suraj
Suraj
I'm a Developer from India with a passion for DevOps ♾️ and open-source 🧑🏻💻. I'm always striving for the best code quality and seamless workflows. Currently, I'm exploring AI/ML and blockchain technologies. Alongside coding, I write Technical blogs at Hashnode, Dev.to & Medium 📝. In my free time, I love traveling, reading books