DIY Product Photography Setup: Create Studio-Quality Images
 ProdShot Creator
Why DIY Product Photography Setup Rules Modern E-commerce

In the competitive world of online retail, high-quality product photos are essential. They're no longer a nice-to-have, but a must-have for attracting customers and boosting sales. Traditionally, professional-quality images meant pricey studio sessions and long wait times. But DIY product photography setups are changing the game, giving businesses of all sizes more control, flexibility, and cost-effectiveness.
This move towards DIY isn't a fad; it’s a shift in how businesses handle visual content. A major benefit is creative control. With a DIY setup, you can play with different angles, lighting, and styling to perfectly represent your products and brand. Plus, DIY lets you quickly reshoot products as needed, easily refreshing your online store. This means faster responses to market changes and customer preferences compared to relying on outside studios.
Cost Savings and Faster Turnaround: Key Advantages of DIY
Imagine needing updated product images for a seasonal sale. A DIY setup allows shooting and uploading new images in a matter of hours. Working with a professional studio? That could take days or even weeks, potentially delaying your campaign and impacting sales. This quick turnaround is vital in today’s fast-paced e-commerce world. The rise of DIY product photography is a worldwide trend as e-commerce continues to grow rapidly. In 2023, the global ecommerce product photography market was valued at USD 163.91 million. It's projected to reach USD 342.27 million by 2031, growing at a CAGR of 11.1%. A 2022 survey found that over 60% of new online retailers in North America and Europe use DIY setups, citing lower costs and quicker turnarounds as primary benefits. Find more detailed statistics here: https://www.verifiedmarketresearch.com/product/ecommerce-product-photography-market/
Leveling the Playing Field: Competing With Larger Brands
Another compelling reason for DIY's popularity? Significant cost savings. Studio rentals, professional photographers, and editing can be expensive. Investing in a DIY setup drastically reduces these costs, freeing up funds for other growth strategies. This is particularly helpful for startups and small businesses with tight budgets. Moreover, DIY allows smaller companies to compete with larger brands by producing equally appealing visuals without the huge expense. Think of a small, handmade jewelry business competing with a big retailer. A well-executed DIY setup lets the artisan showcase their work with professional-level quality, attracting buyers and building brand recognition.
Building your own setup allows you to adapt and grow. As your business expands, you can upgrade equipment and refine your techniques to match your brand’s evolving vision. This scalability makes DIY a sustainable solution for creating visual content in the long run.
Essential Gear That Actually Makes A Difference
Building a DIY product photography setup doesn't require breaking the bank. However, understanding which equipment truly delivers results, versus falling for marketing hype, is key. By analyzing successful setups, we can identify the essential items that offer the best value. You'll learn how to choose cameras, lighting, and accessories suited to your specific products and potential growth. This approach maximizes the impact of every dollar you spend.
Camera and Tripod: The Foundation of Your Setup
While professional cameras boast advanced features, a high-quality smartphone can capture stunning product images, especially when paired with AI-powered editing tools like ProdShot. For greater control, entry-level DSLR or mirrorless cameras are excellent choices. Remember, technique outweighs technology, particularly when you're just starting out.
Regardless of your camera choice, a tripod is essential. It stabilizes your shots and ensures consistency, crucial for detailed product photography. Consider it the anchor of your setup, offering stability and enabling precise adjustments. This consistency is vital for maintaining a professional appearance across your product images.
Background and Lighting: Setting the Stage
A clean, white background is the industry standard for product photography. It eliminates distractions and directs attention to your product. Simple white poster board offers a cost-effective starting point, providing a smooth surface. You can upgrade to a seamless backdrop as your business expands. For more detailed advice, check out our guide on professional Amazon product photography.
Lighting is where your DIY setup can truly excel. Natural light from a window is a fantastic, free resource. However, mastering its intensity and direction takes practice. This is where affordable tools like reflectors and diffusers become invaluable. Reflectors bounce light back onto your product, filling in shadows and creating a more balanced appearance. Diffusers soften harsh light, minimizing glare and producing a more natural look.
Choosing the Right Lighting: A Data-Driven Approach
The following infographic compares three popular lighting choices: natural window light, LED panels, and ring lights. It visualizes their average cost, brightness (lumens), and color temperature range (Kelvin).
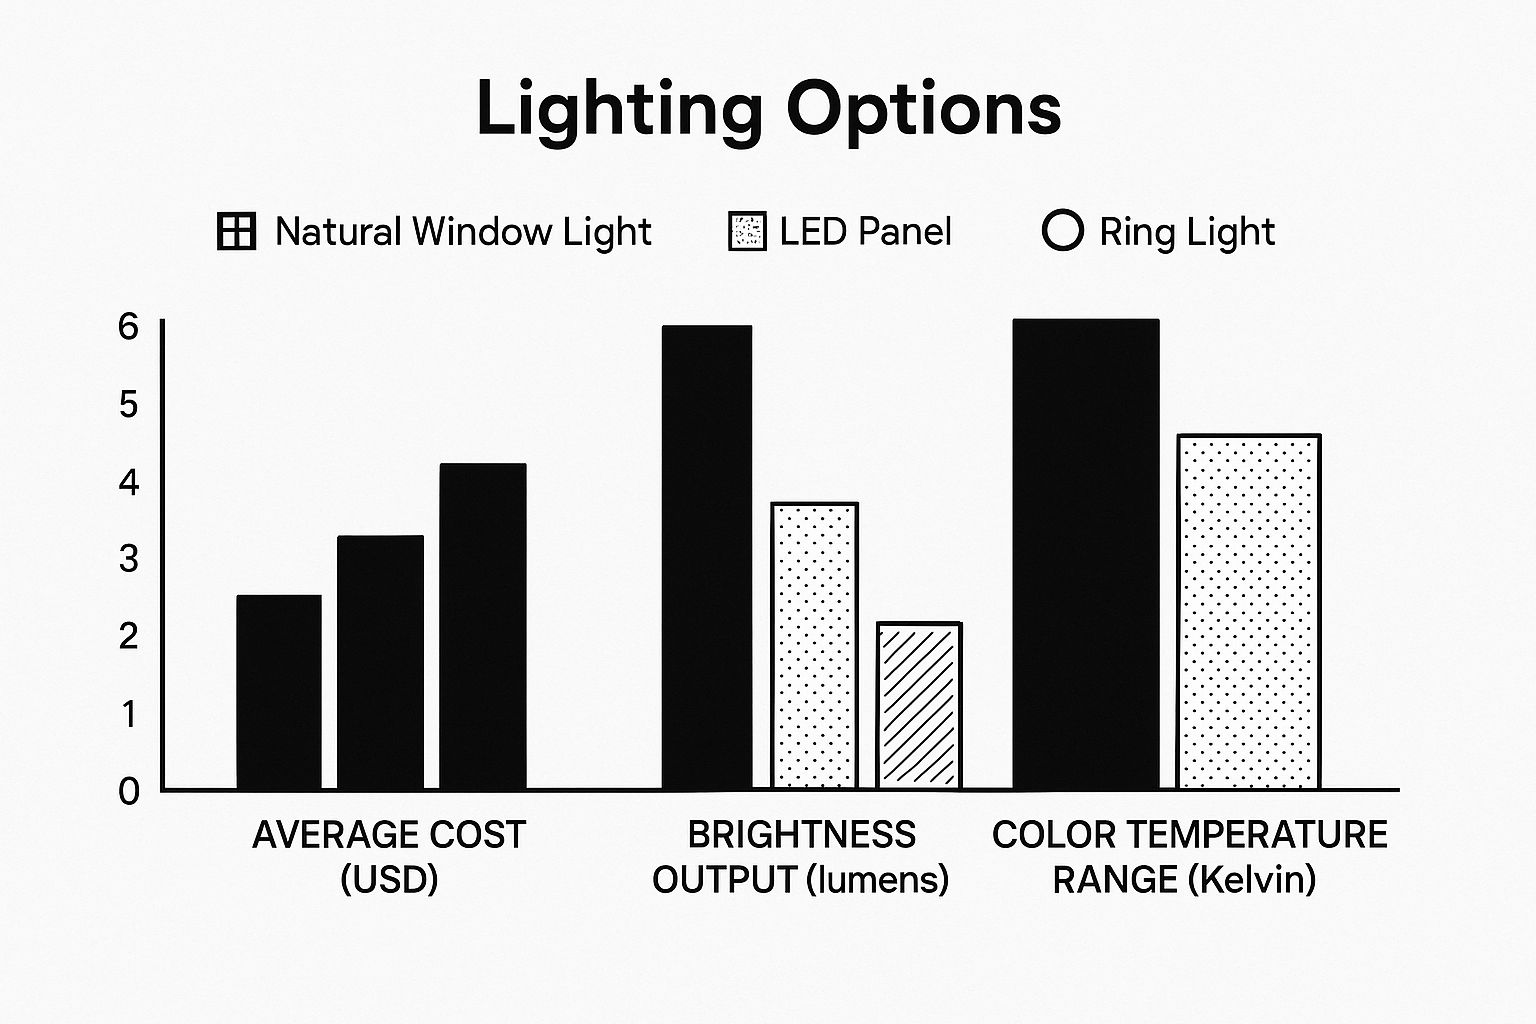
As the data shows, natural window light is a budget-friendly option with a balanced color temperature. LED panels provide more control and higher brightness, but come at a higher price. Ring lights are a favorite for beauty products but aren't ideal for all product types due to their circular reflection. For further reading, you might find this helpful: How to Master….
Props and Accessories: Adding the Finishing Touches
While not absolutely necessary, props can elevate your product photography by providing context and visual appeal. For instance, displaying a coffee mug with coffee beans, or a book with reading glasses, creates a lifestyle image that resonates with potential buyers. However, use props sparingly to avoid overshadowing the product.
To help illustrate the different equipment options available, let's take a look at the following comparison table:
DIY Product Photography Equipment Comparison: This table compares essential equipment options across different budget ranges and their effectiveness for various product types.
| Equipment Type | Budget Option | Mid-Range Option | Professional Option | Best For |
| Camera | Smartphone | Entry-level DSLR | High-end DSLR or Mirrorless | Smartphones: Quick shots, social media; DSLR/Mirrorless: Detailed shots, professional use |
| Tripod | Mini Tripod | Standard Tripod | Heavy-duty Tripod | All product types, essential for stability |
| Background | White Poster Board | Seamless Backdrop Paper | Professional Backdrop System | Poster board: Small products, simple setups; Backdrop paper/system: Larger products, versatility |
| Lighting | Natural Window Light | LED Panel Lights | Studio Strobes | Natural light: Cost-effective, balanced light; LED panels: Controllable, consistent light; Strobes: High power, professional results |
| Accessories | Reflectors, Diffusers | Lightbox, Softbox | Light Meter, Color Checker | Reflectors/diffusers: Light modification; Lightbox/softbox: Small product photography; Light meter/color checker: Precise color and exposure |
This table highlights the progression of equipment options as your needs and budget grow. Starting with budget-friendly choices, you can upgrade to more professional tools as you gain experience and your business expands.
Additional accessories like a lightbox are beneficial for shooting smaller items. A lightbox creates diffused, even lighting, minimizing shadows and highlighting details. These tools are investments that can significantly enhance your images as your skills develop. Building a DIY setup is about selecting the right tools for your needs and budget. By understanding the essential gear and its function, you can create high-quality images that boost your brand and increase sales.
Lighting Techniques That Transform Amateur Into Pro

Lighting is the cornerstone of successful DIY product photography. Mastering it allows your products to truly shine. Neglecting it, however, can render even the most expensive camera equipment useless. This guide will break down professional lighting principles with practical, real-world examples and step-by-step guidance, empowering you to shape shadows, eliminate unwanted reflections, and create the perfect mood for showcasing your products.
Natural Light: The Free and Versatile Option
Natural light, especially from a window, offers a readily available, high-quality light source for your DIY product photography setup. Positioning your setup near a window, but not in direct sunlight, creates soft, diffused light that's ideal for a wide variety of products. For instance, a table placed perpendicular to a window allows the light to gently wrap around the subject, minimizing harsh shadows.
Using simple, affordable tools can significantly enhance natural light. Foam boards, acting as reflectors, bounce light back onto the product, filling in shadows and creating a more balanced, three-dimensional appearance. This technique helps bring out the details and textures of your product, making it more visually appealing.
Artificial Light: Control and Consistency
While natural light has many advantages, it's not always reliable. Artificial light sources, such as LED panels, provide greater control over your lighting environment. They offer consistent color temperature and brightness, ensuring predictable results regardless of the time of day or weather. This consistency becomes increasingly valuable as your photography needs evolve.
One potential drawback of artificial light is its potential harshness. Diffusers, like softboxes or umbrellas, soften the light from LED panels, minimizing stark shadows. This creates a more natural, inviting look, avoiding the artificial feel that can sometimes accompany direct LED illumination.
Common Lighting Mistakes and How to Fix Them
A frequent mistake is placing the product in direct sunlight. This results in harsh shadows and blown-out highlights, obscuring detail. Instead, opt for indirect sunlight or diffuse the light with a sheer curtain or diffuser. Uneven lighting, where one side of the product appears significantly brighter than the other, is another common issue. This can be easily corrected with reflectors, bouncing light back onto the darker side to achieve a balanced, professional look.
These simple adjustments can drastically improve the quality of your product photography. By avoiding these common pitfalls and understanding how to manipulate light effectively, you can elevate your images from amateur snapshots to professional-grade visuals. Remember, great product photography isn't about expensive equipment; it's about understanding light. Software solutions like ProdShot can further refine your images, providing automated background removal and image enhancements to create truly compelling product visuals. Learn more about AI product photo solutions on ProdShot.net
Transforming Any Space Into Your Photography Studio
Turning any corner of your home or office into a professional DIY product photography setup is entirely possible with a bit of planning and ingenuity. Successful online sellers often make the most of limited spaces, keep clutter at bay, and establish consistent shooting conditions for dependable results. This section explores practical solutions to common challenges, from maximizing natural light to creating seamless backgrounds in tight quarters.
Optimizing Small Spaces for Big Results
Even a small area can become a productive photography studio. One key strategy is vertical space utilization. Shelves, wall-mounted equipment, and vertical backdrops make the most of limited floor space. This helps store equipment and props efficiently, keeping your shooting area clutter-free. Think of it like a well-organized kitchen: everything in its place, optimizing workflow and maximizing space.
Another effective technique is creating a modular setup. Portable equipment like a collapsible table, backdrop stand, and lightweight lighting allows for easy setup and takedown as needed. This adaptability makes impromptu shooting sessions possible, even in multi-purpose spaces. You can quickly transform a dining room into a studio and back again with a modular approach.
Controlling Clutter and Maintaining Consistency
Clutter can disrupt an efficient workflow. Implementing an organizational system is vital for keeping your DIY product photography setup neat and easily accessible. Designated storage containers for props, backgrounds, and equipment prevent lost items and wasted time. This streamlined approach ensures your studio is always ready, maximizing productivity.
Maintaining consistent shooting conditions is essential, especially in shared spaces. Documenting your setup—camera settings, lighting positions, and background arrangements—ensures reproducible results. Detailed record-keeping simplifies future shoots and maintains visual consistency across your product images. Think of it as your photography recipe: follow the same steps for consistent results.
Flexible Design Strategies for Varied Products
Different products require adaptable design strategies. A rolling backdrop stand accommodates both small and large products without a complete studio overhaul. Similarly, adjustable lighting stands and boom arms provide versatile positioning for various product dimensions and angles.
A diverse selection of background materials is also key. White seamless paper provides a clean, professional look, while textured fabrics or colored backdrops offer creative options. Having these readily available in your organized setup ensures you're prepared for any product. It's like having a varied wardrobe for your products: different outfits for different occasions. By implementing these solutions and organizational strategies, you can transform any space into an efficient DIY photography studio, creating professional-quality images that elevate your brand and boost sales. Learn more about simplifying product photography with AI on ProdShot.net.
Technology Revolution In DIY Product Photography
The world of DIY product photography is changing dramatically. New technology is putting professional-quality tools in everyone's hands. Smartphones, once unsuitable for serious product photography, now offer computational photography that rivals dedicated cameras. This includes features like better dynamic range, improved low-light performance, and sophisticated depth-of-field.
Combined with powerful mobile editing apps, smartphones are now a real option for creating stunning product images. This accessibility is changing how businesses, especially small businesses and startups, approach product photography.
Smartphones and AI: A Powerful Combination
AI-powered editing software is accelerating this shift. These tools automate complex editing tasks like background removal, color correction, and object placement. Imagine removing a background with one click or instantly enhancing colors and lighting to match your brand. AI makes these techniques accessible to everyone, regardless of technical skill. This democratization of advanced editing significantly lowers the barrier to entry for DIY photography. You might be interested in: How to master AI product photo editing.
Automated lighting systems, controlled via smartphone apps, are also simplifying lighting setups. These systems automatically adjust brightness, color temperature, and even simulate different lighting scenarios like sunlight or studio lighting. This takes the guesswork out of lighting, helping beginners achieve professional-looking results. It's like having a virtual lighting assistant. This automated approach saves time, allowing you to focus on other aspects of your DIY setup.
Emerging Trends in Accessible Product Photography
Technology has democratized DIY product photography, making high-quality images achievable for almost anyone. The global photography market, valued at $105.2 billion in 2023, is transforming as digital tools and AI empower both amateurs and professionals. In North America and Europe, over 50% of Amazon and Etsy sellers now use DIY setups for their product images, with many reporting professional-quality results at a fraction of the cost. Discover more insights about photography market trends: Photography Statistics.
Emerging trends like 3D product imaging and augmented reality (AR) are blurring the lines between physical and digital product displays. These technologies let customers interact with products virtually, rotating them, zooming in, and even visualizing them in their own homes. This interactivity enhances the online shopping experience and can boost customer engagement and conversions. This shift towards immersive experiences is shaping the future of product photography. As these technologies evolve, they will further democratize DIY product photography, empowering businesses to create captivating visuals and compete effectively in e-commerce.
Market Impact and Business Growth Through DIY Photography
The rise of DIY product photography is more than a budget-friendly trend; it's fundamentally changing the market and how businesses expand. Understanding these shifts will help you make smart choices about your own DIY product photography setup. This includes looking at current market patterns, forecasting growth, and recognizing how regional differences can influence product photography.
Adapting to the DIY Approach
Companies across diverse market segments are adopting DIY product photography. This marks a significant shift in competitive strategy. Smaller businesses, for example, can now create high-quality images comparable to larger brands, effectively leveling the competitive landscape.
This DIY method also offers faster turnaround times for product updates, increasing business agility. Companies can quickly refresh their product visuals in response to evolving trends or customer feedback. This speed and flexibility are vital in today’s fast-paced e-commerce environment.
Economic Factors Driving the Trend
The move towards DIY product photography solutions isn't random. Economic realities, such as the rising costs of traditional studio photography, are prompting businesses to seek self-managed alternatives.
This trend reflects the wider expansion of e-commerce. As more businesses transition online, the need for compelling product images grows. The significant growth of the product photography services market is closely linked to the DIY trend, as businesses and individuals look for both professional and self-service options.
To illustrate this point, consider the following market data:
Let's take a closer look at the growth in the DIY photography market with a summary of key statistics:
DIY Product Photography Market Growth Statistics
| Region | Adoption Rate | Market Value | Growth Rate | Key Drivers |
| North America | 35% | $450 million | 12% | E-commerce growth, Social media marketing |
| Europe | 28% | $320 million | 10% | Demand for visual content, Rise of small businesses |
| Asia-Pacific | 42% | $580 million | 15% | Mobile commerce boom, Increasing disposable incomes |
| Rest of World | 15% | $150 million | 8% | Growing internet penetration, Cross-border e-commerce |
In 2024, the product photography services market was valued at approximately USD 0.78 billion, and it's projected to reach USD 1.78 billion by 2033. Learn more here: Product Photography Services Market As of 2023, over 8 million small businesses globally have invested in DIY product photography setups. In some areas, this number is increasing by 15% year-over-year. This growth underscores the substantial impact DIY photography is having on the business world.
Success Stories Across Industries
The power of effective DIY photography is evident across various sectors and businesses of all sizes. From handcrafted items to cutting-edge tech gadgets, companies recognize that professional-looking images significantly influence customer perception and sales.
Some businesses are integrating their DIY setups into their branding, showcasing behind-the-scenes content and highlighting their authenticity. This transparent approach can create stronger customer connections. Product photo editing services for ecommerce can further elevate the quality of DIY photography. This allows businesses, especially startups and small enterprises, to save money and control their brand messaging. These success stories provide valuable insights for any business seeking to amplify its market presence with DIY photography.
Your DIY Product Photography Success Roadmap
Building a professional DIY product photography setup is a journey, not a destination. This roadmap breaks down the process into actionable steps, accommodating various budgets, skill levels, and time constraints. By phasing your setup’s development, you can begin shooting immediately while progressing toward more advanced capabilities.
Phase 1: Starting Simple With Smartphone Photography
This phase focuses on maximizing what you likely already have: a smartphone.
Equipment: Smartphone, tripod (even a small, flexible one will do), white poster board, natural window light, reflector (white foam board works well). This minimalist approach keeps the initial investment low.
Timeline: Within a day, you can gather these items and start experimenting.
Budget: Under $50 for basic accessories.
Focus: Mastering basic composition, using natural light effectively, and understanding how reflectors shape light. This foundation is critical for future phases.
By positioning your product near a window and using a reflector to fill in shadows, you can achieve surprisingly professional-looking results with minimal equipment. This initial phase proves you don’t need expensive gear to start creating compelling product images.
Phase 2: Enhancing Your Lighting and Background
Now, let’s upgrade your setup for greater control.
Equipment: Add an affordable LED panel light, a seamless backdrop, and a lightbox (especially useful for smaller products). This enhances lighting control and background consistency.
Timeline: Allow 1-2 weeks for research and acquisition.
Budget: $100-$200 for additional lighting and backdrop.
Focus: Learning to control artificial light, exploring different lighting setups, and mastering background removal techniques. This stage significantly expands your photographic capabilities.
This controlled environment provides consistent results, regardless of weather conditions. Additionally, experimenting with LED panels and diffusers enhances your understanding of lighting techniques, taking your images to the next level.
Phase 3: Advanced Techniques and Editing Software
This phase is about refining your skills and adding technology to your workflow.
Equipment: Invest in a more advanced camera (entry-level DSLR or mirrorless) and explore photo editing software like Adobe Lightroom or AI-powered solutions like ProdShot. This combination allows for greater creative control and post-production refinement.
Timeline: 1-2 months for learning new software and techniques.
Budget: Variable, depending on camera choice. Entry-level options are available for under $500.
Focus: Mastering advanced camera settings, understanding post-processing workflows, and developing your own unique photographic style. This stage is where you truly differentiate your product images.
For instance, a DSLR offers greater control over depth of field and image quality. Coupled with software like ProdShot, you can automate tedious editing tasks, saving time and enhancing image quality.
Avoiding Common Pitfalls
Inconsistent Lighting: Maintain consistent lighting throughout your photoshoot for a professional look. This is crucial for creating a cohesive brand image.
Cluttered Backgrounds: Keep your backgrounds clean and uncluttered to draw attention to your product. A simple, clean backdrop is often the most effective.
Ignoring Post-Processing: Even minor edits can greatly improve your images. Investing time in learning basic editing can make a significant difference.
By avoiding these pitfalls and consistently practicing, your DIY product photography setup will produce images that attract customers and drive sales.
Ready to transform your product photography and boost your online sales? ProdShot offers an intuitive AI-driven solution that turns smartphone snapshots into professional-grade product images in seconds. Try ProdShot for free today and experience the power of AI-driven product photography: https://prodshot.net
Article created using Outrank
Subscribe to my newsletter
Read articles from ProdShot Creator directly inside your inbox. Subscribe to the newsletter, and don't miss out.
Written by