8 Product Photography Tips for Stunning Images in 2025
 ProdShot Creator
Transform Your Product Photos: A Quick Guide
Want professional product photos that boost sales? This listicle delivers essential product photography tips to elevate your visuals and captivate customers. Learn how simple adjustments to lighting, background, and camera settings can dramatically improve your images. We'll cover using natural light, mastering manual mode, achieving maximum sharpness with focus stacking, and post-processing techniques. Whether you're a Shopify seller, an Etsy artisan, or a social media influencer, these product photography tips will help showcase your products effectively in 2025 and beyond. Looking for an easy way to create pro-level images using your smartphone? Check out ProdShot.
1. Use Natural Lighting and Shoot Near a Window
One of the most effective and accessible product photography tips for online sellers is leveraging natural light. Shooting near a window offers a simple yet powerful way to capture professional-looking product images without investing in expensive lighting equipment. Natural light provides the most flattering and color-accurate illumination, especially for beginners. Window light, in particular, offers a soft, diffused quality that minimizes harsh shadows and creates an even exposure across your products, making them appear more appealing to potential customers. This approach is perfect for showcasing a product's true colors and textures, leading to higher conversion rates and increased sales.

The key to harnessing the power of window light is positioning your product near a large window during peak daylight hours – when the light is abundant but not direct sunlight. Direct sunlight can create harsh shadows and wash out details, while overcast days provide a naturally diffused light that is ideal for product photography. This technique is readily available to everyone, from Shopify store owners to Etsy sellers and even social media influencers, making it a cornerstone of effective product photography.
The benefits of using natural light are numerous. It's a free and readily available light source, offering a soft, diffused quality that flatters most products. The color temperature of natural light appears natural to viewers, reducing the need for complex white balance adjustments in post-processing. Furthermore, using window light simplifies your setup significantly, eliminating the need for complex and often expensive lighting equipment. This makes it an incredibly cost-effective solution for small businesses and individuals just starting out with product photography.
This technique has been successfully employed by countless online retailers. Many Etsy sellers, especially those specializing in jewelry or handcrafted items, rely on north-facing windows for consistent, diffused light throughout the day. Fashion brands like Everlane often showcase their clothing near large studio windows, capturing the natural drape and texture of the fabrics. Even food photographers utilize the soft glow of morning window light to create mouthwatering images for restaurant menus. These examples highlight the versatility and effectiveness of natural window light across various product categories.
While natural light offers numerous advantages, it's important to be aware of its limitations. It's inherently weather-dependent and inconsistent throughout the day. Optimal shooting hours are limited to specific times, typically during the 'golden hours' – the 2-3 hours after sunrise and before sunset. On cloudy days, the light can be flat and less vibrant. You might also need to use reflectors, like white foam core boards, to fill in shadows and create a more balanced exposure. Finally, replicating the exact lighting conditions for batch shooting can be challenging, potentially leading to inconsistencies in your product images.
Here are some actionable tips to maximize the benefits of natural window light for your product photography:
Choose the Right Window: A north-facing window (in the Northern Hemisphere) provides the most consistent and diffused light throughout the day, minimizing dramatic shifts in light intensity and color temperature. South-facing windows (in the Northern Hemisphere) receive more direct sunlight and should be avoided unless diffused with a sheer curtain or scrim.
Shoot During Golden Hours: Capture your product images during the 'golden hours' for the most flattering and warm lighting. This period offers a soft, directional light that enhances details and creates a pleasing aesthetic.
Utilize Reflectors: Use white foam core boards or reflectors to bounce light back onto your product and fill in shadows. This creates a more even exposure and minimizes dark areas.
Diffuse Direct Sunlight: If you must shoot in direct sunlight, diffuse it using a sheer white curtain or a dedicated diffuser to soften the light and reduce harsh shadows.
Experiment with Distance: Adjust the distance between your product and the window to control the intensity of the light. Moving closer to the window increases the light intensity, while moving further away softens it.
By understanding the nuances of natural window light and implementing these practical tips, you can elevate your product photography and create stunning images that attract customers and boost your online sales. This simple yet powerful technique proves that you don't need expensive equipment to capture professional-quality product photos.
2. Choose the Right Background and Keep It Simple
In product photography, the background plays a crucial, yet often underestimated, role. It sets the stage for your product, influencing how it's perceived and ultimately impacting its sales potential. Choosing the right background and keeping it simple is paramount to effective product photography, ensuring your item remains the star of the show. A cluttered or distracting background can draw attention away from the product, while a well-chosen background can enhance its features and create a more compelling visual story. This is why background selection deserves a prominent place in our product photography tips.

A simple background creates visual separation between the product and its environment, allowing the viewer's eye to focus directly on the item being showcased. This clean aesthetic eliminates distractions and ensures the product's details, colors, and textures stand out prominently. Think of it like a spotlight on a stage – the background should frame the performance, not steal the show. This principle is crucial for online retailers, Shopify store owners, Etsy sellers, and even social media influencers who need their products to grab attention amidst a sea of online content.
A key benefit of using simple backgrounds is the establishment of brand consistency across product catalogs and marketing materials. By maintaining a consistent background style, you create a cohesive visual identity for your brand, reinforcing professionalism and building trust with potential customers. This consistent visual language is particularly important for businesses operating across multiple platforms like Amazon, eBay, and Facebook Marketplace. Imagine scrolling through an online store where each product photo has a wildly different background – it would appear unprofessional and disorganized. A consistent background, however, brings order and professionalism to your online presence.
Successfully implementing this principle can be seen across numerous leading brands. Apple, for instance, is renowned for its iconic use of clean, white backgrounds in its product photography. This minimalistic approach highlights the sleek design and sophisticated features of their devices. Similarly, Amazon strongly encourages pure white backgrounds in its product listings, ensuring a uniform and professional look across its vast marketplace. Warby Parker offers another example, utilizing subtly textured backgrounds for its eyewear photography, adding a touch of lifestyle appeal while maintaining a clean and focused presentation. These examples highlight how a simple background, whether pure white or subtly textured, allows the product to take center stage.
Here are some actionable tips to effectively implement this technique in your own product photography:
Use white or light gray seamless paper for e-commerce: This creates a clean, professional look that is ideal for online marketplaces and product catalogs. Seamless paper is relatively inexpensive and readily available, making it a practical choice for small businesses and online retailers.
Ensure sufficient contrast between product and background: If your product is light-colored, consider a slightly darker background, and vice-versa. This contrast makes the product “pop” and prevents it from blending into the background.
Consider textured backgrounds like marble or wood for lifestyle appeal: While maintaining simplicity, these textures can add a touch of sophistication and context, particularly suitable for social media content and lifestyle product shots.
Maintain 3-4 feet distance between product and background to avoid shadows: This distance allows for even lighting and prevents harsh shadows from distracting from the product itself.
While simple backgrounds offer numerous advantages, it's important to be aware of the potential drawbacks:
Plain backgrounds can appear boring or sterile: Overuse of plain white backgrounds can sometimes lack personality and fail to engage the viewer.
May not convey lifestyle or usage context: For some products, showcasing them in a real-world setting can be beneficial, and a plain background might not achieve this.
Requires careful selection to match brand aesthetic: The background should complement your brand's overall style and target audience.
Choosing the right background is a crucial step in creating compelling product photography. By keeping it simple and following the tips outlined above, you can elevate the presentation of your products, attract more customers, and ultimately boost your sales. Whether you are a seasoned professional or just starting out with product photography, understanding this fundamental principle can significantly impact the effectiveness of your visuals.
3. Master Your Camera Settings and Shoot in Manual Mode
Taking stunning product photos that truly showcase your offerings is crucial for online success, whether you're a Shopify guru, an Amazon artisan, an Etsy entrepreneur, or managing a thriving Facebook Marketplace business. One of the most valuable product photography tips you can implement is mastering your camera settings and embracing manual mode. While automatic settings might seem tempting for their convenience, truly controlling your camera's capabilities unlocks a world of creative possibilities and elevates your product visuals to a professional level. This control is especially vital for consistent branding and achieving the exact aesthetic you envision for your product photography.
Manual mode revolves around understanding and manipulating the exposure triangle: aperture, shutter speed, and ISO. These three elements work in harmony to determine the brightness and overall look of your image. Taking charge of these settings, rather than relying on automatic modes, provides you with the tools to optimize your product images for specific lighting conditions, desired depth of field, and artistic effects that best represent your brand. This is especially beneficial for retailers who need rapid product visuals for marketing campaigns or social media content.
Aperture (f-stop): This controls the size of the lens opening, affecting the depth of field. A wider aperture (smaller f-number, like f/2.8) creates a shallow depth of field, blurring the background and drawing attention to the product's details. This is popular in fashion photography or when highlighting a specific feature of a product. Conversely, a narrower aperture (larger f-number, like f/16) results in a deep depth of field, ensuring that the entire product, from front to back, is in sharp focus. This is ideal for showcasing technical products or jewelry where clarity and detail are paramount.
Shutter Speed: This determines how long the camera's sensor is exposed to light. A fast shutter speed (like 1/250s or faster) freezes motion, perfect for capturing sharp images of moving products or eliminating camera shake. A slower shutter speed (like 1/60s or slower) can be used creatively to blur motion, perhaps to convey a sense of speed or action. For most product photography, a shutter speed fast enough to avoid blur from camera shake is recommended (generally 1/60s or faster when hand-holding the camera). Using a tripod allows for even slower shutter speeds without blur.
ISO: This measures the sensitivity of your camera's sensor to light. A lower ISO (like ISO 100) produces cleaner images with minimal noise (grain), ideal for studio settings with controlled lighting. A higher ISO (like ISO 800 or higher) is useful in low-light situations but can introduce noise. Whenever possible, strive to use the lowest ISO possible to maximize image quality. For most product photography, keeping your ISO between 100-400 is recommended for maintaining clarity and minimizing digital noise.
Putting it all together: Understanding how these three settings interact is the key to manual mode mastery. For example, if you want a shallow depth of field for a beauty product, you'd choose a wide aperture (e.g., f/2.8). This lets in a lot of light, so you'll need to compensate by either using a faster shutter speed or a lower ISO, or a combination of both, to achieve proper exposure.
Benefits of Shooting in Manual Mode:
Consistent exposure: Maintain consistent brightness and depth of field across your entire product shoot.
Enhanced image quality: Control over ISO minimizes noise and maximizes detail.
Artistic control: Create specific moods and effects through intentional blurring or sharp focus.
Professional results: Achieve a polished, high-quality look that surpasses automatic settings.
Challenges of Shooting in Manual Mode:
Learning curve: Requires understanding the exposure triangle and how the settings interact.
Time investment: Takes more time to set up each shot compared to automatic modes.
Potential for errors: Easier to make exposure mistakes without experience.
Adjustment needed: Requires adjustments when lighting conditions change.
Actionable Tips for Product Photography in Manual Mode:
Start with f/8-f/11: This aperture range provides optimal sharpness for most products.
Use ISO 100-400: Minimizes noise and maximizes image quality.
Set a safe shutter speed: 1/60s minimum to eliminate camera shake (use a tripod for slower speeds).
Shoot in RAW format: Provides maximum flexibility for post-processing adjustments.
Practice: Experiment with different settings and lighting conditions to gain experience.
By mastering manual mode, you’ll elevate your product photography, creating compelling visuals that captivate your target audience and boost your online sales. While there is a learning curve, the benefits in terms of image quality, consistency, and creative control are invaluable for any online seller, content creator, or marketing professional. This makes mastering manual mode one of the most impactful product photography tips you can implement.
4. Use a Tripod for Sharp, Consistent Images
In the world of product photography, sharp, consistent images are non-negotiable. A blurred or poorly framed product shot can instantly damage a brand's credibility and deter potential customers. This is where the often-underestimated tripod comes into play. Employing a tripod is a fundamental product photography tip that significantly elevates the quality and professionalism of your product visuals. It provides the stability necessary to capture crisp, clear images, free from the distortions of camera shake, especially crucial for showcasing fine details and achieving that polished, professional look. This stability also ensures consistent framing and composition, creating a cohesive and visually appealing presentation across multiple product shots, which is essential for building a strong brand identity.

A tripod functions by providing a stable, three-legged platform for your camera, eliminating any unintentional movement that can lead to blurry images. This is particularly beneficial when shooting in low-light conditions, using macro lenses for detailed close-ups, or employing techniques like focus stacking and HDR, which require multiple exposures with identical framing. These techniques, frequently used by professional commercial photographers and e-commerce photography studios, become much more achievable and yield superior results with the consistent stability a tripod offers.
Consider the scenario of an Amazon product photographer tasked with showcasing a new line of shoes in various colorways. Maintaining consistent framing across each color variant is crucial for a professional presentation. A tripod allows them to achieve this precision effortlessly, ensuring each image is perfectly aligned and comparable. Similarly, watch photographers rely on tripods to capture intricate details from multiple angles with unwavering accuracy, while cosmetics brands utilize them to ensure consistent product placement across entire marketing campaigns. For social media influencers and content creators showcasing products, a tripod helps maintain a professional, high-quality visual standard across their content.
Implementing a tripod into your product photography workflow offers numerous advantages. It guarantees sharp images even at slower shutter speeds, crucial for capturing fine details in low light. It enables hands-free operation, ideal for utilizing a self-timer or remote shutter release, further minimizing camera shake. Moreover, a tripod maintains exact positioning for multiple angle shots, eliminating the need for constant readjustment and ensuring consistent framing. Finally, it reduces physical fatigue during long shooting sessions, a significant benefit for anyone undertaking extensive product photography projects.
Of course, there are some considerations to keep in mind. Tripods add to your equipment cost and weight, which can be a factor for those working with limited budgets or needing portability. Setting up and adjusting a tripod can also slow down your workflow, especially in the beginning. They can also be somewhat cumbersome in tight shooting spaces. However, the significant benefits in image quality and consistency far outweigh these minor drawbacks.
Here are some actionable tips for maximizing the effectiveness of a tripod in your product photography:
Invest in a sturdy tripod: Ensure your tripod can comfortably support the weight of your camera and lens. A flimsy tripod defeats the purpose of stability.
Use a remote shutter release or self-timer: Even the slightest touch can introduce vibrations. A remote or timer eliminates this risk.
Enable mirror lock-up (for DSLR cameras): Mirror slap can introduce subtle vibrations. Mirror lock-up minimizes this.
Mark tripod leg positions: This allows for easy repositioning during shoots, particularly useful for maintaining consistency across multiple sessions.
Whether you're a Shopify, Amazon, or Etsy store owner, a small online retailer, or a marketing agency needing high-quality product visuals, incorporating a tripod into your photography setup is a game-changer. This simple yet powerful tool dramatically enhances the quality and professionalism of your product images, ultimately boosting your brand image and attracting more customers. By understanding how to effectively utilize a tripod and applying these product photography tips, you can achieve professional-grade results that elevate your product presentations and drive sales. This is why using a tripod deserves its place as a core component in any product photography toolkit.
5. Show Multiple Angles and Key Product Details
One of the most effective product photography tips for boosting sales and reducing returns is showcasing your product from multiple angles and highlighting key details. This approach provides potential customers with a comprehensive understanding of the item's size, features, and quality, fostering trust and setting accurate expectations. In the competitive world of e-commerce, where customers can't physically examine a product, detailed visuals are crucial for replicating the in-store experience. This is particularly important for Shopify, Amazon, and Etsy store owners, as well as small online retailers, who often rely heavily on product photography to drive sales.
This technique goes beyond simply displaying the front of your product. It involves capturing images from various perspectives, including front, back, side, and 45-degree angles, as well as close-up shots that reveal texture, craftsmanship, and unique features. Think of it as creating a 360-degree view of your product, allowing customers to virtually “hold” the item in their hands and examine it from every angle. This level of transparency not only enhances the customer experience but also contributes to a more informed purchasing decision, thereby minimizing post-purchase dissatisfaction and costly returns. For sellers on platforms like eBay and Facebook Marketplace, where trust is paramount, this comprehensive visual documentation can be a significant differentiator.
Successful implementation of this technique can be seen across various industries. Nike, for instance, masterfully showcases its shoes by providing images of the sole, side profile, and close-up shots of the materials, emphasizing both design and quality. Electronics retailers often display the front, back, and sides of devices, highlighting port and connection details that are crucial for informed purchasing. Furniture companies understand the importance of scale and context, providing multiple room angles and close-ups of fabric textures to help customers visualize the piece in their own homes. Even social media influencers and content creators leverage this strategy, showcasing products in detail to engage their audience and drive conversions.
Here are some actionable product photography tips to effectively showcase your products from multiple angles:
Capture the essentials: At a minimum, include front, back, side, and 45-degree angle shots. These provide a foundational understanding of the product's shape and dimensions.
Zoom in on the details: Include close-up shots of textures, logos, stitching, engravings, and any other unique features that differentiate your product. High-quality close-ups showcase the craftsmanship and quality of your product, building customer confidence.
Provide a sense of scale: Use size reference objects (e.g., a ruler, a coin, or a common household item) or lifestyle context (e.g., a model wearing the product) to give customers a clear understanding of the product's size. This is particularly important for items where size is a crucial purchasing factor, such as clothing, jewelry, and furniture.
Document functionality: If your product has moving parts, openings, or specific functional elements, ensure these are clearly documented through images or even short videos. Demonstrating functionality adds value and clarifies how the product works.
Maintain consistency: While showcasing different angles, maintain consistency in lighting, background, and overall style to create a cohesive and professional presentation. This contributes to brand recognition and strengthens your visual identity.
While the benefits of showcasing multiple angles are numerous, there are a few considerations to keep in mind:
Increased time and effort: Capturing and editing multiple images per product naturally requires more time and effort.
Storage and bandwidth: Storing and serving a larger number of images will increase your storage and bandwidth requirements.
Potential for overwhelm: Too many images can sometimes overwhelm customers. Carefully curate the selection to provide comprehensive information without creating visual clutter.
Despite these minor drawbacks, the advantages of this product photography technique far outweigh the challenges. By providing a thorough visual representation of your product, you empower customers to make informed decisions, build trust, increase sales, and ultimately reduce returns. This approach has been popularized by major e-commerce platforms, automotive photography, and fashion retailers, demonstrating its effectiveness across diverse sectors. If you're looking to elevate your product photography and boost your online sales, showcasing multiple angles and key product details is a must-implement strategy.
6. Focus Stacking for Maximum Sharpness
In the competitive world of online product photography, capturing tack-sharp images is crucial for attracting customers and boosting sales. One powerful technique that elevates product visuals to a professional level is focus stacking. This method allows you to achieve edge-to-edge sharpness throughout your entire product, even in challenging situations where depth of field is limited. This is a particularly valuable product photography tip for showcasing intricate details and creating truly captivating images.
Focus stacking involves taking multiple photographs of your product, each focused on a slightly different area. These images are then combined in post-processing software to create a single composite image with an incredibly deep depth of field. This technique overcomes the limitations of a single shot, where only a small portion of the product might be perfectly in focus, especially when shooting small items or using macro lenses.
Think of it this way: imagine photographing a watch. At a wide aperture, you might be able to focus sharply on the watch face, but the hands and band will be blurred. Conversely, if you stop down the aperture for maximum depth of field, you'll lose light and sharpness due to diffraction. Focus stacking offers the best of both worlds – maximum sharpness across the entire watch, from the fine details on the face to the texture of the strap.
This technique has been popularized by macro photographers, high-end jewelry brands, and technical product photographers who demand absolute precision in their images. Now, thanks to accessible software, this once specialized technique is within reach of any online retailer.
Benefits of Focus Stacking:
Extends Depth of Field: Achieve a depth of field beyond the limitations of a single shot.
Maximum Sharpness: Maintain peak lens performance by shooting at optimal apertures.
Professional Quality: Create macro product images rivaling high-end commercial photography.
Wider Aperture Advantage: Avoid the need to stop down to very small apertures, resulting in better image quality and faster shutter speeds.
Weighing the Pros and Cons:
Pros:
Achieve seemingly impossible depth of field, especially beneficial for small product photography.
Maintain maximum image quality and sharpness.
Create a professional appearance competitive with high-end photography, enhancing your brand image.
Utilize wider apertures, leading to better image quality and less noise.
Cons:
Requires specialized software (like Helicon Focus or Photoshop) and post-processing skills.
Can be a time-intensive shooting and editing process.
Subjects must remain completely stationary, necessitating a stable setup.
Can create artifacts if not executed correctly.
Examples of Effective Focus Stacking:
Jewelry photographers commonly stack 20-30 images to capture every intricate detail of a ring or necklace.
Watch manufacturers use focus stacking to showcase the detailed workings of their timepieces, from the dial to the movement.
Electronics companies employ this technique to highlight circuit board components and connectors with pinpoint accuracy.
Tips for Successful Focus Stacking:
Use manual focus and move your camera in small increments between shots.
Overlap focus points by 30-50% for seamless blending in post-processing.
Use a sturdy tripod and remote shutter release to ensure no movement between shots.
The following infographic illustrates the three key steps involved in the focus stacking process:
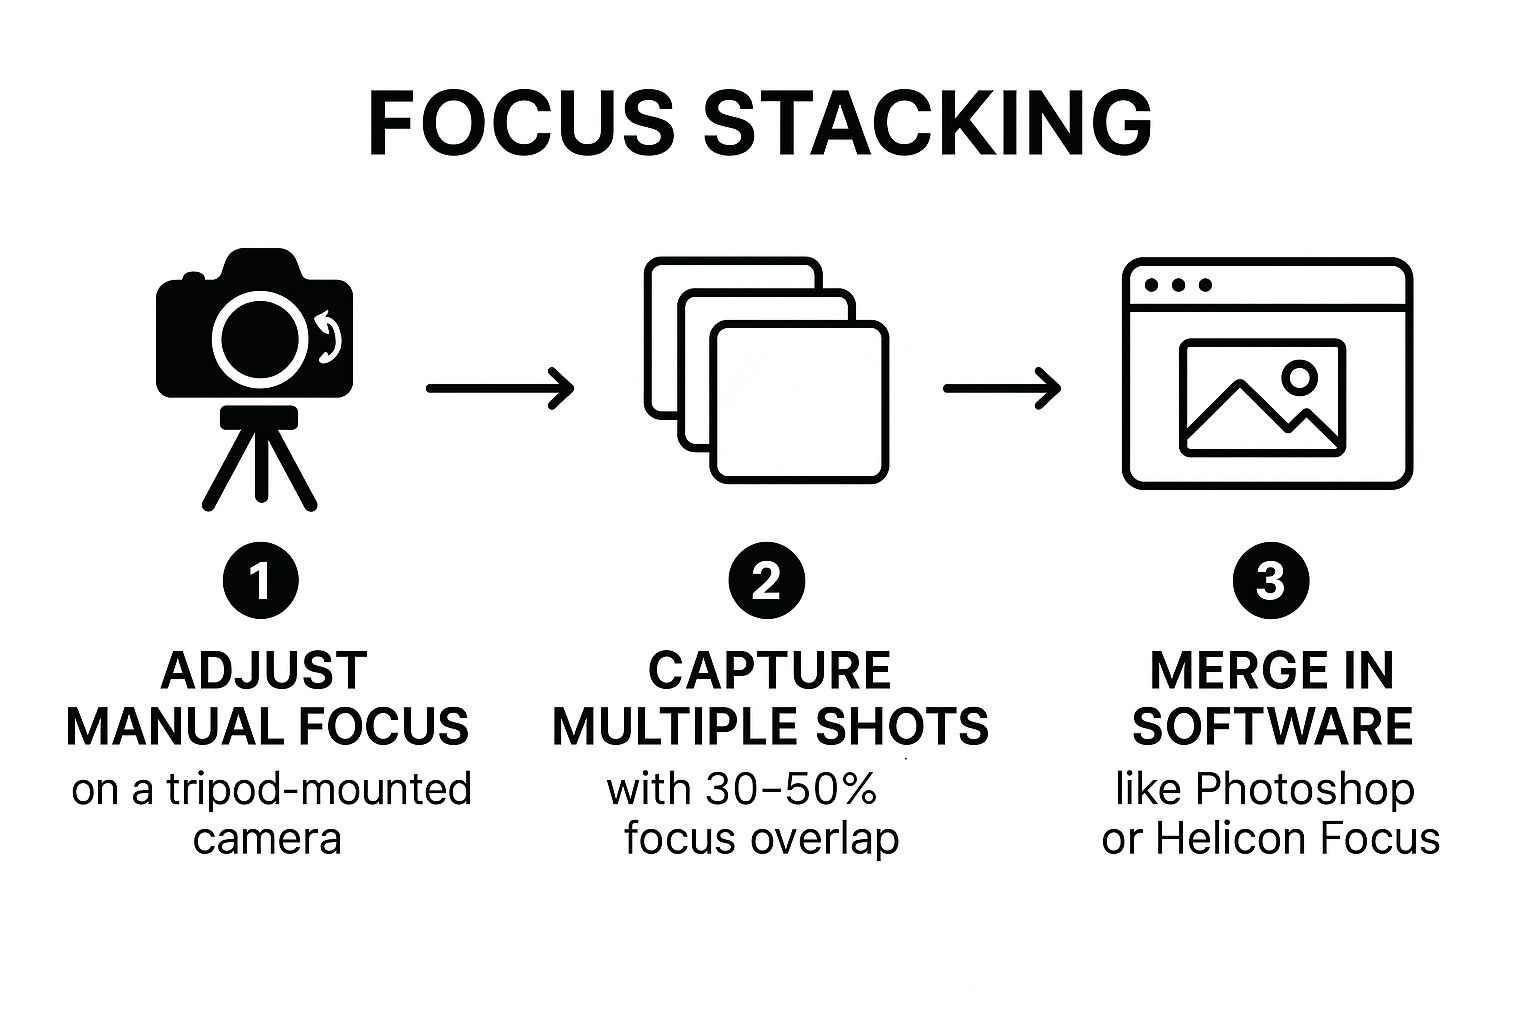
This infographic outlines the simple yet effective process of focus stacking, from setting up your camera on a tripod to merging the images in dedicated software. By following this sequential workflow, you can ensure a smooth and successful focus stacking experience.
While focus stacking requires a bit more effort than traditional product photography, the results are undeniably worth it. By incorporating this powerful technique into your workflow, you can elevate your product images, capturing the attention of potential customers and ultimately driving sales. For Shopify, Amazon, and Etsy store owners, or anyone selling online, focus stacking is a valuable product photography tip that can significantly improve the quality and professionalism of your product visuals.
7. Post-Processing and Color Correction: The Polishing Touch for Perfect Product Photography
Post-processing and color correction are essential steps in product photography, transforming good photos into exceptional marketing assets. This crucial stage elevates your visuals, ensuring accurate product representation and brand consistency across your entire catalog. Whether you're a Shopify store owner, an Amazon seller, an Etsy artisan, or a social media influencer, understanding and implementing these techniques is paramount for success in today's competitive online marketplace. Think of it as the final polish that takes your product photos from amateur snapshots to professional, high-converting images.
This process involves using software to adjust and enhance various aspects of your images after they've been captured. It's much more than just slapping on a filter. It's about meticulously refining your visuals to present your products in the best possible light, literally and figuratively. By correcting colors, removing distractions, and ensuring consistency, you create impactful visuals that resonate with your target audience and drive sales.
Here’s a breakdown of what post-processing encompasses:
Color Accuracy and Consistency: One of the most important aspects of product photography is accurately representing the color of your products. Inconsistencies in lighting and white balance during shooting can lead to color variations. Post-processing allows you to correct these discrepancies and ensure that the colors displayed online match the actual product. This is particularly crucial for fashion brands, where accurate fabric color is paramount, and cosmetics brands, where true-to-life makeup shades are essential. Imagine a customer ordering a vibrant red dress only to receive a dull orange one due to inaccurate color representation. Post-processing helps you avoid such disappointments and build customer trust.
Background Removal and Replacement: A clean, distraction-free background is essential for highlighting your product. Post-processing allows you to remove cluttered or unwanted backgrounds and replace them with a pure white or another suitable backdrop. This is especially beneficial for e-commerce platforms like Amazon and eBay that often require specific background standards. It makes your product the star of the show, allowing potential customers to focus on its features and benefits without distractions.
Blemish Removal and Product Enhancement: Minor imperfections, dust, fingerprints, or scratches can detract from the perceived quality of your product. Post-processing enables you to subtly remove these blemishes and enhance the product's overall appearance. For example, electronics companies can remove dust and fingerprints from screens, making their products look pristine and appealing. However, it's crucial to maintain a realistic representation and avoid over-editing, which can create an unrealistic portrayal of the product.
Optimization for Different Platforms and Uses: Different platforms and marketing channels have varying image size and format requirements. Post-processing allows you to optimize your images for each specific use, whether it's for your website, social media, or print advertising. This ensures your visuals look their best regardless of where they're displayed.
Why is Post-Processing Essential for Product Photography Tips?
Post-processing deserves a prominent place in any list of product photography tips because it bridges the gap between a good photo and a great one. It empowers you to:
Correct Lighting and Exposure Inconsistencies: Even with careful planning, lighting inconsistencies can occur during a photoshoot. Post-processing allows you to correct these issues, ensuring a balanced and professional look.
Create Professional, Polished Final Images: Post-processing adds a layer of polish and professionalism to your product photos, making them stand out from the competition.
Maintain Brand Consistency Across All Products: By using consistent editing techniques and presets, you can maintain a cohesive visual identity across your entire product line, reinforcing your brand image.
Allow Creative Flexibility for Different Marketing Needs: Post-processing provides the flexibility to adapt your images for various marketing purposes, allowing you to experiment with different looks and styles.
Actionable Tips for Effective Post-Processing:
Shoot in RAW format: RAW files contain significantly more image data than JPEGs, providing greater flexibility for editing and color correction.
Create consistent editing presets: Presets save time and ensure consistency across your product images.
Use color checker cards: These cards help calibrate your camera and ensure accurate color reproduction.
Maintain realistic representation while enhancing visual appeal: While enhancements are beneficial, avoid over-editing that could mislead customers.
Pros and Cons of Post-Processing:
Pros: Corrects lighting and exposure issues, creates professional images, maintains brand consistency, and offers creative flexibility.
Cons: Requires software investment and a learning curve, can be time-consuming for large catalogs, and risks over-editing.
Learn more about Post-Processing and Color Correction for a deeper dive into professional editing services and techniques.
Ultimately, post-processing and color correction are vital for elevating your product photography. By mastering these techniques, you can present your products in the most compelling way, attracting customers and driving sales.
8. Proper Product Styling and Composition
Product photography is more than just snapping a picture of your product against a white background. It's about creating a visual narrative that resonates with your target audience and elevates your brand. Proper product styling and composition are crucial for achieving this, transforming simple product shots into compelling images that drive sales. This technique deserves its place on this list because it bridges the gap between simply displaying a product and truly selling it. It's the key to creating product images that don't just inform, but also inspire and persuade.
At its core, product styling involves thoughtfully arranging your product alongside complementary props and background elements to create a cohesive and visually appealing scene. Composition, on the other hand, refers to how these elements are arranged within the frame, guiding the viewer's eye and emphasizing key features. Together, they work to establish a specific mood, showcase the product's uses and benefits, and connect with the viewer on an emotional level. This is particularly impactful for Shopify, Amazon, and Etsy store owners, as well as small online retailers, who rely heavily on visuals to attract and convert customers.
Imagine two images of a handcrafted ceramic mug. One is a simple shot against a plain white backdrop. The other shows the same mug nestled on a rustic wooden table, alongside a steaming cup of coffee and an open book. Which image is more likely to entice a buyer? The second image, through careful styling and composition, paints a picture of a cozy morning ritual, instantly connecting with the viewer's desire for comfort and relaxation. This is the power of effective product styling.
Successful product styling and composition can manifest in various ways, depending on the product and target audience. For example, Anthropologie excels at styling clothing with complementary accessories and lifestyle settings, creating aspirational scenes that embody their bohemian aesthetic. Williams Sonoma, on the other hand, arranges kitchen products in realistic cooking scenarios, demonstrating their functionality and appealing to home cooks. Similarly, West Elm showcases furniture in styled room environments, allowing viewers to visualize the pieces in their own homes. Even for sellers on platforms like eBay and Facebook Marketplace, basic styling can significantly enhance product presentation.
Here are some actionable tips to elevate your product photography through styling and composition:
The Rule of Odds: Use an odd number of objects in your composition (one, three, five) as this tends to be more visually appealing and dynamic than even numbers.
Create Depth: Use layering and varying heights of props to add depth and dimension to your images. This prevents the scene from looking flat and uninteresting.
Complementary Props: Choose props that complement your product rather than compete with it. The focus should always remain on the product itself.
Consistent Aesthetic: Maintain a consistent styling aesthetic across your product lines to reinforce your brand identity and create a cohesive visual experience for your customers.
Target Audience Focus: Consider your target audience's lifestyle and preferences when choosing props and settings. What kind of environment would they resonate with?
Highlight Key Features: Use styling and composition to draw attention to the product's key selling points. For instance, if a handbag has a unique clasp, ensure it's prominently featured.
While the benefits are numerous, there are also potential drawbacks to consider. Styling requires additional props, tools, and creative planning, which can be time-consuming and potentially costly. If executed poorly, styling can distract from the product rather than enhance it. Furthermore, highly stylized photography might not be suitable for all product categories or brand aesthetics. Simple, clean product shots may be more effective for certain technical products or brands with a minimalist approach. Advertising and marketing agencies working with tight deadlines also need to balance the benefits of styling against time constraints. Social media influencers, however, can leverage styling to great effect, creating engaging content that resonates with their followers.
For products like home decor, styling is almost essential to showcase the item’s potential and inspire customers. Learn more about Proper Product Styling and Composition.
By understanding the principles of product styling and composition, and carefully considering your target audience and brand aesthetic, you can transform your product photography from simple documentation to powerful visual storytelling, ultimately driving engagement, increasing conversions, and boosting your bottom line. This is especially critical for businesses operating in competitive online marketplaces like Shopify, Amazon, and Etsy. By mastering this technique, you'll be well-equipped to create product images that truly stand out and capture the attention of potential customers.
8 Key Product Photography Tips Comparison
| Tip Title ⭐📊 | Implementation Complexity 🔄 | Resource Requirements ⚡ | Expected Outcomes ⭐ | Ideal Use Cases 💡 | Key Advantages ⭐ |
| Use Natural Lighting and Shoot Near a Window | Low 🔄 | Minimal (natural light, reflectors) ⚡ | Flattering, color-accurate images 📊 | Budget setups, consistent soft lighting | Cost-effective, natural look, easy control ⭐ |
| Choose the Right Background and Keep It Simple | Low to Medium 🔄 | Background materials (paper, textures) ⚡ | Professional, clean product focus 📊 | E-commerce, brand consistency | Enhances focus, easy to edit, consistent look ⭐ |
| Master Your Camera Settings and Shoot in Manual Mode | Medium to High 🔄 | Knowledge of camera, manual controls ⚡ | Consistent exposure, artistic control 📊 | Professional studios, varied lighting | Precise image quality, artistic flexibility ⭐ |
| Use a Tripod for Sharp, Consistent Images | Low to Medium 🔄 | Tripod, remote shutter (optional) ⚡ | Sharp, stable, repeatable framing 📊 | Macro, slow shutter speed, multi-angle | Eliminates shake, consistent framing, reduces fatigue ⭐ |
| Show Multiple Angles and Key Product Details | Medium 🔄 | Extra shooting time, storage ⚡ | Comprehensive product detail 📊 | E-commerce, complex products | Builds trust, reduces returns, highlights features ⭐ |
| Focus Stacking for Maximum Sharpness | High 🔄 | Tripod, software, time for editing ⚡ | Edge-to-edge sharpness, professional macro 📊 | Jewelry, small detail work, macro shots | Superior sharpness, maintains quality, competitive look ⭐ |
| Post-Processing and Color Correction | Medium 🔄 | Editing software, skill, time ⚡ | Polished, color-accurate final images 📊 | Marketing, brand consistency | Corrects inconsistencies, professional finish, flexible use ⭐ |
| Proper Product Styling and Composition | Medium to High 🔄 | Props, styling tools, creative input ⚡ | Engaging, emotional product presentation 📊 | Lifestyle brands, high-end retail | Enhances engagement, differentiates products, supports premium pricing ⭐ |
Ready to Elevate Your Product Photography?
This article has covered essential product photography tips, from utilizing natural light and simple backgrounds to mastering camera settings and post-processing techniques. We've explored the importance of showcasing multiple angles, using a tripod for consistent shots, and even delved into more advanced techniques like focus stacking. By implementing these product photography tips, you're well on your way to creating stunning, professional images that will not only enhance your brand image but also significantly boost your sales. Whether you're selling on Shopify, Amazon, Etsy, or even social media platforms, high-quality product visuals are paramount for attracting customers and driving conversions. Remember, mastering these concepts translates directly to increased engagement, improved customer trust, and ultimately, a more successful online business.
As you refine your skills and experiment with different techniques, you will discover your own style and learn what resonates best with your target audience. Consistency is key to building a cohesive brand image. If you're looking for an effortless way to further elevate your product photography and want to generate studio-quality images from your smartphone, explore the power of ProdShot. Start your free trial today and experience the difference that professional-grade product photos can make for your business!
Article created using Outrank
Subscribe to my newsletter
Read articles from ProdShot Creator directly inside your inbox. Subscribe to the newsletter, and don't miss out.
Written by