Product Photography Lighting Setup: Tips for Stunning Shots
 ProdShot Creator
Building Your Essential Product Photography Lighting Arsenal
Creating stunning product photography relies heavily on mastering your lighting setup. It's not about acquiring the most expensive equipment, but rather understanding how light and shadow interact to highlight your product's best features. Discussions with successful commercial photographers reveal that smart lighting choices, not a big budget, are the key to impactful images. Let's explore how to build a lighting arsenal that elevates your product photography.
Choosing the Right Lighting System
The photography lighting market is experiencing significant growth, fueled by the ever-present need for high-quality visuals online. In 2022, the global photography lighting equipment market was valued at approximately $4.3 billion, with projections reaching $4.8 billion by 2030. This growth emphasizes the vital role lighting plays in showcasing products and capturing consumer attention. LED lighting systems are becoming increasingly popular, predicted to hold over 50% of the market share by 2026. This shift towards LEDs reflects their efficiency and versatility in product photography. Explore this topic further. Selecting the appropriate lighting type also significantly affects your final images.
Consider the differences between commonly used lighting options: natural light, continuous lighting, and flash lighting. The infographic below provides a concise comparison of these lighting types, based on cost, ease of use, and light quality:
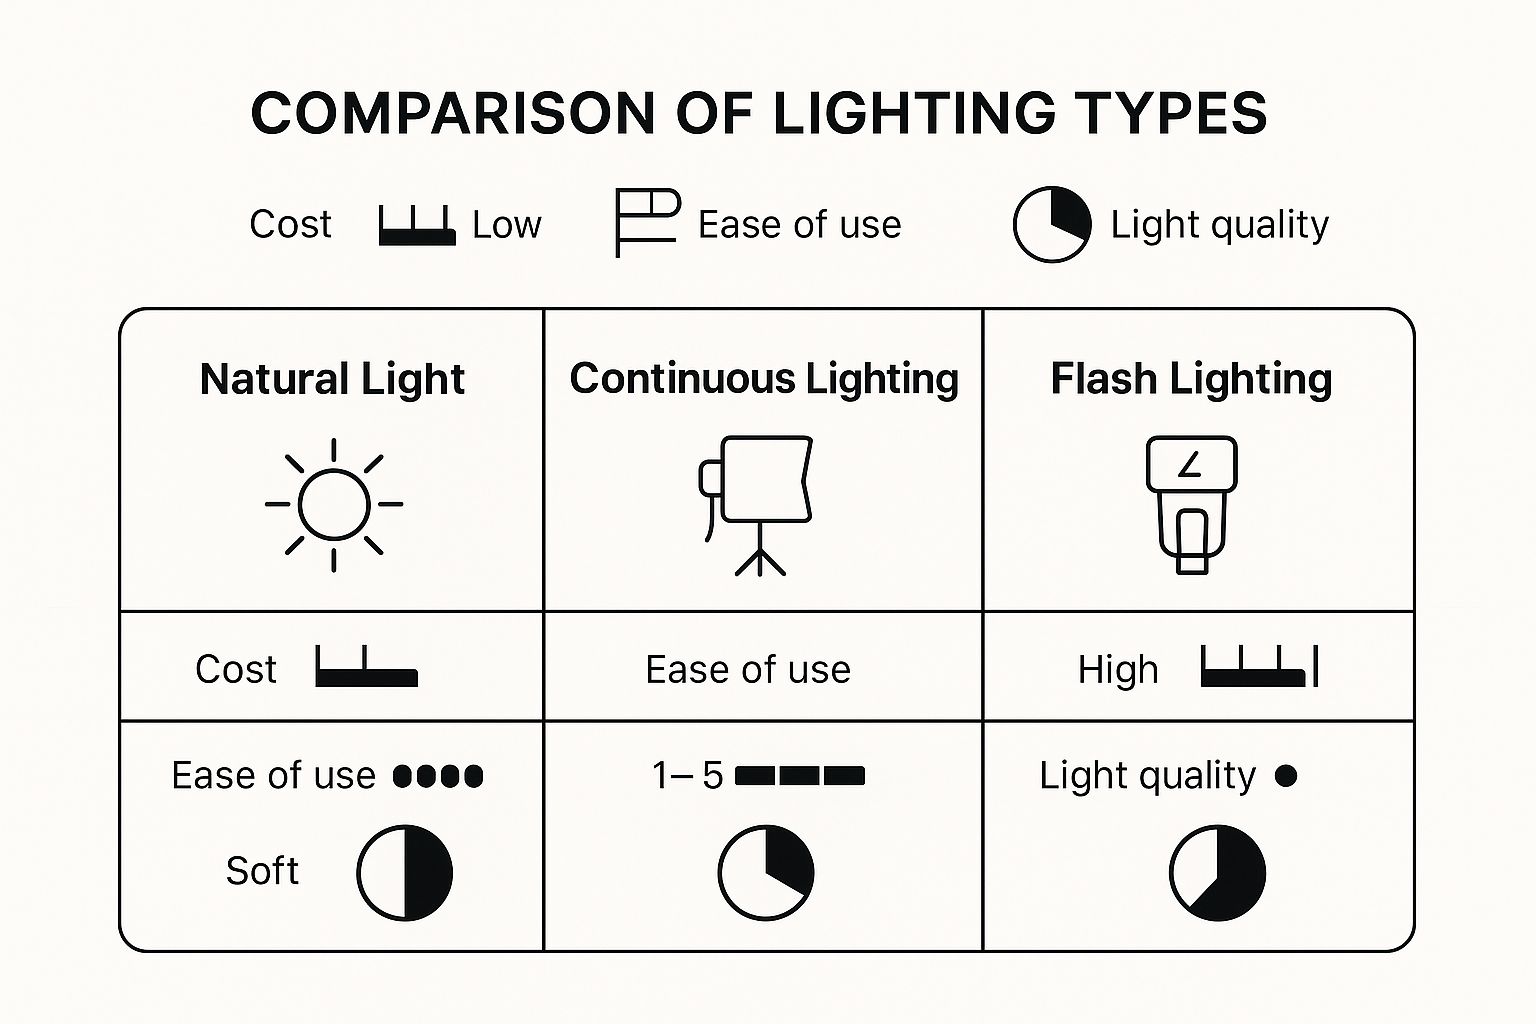
As the infographic shows, natural light is the most budget-friendly and offers beautiful soft light, but its availability and control can be unpredictable. Continuous lighting offers consistent output and is user-friendly, providing a good balance. Flash lighting, although more complex, offers the greatest control and light intensity, making it ideal for capturing fine details.
Exploring Light Modifiers and Accessories
Creating a professional setup involves understanding light modifiers. These tools shape and control light, turning harsh shadows into soft, appealing illumination. A softbox diffuses light, much like clouds soften sunlight. Umbrellas create a broader, more diffused light, suitable for larger products or group shots.
Stands are another essential element, providing stability and allowing for precise positioning of your lights and modifiers. This is particularly important for consistency. Boom arms, for instance, enable overhead light placement, minimizing shadows and creating even illumination across your product.
Finally, consider using reflectors. These bounce light back onto the subject, filling in shadows and adding dimension. A white reflector brightens shadows, while a black reflector absorbs light to deepen shadows for a more dramatic effect. They act like sculpting tools for your light.
To help you make informed decisions about your lighting equipment, the table below compares several popular lighting types:
Lighting Equipment Comparison Guide A detailed comparison of different lighting types including LED, fluorescent, and tungsten systems with their key specifications and best use cases
| Lighting Type | Color Temperature | Power Consumption | Heat Output | Best For | Price Range |
| LED | 3000K-6000K | Low | Low | Product photography, video | $50-$500+ |
| Fluorescent | 2700K-6500K | Moderate | Low | Product photography, general lighting | $20-$100+ |
| Tungsten | 3200K | High | High | Video, still photography (with cooling) | $30-$200+ |
This table highlights the key differences in color temperature, power consumption, heat output, and price range, helping you choose the best lighting type for your specific needs. LED lights offer the most versatility and control for product photography, while tungsten lights can be a good option for video, but require careful heat management.
By carefully selecting your lighting system, modifiers, and accessories, you are creating a comprehensive toolkit for producing compelling product visuals that can transform potential customers into buyers.
Mastering Light Boxes For Flawless Product Shots
Light boxes are a game-changer for product photography. They offer a simple yet effective way to achieve professional-looking results, creating a clean, crisp aesthetic that makes products truly pop and entices potential buyers. But how do you choose the right light box and use it to its full potential?
Selecting the Perfect Light Box
Choosing the correct light box size is crucial. For smaller items like jewelry or electronics, a compact light box is ideal. Larger products, such as clothing or shoes, require more spacious setups. It's like choosing the right frame for a picture – the frame should complement the subject, not distract from it. For more tips on product photography, check out this guide on mastering Amazon product photography.
Lighting Sources for Accurate Colors
The type of lighting you use inside your light box significantly impacts color accuracy. LED lights offer excellent color rendering and stay cool, unlike halogen bulbs. This consistent color temperature is especially important when photographing products where precise color representation is key. Imagine photographing a vibrant red dress – getting the color just right is essential for online shoppers.
DIY Light Box Construction: Saving Money Without Sacrificing Quality
Building your own light box can be a cost-effective alternative to buying a pre-made one. Simple materials like cardboard, white fabric, and tape can be used to create a surprisingly effective light box. This DIY approach lets you customize the size to perfectly fit your products while saving you money. Interestingly, the photography light box market is growing, projected to have a CAGR of 5.9% from 2023 to 2031. This growth underscores the increasing importance of light boxes in professional product photography. Learn more about light box market statistics.
Positioning Strategies for Eliminating Shadows
Strategic placement of your product and lights within the light box minimizes unwanted shadows and color casts. Placing lights on opposite sides of the box creates even illumination, like a perfectly balanced scale. Using reflectors can further refine the lighting by bouncing light back onto the product, filling in any remaining shadows.
Maintaining Crisp Details for Enhanced Visual Appeal
The ultimate goal is to create images that showcase your product's details with exceptional clarity. The diffused light within a light box minimizes harsh highlights and shadows, ensuring even light distribution. This soft, even lighting preserves those important details, giving your product images the professional look that builds customer trust and encourages purchases.
Strategic Lighting Patterns That Sell Products
Building upon a solid foundation of equipment and light box mastery, the next step in creating truly compelling product photography is understanding lighting patterns. These patterns, much like carefully constructed recipes, can transform ordinary product shots into images that practically sell themselves. They expertly manipulate light and shadow to highlight textures, create depth, and ultimately, influence buyer behavior.
The Foundational Three-Point Lighting Setup
The three-point lighting system serves as the cornerstone for most product photography. This system involves a key light, the primary illuminator of the product; a fill light, which softens the shadows cast by the key light; and a backlight, separating the product from the background to add depth. Imagine it as a conversation between these light sources, each contributing to the overall story of the product. This setup offers impressive versatility and adaptability to almost any product.
Adapting Portrait Lighting Techniques
Surprisingly, techniques borrowed from portrait photography, such as Rembrandt lighting and butterfly lighting, can be incredibly effective for product shots. Rembrandt lighting, recognizable by the triangle of light under the eye, creates dramatic shadows and adds an artistic flair. Butterfly lighting, achieved with the key light positioned directly in front of and above the subject, creates a symmetrical, glamorous look that is perfect for showcasing reflective products like jewelry.
Exploring Rim Lighting and Background Techniques
Rim lighting, created by positioning a light source behind the product, produces a captivating outline or halo effect, perfectly emphasizing shape and form. Think of photographing a glass bottle – rim lighting would beautifully highlight its curves, adding a sense of elegance. Moreover, controlling your background lighting can dramatically impact a product’s presentation. A brighter background creates an airy feel, while a darker background adds drama and focuses attention directly on the product.
Ensuring Professional Results Every Time
Hands-on practice and troubleshooting techniques are crucial to mastering these lighting patterns. For example, if your shadows appear too harsh, simply adjust the position or intensity of your fill light. If the product seems to blend into the background, experiment with different backlight intensities or background colors. The importance of professional product photography lighting is further underscored by the booming ecommerce product photography market. Projected to grow from USD 163.91 million in 2023 to USD 342.27 million by 2031, this growth signifies the vital role of high-quality visuals in online sales and brand building. Find more detailed statistics here. By understanding these lighting principles and consistently applying them, you won’t just create captivating images; you'll cultivate a more compelling online presence.

Conquering Reflective Surfaces And Tricky Materials
Reflective surfaces and tricky materials like metal, glass, and jewelry can be challenging for product photographers. These materials often bounce light in unexpected ways, creating unwanted glare, hotspots, and reflections. These issues can obscure details and make the product less appealing. However, with the correct product photography lighting setup, these challenges can be overcome to create stunning product images.
Taming Reflections with Strategic Angles
One of the best ways to manage reflections is by carefully adjusting angles. By slightly changing the position of your product or camera, you can control how light interacts with the surface. It's similar to playing billiards—a small change in the cue angle drastically changes the ball's trajectory. Likewise, minor adjustments in your photography setup can significantly reduce or eliminate reflections, highlighting the product's best features.
The Power of Polarizing Filters
Polarizing filters are invaluable for controlling reflections, particularly when photographing glass or water. These filters selectively block certain light waves, minimizing glare and boosting color saturation. This is especially helpful for transparent products like bottles or glassware, as it enhances their shape and clarity. A polarizing filter acts like a tool that removes distracting glare, unveiling the product's true beauty.
Sculpting Light with Bounce Cards
Black and white bounce cards provide a simple yet effective way to shape light and manage reflections. White bounce cards reflect light back onto the subject, softening harsh highlights and filling in shadows. Conversely, black bounce cards absorb light, deepening shadows and reducing glare. Using both allows precise control of light and shadow, enhancing the product's form and texture. This is particularly useful for jewelry photography, accentuating intricate details and creating sparkle.
Photographing Transparent Objects: A Balancing Act
Photographing transparent objects presents unique challenges. The goal is to showcase the object's form and clarity without unwanted reflections. This requires a delicate balance of light and shadow.
Placing the object against a white background and using a backlight to define its edges is a helpful technique. Carefully adjusting the backlight's intensity and position can create a subtle halo effect, highlighting the object's contours. Additionally, strategically placed black cards absorb stray light, preventing unwanted reflections within the transparent material. Mastering these techniques allows you to transform challenging materials into captivating subjects, elevating your product photography.
Color Accuracy That Builds Customer Trust
Nothing damages customer confidence quite like receiving a product that looks completely different from what they saw online. Accurate color representation is essential in product photography for ensuring customer satisfaction and reducing returns. This means understanding color temperature, white balance, and how they work together to shape the final image.
Mastering Color Temperature and White Balance
Color temperature, measured in Kelvin (K), describes how warm or cool a light source appears. Lower color temperatures (e.g., 2700K) have a warm appearance, similar to the soft glow of a candle. Higher temperatures (e.g., 6500K) appear cool, like a bright overcast sky. This directly impacts how your product’s colors appear in photos.
White balance is your camera’s way of compensating for these color temperature variations, ensuring white objects appear truly white under any light source. Imagine photographing a white sheet of paper under a warm incandescent bulb. Without proper white balance, the paper would look yellow. A correct white balance neutralizes this color cast, restoring accurate colors. You might be interested in learning more about product photo retouching to further enhance color accuracy.
Handling Mixed Lighting and Color Correction
Many photographers encounter mixed lighting, a situation where multiple light sources with different color temperatures illuminate the product. Combining natural window light (cool) with tungsten lamps (warm), for example, creates an uneven color cast across the product.
Color correction gels offer a practical solution by modifying the color temperature of your light sources. Placed over the light, these gels adjust its color to match other light sources in the scene. It’s like fine-tuning a painting: adding a touch of blue to yellow creates the perfect green. Achieving balanced lighting is critical for accurate product representation.
Shooting in RAW and Post-Processing Techniques
Shooting in RAW format provides maximum flexibility during post-processing. Unlike JPEGs, RAW files preserve all the image data captured by your camera's sensor. This offers greater control over color correction, allowing for fine-tuning without compromising image quality. Think of RAW files as a sculptor’s clay, offering complete freedom to mold and refine the image.
Post-processing ensures color consistency throughout your product catalog. For example, when photographing a clothing line, post-processing ensures consistent colors across all garments, regardless of slight lighting variations during individual shots.
Optimizing for Different Materials and Product Categories
Different materials react uniquely to various color temperatures. A metallic surface might appear cooler under a higher color temperature light, while wood might appear warmer under a lower temperature. Understanding these nuances is essential for optimizing your product photography lighting setup.
This knowledge enables customized lighting tailored to the materials being photographed. Jewelry photography, for instance, benefits from a cooler light temperature to enhance the sparkle of gemstones. Food photography, on the other hand, might require warmer light to create a more appealing image.

By understanding how lighting interacts with different product categories and meticulously managing your white balance, you’ll create photographs that showcase true-to-life colors. This builds trust with potential customers, strengthens your brand image, and enhances the overall shopping experience. This attention to detail can be the deciding factor between making a sale and losing a customer.
Professional Results On Any Budget
Creating stunning product photography doesn't have to break the bank. Resourcefulness, not deep pockets, is the key. Many photographers achieve professional-quality results with product photography lighting setups built on clever, affordable alternatives and DIY solutions. This smart budgeting allows for maximum impact without overspending.
Affordable Lighting Solutions That Rival Expensive Setups
Believe it or not, standard desk lamps can be surprisingly effective substitutes for expensive studio lighting. The trick is using the right bulb. A daylight-balanced LED bulb, for instance, provides consistent, controllable light comparable to a professional softbox. This is especially useful for smaller product shoots and dramatically reduces initial investment, making professional product photography accessible even on a tight budget. For a broader perspective on photography costs, check out this article: How much professional photography costs.
DIY Softboxes and Reflectors: Maximizing Your Resources
DIY light modifiers like softboxes and reflectors can be crafted from readily available materials like cardboard, foam board, and white fabric. A cardboard box lined with white fabric, for example, can effectively diffuse light, creating a softbox that rivals commercial options. White foam board makes an excellent reflector to fill in shadows and balance the image. These DIY solutions offer a high degree of customization, allowing photographers to perfectly tailor their lighting to the product.
Harnessing the Power of Natural Light
Don't underestimate the power of window light. This free and abundant light source can rival any studio setup. By strategically positioning products and using reflectors to manipulate natural light, photographers achieve stunning results without spending a penny on artificial lighting. This technique is particularly effective for products that benefit from soft, diffused lighting. Working with natural light also helps develop a keen eye for detail and nuance, as photographers learn how light interacts with their subjects.
Prioritizing Equipment Purchases for Maximum Impact
For budget-conscious photographers, starting with the essentials and gradually expanding your setup as your business grows is a smart strategy. Begin with a basic two-light setup, then add modifiers and accessories as needed based on specific project requirements. This approach avoids unnecessary expenses and ensures every piece of equipment serves a distinct purpose. It's a mindful approach to equipment acquisition that promotes sustainable growth, allowing your setup to evolve alongside your business.
To help you visualize the different budget options, let's take a look at the table below. It outlines equipment recommendations and expected results for various investment levels.
Budget Setup Options By Investment Level
A breakdown of equipment recommendations and expected results for different budget ranges from beginner to professional setups
| Budget Range | Essential Equipment | Optional Additions | Suitable For | Expected Results |
| Beginner (<$50) | Daylight-balanced LED bulbs, Desk lamps, White foam board | Cardboard box for DIY softbox | Simple product shots, Online marketplaces, Social media content | Good quality images for online use, Practice lighting techniques |
| Intermediate ($50-$200) | Basic two-light setup, Umbrella reflectors, Tripod | Backdrop stand, Basic light modifiers | Small business owners, E-commerce product photography, Bloggers | Improved image quality and control over lighting, More professional look |
| Professional ($200+) | Studio strobes, Softboxes, Light meter, Reflectors | Multiple backdrops, Advanced light modifiers, Professional camera and lenses | Professional photographers, Large product shoots, Commercial photography | High-quality, consistent results, Versatile lighting setups for complex products |
This table highlights the different stages of equipment acquisition. As your budget increases, so does the sophistication and control you have over your lighting. Starting small and strategically upgrading your equipment allows for controlled growth and ensures a solid return on investment.
Key Takeaways For Lighting Success
Mastering your product photography lighting setup is essential for captivating images that drive sales. This section offers practical insights gleaned from experienced commercial photographers, providing actionable steps, systematic approaches, and proven workflows to elevate your product photography.
Actionable Checklists For Different Shooting Scenarios
Each product and shooting situation presents unique lighting challenges. Shooting a reflective watch, for instance, demands a different approach compared to photographing a matte ceramic vase. Having checklists tailored to specific scenarios streamlines your workflow and ensures consistent, high-quality results. Consider developing checklists for:
Reflective products: Focus on techniques to control reflections and minimize hotspots.
Transparent objects: Detail methods to reveal the product's form while maintaining clarity.
Textured surfaces: Highlight how strategic lighting angles can emphasize texture.
Different product sizes: Outline variations in setup for small items versus larger objects.
These checklists serve as valuable quick-reference guides, helping you avoid common pitfalls and maintain professional standards.
Systematic Approaches to Lighting Setup for Consistent Results
Consistency is key in product photography, particularly for building a cohesive brand identity. A systematic approach to lighting helps achieve this consistency:
Standardize your three-point lighting: Maintain consistent positions and intensities for your key light, fill light, and backlight. You can learn more about effective three-point lighting setups from resources like Digital Photography School.
Document your settings: Meticulously record your camera settings, lighting positions, and modifier choices for easy replication.
Create lighting diagrams: Visual diagrams act as blueprints, allowing you to easily recreate specific lighting setups.
Calibrate your monitor: Ensure accurate color representation to avoid unexpected surprises during post-processing. Tools like Datacolor SpyderX can help with monitor calibration.
This systematic approach provides a reliable framework, ensuring your product images maintain a professional and consistent look, regardless of the product or shooting environment.
Proven Workflows That Maximize Productivity and Quality
Time is a valuable asset in any business. Optimizing your workflow enables you to capture more images without compromising quality. Consider these time-saving strategies:
Batch similar products: Photograph items with similar lighting needs in a single session to maximize efficiency.
Streamline your post-processing: Utilize presets and batch editing in software like Adobe Lightroom to accelerate your workflow.
Invest in tethering software: Transfer images directly to your computer for real-time viewing and faster feedback. Capture One is a popular option for tethered shooting.
Maintain your equipment: Regularly clean and inspect your gear to prevent unexpected problems during shoots.
A well-optimized workflow not only boosts productivity but also ensures consistent, high-quality results across your portfolio. This efficiency and dependability will impress clients and contribute to your long-term success.
Subscribe to my newsletter
Read articles from ProdShot Creator directly inside your inbox. Subscribe to the newsletter, and don't miss out.
Written by