Backup and restore strategies for ETCD and workloads
 Harshit Sahu
Table of contents
- Guide to Backing Up and Restoring an ETCD Cluster with Built-in Snapshots.
- Understanding Etcd Snapshots:
- Pre-requisites:
- Backup Process:
- Restoring an etcd cluster:
- Backup of Workloads or Cluster
- Section 1: Velero
- Section 2: Stash
- Section 3: CSI Snapshotting
- Section 4: Disaster Recovery Including etcd Backup and Restore
- Conclusion

Guide to Backing Up and Restoring an ETCD Cluster with Built-in Snapshots.
In the world of distributed systems and containerized environments, ensuring data integrity and availability is paramount. Etcd, a distributed key-value store, is at the heart of many Kubernetes clusters, acting as the source of truth for critical configuration and state information. Like any critical system, etcd requires robust backup and restore mechanisms to safeguard against data loss or corruption.
One of the most effective ways to backup and restore an etcd cluster is by utilizing its built-in snapshot feature. In this guide, we’ll delve into the details of backing up and restoring an etcd cluster using these snapshots, ensuring the resilience of your infrastructure.
Understanding Etcd Snapshots:
Etcd snapshots provide a convenient and efficient way to capture the current state of the cluster’s key-value store at a particular moment in time. These snapshots are essentially point-in-time backups that can be used to restore the etcd cluster to a previous state in case of failures or data corruption.
Behind the scenes, etcd snapshots are taken by creating a consistent snapshot of the entire etcd data directory. This snapshot contains all the necessary information to restore the cluster to the exact state it was in when the snapshot was taken.
Pre-requisites:
Before we dive into the backup and restore process, let’s ensure we have the necessary prerequisites in place:
A running etcd cluster: Ensure that your etcd cluster is up and running. This could be a standalone cluster, or a cluster deployed as part of a Kubernetes environment.
Access to etcdctl:
etcdctlis the command-line utility for interacting with etcd clusters. Make sure it’s installed and configured on your system.–endpoints=https://127.0.0.1:2379: This flag specifies the endpoints of the etcd cluster from which the snapshot will be taken. In this example, the snapshot will be taken from a cluster running on
https://127.0.0.1:2379. Make sure to replace this with the actual endpoint of your etcd cluster.–cacert=/etc/etcd/ca.crt: This flag specifies the path to the CA (Certificate Authority) certificate file used to verify the authenticity of the etcd server’s certificate. It ensures secure communication with the etcd cluster.
–cert=/etc/etcd/etcd-server.crt: This flag specifies the path to the certificate file used by
etcdctlto authenticate itself to the etcd server. This certificate should be signed by the CA specified in–cacert.–key=/etc/etcd/etcd-server.key: This flag specifies the path to the private key file corresponding to the certificate specified in
–cert. It is used for authentication purposes when communicating with the etcd server.
Note:
The values for the --endpoints, --cacert, --cert, and --key flags in the etcdctl command can typically be found in the configuration files and directories of your etcd cluster.
Or you can simply see these values in the Static-Manifest f
ile of ETCD pod which is present in “/etc/kubernetes/manifests/etcd.yaml”.
Also by below command:
"kubectl describe pod etcd-controlplane -n kube-system"
"cat /etc/kubernetes/manifests/etcd.yaml"
You will get an output which will look something like this:


Backup Process:
Taking a backup of an etcd cluster using snapshots is a straightforward process:
1. Connect to the etcd Cluster:
Use etcdctl to connect to one of the etcd cluster members.
ETCDCTL_API=3 etcdctl snapshot save /opt/backup.db \
--endpoints=https://127.0.0.1:2379 \
--cacert=/etc/etcd/ca.crt \
--cert=/etc/etcd/etcd-server.crt \
--key=/etc/etcd/etcd-server.key
2. Wait for Snapshot to Complete:
Depending on the size of your etcd data and the cluster’s workload, the snapshot process may take some time. It’s essential to wait until the snapshot is complete before proceeding.
3. Verify Snapshot:
Once the snapshot process is finished, you can verify the integrity of the snapshot file if needed.
etcdctl snapshot status <SNAPSHOT_FILE_PATH/snapshot.db>
This command will display information about the snapshot, including its revision and total size.
Restoring an etcd cluster:
Note:
If any API servers are running in your cluster, you should not attempt to restore instances of etcd. Instead, follow these steps to restore etcd:
stop all API server instances.
restore state in all etcd instances.
restart all API server instances.
We also recommend restarting any components (e.g. kube-scheduler, kube-controller-manager, kubelet) to ensure that they don’t rely on some stale data. Note that in practice, the restore takes a bit of time. During the restoration, critical components will lose leader lock and restart themselves.
Restoring:
1. Stop all API server instances.
service kube-apiserver stop
2. Restore state in all etcd instances.
etcd supports restoring from snapshots that are taken from an etcd process of the major.minor version. Restoring a version from a different patch version of etcd is also supported. A restore operation is employed to recover the data of a failed cluster.
Before starting the restore operation, a snapshot file must be present. It can either be a snapshot file from a previous backup operation, or from a remaining data directory.
When restoring the cluster, use the --data-dir option to specify to which folder the cluster should be restored:
ETCDCTL_API=3 etcdctl --data-dir /etc/kuberentes/etcd snapshot restore /opt/backup.db \
--endpoints=https://127.0.0.1:2379 \
--cacert=/etc/etcd/ca.crt \
--cert=/etc/etcd/etcd-server.crt \
--key=/etc/etcd/etcd-server.key
where <--data-dir-location> is a directory that will be created during the restore process.
3. Change ownership:
Set ownership on the new data directory:
sudo chown -R etcd:etcd <data-dir-location>
4. Update the <--data-dir-location>
As the data is restored, you need to modify the Etcd pod’s manifest file to use the new restored data directory as a volume. Open the Etcd manifest file for editing.
Update the <--data-dir-location> inside the manifest file of ETCD which is in “/etc/kubernetes/manifests/etcd.yaml”
**5. Restart all API server instances.
**
systemctl daemon-reload
service etcd restart
service kube-apiserver start
Best Practices
Here are some best practices to keep in mind when working with etcd snapshots:
Regularly Scheduled Backups: Schedule regular backups of your etcd cluster to ensure that you have recent snapshots available in case of emergencies.
Secure Backup Storage: Store your snapshot files in a secure location, preferably on redundant and durable storage to mitigate the risk of data loss.
Test Restoration Process: Periodically test the restoration process using your snapshots to ensure that everything is functioning correctly. This practice helps uncover any potential issues before they become critical.
Monitor Snapshot Health: Monitor the health and integrity of your snapshot files to detect any anomalies or corruption early on.
Backup of Workloads or Cluster
Kubernetes, the popular container orchestration platform, empowers organizations to run resilient and scalable applications. However, data loss or system failures can still occur, making it imperative to have a robust backup and restore strategy. In this guide, i will explore various methods and tools for creating and recovering backups within a Kubernetes environment. I’ll provide code examples and configurations for each solution, ensuring you have a clear understanding of how to implement these processes.
Section 1: Velero
Velero (formerly Heptio Ark) gives you tools to back up and restore your Kubernetes cluster resources and persistent volumes. You can run Velero with a cloud provider or on-premises. Velero lets you:
Take backups of your cluster and restore in case of loss.
Migrate cluster resources to other clusters.
Replicate your production cluster to development and testing clusters.
To install Velero and create a backup, follow these steps:
# Install Velero
brew install velero

# Install Velero with the appropriate provider plugin (e.g., AWS, GCP, Azure)
velero install --provider aws
1.1 Backup with Velero
Each Velero operation — on-demand backup, scheduled backup, restore is a custom resource, defined with a Kubernetes Custom Resource Definition (CRD) and stored in etcd. Velero also includes controllers that process the custom resources to perform backups, restores, and all related operations.
You can back up or restore all objects in your cluster, or you can filter objects by type, namespace, and/or label.
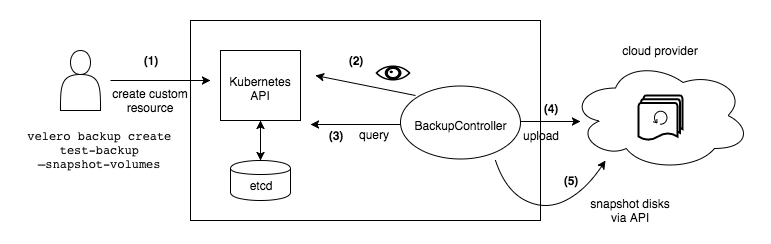
Backup workflow
When you run velero backup create my-backup:
- The Velero client makes a call to the Kubernetes API server to create a
Backupobject.
2. The BackupController notices the new Backup object and performs validation.
3. The BackupController begins the backup process. It collects the data to back up by querying the API server for resources.
4. The BackupController makes a call to the object storage service – for example, AWS S3 – to upload the backup file.
By default, velero backup create makes disk snapshots of any persistent volumes. You can adjust the snapshots by specifying additional flags. Run velero backup create --help to see available flags. Snapshots can be disabled with the option --snapshot-volumes=false.
Here’s some command example to create a backup with Velero:
#Backup a namespace and it’s objects.

velero backup create <backup-name> --include-namespaces default

#Backup all deployments in the cluster.

velero backup create <backup-name> --include-resources deployments

#Backup the deployments in a namespace.

velero backup create <backup-name> --include-resources deployments --include-namespaces demo

#Backup entire cluster including cluster-scoped resources.

velero backup create <backup-name>

#Backup a namespace and include cluster-scoped resources.

velero backup create <backup-name> --include-namespaces <namespace> --include-cluster-resources=true

#Include resources matching the label selector.

velero backup create <backup-name> --selector stage=prod

#Include resources that are not matching the selector

velero backup create <backup-name> --selector "<key> notin (<dev,test>)"

#Exclude kube-system from the cluster backup.

velero backup create <backup-name> --exclude-namespaces kube-system

#Exclude secrets from the backup.

velero backup create <backup-name> --exclude-resources secrets

#Exclude secrets and rolebindings.

velero backup create <backup-name> --exclude-resources secrets,rolebindings
1.2 Restore with Velero
The restore operation allows you to restore all of the objects and persistent volumes from a previously created backup. You can also restore only a filtered subset of objects and persistent volumes. Velero supports multiple namespace remapping–for example, in a single restore, objects in namespace “abc” can be recreated under namespace “def”, and the objects in namespace “123” under “456”.
By default, backup storage locations are created in read-write mode. However, during a restore, you can configure a backup storage location to be in read-only mode, which disables backup creation and deletion for the storage location. This is useful to ensure that no backups are inadvertently created or deleted during a restore scenario.
Restore workflow
The following is an overview of Velero’s restore process that starts after you run velero restore create.
1. The Velero client makes a call to the Kubernetes API server to create a Restore object.
2. The RestoreController notices the new Restore object and performs validation.
3. The RestoreController fetches basic information about the backup being restored, like the BackupStorageLocation (BSL). It also fetches a tarball of the cluster resources in the backup, any volumes that will be restored using File System Backup, and any volume snapshots to be restored.
4. The RestoreController then extracts the tarball of backup cluster resources to the /tmp folder and performs some pre-processing on the resources, including:
Sorting the resources to help Velero decide the restore order to use.
Attempting to discover the resources by their Kubernetes Group Version Resource (GVR). If a resource is not discoverable, Velero will exclude it from the restore. See more about how Velero backs up API versions.
Applying any configured resource filters.
Verify the target namespace, if you have configured
--namespace-mappingsrestore option.
5. The RestoreController begins restoring the eligible resources one at a time. Velero extracts the current resource into a Kubernetes resource object. Depending on the type of resource and restore options you specified, Velero will make the following modifications to the resource or preparations to the target cluster before attempting to create the resource:
The
RestoreControllermakes sure the target namespace exists. If the target namespace does not exist, then theRestoreControllerwill create a new one on the cluster.If the resource is a Persistent Volume (PV), the
RestoreControllerwill rename the PV and remap its namespace.If the resource is a Persistent Volume Claim (PVC), the
RestoreControllerwill modify the PVC metadata.Execute the resource’s
RestoreItemActioncustom plugins, if you have configured one.Update the resource object’s namespace if you’ve configured namespace remapping.
The
RestoreControlleradds avelero.io/backup-namelabel with the backup name and avelero.io/restore-namewith the restore name to the resource. This can help you easily identify restored resources and which backup they were restored from.
6. The RestoreController creates the resource object on the target cluster. If the resource is a PV then the RestoreController will restore the PV data from the durable snapshot, File System Backup, or CSI snapshot depending on how the PV was backed up.
7. If the resource already exists in the target cluster, which is determined by the Kubernetes API during resource creation, the RestoreController will skip the resource. The only exception are Service Accounts, which Velero will attempt to merge differences between the backed up ServiceAccount into the ServiceAccount on the target cluster. You can change the default existing resource restore policy to update resources instead of skipping them using the --existing-resource-policy.
8. Once the resource is created on the target cluster, Velero may take some additional steps or wait for additional processes to complete before moving onto the next resource to restore.
If the resource is a Pod, the
RestoreControllerwill execute any Restore Hooks and wait for the hook to finish.If the resource is a PV restored by File System Backup, the
RestoreControllerwaits for File System Backup’s restore to complete. TheRestoreControllersets a timeout for any resources restored with File System Backup during a restore. The default timeout is 4 hours, but you can configure this be setting using--fs-backup-timeoutrestore option.If the resource is a Custom Resource Definition, the
RestoreControllerwaits for its availability in the cluster. The timeout is 1 minute.
7. If any failures happen finishing these steps, the RestoreController will log an error in the restore result and will continue restoring.
Here’s some command example to create a restore with Velero:
#Restore two namespaces and their objects.

velero restore create <backup-name> --include-namespaces <namespace1>,<namespace2>

#Restore all deployments and configmaps in the cluster.

velero restore create <backup-name> --include-resources deployments,configmaps

#Restore only namespaced resources in the cluster.

velero restore create <backup-name> --include-cluster-resources=false
Section 2: Stash
Stash by AppsCode is a cloud native data backup and recovery solution for Kubernetes workloads. If you are running production workloads in Kubernetes, you might want to take backup of your disks, databases etc. Traditional tools are too complex to set up and maintain in a dynamic compute environment like Kubernetes. Stash is a Kubernetes operator that uses restic or Kubernetes CSI Driver VolumeSnapshotter functionality to address these issues. Using Stash, you can backup Kubernetes volumes mounted in workloads, stand-alone volumes and databases. Users may even extend Stash via addons for any custom workload.
2.1 Backup and Restore with Stash
If you are using a volume that can be mounted in multiple workloads, aka ReadWriteMany/RWX, you might want to backup the volume independent of the workloads. Stash supports backup of stand-alone volumes. This guide will give you an overview of how stand-alone volume backup and restore process works in Stash.
Backup workflow
The following diagram shows how Stash takes backup of a stand-alone volume.
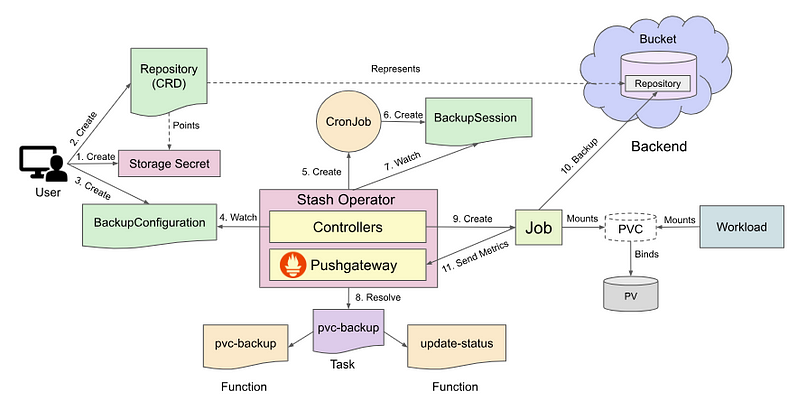
The backup process consists of the following steps:
At first, a user creates a secret with access credentials of the backend where the backed up data will be stored.
Then, she creates a
Repositorycrd that specifies the backend information along with the secret that holds the credentials to access the backend.Then, she creates a
BackupConfigurationcrd targeting the volume. TheBackupConfigurationobject also specifies theTaskto use to backup the volume.Stash operator watches for
BackupConfigurationcrd.Once Stash operator finds a
BackupConfigurationcrd, it creates a CronJob with the schedule specified inBackupConfigurationobject to trigger backup periodically.On next scheduled slot, the CronJob triggers a backup by creating a
BackupSessioncrd.Stash operator also watches for
BackupSessioncrd.When it finds a
BackupSessionobject, it resolves the respectiveTaskandFunctionand prepares a backup Job definition.Then, it mounts the targeted volume into the Job and creates it.
The Job takes backup of the targeted volume.
Finally, when backup is completed, the Job sends Prometheus metrics to the Pushgateway running inside Stash operator pod. It also updates the
BackupSessionandRepositorystatus to reflect the backup procedure.
Here’s some Yaml example to create a backup with Stash:
apiVersion: stash.appscode.com/v1beta1
kind: BackupConfiguration
metadata:
  name: deployment-backup
  namespace: demo
spec:
  repository:
    name: gcs-repo
  schedule: "*/5 * * * *"
  target:
    ref:
      apiVersion: apps/v1
      kind: Deployment
      name: stash-demo
    volumeMounts:
    - name: source-data
      mountPath: /source/data
    paths:
    - /source/data
  retentionPolicy:
    name: 'keep-last-5'
    keepLast: 5
    prune: true
Restore workflow
The following diagram shows how Stash restores backed up data into a stand-alone volume. Open the image in a new tab to see the enlarged version.
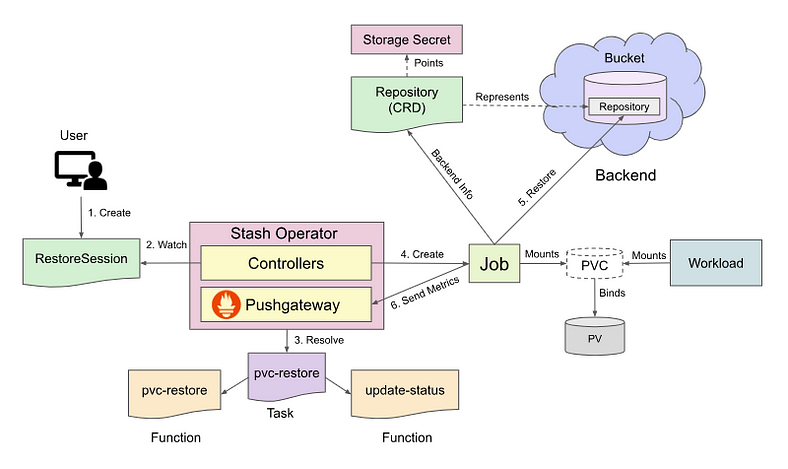
The restore process consists of the following steps:
At first, a user creates a
RestoreSessioncrd which specifies the targeted volume where the backed up data will be restored and theRepositorycrd which holds the backend information where the backed up data has been stored. It also specifies theTaskto use to restore the target.Stash operator watches for
RestoreSessionobject.Once it finds a
RestoreSessionobject, it resolves the respectiveTaskandFunctionand prepares a restore Job definition.Then, it mounts the targeted volume into the Job and creates it.
The Job restores the backed up data into the volume.
Finally, when the restore process is completed, the Job sends Prometheus metrics to the Pushgateway and update the
RestoreSessionstatus to reflect restore completion.
Here’s some command example to create a restore with Stash:
apiVersion: stash.appscode.com/v1beta1
kind: RestoreSession
metadata:
  name: deployment-restore
  namespace: demo
spec:
  repository:
    name: gcs-repo
  target: # target indicates where the recovered data will be stored
    ref:
      apiVersion: apps/v1
      kind: Deployment
      name: stash-recovered
    volumeMounts:
    - name:  source-data
      mountPath:  /source/data
    rules:
    - paths:
      - /source/data/
Section 3: CSI Snapshotting
3 Backup with CSI Snapshotting
- Using CSI Snapshotting: Many storage providers offer Container Storage Interface (CSI) snapshots, which allow direct creation of volume snapshots. CSI snapshots are particularly efficient for backing up PVCs.
If your storage class supports CSI snapshots, you can use kubectl to create snapshots and schedule backups.
kubectl create snapshot --namespace my-namespace my-snapshot --volume-snapshot-classes my-csi-class --snapshot-content-name my-snapshot-content
Section 4: Disaster Recovery Including etcd Backup and Restore
4.1 Backup etcd Data
- Using etcdctl: etcd is a critical component of a Kubernetes cluster that stores control plane state, including configuration, secrets, and more. Regularly back up etcd data to safeguard your Kubernetes control plane.
Use the etcdctl command to create snapshots of etcd data, ensuring you have a complete backup of your cluster’s control plane:
etcdctl snapshot save /path/to/snapshot.db
4.2 Restore etcd Data
- Using etcdctl: In a disaster recovery scenario, restore your Kubernetes control plane state from an etcd snapshot.
Use the etcdctl command to restore data from an etcd snapshot to the specified data directory:
etcdctl snapshot restore /path/to/snapshot.db --name my-etcd-member --data-dir /var/lib/etcd
Conclusion
A comprehensive backup and restore strategy is critical in Kubernetes, ensuring the resilience and reliability of your applications and data. Velero, Stash, and etcd snapshots provide powerful tools for managing backups and disaster recovery. Automated backup schedules guarantee that your data is continuously protected and recoverable in case of unexpected events. Customize these solutions to meet your specific environment, test them regularly, and be confident in your ability to safeguard your Kubernetes ecosystem.
Subscribe to my newsletter
Read articles from Harshit Sahu directly inside your inbox. Subscribe to the newsletter, and don't miss out.
Written by
Harshit Sahu
Harshit Sahu
Enthusiastic about DevOps tools like Docker, Kubernetes, Maven, Nagios, Chef, and Ansible and currently learning and gaining experience by doing some hands-on projects on these tools. Also, started learning about AWS and GCP (Cloud Computing Platforms).