White Background Product Photography: Professional Guide
 ProdShot Creator
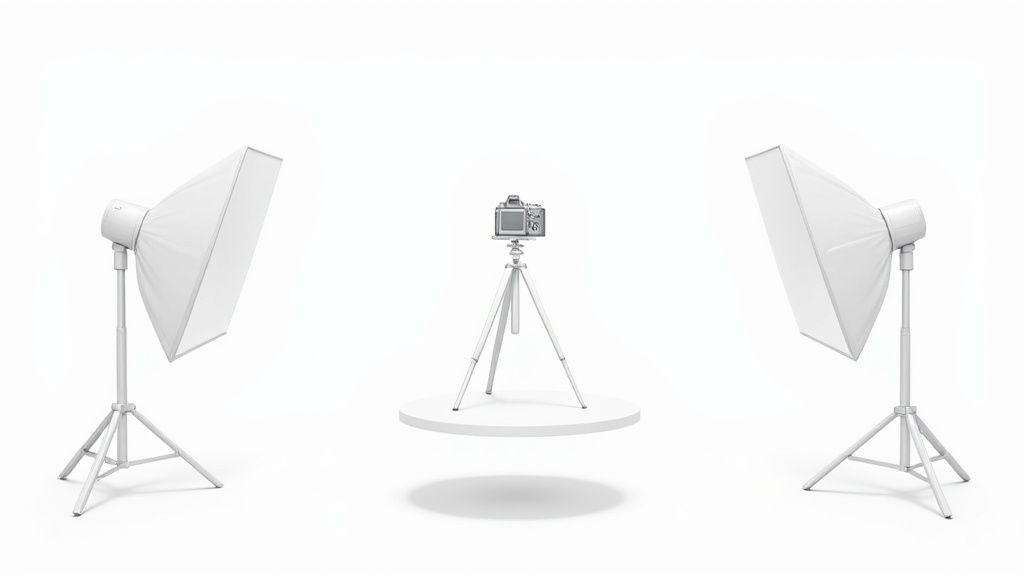
Why White Backgrounds Transform Your Product Sales
White backgrounds for product photography might appear simplistic, even dull. But this minimalist style is surprisingly powerful when it comes to boosting sales. It’s not just an aesthetic choice; it’s a strategic move supported by both psychology and tangible results. So, what makes white backgrounds so effective?
Minimizing Distractions, Maximizing Impact
Imagine your product as the star. A white background serves as a clean, empty stage, directing all attention where it should be: on what you’re selling. It removes any visual clutter that could divert potential customers, allowing them to quickly grasp your offering. This clarity is especially vital in the fast-paced online marketplace where attention spans are limited.
Building Trust and Professionalism
White background product photography also cultivates trust. This consistent approach creates a professional image, elevating your brand and signaling to customers that you value your products. Picture an online store with inconsistent product photos: some on patterned backgrounds, others on dark wood, and some even on cluttered kitchen counters. This inconsistency looks amateurish and can undermine customer confidence.
Furthermore, the use of a white background has become standard practice in e-commerce, particularly on platforms like Amazon. This method is preferred because it minimizes distractions and highlights product details, which can greatly improve conversion rates. Studies have shown that customers find it simpler to navigate and make informed purchase decisions when products are presented on a white background. The white backdrop isolates the product, enabling potential buyers to focus more clearly on its features and design. Companies like ABLE, who redesigned their jewelry product photography to feature white or neutral backgrounds, reported increased customer satisfaction due to the improved clarity and ease of viewing product details. Learn more about white background best practices here: https://omi.so/resources/blog/product-photography-white-background
Reducing Cognitive Load For Easier Decisions
White backgrounds aren't just visually pleasing; they simplify the shopping experience. When a shopper sees a product against a complex background, their brain works harder to process the image and identify the main subject. This cognitive load can be tiring, causing decision fatigue and potentially leading to abandoned carts. A clean white background removes this extra effort, making it easier for customers to evaluate features and make a purchase.
Seamless Integration and Platform Requirements
Many major online marketplaces, such as Amazon and eBay, strongly encourage or even mandate white background product photography. They understand the value of consistency and clarity for both sellers and buyers. Adopting white backgrounds not only enhances your product listings but also ensures compliance with platform guidelines, maximizing your product visibility. This simple choice can significantly improve how your products are perceived and how many potential customers see them.
Building Your White Background Photography Setup
Creating high-quality white background product photography doesn't require a huge investment, but it does demand careful planning and the right equipment. Whether your budget is tight or you have more to spend, understanding the essentials will significantly impact your results. This means choosing the right lighting, backdrops, and camera accessories that work together to showcase your products effectively. Want to learn more? Check out this helpful resource: How to master professional Amazon product photography.
Essential Equipment
The core components of your setup determine the quality and consistency of your images.
Backdrop: A seamless white backdrop is essential. Professional backdrops are ideal, but a roll of white paper or a large white sheet offers a cost-effective alternative.
Lighting: Proper lighting eliminates shadows and ensures even illumination. Two softbox lights positioned on either side of your product are a good starting point. Even affordable clamp lights with daylight bulbs can work well.
Camera: While a professional DSLR offers more control, even a smartphone with a decent camera can produce excellent results with the right setup.
Tripod: A tripod keeps your camera steady, which is especially important for consistent shots and sharper images, particularly in low light.
Reflectors: Reflectors bounce light back onto the product, filling in shadows and creating a more even distribution. White foam boards or even pieces of white cardboard can work as DIY reflectors.
Setting Up Your Studio Space
You don't need a huge studio. A small area with enough space for your backdrop, lighting, and product is sufficient. A corner of a room or a tabletop can easily be transformed into a functional photography space. Make sure you have enough power outlets for your lighting.
The infographic above illustrates a minimalist setup. It highlights the essential components: a DSLR camera on a tripod, a lightbox, and strategically placed reflectors. This visualization emphasizes how simple arrangements can achieve professional results. Even with a compact setup, you can create high-quality images.
To help you choose the right equipment for your budget, take a look at the comparison table below. It provides recommendations for both budget-conscious and professional setups.
Introducing the "White Background Photography Equipment Guide". This table offers a comparison of essential equipment across budget levels with specific product recommendations to help you make informed decisions.
| Equipment Type | Budget Option | Professional Option | Best For | Price Range |
| Backdrop | White paper roll | Seamless white vinyl backdrop | Beginners / Small product shoots | $10 - $30 |
| Backdrop | White muslin backdrop | Professional studio backdrop system | Larger products / More control | $30 - $100+ |
| Lighting | Clamp lights with daylight bulbs | Softbox lighting kit | Beginners / Limited budget | $20 - $50 |
| Lighting | Studio strobe lights | High-end strobe lighting system | Professional results / Advanced control | $100 - $500+ |
| Camera | Smartphone with good camera | DSLR or mirrorless camera | Beginners / Casual use | Varies |
| Camera | Entry-level DSLR | Professional-grade DSLR | High-quality images / Professional use | $500 - $3000+ |
| Tripod | Lightweight tripod | Heavy-duty studio tripod | Stability / Versatility | $20 - $150+ |
| Reflectors | White foam boards | Collapsible reflectors with different surfaces | Controlling light reflection / Versatility | $10 - $50+ |
This table summarizes key equipment choices for white background photography based on budget and need. It emphasizes that quality results can be achieved at any budget level with the right tools.
Tips for Maximizing Your Setup
Here are some tips for getting the most from your setup:
Minimize Clutter: A clean, distraction-free area around your setup will improve focus and results.
Diffuse Your Light: Diffusers on your lights soften the light and minimize harsh shadows.
Experiment With Angles: Different camera angles can dramatically improve product presentation.
Test Your Setup: Test shots are crucial for optimizing lighting and backdrop before final images. Regularly evaluate and adjust your setup based on the specific product.
Sweep: A seamless sweep, curving from the vertical backdrop to the horizontal surface, creates a professional, “floating” product look, eliminating the horizon line and simplifying editing.
By following these guidelines, you can create a professional white background photography setup on any budget. This allows you to showcase your products in the best possible light, ultimately driving sales.
Lighting Techniques That Make Products Shine
Mastering lighting for white background product photography is essential for creating professional, high-converting images. This careful lighting is where the “magic” happens, giving products that desirable "floating" effect against a pristine backdrop. However, it's also where many photographers struggle.
Understanding the Importance of Soft, Diffused Light
The secret to white background product photography is soft, diffused light. This minimizes harsh shadows and stark contrasts, allowing product details to stand out. Imagine photographing a glass bottle under direct, harsh light. You’ll probably get distracting reflections and blown-out highlights. Diffused light, on the other hand, provides smoother, more even illumination, truly representing the product.
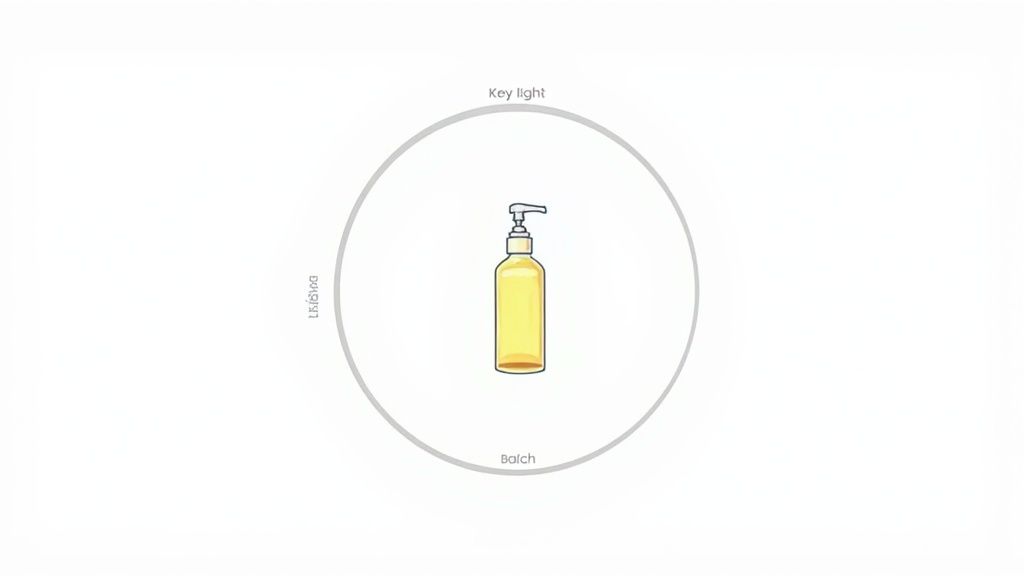
Utilizing the Two-Light Setup
One effective technique is the two-light setup. Position two softbox lights on either side of the product for balanced illumination. This eliminates shadows and ensures even lighting. Imagine photographing a shoe. Two softboxes, one on each side, will evenly light the shoe, showcasing its texture and details without unwanted shadows.
Addressing Challenges With Reflective and Transparent Objects
Reflective and transparent objects present unique challenges. Reflective surfaces mirror light sources, while transparent items can look washed out. Strategic lighting and positioning are key here. For reflective items, consider larger diffusers or strategically placed flags to control reflections. Backlighting can define the shape of transparent objects, creating depth.
This lighting management not only enhances visual appeal but also simplifies post-processing. Fewer shadows and consistent lighting reduce the need for extensive editing. Plus, advancements in AI technology have further helped the process. The trend toward white backgrounds is complemented by AI tools that automate tasks like background removal and color correction. This saves time and ensures consistency, crucial for a professional brand image. Find more detailed statistics here: https://clippingpathlab.com/10-game-changing-product-photography-trends-for-2025-and-beyond/
Fine-Tuning Your Lighting Setup
Even with two lights, small adjustments make a big difference. Consider these best practices:
Adjust Light Intensity: Balance the intensity for even illumination. Uneven lighting can create distracting shadows and highlight flaws.
Experiment with Distance: Moving the lights changes the softness and spread of light. Closer is softer; further is more focused.
Utilize Reflectors: Reflectors bounce light back onto the product, filling shadows and enhancing evenness. This helps with intricate details or complex shapes.
By understanding these lighting techniques, you’ll create stunning, high-converting white background product photos. These principles are the foundation for professional results that showcase your products in their best light.
Camera Settings That Deliver Professional Results
Getting the right camera settings is crucial for elevating your product photos from ordinary snapshots to professional, high-impact images that drive sales. Regardless of whether you're using a simple smartphone or a sophisticated DSLR, understanding these settings—aperture, shutter speed, and ISO—is paramount for achieving perfect exposure and sharpness, especially against a white background.
Mastering Aperture, Shutter Speed, and ISO
Aperture, shutter speed, and ISO form a crucial triad in photography, working in concert to determine the exposure and depth of field. Aperture, measured in f-stops (e.g., f/2.8, f/5.6, f/11), controls the light entering the lens. A lower f-stop (like f/2.8) produces a shallow depth of field, blurring the background and emphasizing the product. This works well for single-item shots. Conversely, a higher f-stop (f/8 or higher) provides a greater depth of field, ensuring everything remains in focus – ideal for multiple products or larger items.
Shutter speed dictates how long the camera's sensor is exposed to light. This setting influences motion blur. Faster shutter speeds freeze action, essential for capturing sharp images of moving subjects, while slower speeds can create artistic blur effects. For still product photography, a shutter speed of 1/125th of a second or faster is usually sufficient to prevent camera shake. If you’re shooting handheld, you might need an even faster speed for sharp results.
ISO gauges the sensitivity of your camera's sensor to light. Lower ISO values (e.g., ISO 100) yield cleaner images with minimal noise, perfect for well-lit studios. Higher ISO settings brighten images in low-light conditions, but at the cost of introducing grain or noise. For white background product photography, aim for the lowest ISO possible while maintaining correct exposure. This balance ensures crisp, clean images that highlight product details.
Focusing For Maximum Sharpness
Accurate focus is essential. Use your camera’s autofocus or manual focus to ensure your product is perfectly sharp. For optimal sharpness, particularly with smaller products, consider focus stacking. This involves capturing several images at different focus points, later merging them in post-processing software like Photoshop to create a composite image with front-to-back sharpness. This technique is especially valuable for showcasing intricate details.
Composition Techniques
Thoughtful composition elevates your product photography. The rule of thirds, a compositional guideline that suggests placing key elements off-center, can create more visually engaging images. Experiment with various angles and perspectives to find the best way to showcase your product's features. A slightly elevated angle, for instance, effectively displays the top and sides of a product.
Advanced Techniques: Exposure Bracketing
Exposure bracketing captures multiple images of the same scene at different exposure levels: one underexposed, one correctly exposed, and one overexposed. Combine these images in post-processing to create a final image with a wider dynamic range, capturing details in both shadows and highlights. This technique is especially beneficial for products with varying tones or reflective surfaces.
By understanding and applying these camera settings and techniques, you can create stunning, professional-quality product photos against a white background. These images will enhance your online listings and significantly boost sales. Remember to test your settings and explore various techniques to determine what best suits your specific product and setup. Attention to these details will dramatically improve the final quality and overall impact of your product images.
Post-Processing Secrets For Flawless White Backgrounds
Even perfectly lit and expertly composed product photos often benefit from post-processing. This final touch elevates good product photography to images that truly sell, attracting online shoppers and boosting conversions. Let’s explore the editing techniques experts use to perfect white background product photography.
Essential Post-Processing Techniques
After shooting your products against a white backdrop, these key editing steps can dramatically improve their appearance:
Background Cleanup: Even with a white backdrop, minor imperfections or shadows can detract from the product. Use tools like the Magic Wand or Background Eraser in Photoshop (or similar features in other software) to create a perfectly clean, distraction-free white background. This makes the product stand out.
Color Correction: Accurate colors are essential for online sales. Correcting any color casts from the shooting process ensures the product’s true colors are represented online. Tools like Levels and Curves in Photoshop, or White Balance adjustments in Lightroom, give you precise control over color and tone, managing customer expectations.
Detail Enhancement: Subtly enhancing details like texture and sharpness can make a product look its best. Sharpening and Clarity tools can achieve this, but avoid over-sharpening, which can create an unnatural look.
Resizing and Cropping: Optimize your images for each online platform's specific image size and aspect ratio requirements. This ensures correct display and fast loading times, improving the customer experience.
Software Options: From Photoshop To Budget-Friendly Alternatives
Photoshop remains an industry standard, but excellent alternatives offer similar capabilities at various price points. GIMP offers powerful tools for background removal, color correction, and detail enhancement. Online tools like Pixlr provide basic editing for quick touch-ups. The best software depends on your budget, skill level, and needs. Check out this helpful resource: How to master product photo editing.
The AI Revolution in Product Photography Editing
AI is changing post-processing. AI-powered tools automate tasks like background removal and color correction, saving time and effort, especially when managing large product catalogs. Some tools can even automatically identify and remove backgrounds with impressive accuracy.
Streamlining Your Workflow With Batch Processing
Batch processing is crucial for handling multiple product images. Many editing programs let you apply the same adjustments (like color correction or resizing) to multiple images at once. This significantly reduces editing time and ensures consistent results across your product catalog.
Before and After: Seeing the Transformation
Post-processing’s impact can be striking. Comparing an unedited image with its final version highlights the improvements. The “before” might look dull and imperfect, while the “after” presents a vibrant, professional image that grabs attention and encourages sales.
| Feature | Before Post-Processing | After Post-Processing |
| Background | Uneven, with shadows and imperfections | Clean, pure white |
| Color | Slightly dull or inaccurate | Vibrant and accurate |
| Details | Less defined | Sharp and clear |
| Overall Impression | Amateurish | Professional and appealing |
This table showcases how post-processing transforms white background product photography. These refinements create a more professional and compelling online product presentation.
Mastering Different Product Categories On White Backgrounds
Product photography, even with a simple white backdrop, requires a nuanced approach. Different product categories present unique challenges. Understanding these nuances is essential for creating images that truly showcase your products and boost sales. This section explores specialized techniques for various product types, highlighting how these approaches can dramatically improve your results.
Jewelry Photography: Capturing Sparkle and Shine
Jewelry photography demands meticulous attention to detail. Capturing the sparkle and shine of precious metals and gemstones without distracting reflections is key. Macro lenses are indispensable for highlighting intricate details. Careful lighting using diffusers and reflectors minimizes harsh reflections. A light tent can create soft, even illumination.
Key Technique: Focus stacking, which combines multiple images taken at different focus points, ensures every detail is perfectly sharp.
Common Mistake: Overexposing the image, washing out the jewelry's sparkle.
Fashion Photography: Showcasing Fit and Form
Fashion photography on a white background aims to showcase the fit, form, and texture of garments. Techniques range from simple flat lays to more complex ghost mannequin methods.
Flat Lay Technique: This involves arranging clothing on a flat surface, carefully smoothing wrinkles and shaping the garment for an appealing presentation.
Ghost Mannequin Technique: Photographing clothing on a mannequin and then digitally removing the mannequin in post-processing creates the illusion of an invisible form, better representing how the clothing would look on a person.
Common Mistake: Inconsistent lighting can lead to uneven shadows and misrepresent color or texture.
Electronics Photography: Managing Reflections
Electronics, with their sleek, often reflective surfaces, present particular lighting challenges. The goal is to showcase the product's key features without overwhelming reflections.
Key Technique: Using polarized light can significantly reduce glare and reflections.
Essential Equipment: A macro lens is helpful for capturing close-up shots of buttons, ports, and other small details.
Common Mistake: Allowing bright light sources to reflect directly off the product, obscuring features.
Food Photography: Making It Irresistible
Food photography aims to make products look fresh and appealing. Lighting and styling are crucial for showcasing texture and creating a mouthwatering image.
Key Technique: Use natural light whenever possible for a fresh, inviting look.
Essential Equipment: A spray bottle with water can add a touch of freshness to produce, while props like cutlery or napkins can enhance the scene.
Common Mistake: Over-styling the food, making it look artificial.
Cosmetics Photography: Emphasizing Texture and Color
Cosmetics photography focuses on texture and color. Macro photography brings out fine details. Accurate color representation is vital for matching customer expectations.
Key Technique: Using a shallow depth of field can highlight the product's texture and draw attention to key features.
Common Mistake: Inaccurate color representation can disappoint customers when the actual product looks different.
Industrial Product Photography: Communicating Quality
Industrial product photography needs to clearly communicate the product's quality, durability, and functionality. Lighting and angles should emphasize construction and design.
Key Technique: Utilizing a variety of angles, including close-ups, demonstrates features and build quality.
Essential Equipment: A tripod is vital for sharp images, especially with longer exposures needed for larger products.
Common Mistake: Not cleaning the product thoroughly before the shoot, diminishing its professional appearance.
To help summarize the key techniques and challenges for each product category, the following table provides a helpful overview:
Product Category White Background Photography Guide: Specific techniques, challenges, and solutions for different product types on white backgrounds.
| Product Category | Main Challenges | Key Techniques | Essential Equipment | Common Mistakes |
| Jewelry | Capturing sparkle and shine without reflections | Macro lenses, diffusers, reflectors, focus stacking | Macro lens, light tent, diffuser, reflector | Overexposure, washing out sparkle |
| Fashion | Showcasing fit, form, and texture | Flat lay, ghost mannequin | Mannequin, styling tools | Inconsistent lighting, uneven shadows |
| Electronics | Managing reflections on sleek surfaces | Polarized light, macro photography | Polarizing filter, macro lens | Bright reflections obscuring features |
| Food | Making food look fresh and appealing | Natural light, styling, props | Spray bottle, props, reflector | Over-styling, artificial appearance |
| Cosmetics | Emphasizing texture and color accurately | Macro photography, shallow depth of field | Macro lens | Inaccurate color representation |
| Industrial Products | Communicating quality, durability, and function | Variety of angles, close-ups | Tripod | Not cleaning the product thoroughly |
This table summarizes the key challenges, techniques, and equipment needed for each product category, along with common mistakes to avoid.
By adapting your white background product photography techniques to each product category, you can create compelling images that highlight key features and drive conversions. These specialized approaches ensure that your visuals accurately represent your products and resonate with your target audience.
Key Takeaways
This guide has explored the world of white background product photography, from its importance to practical techniques. Let's recap the key takeaways to ensure your product images truly shine and boost those sales figures.
The Power of Simplicity
The core purpose of white background product photography is clarity. A clean, uncluttered background directs all attention to your product. This minimizes distractions, simplifies the viewing experience for potential customers, and presents a professional, trustworthy image. This seemingly simple choice has a profound impact on customer perception and purchasing decisions.
Essential Equipment and Setup
Creating a professional photography setup doesn't require a huge investment. Whether you're working with a simple backdrop and clamp lights or a more advanced setup with softboxes and a professional camera, the fundamental principles remain constant: soft, diffused lighting and a clutter-free environment. For insights into professional photography costs, check out this helpful resource: Understanding the costs of professional product photography.
- Invest Wisely: Focus on essential equipment: a good quality backdrop, reliable lighting, and a sturdy tripod.
- Maximize Your Space: With careful planning and organization, even a small space can transform into a functional studio.
- Test and Adjust: Regular testing ensures optimal lighting and backdrop settings for every product.
Lighting: The Key to Professional Results
Lighting is arguably the most crucial element in white background product photography. Mastering soft, diffused lighting is key to minimizing harsh shadows, avoiding color distortions, and achieving that desirable "floating" product effect.
- The Two-Light Setup: Positioning two softboxes on either side of the product often provides balanced illumination.
- Reflective and Transparent Objects: These require particular attention. Employ larger diffusers, backlighting, and strategic positioning to control reflections and clearly define shapes.
- Fine-Tuning: Small adjustments to light intensity and distance can significantly impact the final image.
Camera Settings and Techniques
Optimizing your camera settings is essential for sharp, well-exposed photographs.
- Aperture, Shutter Speed, and ISO: Understanding the interplay of these settings is fundamental for controlling exposure and depth of field.
- Focus: Precise focus is paramount. Utilize autofocus, manual focus, or focus stacking techniques to achieve maximum sharpness.
- Composition: Consider composition techniques, such as the rule of thirds, to enhance visual appeal.
Post-Processing: The Finishing Touch
Even well-shot images can benefit from post-processing.
- Background Cleanup: Achieve a perfectly clean white background.
- Color Correction: Ensure accurate color representation.
- Detail Enhancement: Subtly enhance details like texture and sharpness.
- Batch Processing: Employ batch processing techniques to streamline your workflow, especially when dealing with extensive product catalogs.
Mastering Different Product Categories
Each product category presents its own set of challenges, requiring specific techniques. From jewelry to electronics, food to cosmetics, adapting your approach is crucial for effective product presentation. Understanding the unique requirements of each category will ensure accurate representation and resonate with your target audience. The key is to identify the inherent challenges and adapt accordingly.
Consistency and Scalability
As your business grows, maintaining consistency in your product photography becomes increasingly important. Implementing efficient workflows and using tools that streamline the process, such as AI-powered editing software, is essential for scaling your operations without compromising quality. This consistency builds brand recognition, strengthens customer trust, and contributes to long-term success.
ProdShot simplifies the creation of stunning, professional-quality product photos. Transform your smartphone snapshots into marketplace-ready images in seconds. Start your free trial today!
Subscribe to my newsletter
Read articles from ProdShot Creator directly inside your inbox. Subscribe to the newsletter, and don't miss out.
Written by