OAuth vs. Sender Identities: Which One Should You Use?
 BoldSign
Ever wondered how to securely send eSignatures on behalf of others without sharing your credentials? In this blog, we compare OAuth and sender identities in BoldSign, breaking down their differences in simple terms. Whether you’re a student, business owner, or developer, discover which method best suits your needs for seamless, secure document signing!
What is OAuth?
OAuth is a secure way for apps to access your account information without sharing your password. It uses tokens to grant limited access to specific data.
How it works
The user signs in to their account (e.g., via Google, Facebook, etc.).
They approve what the app can do, like reading emails or making posts.
The app gets a temporary access token (not the user’s password).
The token unlocks only the features that the user is allowed to use, nothing more.
Learn more about OAuth and its flows on our blog.
How is OAuth implemented in BoldSign?
BoldSign uses OAuth to let apps securely interact with its API for sending or signing documents on your behalf.
OAuth Flows in BoldSign
BoldSign supports:
Authorization Code Flow (with PKCE)
Client Credentials Flow (server-to-server communication)
Implicit Flow (for single-page apps)
Set up an OAuth app in BoldSign to enable these flows.
Authorization Code Flow
The BoldSign Authorization Code Flow allows users to log in and authorize an app to act on their behalf. The app receives an authorization code, exchanges it for a token via a secure server, and uses it for API calls. A Proof Key for Code Exchange (PKCE) enhances security for public clients.
How to make an API call using Authorization Code Flow:
1. Set up an OAuth app in BoldSign to get a client ID and client secret. It also defines a redirect URI for user authentication.
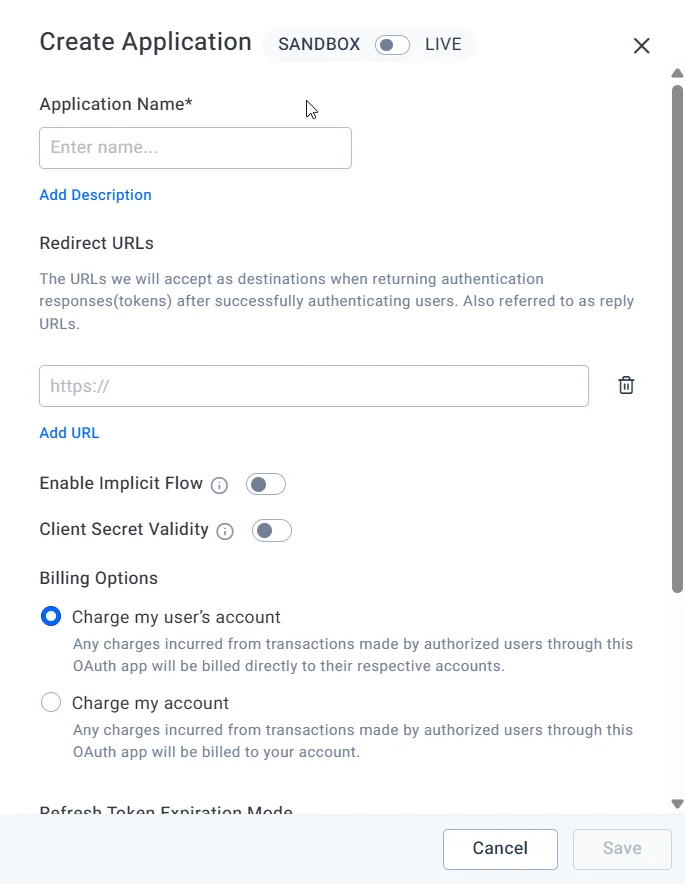
Create OAuth dialog to register app
2. Direct users to the BoldSign login page to sign in and grant your app permission to act on their behalf.
    https://account.boldsign.com/connect/authorize?response_type=code
    &client_id=YOUR_CLIENT_ID
    &state=YOUR_REQUEST_STATE
    &scope=YOUR_SPACE_DELIMITED_SCOPES
    &code_challenge=YOUR_CODE_CHALLENGE
    &code_challenge_method=S256
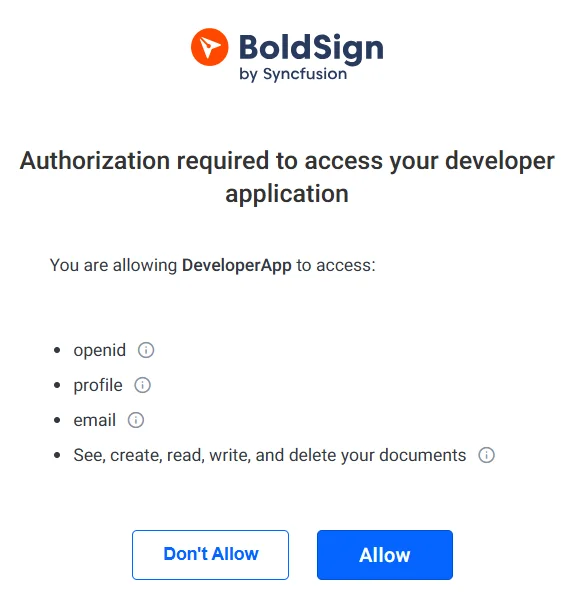
Authorize an app
3. After user approval, BoldSign sends a temporary authorization code to your redirect URI, confirming consent.
https://yourapp.com/callback?state=<your_requested_state>&code=<authorization_code_received>&scope=<your_space_delimited_scopes>&session_state=<session_state_value>

Copy the callback code for authorization
4. Your app sends the code, client ID, client secret, and redirect URI to BoldSign to get an access token and refresh token.
    POST 'https://account.boldsign.com/connect/token'
    -H 'Content-Type: application/x-www-form-urlencoded'
    -d 'grant_type=authorization_code'
    -d 'client_id=<your_client_id>'
    -d 'client_secret=<your_client_secret>'
    -d 'code=<your_auth_code>'
    -d 'redirect_uri=<your_redirect_uri>'
    -d 'code_verifier=<your_code_verifier>'
5. BoldSign delivers an access token to make API calls and a refresh token to maintain access over time.
    {
      "id_token": "<id_token_value>",
      "access_token": "<access_token_value>",
      "expires_in": 3600,
      "token_type": "Bearer",
      "refresh_token": "<refresh_token_value>",
      "scope": "<your_space_delimited_scopes>"
    }
6. Execute API requests by using the access token to interact with the BoldSign API and refresh the tokens to extend access.
const express = require('express');
const axios = require('axios');
const qs = require('querystring');
require('dotenv').config();
 const crypto = require('crypto');
function generatePkcePair() {
    // Generate a code verifier
    const codeVerifier = crypto.randomBytes(32).toString('base64url');
    // Create a code challenge based on codeVerifier
    let codeChallenge = crypto.createHash('sha256').update(codeVerifier).digest('base64url');
    // Return both the code verifier and the code challenge
    return { codeVerifier, codeChallenge };
}
const app = express();
const PORT = process.env.PORT || 3000;

// BoldSign OAuth credentials (stored in .env)
const CLIENT_ID = process.env.BOLDSIGN_CLIENT_ID;
const CLIENT_SECRET = process.env.BOLDSIGN_CLIENT_SECRET;
const REDIRECT_URI = 'http://localhost:3000/callback';
const AUTH_URL = 'https://account.boldsign.com/connect/authorize';
const TOKEN_URL = 'https://account.boldsign.com/connect/token';
const API_URL = 'https://api.boldsign.com/v1/document/send';
const { codeVerifier, codeChallenge } = generatePkcePair();


// Middleware to parse URL-encoded bodies
app.use(express.urlencoded({ extended: true }));

// Step one: Redirect to BoldSign® authorization URL
app.get('/login', (req, res) => {
 const authUrl = `${AUTH_URL}?response_type=code&client_id=${CLIENT_ID}&redirect_uri=${REDIRECT_URI}&scope=openid profile email offline_access BoldSign.Documents.All&code_challenge=${codeChallenge}&code_challenge_method=S256`;
res.redirect(authUrl);
});

// Step two: Handle callback and exchange code for token
app.get('/callback', async (req, res) => {
 const { code } = req.query;
 if (!code) {
   return res.status(400).send('Authorization code not provided');
 }
 try {
   const response = await axios.post(
     TOKEN_URL,
    qs.stringify({
       grant_type: 'authorization_code',
       code,
      redirect_uri: REDIRECT_URI,
       client_id: CLIENT_ID,
      client_secret: CLIENT_SECRET,
       code_verifier: CodeVerifier,
     }),
     { headers: { 'Content-Type': 'application/x-www-form-urlencoded' } });
   const { access_token } = response.data;

   // Step three: Use the access token to send a signature request
   const signatureRequest = await sendSignatureRequest(access_token);
  res.send(`Document sent for signature! Request ID: ${signatureRequest.documentId}`);
 } catch (error) {
  console.error(error.response?.data || error.message);
  res.status(500).send('Error during authorization');
 }});

// Function to send a signature request using the BoldSign® API
async function sendSignatureRequest(accessToken) {
 const documentData = {
   title: 'Customer Agreement',
   files: ["data:application/{{fileType}};base64,{{base64FileContent}}"], // Your file in base64 format
   signers: [{
       name: 'Customer Name',
      emailAddress: 'customer@example.com',
      signerOrder: 1,
       formFields: [{
           id: 'signature1',
          fieldType: 'Signature',
          pageNumber: 1,
           bounds: { x: 100, y: 100, width: 200, height: 50 },
          isRequired: true,
         }]
     }],
 };

 const response = await axios.post(API_URL, documentData, {
   headers: { Authorization: `Bearer ${accessToken}`, 'Content-Type': 'application/json' }
 });
 return response.data;
}

// Start the server
app.listen(PORT, () => { console.log(`Server running on http://localhost:${PORT}`); });
7. Use the refresh token to obtain a new access token when the current one expires, ensuring continuous app authorization.
    POST 'https://account.boldsign.com/connect/token'
         -H 'Content-Type: application/x-www-form-urlencoded'
         -d 'grant_type=refresh_token'
         -d 'client_id=<your_client_id>'
         -d 'client_secret=<your_client_secret>'
         -d 'refresh_token=<your_refresh_token>'
Client Credentials Flow
This flow enables server-to-server communication in BoldSign without user involvement. The app uses its client ID and secret to obtain a token for direct API access, which is ideal for automated tasks like sending onboarding documents.
How to make an API call using Client Credentials Flow
1. Create an OAuth app in BoldSign to obtain a client ID and client secret, configurable for sandbox or production environments.
Create OAuth dialog to register an app
2. Your app sends a POST request to the BoldSign token endpoint with the client ID, client secret, and scopes like BoldSign.Documents.All.
    POST 'https://account.boldsign.com/connect/token'
         -H 'Content-Type: application/x-www-form-urlencoded'
         -d 'grant_type=client_credentials'
         -d 'client_id=<your_client_id>'
         -d 'client_secret=<your_client_secret>'
         -d 'scope=<your_scopes>'
3. BoldSign validates your credentials and provides an access token that’s active for a limited duration.
    {
      "access_token": "<access_token_value>",
      "expires_in": 3600,
      "token_type": "Bearer",
      "scope": "<your_scopes>"
    }
4. Use the access token in API requests to perform actions like sending documents or retrieving statuses.
const axios = require('axios');

// Configuration
const clientId = 'your-client-id'; // Replace with your BoldSign Client ID
const clientSecret = 'your-client-secret'; // Replace with your BoldSign Client Secret
const tokenUrl = 'https://account.boldsign.com/connect/token';
const apiUrl = 'https://api.boldsign.com/v1/document/send';

// Function to get access token using the Client Credentials flow
async function getAccessToken() {
 try {
   const authString = Buffer.from(`${clientId}:${clientSecret}`).toString('base64');
   const response = await axios.post(
     tokenUrl,
     new URLSearchParams({ grant_type: 'client_credentials', scope: 'BoldSign.Documents.All BoldSign.Templates.All', client_id: clientId, client_secret: clientSecret }),
     { headers: { Authorization: `Basic ${authString}`, 'Content-Type': 'application/x-www-form-urlencoded', }, }
   );
   return response.data.access_token;
 } catch (error) {
  console.error('Error fetching access token:', error.response?.data || error.message);
   throw error;
 }}

// Function to create and send a document
async function createAndSendDocument(accessToken) {
 try {
   const response = await axios.post(
     apiUrl,
  {
      title: 'Customer Agreement',
      files: ["data:application/{{fileType}};base64,{{base64FileContent}}"], // Your file in base64 format,
      signers: [{
        name: 'Customer Name',
        emailAddress: 'customer@example.com',
        signerOrder: 1,
         formFields: [{
            id: 'signature1',
            fieldType: 'Signature',
            pageNumber: 1,
            bounds: { x: 100, y: 100, width: 200, height: 50 },
            isRequired: true,
        }]
     }],
  },
     { headers: { Authorization: `Bearer ${accessToken}`, 'Content-Type': 'application/json', }}
   );
  console.log('Document created successfully:', response.data.documentId);
   return response.data.documentId;
 } catch (error) {
  console.error('Error creating document:', error.response?.data || error.message);
   throw error;
 }}

// Main function to execute the flow
async function automateDocumentProcessing() {
 try {
   // Step 1: Get access token
   const accessToken = await getAccessToken();
   // Step 2: Create and send document
   const documentId = await createAndSendDocument(accessToken);
  console.log('Document processing initiated. Document ID:', documentId);
 } catch (error) {
  console.error('Automation failed:', error);
 }
}
// Run the automation
automateDocumentProcessing();
5. Request a new access token with your client ID and client secret when the current one expires, as this flow does not include a refresh token.
Implicit Flow
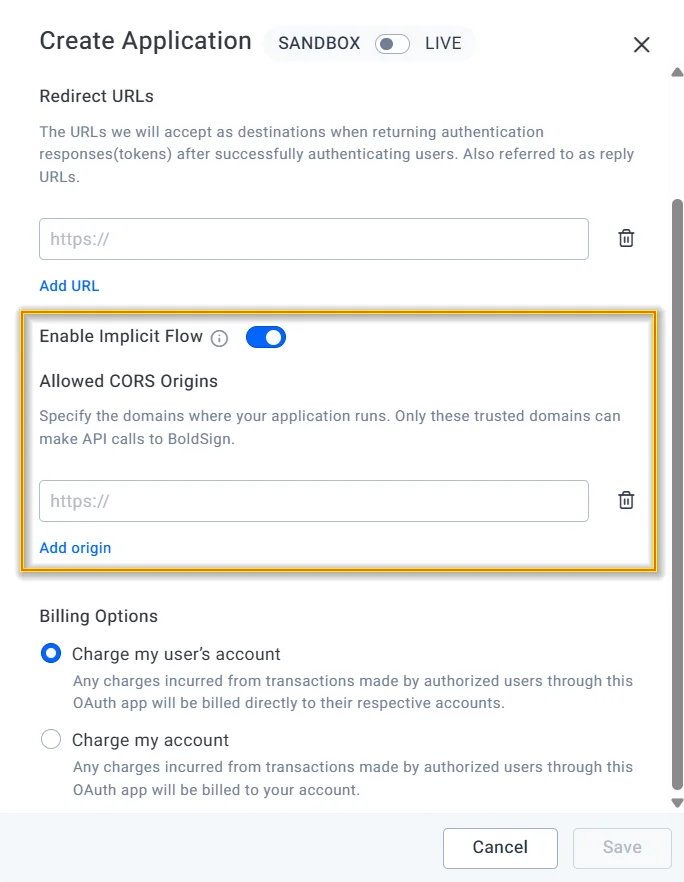
The BoldSign Implicit Flow is designed for client-side apps like single-page web apps, since it delivers tokens directly via the browser. It’s simpler but less secure, requiring CORS settings for specified domains to enhance safety.
How to make an API call using Implicit Flow
1. Create an OAuth app in BoldSign to get a client ID and client secret. Define a redirect URI and configure CORS domains for secure access.
Create OAuth dialog to register an app
2. Direct the user to the BoldSign authorization URL with parameters like response_type=token and scopes (e.g., BoldSign.Documents.All) for login and consent.
    https://account.boldsign.com/connect/authorize
    ?response_type=token
    &client_id=<your_client_id>
    &state=<your_request_state>
    &scope=<your_space_delimited_scopes>
    &redirect_uri=<your_redirect_uri>
    &nonce=<your_nonce_value>

Authorize app
3. After user approval, BoldSign redirects to your app’s URI, embedding the access token in the URL fragment for immediate use.

Get access token via callback URL
4. Extract the access token from the URL and use it to make API requests like sending documents or embedding a signature widget in your app.
<!DOCTYPE html>
<html lang="en">
<head>
   <meta charset="UTF-8">
   <meta name="viewport" content="width=device-width, initial-scale=1.0">
   <title>BoldSign Quick Signature Widget - OAuth Implicit Flow</title>
   <style>
      #signature-widget { width: 100%; height: 400px; border: none; }
      button { padding: 10px 20px; margin: 10px 0; }
   </style>
</head>
<body>
   <h2>Quick Signature Widget with BoldSign</h2>
   <button onclick="startOAuthFlow()">Sign Document</button>
   <iframe id="signature-widget" style="display: none;"></iframe>
<script>
// BoldSign OAuth settings
       const clientId = ‘’; // Replace with your BoldSign OAuth client ID
       const redirectUri = 'http://localhost:3000/callback'; // Replace with your registered redirect URI
       const scope = 'BoldSign.Documents.Create'; // Scope for creating documents
       const authorizeUrl = 'https://account.boldsign.com/connect/authorize';
       const documentId = 'e94ef46d-abf6-4a57-a87e-71bdb3e14352'; // Replace with your document ID.

       // Step 1: Start OAuth Implicit Flow
       function startOAuthFlow() {
           const authUrl = `${authorizeUrl}?response_type=token&client_id=${clientId}&redirect_uri=${redirectUri}&scope=${scope}&state=xyz123&nonce=abc456`;
          window.location.href = authUrl; // Redirect to BoldSign for user consent
       }

       // Step 2: Handle the redirect and extract access token from URL fragment
       function handleCallback() {
           const hash = window.location.hash.substring(1); // Remove the '#' from URL fragment
           const params = new URLSearchParams(hash);
           const accessToken = params.get('access_token');

           if (accessToken) {
            openSignatureWidget(accessToken);
           } else {
              console.error('No access token found in URL');
           }
       }

       // Step 3: Open the BoldSign® Signature Widget in a new tab with the access token
       function openSignatureWidget(accessToken) {
           const widgetUrl = `https://app.boldsign.com/document/sign?access_token=${accessToken}&documentId=${documentId}`;
           window.open(widgetUrl, '_blank');
       }

       // Check if this is the callback page
       if (window.location.hash) {
          handleCallback();
       }
   </script>
</body>
</html>
What are Sender identities?
Sender identities let you send communications like emails or documents on behalf of another person using their name and email. This “on behalf” feature makes it appear as though the named sender initiated the action, which is ideal for authorized representation.
How it works:
Register a user’s name and email as a sender identity.
The user approves your request to act on their behalf.
You send communication using their identity.
The communication shows their details, but you control the process.
How are sender identities implemented in BoldSign?
In BoldSign, sender identities are set up through the web app or API, enabling you to send eSignature documents as someone else with their permission. It simplifies team workflows and client management, using their email as the sender, and they don’t need a BoldSign account. You can customize notifications and revoke access for security.
How to create sender identities in the BoldSign web app
1. Sign in to your BoldSign account using the web app.
2. Go to API > Sender Identities.
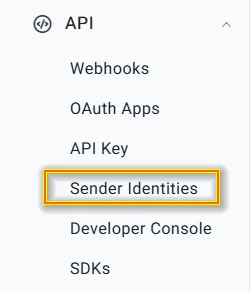
Go to sender identities from the web app under API
3. Enter the sender’s name and email.
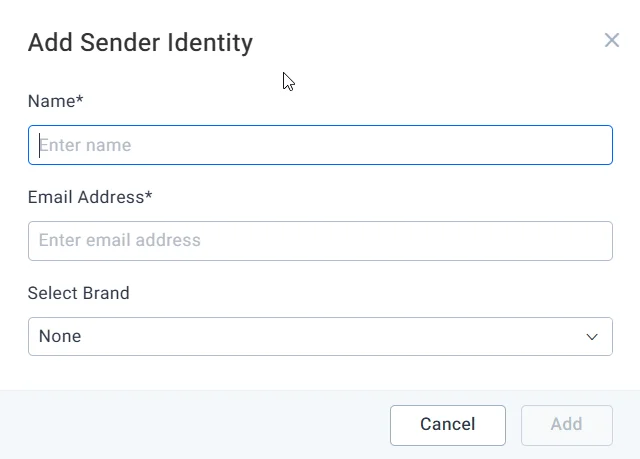
Add sender identity user details
4. BoldSign emails the person a link to review and approve your request to send on their behalf.
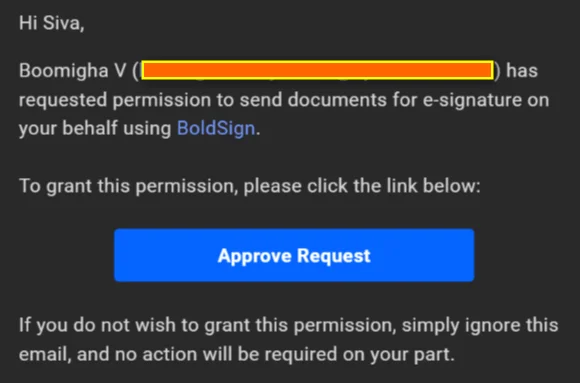
User receives notification for approval request
5. Once they approve, you’re notified and can start sending documents under their name and email.
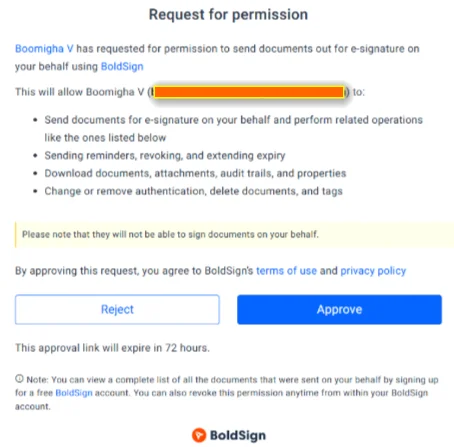
Before approval, permissions were listed
Notification after approval:
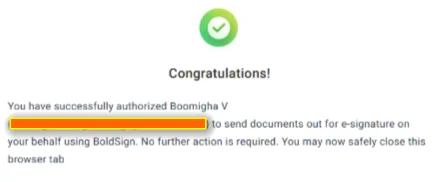
Notification of the approval by sender identity user
It’s simple, requiring just a few clicks, and easy for anyone to use—no tech skills needed.
How to create sender identities via the BoldSign API
Developers can use the BoldSign API to create sender identities, which is perfect for automating tasks in apps like CRMs or custom platforms. Just send a request with the sender’s name, email, and optional notification settings like alerts for document views or completion. To create a sender identity via the API:
Use your API key to send a POST request with the sender’s details.
The sender approves the request via email.
Once approved, the identity is ready for use in your app.
    curl -X 'POST' \
    'https://api.boldsign.com/v1/senderIdentities/create' \
    -H 'accept: */*' \
    -H 'X-API-KEY: {your API key}' \
    -H 'Content-Type: application/json' \
    -d '{
      "name": "Luther Cooper",
      "email": "luthercooper@cubeflakes.com",
      "redirectUrl": "https://yourapp.com",
      "brandId": "{brandID}",
      "notificationSettings": {
        "viewed": true,
        "sent": false,
        "completed": true
      }
    }'
Sending documents on behalf of others using sender identities
With an approved sender identity, you can send eSignature documents on behalf of someone else using their email. This is great for multi-user setups, like businesses managing client contracts. Simply add the sender’s email in the API’s “onBehalfOf” field when sending a document. It will appear to come from their email, but you’ll handle the process. The API supports both JSON and form-data formats for flexibility.
    curl --location --request POST 'https://api.boldsign.com/v1/template/send?templateId=<template_ID>'
    --header 'X-API-KEY: {your API key}'
    --header 'Content-Type: application/json'
    --data-raw '{
      "onBehalfOf": "luthercooper@cubeflakes.com"
    }'
Please refer to this documentation for more details: Send a document on someone’s behalf. To learn more about using sender identities in the API, please refer to this blog.
A side-by-side comparison of OAuth and sender identities
| Aspect | OAuth | Sender Identities |
| Purpose | Authenticate and authorize API access to BoldSign resources (e.g., documents, templates) | Delegate authority to send eSignature documents on behalf of another user or entity |
| Scope | Controls what API resources the app can access | Defines who can send documents using another person’s name and email |
| Set up | Needs technical setup with tokens and app IDs | Easy set up via web or API; no tech skills required |
| How it works | Uses tokens to authorize API calls after user login | Requires email approval from the person to send as them |
| Main use | Automates workflows for apps or integrations | Streamline document workflows for teams or assistants sending on behalf of others |
| Authentication | Token-based (Bearer tokens) with scopes like offline_access | Approval-based, no direct authentication for the delegate beyond initial setup |
| Security | Uses secure token and PKCE; refresh tokens reduce the need for repeated user logins | Owners can revoke access via email or web app (if they have an account in BoldSign) |
| Account needs | Requires a BoldSign account and license for each user | No BoldSign account needed for the person you send on behalf of |
Key takeaway: Use OAuth for secure, automated API access; choose sender identities for easy, account-free delegation of document sending.
When to use OAuth vs. Sender identities
| Aspect | OAuth | Sender identities |
| Use when | 1. Building apps that connect to BoldSign (like sending documents from CRM). |
2. Apps need secure access to BoldSign without sharing passwords.
3. You need long-term access without repeated logins. | 1. Sending documents like someone else.
2. Documents must show the sender’s name and email.
3. Teams share sending tasks or need clear records of who approved. |
| Use-case example | A company’s HR app uses OAuth to connect with BoldSign, automatically sending and tracking contracts for HR managers. | An assistant sends contracts as the CEO. After the CEO approves, the assistant uses sender identities to send documents that look like they’re from the CEO. |
Quick Tip: Choose OAuth for app integrations and automation; use sender identities to send documents as someone else with their permission.
Pros and cons of OAuth
Pros
Secure: OAuth uses tokens for safe access, reducing password risks.
Scalable: It’s great for big apps that connect to BoldSign like CRMs.
Flexible: This option works for different app types with long-term access.
Cons
Complex: You’ll need some technical know-how to set up and manage OAuth.
Time-consuming: Initial setup takes effort, like configuring IDs and URLs.
Maintenance: Tokens expire and need refreshing or reregistering, which can be tricky.
Pros and cons of sender identities
Pros
Easy: Identities are simple to set up via web or API—no tech skills needed.
Professional: Documents show the sender’s name and email.
Trackable: Approvals and revocations keep actions clear and secure.
Cons
Approval wait: Delays can occur if the sender doesn’t approve quickly.
Oversight needed: You’ll have to monitor permissions to prevent misuse.
Quick tip: OAuth is best for tech-savvy users building automated apps, while sender identities are ideal for users with less technical know-how who need to send documents as someone else with approval.
Which is better: OAuth or sender identities in BoldSign?
OAuth is best when:
You’re building an app like a CRM that automatically sends or manages documents in BoldSign.
You need secure, long-term access to BoldSign features without repeated logins.
You’ve got a technical setup.
We recommend you avoid OAuth if you just need to send documents manually or aren’t tech-savvy.
Sender identities are best when:
You want to send documents as someone else (an assistant sending for a manager, for example).
The sender’s email should appear on documents for branding.
You need a simple setup for teams with clear approval records.
We recommend you avoid sender identities if waiting for sender approval is an issue or if you need advanced app features.
Quick tip: Pick OAuth for tech-heavy automation and sender identities for easy, team-based sending. If you’re unsure, sender identities are simpler for most users!
Conclusion
OAuth is perfect for developers automating BoldSign tasks via apps, while sender identities make it easy for anyone to send documents as someone else with approval. Choose what fits your needs and streamline your eSignature process with BoldSign! Try BoldSign today to start sending securely!
Related blogs
Introducing BoldSign Node.js SDK for effortless E-Signature integration
How to Use BoldSign OAuth 2.0 for Seamless Application Integration
Note: This blog was originally published at boldsign.com
Subscribe to my newsletter
Read articles from BoldSign directly inside your inbox. Subscribe to the newsletter, and don't miss out.
Written by
BoldSign
BoldSign
BoldSign is a secure, legally compliant e-signature solution for businesses and individuals. It simplifies document signing with a user-friendly platform and powerful API & SDK for easy integration. Send, sign, and manage contracts effortlessly.