🚀 My DevOps Journey: Week 1 — From Architecture to Linux, Build Systems, and Web Servers
 Anandhu P A
Hi everyone! 👋
This is my first blog in my Learning in Public DevOps journey. I started this on June 3rd, and Week 1 was 4 days long. I am sharing what I learned — not just tools, but how they all fit together across the software development lifecycle (SDLC).
🗺️ Why I Chose DevOps (Not Flutter)
I had a foundation in Flutter and could have tried applying for Flutter jobs.
But I realized that I am more passionate about how apps run on servers, how infra scales, and how automation happens behind the scenes — not just building UIs.
So instead of going for a Flutter job and trying DevOps part-time, I chose to go all-in on DevOps because that’s where I want to grow long-term.
🌟 Week 1 Learning
🏛️ 12-Factor App Methodology (Day 1)
The 12-Factor methodology outlines clear guidelines for developers, architects, and DevOps engineers who aim to create high-performance applications in the cloud. Imagine having a brilliant idea and building an application to share that vision with the world. In the past, launching an application involved overcoming numerous obstacles such as long waiting periods for a dedicated server. Once acquired, that server was permanently tied to your application, and scaling meant adding more resources to that single machine. This is often referred to as Vertical Scaling. Often, session data was stored locally, meaning that if the server failed, user progress was lost, and users had to restart from scratch.
Fast forward to today. High-growth SaaS startups can see user numbers rise from zero to millions in mere months. Thanks to modern cloud platforms, provisioning and hosting resources can take minutes—or even seconds. With Platform-as-a-Service (PaaS) and serverless technologies, you simply write your code, push it, and see it live. These cloud platforms almost never go down.
In earlier architectures, scaling was done through vertical scaling like I said before. But it will often lead to a problem that the application needs to be taken offline for upgrades. Modern applications, however, scale horizontally by adding more servers and adding additional instances of the application. So, whenever we want to upgrade a server, all the other instances running on the other servers will make it easier to take the application offline on 1 server that needs an upgrade. This is why Horizontal Scaling is preferred over Vertical Scaling.
A decade ago, engineers at Heroku distilled a set of guiding principles for building modern applications, known today as the 12-Factor App. These twelve principles provide a blueprint for creating scalable, resilient, and maintainable applications.
The 12 principles that the 12-Factor App mentioned to make an application ready for cloud are:
1️⃣ Codebase
One codebase per app, shared by all environments. If your app’s GitHub repo is used for dev, staging, prod — same code should be used on all the stages but different deploys.
2️⃣ Dependencies
Declare all dependencies explicitly — no hidden ones. A requirements.txt (Python) or package.json (Node.js) lists packages. you don’t assume they exist on the server. These files will help to install the dependencies for the application more easily.
3️⃣ Config
Store config in environment variables, not in code. These environment variables maybe different for different stages in the SDLC. So, separating it in a separate file is essential. Database passwords can be stored in .env file. For example, data like DB_PASS=securepass should be stored in a .env and not inside your code file.
4️⃣ Backing Services
Treat external services (DB, Redis, queue) as separate attached resources. If your app connects to a PostgreSQL DB via DATABASE_URL variable which is available in the .env file, if the DB needs to be swapped, it can be easily done without changing the code.
5️⃣ Build, Release, Run
Keep build, release, run stages separate.
Build: Compile Java and get a
.jarfile.Release: Combine build + config file for the release version
Run: Start the app using release artifacts.
This allows rollback if a release has bugs.
6️⃣ Processes
The Application must be stateless that means no data should be hardcoded in the code and developers should consider storing state in DB or cache. User login session is stored in Redis, not in app memory. So, multiple app instances can handle the user.
7️⃣ Port Binding
App must serve HTTP directly on a port. A Flask app runs on port 5000 → http://localhost:5000 which means no Apache or Nginx inside the app. External reverse proxy is optional.
8️⃣ Concurrency
App should support scaling by running multiple instances on different servers. For example, Running 5 instances of your app behind a load balancer and each one stateless and independent. With this, when more users come to access the application that 1 server can’t handle, it then can access the application through other instances of the application in other servers. A Load Balancer helps in assigning instances to users trying to access the application. There will also be some problems that will occur when we do it. If a user has previously connected to one server, then the sessions will be stored in that server only. So, when the load balancer switches that user from an instance in a server to another, the sessions may be lost. To resolve that, techniques like Sticky Sessions are used where the load balancer automatically switches a user to a specific server that has the user’s sessions only when a request comes from that user. This technique is not approved by the 12-Factor Application. So, as mentioned before, all state information should be stored in external backing services, allowing all processes to access uniform data regardless of which instance handles a given request (Factor 4).
9️⃣ Disposability
App must start fast, shut down cleanly. If a container gets a SIGTERM, the app stops gracefully that means finishing any tasks that is currently running, then shuts down quickly but after the SIGTERM signal is given and the application is not shutdown within a specific time frame, a SIGKILL signal forcefully shutdown the application. This is important for scaling and resilience.
🔟 Dev/Prod Parity
Keep dev and prod environments as similar as possible.
For Example,
Dev uses PostgreSQL, Prod should also use PostgreSQL (not SQLite).
Dev uses Linux then ideally Prod should too.
This avoids "it works on my machine, not on production" bugs.
1️⃣1️⃣ Logs
App should stream logs to stdout and SHOULD NOT manage log files manually. For Example, Flask app uses print() or logger to the stdout which then is captured by Docker and then it is sent to centralized logging tools (ELK, Grafana Loki).
1️⃣2️⃣ Admin Processes
Run one-off admin tasks in an identical environment. For Example, you run a DB migration script, it should be run as a short-lived process using the same config/env as the app.
By learning the 12-Factor Application, I realized how this architecture supports scalability & cloud-readiness and also learned how these principles relate to DevOps practices like Docker & Kubernetes.
Challenges that I faced while learning the 12-Factor Application:
I thought all the factors had standalone principles and then came to know that all the factors are somewhat connected together. One example might be that one codebase supports multiple deploys which in turn related to the Build/Release/Run separation and also the Dev/Prod Parity. And also, the Stateless nature of a Process will help in the Concurrency of the application.
I had a confusion that: “Are databases just packages installed via .env files?” and then came to know that .env files store configurations for the external backing services like Redis and DB which is installed in the Backing Services factor.
I also had some confusions like “What is the difference between dependencies and backing services? Can’t they be separated with a single file? Why separate file of Dependencies and Backing Services?”. I then came to know that dependencies are Libraries/packages inside your app like Flask, Pandas, etc. which can be installed from the requirements.txt file and Backing services are External resources your app connects to like PostgreSQL, Redis, S3. It is accessed via the network and stores in the .env files
I also had a question on “If admin process resets something, will it affect only one instance?”. I researched about it and found out that the admin process is configured to run on the shared DB like Redis. So, that will reset the variables of functions in all the instances and if the admin process is configured to run on an application instance which I thought what an admin process pushes a reset on, then it will only affect that instance locally.
🔗 How DevOps Tools Connect Across the Pipeline (Day 1)
Let’s learn where all the DevOps Tools clicks in with a small story of developing an application. Let us consider a developer developing a small application. Now, the developer can only access the application in this own laptop or what we can call his local environment. He needs to deploy it to a server to make the application public so that others can see the work of the developer. So, he buys an IP maybe of Cloud or not as well. This is where Cloud Platforms like AWS, Microsoft Azure, Google Cloud Platform comes in. After getting an IP, to make the website easier to locate, he purchases a domain name and links the domain name to the purchased IP address, and he can host the application on that IP address (Use DNS to map a domain name to the server's IP).
Now when the application needs to be scaled, more developers come to help him, and all the developers should be able to work on the same codebase on remote locations. That’s where GIT/Version Control and Remote Repositories like GitHub comes in. Multiple developers can work on a same codebase using Git and GitHub.
Now, when there is multiple developers, code integration is done through GitHub and now building the application will not be possible as the latest files of the applications are located in different local environments of the developers working on it. So, there exists the need for a build server, then to test the application after build, a test server is needed and the after the testing is done, a production server is needed where all the security policies are implemented, scalability is implemented and all that.
Now, there comes a problem that all these stages should have the environment that is same for all the servers. i.e., build, test and production. The dependencies and backing services that is installed on the developers’ local environment should also be installed on all these server environments. Manually setting up and installing all these dependencies in all the servers is a hectic and error prone task. These we use the technology of Containerizations like Docker. In Doctor, we can create a Docker image includes your app, Python/Node environment, packages and dependencies that the application needs. now we can just run this docker image on all the servers to get the same environment for all the servers without manually installing all the dependencies on each server.
Now with this, we need to manually move the application from the GitHub to the build server, then after build to the test server, then after testing to the production server. This would make the company to only do this production process only once a week. This is not at all acceptable when even a small bug fix would require a whole week to be set for production. This is where automating this with CI/CD Tools like Jenkins, GitHub Actions, etc. comes in. They detect code pushes to GitHub, then Trigger pipeline from build to test then to deploy.
When there is high traffic in production server, scaling is required. Horizontal Scaling should be implemented, multiple instances of application and docker containers/images should be implemented. That is where Container Orchestration Tools like Kubernetes is implemented. With Kubernetes, it creates multiple instances (pods) of your container, scales up/down automatically, restarts failed containers, Balances load between them, etc.
Now for repeating the creation of an infrastructure like this for multiple tasks is very time consuming. Thats where Infrastructure-as-Code tools like Terraform is used. Terraform helps to write config files to define cloud infrastructure and can recreate or duplicate infra anytime, anywhere.
Now to setup configurations of all the infrastructure that is provisioned by the Terraform, we use automation tools like Ansible. Ansible helps us to automate software install, package setup, and server config and can work with cloud VMs, containers, bare metal.
Ansible and Terraform has many functions that overlaps with each other. But in simple words we can say that - Terraform is the technology that is better for provisioning the infrastructure (create cloud servers and databases) and Ansible is the technology that is better for configuring the infrastructure (install software, copy files, set permissions).
Now, we also need to monitor traffic and other metrics of the application. For that we use monitoring tools like Grafana and Prometheus. Use Prometheus to collect metrics (CPU, RAM, app health). Use Grafana to visualize them, Alerts can be triggered when thresholds are crossed.
Challenges while learning about the DevOps Tools:
I had some confusions regarding the overlapping between Terraform and Ansible. I thought Terraform is used to create an infrastructure and Ansible makes infrastructures automatically when needed. Then, later came to know that Terraform provisions the servers/defines like build, test and production and Terraform does not install things inside those servers like Docker, Nginx, or code - It is the job of Ansible and Ansible configures the infrastructure that is provisioned by Terraform. Ansible Install Docker, Python, Nginx, etc. and also Copy application code, Restart services, Setup environments after servers are provisioned. Its like Terraform creates empty houses🏠, Ansible adds furniture, lights, paint, appliances 🪑💡🖥️.
🐧 Linux Essentials, Services & Networking (Day 2)
Learned some Absolute Basic Linux commands like cd, ls, mkdir, touch, echo, cp, mv (moving and renaming), rm etc. Then learn a little bit more advanced commands I think like tree to show a directory in a tree format, -p argument for mkdir to make directories in tree format even if some directories do not exist, do it by creating that also. For example, if I only have a directory called map in the current directory, then mkdir -p map/asia/india/kerala/tvm.txt will create all the directories inside map with the hierarchy that I mentioned, -r argument to go recursive. For example, cp -r map/asia/india/kerala /home/user/ will copy the kerala directory to the user home. I also learned to use the Linux console editor - VI Editor. There are 2 modes - command mode and insert mode, default mode will be command mode, to switch from command mode to insert mode, i can be used, to switch from insert mode to command mode esc can be used, to save the file, go to command mode and type :w, for quitting the editor use :q in command mode, :wq for same and quit, yy to copy a line, dd to cut or delete a line, p to paste a line, x to delete a single character, u to undo, Ctrl + r to redo the change, etc. I also learned some user management in Linux, root user, and sudoers, commands like whoami, id, su, ssh, sudo, wget, ping, curl, then learned about rpm-based package managers like yum after learning rpm itself like using -i for install, -e for removing, -q for querying the information of already installed packages. for yum, I learned the basic install command, repolist command to see the repositories available in yum within the system itself, remove command. I also learned about services and how to start and stop a service using commands like service start httpd and service stop httpd also some more advanced commands with systemctl which helps us to start, stop, enable services when system boots up as well as disable services. commands like - systemctl start httpd, systemctl stop httpd, systemctl enable httpd, systemctl disable httpd. I also learned some advanced things which I think it is like converting an application into service. For example, if a python program is created, we can make it into a service by creating a my_app.service file or any filename in the /etc/systemd/system directory. The service file has 3 parts (or maybe i learned only 3) - [Unit], [Service] and [Install]. In [Unit] section, we just define the description and more details about the service. In [Service] section, we use the ExecStart directory to mention the command that needs to be used to start the application, and optional commands that run before or after starting the service can be mentioned in the ExecStartPre and ExecStartPost directives respectively. The [Install] section is used when we need to enable the service when system boots up. In that case we need to configure the service to begin when the system reaches a specific stage during the boot sequence using a WantedBy directive.
One of the example .service file that I created:
[Unit]
Description=My Python Web Application


[Service]
ExecStart=/usr/bin/python3 /opt/code/my_app.py
ExecStartPre=/opt/code/configure_db.sh
ExecStartPost=/opt/code/email_status.sh
Restart=always


[Install]
WantedBy=multi-user.target
This will configure the service to begin when the system reaches the multi-user target during the boot sequence.
To make this into effect, reloading systemd to register is requires. To do that we can use the command: systemctl daemon-reload
Linux Networking
Then I learned some absolute basic Linux Networking. I learned how switches are used to connect multiple devices in the same network using the IP addresses of a same interface. switches cannot be used to communicate outside the network and should be with same network interface. We can use the command ip link to see the interfaces available in the system, ip addr add IP/SUBNET_MASK dev INTERFACE for example: ip addr add 192.168.1.10/24 dev eth0.
To connect devices in different networks, we use routers. A router will have an IP address on both the networks which are different, and the router will just behave as another normal node/device that is connected to a network. So, how does a node in a network know that it can reach to another network using the router? which is just another device in the view of the node which needs to connect to the outside network. To do that, we need to configure the kernel routing table and make the router as a gateway to the network 2. We can use the route command to see the current kernel routing table. To add an entry to the routing table, we can use the command: ip route add IP/SUBNET_MASK via ROUTER_IP. For Example: ip route add 192.168.2.0/24 via 192.168.1.1. NOTE: Here 192.168.1.1 is the IP of router in the network we are configuring for. The router may have a different IP in the network which we are trying to connect.
When systems need Internet access, such as reaching Google within the 172.217.104.0 network, the router connected to the Internet must be designated as the default gateway. To set up a default route, use:
ip route add default via 192.168.2.1
Both the "default" keyword and the "0.0.0.0" entry function as catch-all destinations for packets that do not match more specific routes.
After this, I learned about basic DNS functions. DNS is used to assign domain names to IP Addresses so that we never need to remember IP Addresses of all the websites that we need to visit.
Suppose a system in your network provides database services and you want to refer to it by an easy-to-remember name like "db". Attempting to ping "db" immediately, however, results in an unknown host error. To resolve this, add an entry to the /etc/hosts file on system A to map the IP address to the name "db" like: 192.168.1.11 db which will create a local DNS.
You can also add multiple aliases for the same IP address. For instance, to associate a system with both "db" and "www.google.com", update the /etc/hosts file as follows:192.168.1.11 www.google.com 192.168.1.11 db
Centralizing DNS with a DNS Server
To simplify name resolution in larger networks, you store these mappings on a single DNS server. For example, consider these entries on your centralized DNS server:192.168.1.10 web 192.168.1.11 db 192.168.1.12 nfs 192.168.1.20 web 192.168.1.21 db-1 192.168.1.22 nfs-1 192.168.1.31 web-1 192.168.1.32 db-2 192.168.1.40 web-2 192.168.1.41 sql 192.168.1.42 web-5 192.168.1.61 web-test 192.168.1.63 db-prod 192.168.1.64 nfs-4 192.168.1.60 web-3 192.168.1.62 nfs-prod
Configure each host on your network to use this DNS server for name resolution by specifying its IP address in the /etc/resolv.conf file. For example, if your DNS server’s IP address is 192.168.1.100, add:nameserver 192.168.1.100
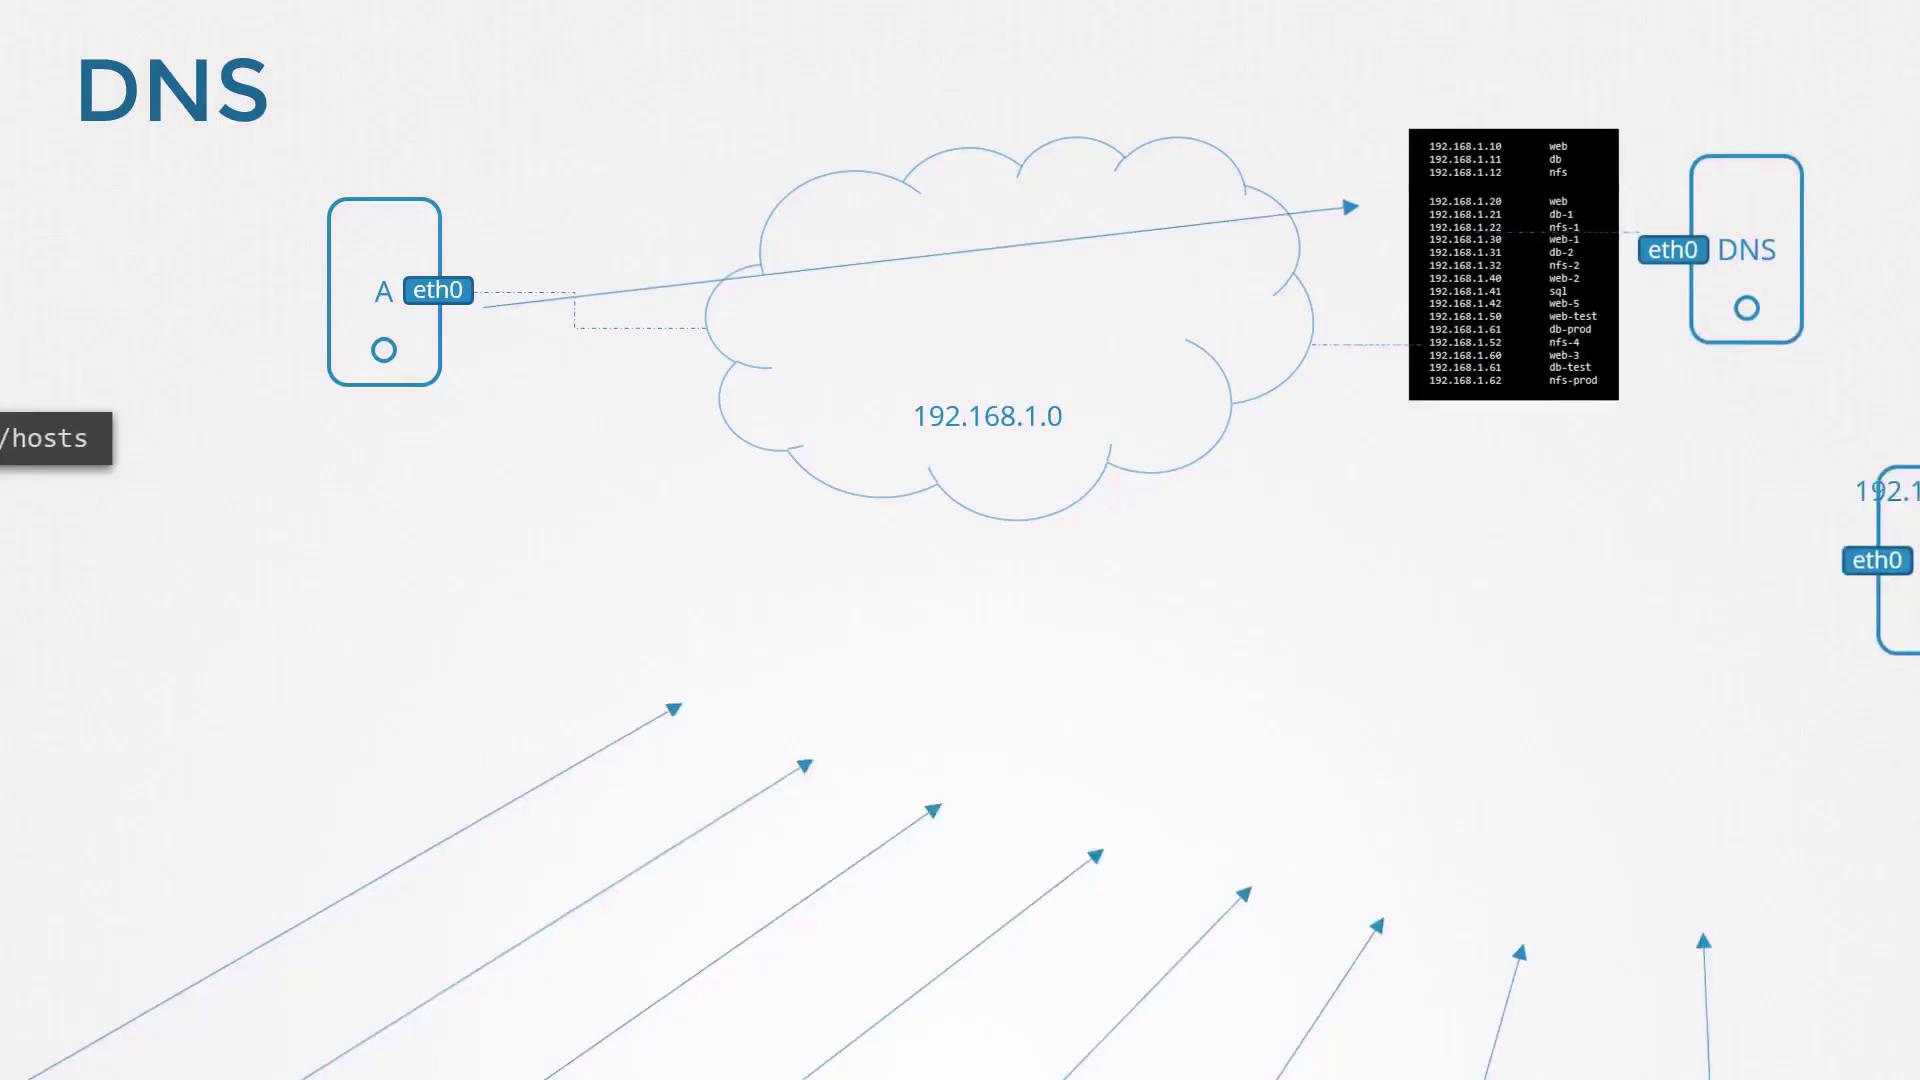
With this setup, if a hostname isn’t locally resolved via /etc/hosts, the system queries the DNS server. Updating the DNS server’s mappings automatically refreshes host resolution across the network.
So, keep in mind that the local DNS has priority over the DNS server. Only if the hostname cannot be resolved with local DNS, it goes to the DNS Server.
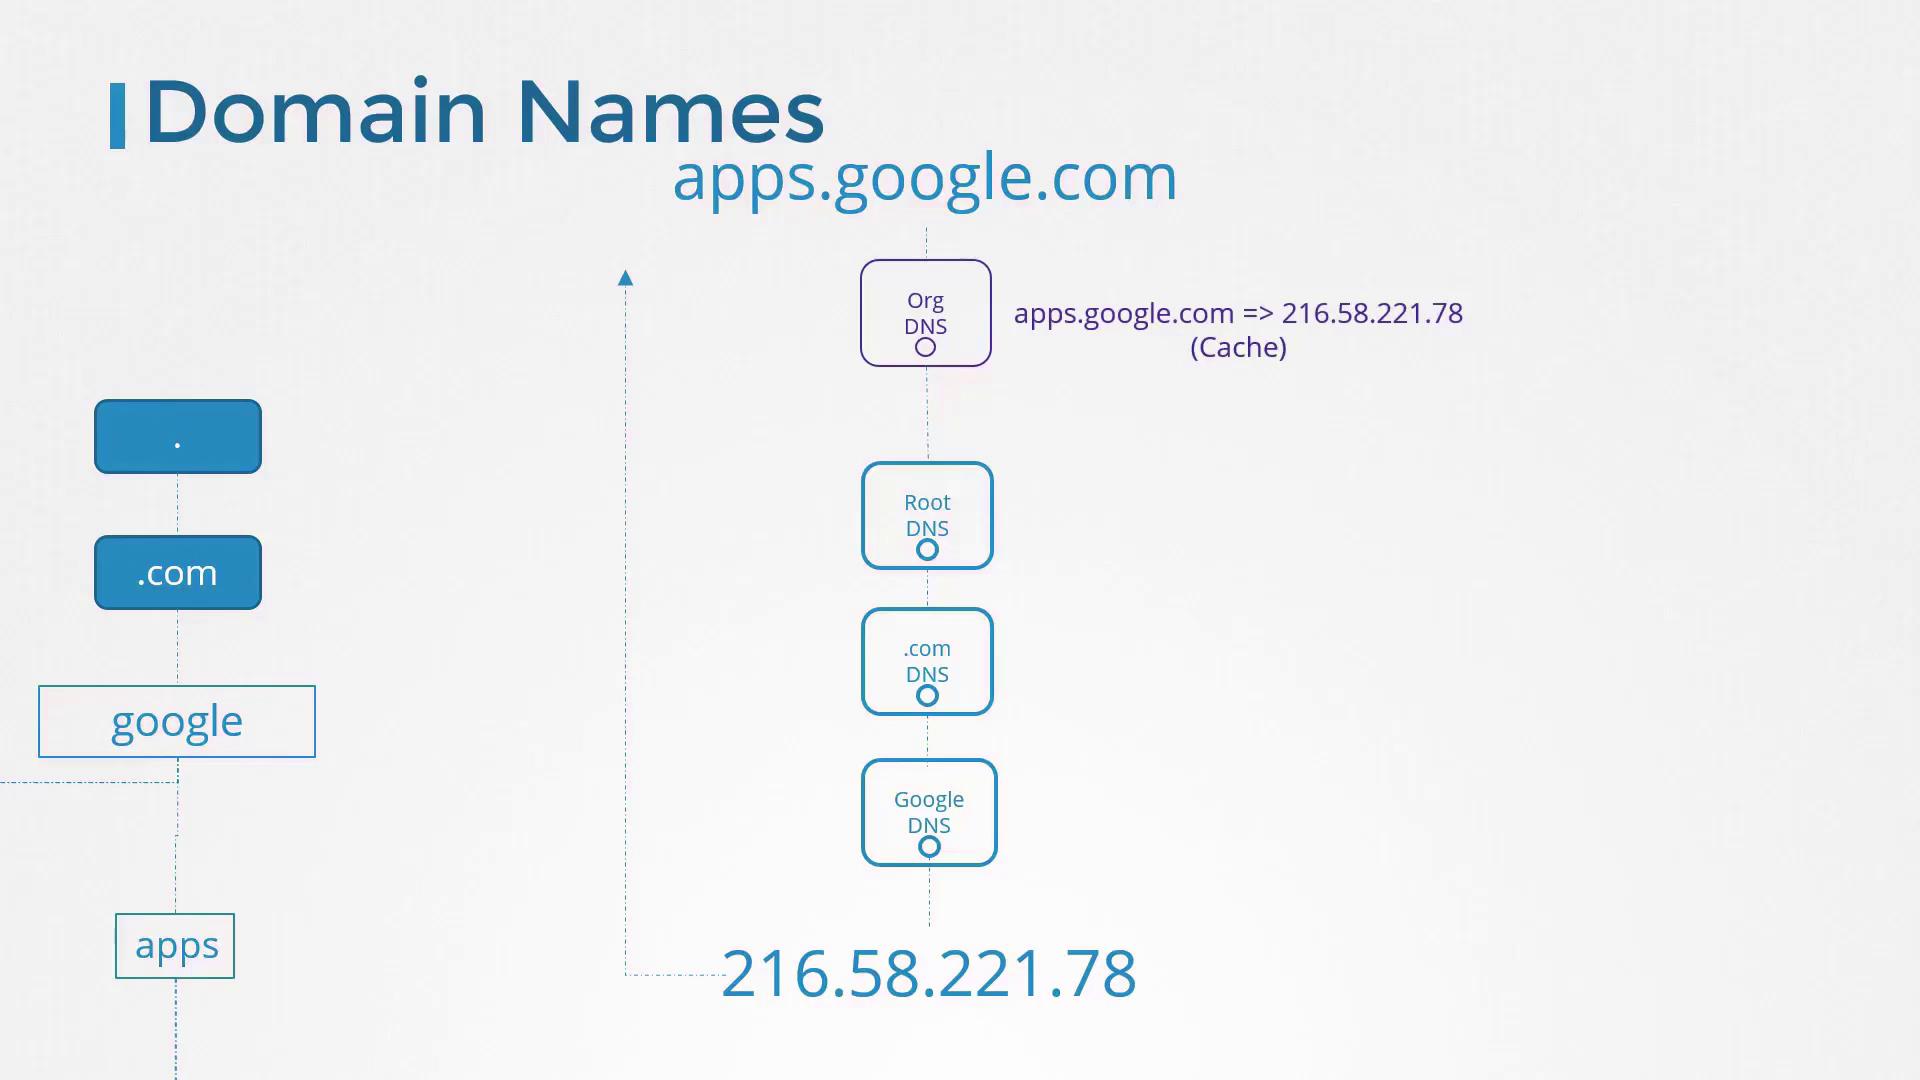
DNS Hierarchy and Search Domains
Consider the hierarchical structure of Google’s domain. The primary domain is "google.com", while "www" is one of its subdomains. Other subdomains like maps.google.com, drive.google.com, apps.google.com, and mail.google.com represent different Google services. When queried, your DNS server may need to forward the request up the hierarchy, which involves root DNS servers which looks for .com domain then to TLD servers which looks for the google domain, and then authoritative DNS servers like google to resolve the domain to the correct IP address like for the apps, drive, mail, etc.
Similarly, an organization might use a domain such as mycompany.com with subdomains like www.mycompany.com for the public website, mail.mycompany.com for email, drive.mycompany.com for storage, payroll.mycompany.com for payroll services, and hr.mycompany.com for human resources. These DNS records are centrally managed by the internal DNS server.
To simplify internal hostname resolution, you can configure a search domain in /etc/resolv.conf. This allows you to use short names instead of fully qualified domain names. For example:nameserver 192.168.1.100search mycompany.com
Now, when you ping a short name like "web", the system automatically appends "mycompany.com" to resolve it:ping web.mycompany.com
Types of DNS Records:
Type A: Web Server with IPv4
Type AAAA (Quad A): Web Server with IPv6
Type CNAME: Points to another DNS
⚙️ App Build Basics — Java, Python, Node.js (Day 3)
As I am learning DevOps, I think i need to know some basics of how an application is coded (I just wish to know at least to read a basic application code), how it is built, and how it is run, because that is the thing that we try to automate. So, i started learning some absolute basics of how a basic application will look like, how it is compiled, how it is build/packages and how it is run. I just took the most popular languages/frameworks and decided to learn some about them only. I chose Java, Python and Node.js
I learned that there are 2 types of languages: Compiled Languages and Interpreted Languages.
Compiled Language will create a compiled file and then execute that compiled file while an interpreted language just runs the code as it is using an interpreter. but I also came to know that even in interpreted language, an intermediate bytecode is generated like .pyc for python.
JAVA:
Java is a Compiled Language. I learned how to install java in a Linux OS, What is JDK - Java Developer Kit (includes common tools like java, javac, javadoc, jdb, jar, etc.). I also learned what is JRE, JVM, etc.
javac is used for compiling a java program, which will create a bytecode/compiled code, which is then run using the java command. To package multiple .class files when it is a java application, we use JAR (Java Archive) or WAR (Web Archive) to package the application.jar cf MyApp.jar MyClass.class Service1.class Service2.class ...
To execute the JAR file directly, use:java -jar MyApp.jar
To create the documentation, run:javadoc -d doc MyClass.java
So, The essential build process for a Java application can be summarized in the following commands:
javac MyClass.java
jar cf MyClass.jar [list of classes and resources]
javadoc -d doc MyClass.java
Automating Builds with Ant
Ant is a popular build tool that uses an XML configuration file to define various build targets such as compile, document, and package. Some other popular ones are maven and gradle.
I learned just to read an ANT script and I cannot create a ANT script as of now, planning to do that in the future if needed in the DevOps Learning. I know how ANT automates the build process by defining separate sections for compiling, packaging and documenting. I know to read the file to recognise the source and destination path of compiling, packaging as well as documenting. I know to run ANT commands just to run the compile section by using ant compile and run multiple sections of ant like ant compile jar, etc.
This was the build.xml file that I worked with which I just found in a GitHub Repository:
<?xml version="1.0"?>
<project name="Ant" default="main" basedir=".">
    <!-- Compiles the Java code -->
    <target name="compile">
        <javac srcdir="/app/src" destdir="/app/build">
        </javac>
    </target>
    <!-- Generates Javadoc -->
    <target name="docs" depends="compile">
        <javadoc packagenames="src" sourcepath="/app/src" destdir="/app/docs">
            <fileset dir="/app/src">
                <include name="**/*" />
            </fileset>
        </javadoc>
    </target>
    <!-- Creates the deployable JAR file -->
    <target name="jar" depends="compile">
        <jar basedir="/app/build" destfile="/app/dist/MyClass.jar">
            <manifest>
                <attribute name="Main-Class" value="MyClass" />
            </manifest>
        </jar>
    </target>
    <!-- Main target that assembles the project -->
    <target name="main" depends="compile, jar, docs">
        <description>Main target</description>
    </target>
</project>
I also learned to install Maven and how to run basic builds with it, same for Gradle as well. I have not currently had a deep dived into build automation tools, but I am planning to.
NodeJS:
Learned how to install Node, check the version using -v, run a node.js file using node filename, learned about the Node Package Manager i.e., NPM, which comes installed with node itself, learned to check npm version, install packages with npm, learned to read a basic package.json file, local vs. global package installation using the -g option,
Python:
I Learned that I could install Python2 and Python3 in a single system, see versions of both using -V option, learned about the python package manager - PIP, which comes installed with python, check the version of pip and also find out which python is pip pointing to in the system (python2 or python3) with the -V option, pip show command to see the details of an already installed package, came to know that a python application would have 2 lib-sites, one for python2 and one for python3, packages that are installed with python2 will be stored in the python2 lib-sites and there is also a separations of lib64-sites which stores the 64-bit packages for python2 and python 3 as well both will have separate paths.
🚀 Source Control Management Basics (Day 3)
GIT
I learned absolute basics of git like fundamentals including installing (yum install git), initializing using git init, and managing Git repositories. Learned to know the status of git using git status to show untracked and tracked files in the repository, learned how to create a local git repo, git add main.py to add that file to be tracked in git, git commit to commit the changes, a message should be passed for the commit with -m option describing the changes that has been done before committing, default branch will be master branch. To make the git accessible for remote developers, remote cloud repositories like GitHub, GitLab, etc. is used, git push to push to the GitHub and git pull to pull from the GitHub repository. If you encounter a merge conflict, you'll need to resolve it manually before the changes can be successfully integrated. Merge Conflict occurs when 2 or more developers commit changes to a same line of code. GitHub has intelligence to automatically integrates if the changes are in different lines, but a Merge Conflict will occur when there are changes in same line from 2 commit files of 2 developers. I have just covered the basics of version control only and have already planned have a very deep dive into version control in the next week itself.
🌐🗄️ Web Server (Day 3)
Learned why web servers aren’t needed for a standalone application but only applications that has a client-server communication. Let’s take a chat application as example, a dedicated chat server receives messages from various users and routes them appropriately. This model supports multiple clients that are accessed via web browsers, desktop applications, or mobile devices, allowing thousands of users to interact with the server concurrently.
Types of Servers
Web Servers: Host static content such as HTML, CSS, JavaScript files, images, and videos.
Application Servers: Execute backend business logic, such as processing orders, handling payments, and interacting with databases.
Database Servers: Run database systems like MySQL, PostgreSQL, or MongoDB.
Email Servers: Handle the transmission and receipt of emails.
Backup Servers: Perform routine backups to secure critical data.
A crucial function of all these servers is the ability to listen on a specific port for incoming requests. This listening behavior distinguishes a server from a typical machine. In fact, any device like a laptop to a Raspberry Pi can be setup as a server if it runs the appropriate software.
I have got a simple e-commerce application from GitHub. I am mainly focusing on a web server and application server to run it after i learn about web servers, databases and all the other things that i learned before. I am considering this goal.
Web Servers: Manage and deliver web content—HTML, JavaScript, CSS, images, and videos—to end users.
Application Servers: Handle backend processes such as processing transactions, managing database interactions, and executing business logic
For example, in the e-commerce application, the web server takes charge of the user interface, while the application server processes orders, handles payments, and manages shipping details. In smaller applications, web and application logic often coexist on a single server.
I first learned What Are Web Frameworks and Web Servers, came to know that both server-side and client-side codes are developed as part of a single application, and web frameworks simplify the interactions between them.
package com.example.demo;


import org.springframework.boot.SpringApplication;
import org.springframework.boot.autoconfigure.SpringBootApplication;
import org.springframework.web.bind.annotation.GetMapping;
import org.springframework.web.bind.annotation.RestController;


@SpringBootApplication
@RestController
public class DemoApplication {


    public static void main(String[] args) {
        SpringApplication.run(DemoApplication.class, args);
    }


    @GetMapping("/products")
    public String[] getProducts() {
        return getProductList();
    }

    // Assume getProductList() retrieves a list of products from the database.
}
In this Java example, an HTTP GET request on "/products" fetches a list of products from the database. Other languages offer similar functionality.
Consider the following samples using Python with Flask and JavaScript with Express:
from flask import Flask
app = Flask(__name__)


@app.route('/products')
def get_products():
    return getProductList()  # Assume getProductList() retrieves product data.


if __name__ == '__main__':
    app.run()
const express = require('express');
const app = express();


app.get('/products', (req, res) => {
    res.send(getProductList()); // Assume getProductList() retrieves product data.
});


app.listen(3000, () => console.log('Server running on port 3000'));
After developing the web application, the next step is to serve it by configuring the application to listen on a specific port and processing incoming requests. In some frameworks, like Flask, the built-in server can be used for development, but in production time, a dedicated web server should be employed.
Like I mentioned somewhere before, Static web servers, such as the Apache HTTP server and NGINX, focus on delivering static content. On the other hand, application servers like Apache Tomcat and Gunicorn are used to handle dynamic content by executing server-side code that interacts with databases and other services.
I then learned to setup a basic Apache HTTP service to host a static webpage, installation of Apache using yum install httpd, and using systemctl to start and stop the service, The main configuration file is located at /etc/httpd/conf/httpd.conf. By reading the httpd.conf file we can see that Apache listens on port 80 for all IP addresses on the host. The DocumentRoot specifies the directory containing your static files. To launch your custom website, simply move your static webpage files into this directory. Once you refresh your browser, your static webpage can be seen in the browser.
Server Name Configuration
Setting a server name in the configuration helps Apache to correctly identify requests for your website. For instance, consider the following configuration for a website about houses:
Listen 80
DocumentRoot "/var/www/"
ServerName www.houses.com:80
This configuration lets you access your website via www.houses.com. For this to work seamlessly, the domain name must resolve to your server’s IP address. In a local testing environment, add the following entry to your /etc/hosts file to setup local DNS as we learned before. By using this method, Apache supports hosting multiple websites on a single server using a property called VirtualHosts in the .conf file
Below is an example configuration for hosting two websites:
<VirtualHost *:80>
    ServerName www.houses.com
    DocumentRoot /var/www/houses
</VirtualHost>


<VirtualHost *:80>
    ServerName www.oranges.com
    DocumentRoot /var/www/oranges
</VirtualHost>
When a user navigates to either domain, Apache selects the appropriate document root based on the domain in the request. Ensure that the corresponding files (HTML, CSS, JavaScript, images, etc.) for each website are properly placed in their designated directories.
Any modifications to the configuration require a restart of the Apache service using systemctl restart httpd.
For better organization, you can split virtual host configurations into separate files instead of maintaining everything in the primary configuration file and just include the separate .conf file by using the Include option in the main .conf file like this:
ServerName www.houses.com:80


Include conf/houses.conf
Include conf/oranges.conf
The contents of /etc/httpd/conf/houses.conf is:
<VirtualHost *:80>
    ServerName www.houses.com
    DocumentRoot /var/www/houses
</VirtualHost>
Similarly, /etc/httpd/conf/oranges.conf has:
<VirtualHost *:80>
    ServerName www.oranges.com
    DocumentRoot /var/www/oranges
</VirtualHost>
The /etc/hosts/ should also have these entries like this:
127.0.0.1       localhost
127.0.0.1       www.houses.com
127.0.0.1       www.oranges.com
These configurations ensure that requests to www.houses.com or www.oranges.com are directed to your local Apache server on port 80.
Apache Tomcat
Learned to install Apache Tomcat, the bin directory contains the startup.sh and shutdown.sh files to start and stop the Tomcat servers for Linux respectively, and startup.bat and shutdown.bat for the same in Windows. Also learned that all the configuration files are located in the conf directory, like server.xml, logs in the logs directory, and all the dynamic webpage files should be moved to the webapps directory in the Apache Tomcat server directory, the lib, temp, and work directories manages libraries, temporary files, and work data respectively.
Deploying a Web Application
First, package your application's source code into a WAR file. You can use the jar utility or build tools such as Maven or Gradle:
jar -cvf app.war *
mvn package
gradle build
Then, copy the WAR file (e.g., app.war) to the webapps directory of your Tomcat server. If Tomcat is running, it will automatically detect the new file, extract it, and deploy the application into a folder corresponding to the WAR file name (for example, /app).
To confirm deployment, review the Tomcat logs located in the logs directory. Check the contents of catalina.out with:
cat ~/apache-tomcat-8.5.53/logs/catalina.out
Example log output:
18-Mar-2020 10:43:32.769 INFO [localhost-startStop-1] org.apache.catalina.startup.HostConfig.deployDirectory Deployment of web application directory [/home/vagrant/apache-tomcat-8.5.53/webapps/ROOT] has finished in [13] ms
18-Mar-2020 10:43:32.783 INFO [main] org.apache.catalina.startup.HostConfig.deployDirectory Deployment of web application directory [/home/vagrant/apache-tomcat-8.5.53/webapps/manager] has finished in [14] ms
18-Mar-2020 10:43:32.789 INFO [main] org.apache.coyote.AbstractProtocol.start Starting ProtocolHandler ["http-nio-8080"]
18-Mar-2020 10:43:32.789 INFO [main] org.apache.catalina.startup.Catalina.start Server startup in 407 ms
18-Mar-2020 11:21:23.560 INFO [localhost-startStop-2] org.apache.catalina.startup.HostConfig.deployWAR Deployment of web application archive [/home/vagrant/apache-tomcat-8.5.53/webapps/app.war] has finished in [57] ms
Once deployed, access your application by navigating to:
http://your-hostname:8080/app
For example, if your application displays a "Hello, World" message, its homepage will appear similar to the following:

Python Flask App Deployment
Learned to install gunicorn, run flask application with gunicorn, and only covered some basics on how to deploy a flask application using gunicorn.
NodeJS Express App Deployment
Once the dependencies are installed using npm install command, start the application using Node.js. Since the entry point is app.js, you can launch it directly: node app.js. And most of the application will have a package.json file which can be configured to run in production mode and developer mode. Let me show you a sample package.json file. Learning to read a package.json file helped me here:
{
  "name": "my-application",
  "version": "0.0.0",
  "private": true,
  "dependencies": {
    "dotenv": "^5.0.0",
    "execa": "^0.9.0",
    "express": "^4.16.2"
  },
  "scripts": {
    "debug": "node debug app.js",
    "start": "NODE_ENV=production node app.js",
    "start:dev": "NODE_ENV=dev node app.js",
    "test:e2e": "node tests/run-e2e-test.js",
    "test:unit": "jest tests/unit",
    "test:unit:watch": "jest tests/unit --watch"
  }
}
To run in production mode:npm run start
And for development mode:npm run start:dev
These are all mentioned in the scripts section of the package.json file on how to run the application when a specific mode is triggered when run. For Example, when npm run start is used, it internally executes - NODE_ENV=production node app.js. So, this is how deployment works in Node JS.
I also learned about Process Manager - PM2. While running an application with node app.js or via npm scripts, it can work well during development, but they are not reliable for production environments. A crash in Node.js will terminate the process and may cause downtime. To avoid this, it is best to use a production-grade process manager like PM2. pm2 start app.js is used to run an application in PM2, pm2 start app.js -i INSTANCES is used to run multiple instances of the app. For Example: pm2 start app.js -i 4. You will know this if you have read about the DevOps Tools that I learned in Day 1.
📋 Day 4 — Writing This Blog & Setting Up My GitHub Repo
Today I focused on documenting my Week 1 progress — writing this blog on Hashnode and preparing my GitHub repo (devops-learning-journey) where I will start pushing my learning notes and project files week by week.
Learning is one part, but sharing and tracking progress is equally important in this journey.
👉 You can also check my progress and learning notes on GitHub here:
I’ll be updating it weekly as I move forward 🚀
🚀 Final Thoughts
This week has been foundational and intense — but I now see how apps move from dev → build → test → prod, and how tools like Git, Docker, and Kubernetes fit in.
Going forward, I’ll be focusing on Git, and deepening my Linux skills. Then maybe if time allows, I will start on Shell Scripting as well as go a little bit deeper into a programming language like python.
If you’re starting your DevOps journey too — connect! I’d love to share and learn together.
#DevOps #LearningInPublic #Linux #CI_CD #WebServers #Git #Terraform #Ansible #Kubernetes #12FactorApp
Subscribe to my newsletter
Read articles from Anandhu P A directly inside your inbox. Subscribe to the newsletter, and don't miss out.
Written by
Anandhu P A
Anandhu P A
I’m an aspiring DevOps Engineer with a strong interest in infrastructure, automation, and cloud technologies. Currently focused on building my foundational skills in Linux, Git, networking, shell scripting, and containerization with Docker. My goal is to understand how modern software systems are built, deployed, and managed efficiently at scale. I’m committed to growing step by step into a skilled DevOps professional capable of working with CI/CD pipelines, cloud platforms, infrastructure as code, and monitoring tools