Understanding and Building with Jenkins: CI/CD Pipelines and AWS Integration
 Akshansh Singh
Introduction
Hello there! 👋 The past week was the 9th week of my DevOps learning journey, and I have to say that this was one of the toughest ones so far. Last week, I got started with CI/CD in Jenkins, and this week I continued to dive deeper into it. I learned and understood the Master-Slave Architecture in Jenkins, different types of build triggers and how they work, versioning of artifacts, Pipeline as Code, and learned to build an end-to-end CI/CD pipeline using different technologies.
Master-Slave Architecture
One of the most important concepts in Jenkins is understanding the Master-Slave Architecture. This architecture is used to distribute and organise the workload of running multiple jobs across different machines (physical, virtual, or cloud-based).
Jenkins Master is the central server that hosts the Jenkins web UI, manages job configurations, schedules builds, and coordinates agents (slaves).
Jenkins Slaves are remote machines that connect to the master and execute build jobs or specific stages (e.g., CPU-intensive tests, platform-specific builds) and then send the reports of the build back to the master.
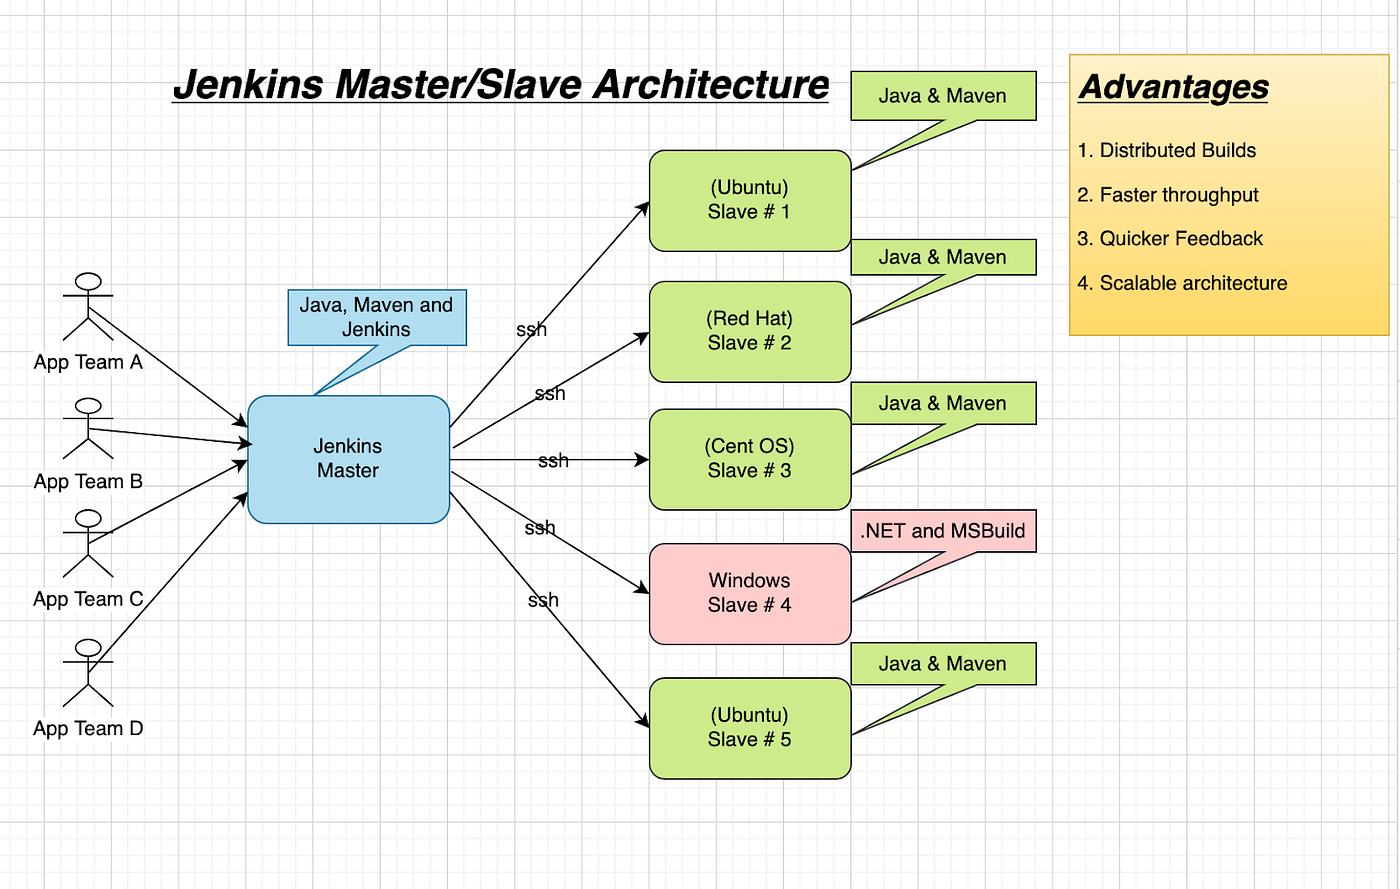
There are many benefits of this architecture:
Scalability - Distribute workloads across multiple machines; the master stays responsive.
Isolation - Run builds in dedicated environments (different OS, JDK versions, or isolated containers).
Platform diversity - Agents can run on Linux, Windows, macOS, or even containerised environments. It is useful when you need to test on multiple OSes or hardware architectures.
Security - Master is protected (usually behind a firewall); only agents need SSH/JNLP access.
Maintenance and upgrades - We can reboot or upgrade agents with minimal disruption, leaving the master unaffected.
I also learned about the prerequisites required, such as OS considerations, requirements of Java, JRE and JDK, networking so master and slave agents can connect to each other, user permissions and working directories, etc. All this was theoretical knowledge needed to understand the benefits and working of Jenkins, so after this I learned to create slave agents using Jenkins and EC2 instances.
I created an Ubuntu EC2 instance with SSH access from my IP address and also from Jenkins Master. Then I installed Java, created the jenkins-agent user, and gave it the required permissions for the workspace. In the Jenkins Master, I added a new Node with remote root directory and the label. In Jenkins, we can assign jobs to different slaves or groups of slaves using labels, so it becomes important to carefully group the slaves which will be used for jobs for a specific project or task. To make use of labels, we have to select "Only build jobs with label expressions matching this node" in the Usage dropdown.
For credentials, I created a credential of "SSH Username with private key" kind with an ID which will be used to select it in the future. I copied the private key from the .pem file and pasted it in the private key section. After saving the configuration, I checked in the slave agent's workspace directory if there was a "remote" directory. If yes, the slave agent has been connected successfully to the master and is ready to be assigned jobs.
Pipeline as Code
A job in Jenkins can be of two types - Freestyle and Pipeline as Code. In freestyle jobs, we manually configure the job settings and build steps in the Freestyle job dashboard. Whereas in Pipeline as Code, it allows you to define the entire CI/CD process in a declarative or scripted syntax inside a Jenkinsfile. This file lives in the source code repository, enabling version control of the build process just like your application code.
Pipeline as Code is the standard for industry-level CI/CD pipelines as it helps in automation of the workflows, enables storing pipeline logic in source control, and provides advanced features like parallel execution, artifact management, and more.
A pipeline is of two types:
Declarative - Structured & opinionated
Scripted - Groovy-based & flexible
I understood the key components/blocks of a Jenkinsfile, such as pipeline, agent, environment, options, stages and stage, steps, when, and post block. Each type of block serves a different purpose and is useful in creating a pipeline. The Jenkinsfile is placed in the root directory of the source code repository so that Jenkins can automatically detect and run it when the pipeline job is configured properly. I created a few build pipelines with simple steps such as checking out code from GitHub, building the application using Maven, and running tests.
CI/CD Pipeline
After I learned and understood the basic working and management of Jenkins, it was time to put it all together and create something to gain hands-on knowledge. A CI/CD pipeline consists of checking out the code, running tests, building the artifact, running code analysis to check for bugs and vulnerabilities, storing the artifact in an artifact repository if it passes all the quality gates, and deploying it in the dev or staging environment.
At first, I decided to create a Continuous Integration pipeline only, which later became a complete CI/CD pipeline. The tools I decided to use for the CI pipeline:
Build tool - Maven
Code Analysis - Sonar Scanner
Storing the artifact - Nexus repository
Notification - Slack Integration

Steps for creating the CI pipeline:
1. Jenkins setup
Installing and configuring required JDK and Maven version
EC2 instance (Ubuntu, t2.medium)
Security group rules:
SSH, port 22, my IP
Custom TCP, port 8080, my IP (Jenkins webpage access)
HTTP, port 80, Anywhere
Custom TCP, port 8080, Sonarqube-sg (Sonarqube communication)
2. Nexus setup
EC2 instance (AWS Linux, t2.medium)
Configuring the setup through a script
Security group rules:
SSH, port 22, my IP
Custom TCP, port 8081, my IP (Nexus webpage access)
Custom TCP, port 8081, Jenkins-sg (Publish artifact from Jenkins)
3. SonarQube setup
EC2 instance (Ubuntu, t2.medium)
Configuring the setup through a script
Security group rules:
SSH, port 22, my IP
HTTP, port 80, my IP (SonarQube webpage access)
HTTP, port 80, Jenkins-sg (Allow Jenkins to send reports)
4. Installation of required plugins
Nexus artifact uploader
Sonar Scanner
Pipeline Maven integration
Build timestamp
Pipeline utility steps
5. Integration of
Nexus
SonarQube
6. Write Pipeline script
7. Set a notification using Slack
After launching EC2 instances for Nexus and SonarQube, the real challenge was to integrate each of them with Jenkins. I won't be talking about these steps in-depth, but the high-level steps were to install the required plugins for these tools, configure the tools in Manage Jenkins > Configure System, create authentication tokens for each of them so Jenkins can connect and communicate to them, provide it in Jenkins configuration, integrate custom quality gates for SonarQube, and configure the pipeline script with code analysis and upload artifact to Nexus steps.
After fixing a few typos and configuration errors, I was able to run the job successfully.

After creating this CI pipeline, the next step was to create a complete CI/CD pipeline using Docker, Docker Hub, and AWS ECR (Elastic Container Registry) and ECS (Elastic Container Service). For deploying the Docker image through ECS, I replaced the Nexus repository with AWS ECR.

Steps for integrating Docker, AWS ECR and ECS-
1. Docker Engine in Jenkins
Installed Docker on the Jenkins server so it can build container images
Required for using
dockerCLI commands in the pipeline
2. Add Jenkins User to Docker Group & Reboot
- Allows the Jenkins user to run Docker commands without sudo
3. Install AWS CLI
Enables Jenkins to interact with AWS services like ECR from the command line
Used in the pipeline for commands like
aws ecr login
4. Create IAM User
A dedicated IAM user with programmatic access and permissions (
AmazonEC2ContainerRegistryFullAccessandAmazonECS_FullAccess)Ensures secure and scoped access to your AWS ECR for Jenkins
5. Create ECR Repository
Create an Elastic Container Registry to store and version Docker images
The destination for built images to be pushed from Jenkins
6. Plugins: ECR, Docker Pipeline, AWS SDK
ECR Plugin – Helps interact with ECR directly from Jenkins
Docker Pipeline Plugin and CloudBees Docker – Enables Jenkins to run Docker build/push commands in a pipeline
AWS SDK Plugin – Enables Jenkins to store and use AWS credentials securely
7. Store IAM Credentials in Jenkins
Use Secret Text or AWS Credentials type under "Manage Credentials"
Required for Jenkins to authenticate with AWS in your pipeline securely
8. Create ECS Cluster and Task Definition
ECS Cluster is a logical grouping of tasks (Fargate or EC2) and services
Task Definition is like a blueprint for your container: image location, CPU/memory requirements, port mappings, and log settings
9. Create a Load Balancer and ECS service
Required to distribute traffic across multiple Fargate tasks and expose your service to the internet
Attach the ECS Service to Load Balancer which ensures that a specified number of tasks (containers) are always running
10. Run Pipeline
Executes stages like Docker build, login to ECR, and push image
Completes CI/CD by deploying containerised artifacts to the cloud registry
The hardest part was learning and configuring AWS ECR and especially ECS. I did all these steps one at a time, and in between, I ran the job multiple times to test whether the steps were working fine. Again, each of these is much more elaborate than I mentioned, but I don't want to stretch the article that long. After writing the complete pipeline and checking beforehand for errors in the script, I created a new Pipeline Job, and seeing it build perfectly was such a rewarding feeling.


For creating a CI/CD pipeline from scratch, it is very important to understand the flow of the pipeline and plan each step accordingly. Planning is as important as configuring and executing those steps.
At last, I learned while exploring Jenkins how Authentication and Authorization work. Jenkins allows the admin to control exactly who can do what - like accessing the dashboard, reading or editing jobs, configuring pipelines, or deleting them. I learned how large companies manage multiple users working on different projects at the same time using Jenkins. They create roles that group users based on their responsibilities, and then assign the same set of permissions to everyone in that role. This not only makes user management easier but also saves a lot of time and reduces the chances of mistakes.
Resources I used-
Challenges I faced-
1️⃣ Disk space issue in the Jenkins server
- 8 GB volume was not enough to run multiple build jobs in the Jenkins server and the jobs kept crashing.
Solution: Increased the EBS volume from 8 GB to 20 GB for the Jenkins EC2 instance.
2️⃣ URL issues for different servers
- For accessing the web pages of Jenkins, Nexus, and SonarQube, when I pasted the public IPs for each instance in the browser, I wasn't able to access the web pages.
Solution: For some reason, the URL was using HTTPS for these public IPs, so I had to manually type http://<INSTANCE_PUBLIC_IP> and then I was able to access the web pages.
3️⃣ Unable to connect the Slave agent with Master
- When adding a new Node in Jenkins Master, I was using the public IP of the slave EC2 instance in the "Host" input and it wasn't connecting to master for that configuration.
Solution: I replaced the public IP address with the private IP address of the slave's EC2 instance, which worked for me.
What's Next?
To be honest, it was one of the toughest things to learn so far as there were too many things to learn in Jenkins, and along with that, I learned about integration with SonarQube, Nexus, AWS ECR, and AWS ECS. So firstly, I would revise all the concepts of Jenkins once again, go through all the steps of creating a pipeline to fully understand the flow, and then next week get started with Python. It was a long article as I had to cover a lot of stuff - sorry about that, and thank you if you still read it till here! :)
Let's Connect!
If you have any recommended resources, better approaches to my challenges, or insights, I'd love to hear them! Drop your thoughts in the comments.
Have a wonderful day!
Subscribe to my newsletter
Read articles from Akshansh Singh directly inside your inbox. Subscribe to the newsletter, and don't miss out.
Written by
Akshansh Singh
Akshansh Singh
Driven by curiosity and a continuous learning mindset, always exploring and building new ideas.