Docker Essentials: A Beginner's Guide to Containers and Deployment
 Divesh Mahajan
Introduction
In this ever-growing field of software development, you've probably heard of Docker at some point. And you may be aware that it has become essential technology for any application development.
If you haven't heard of it, don't worry. In this blog, I'll walk you through the basic concepts of Docker, Installations and setup and help you get started by deploying applications on Docker.
Docker is a container runtime. So firstly, Let's start with understanding containers and then w'll deep dive into docker.
What is a Container?
A container is a lightweight, standalone, executable software package that includes everything needed to run an application: the code, runtime, system tools, system libraries, and settings.
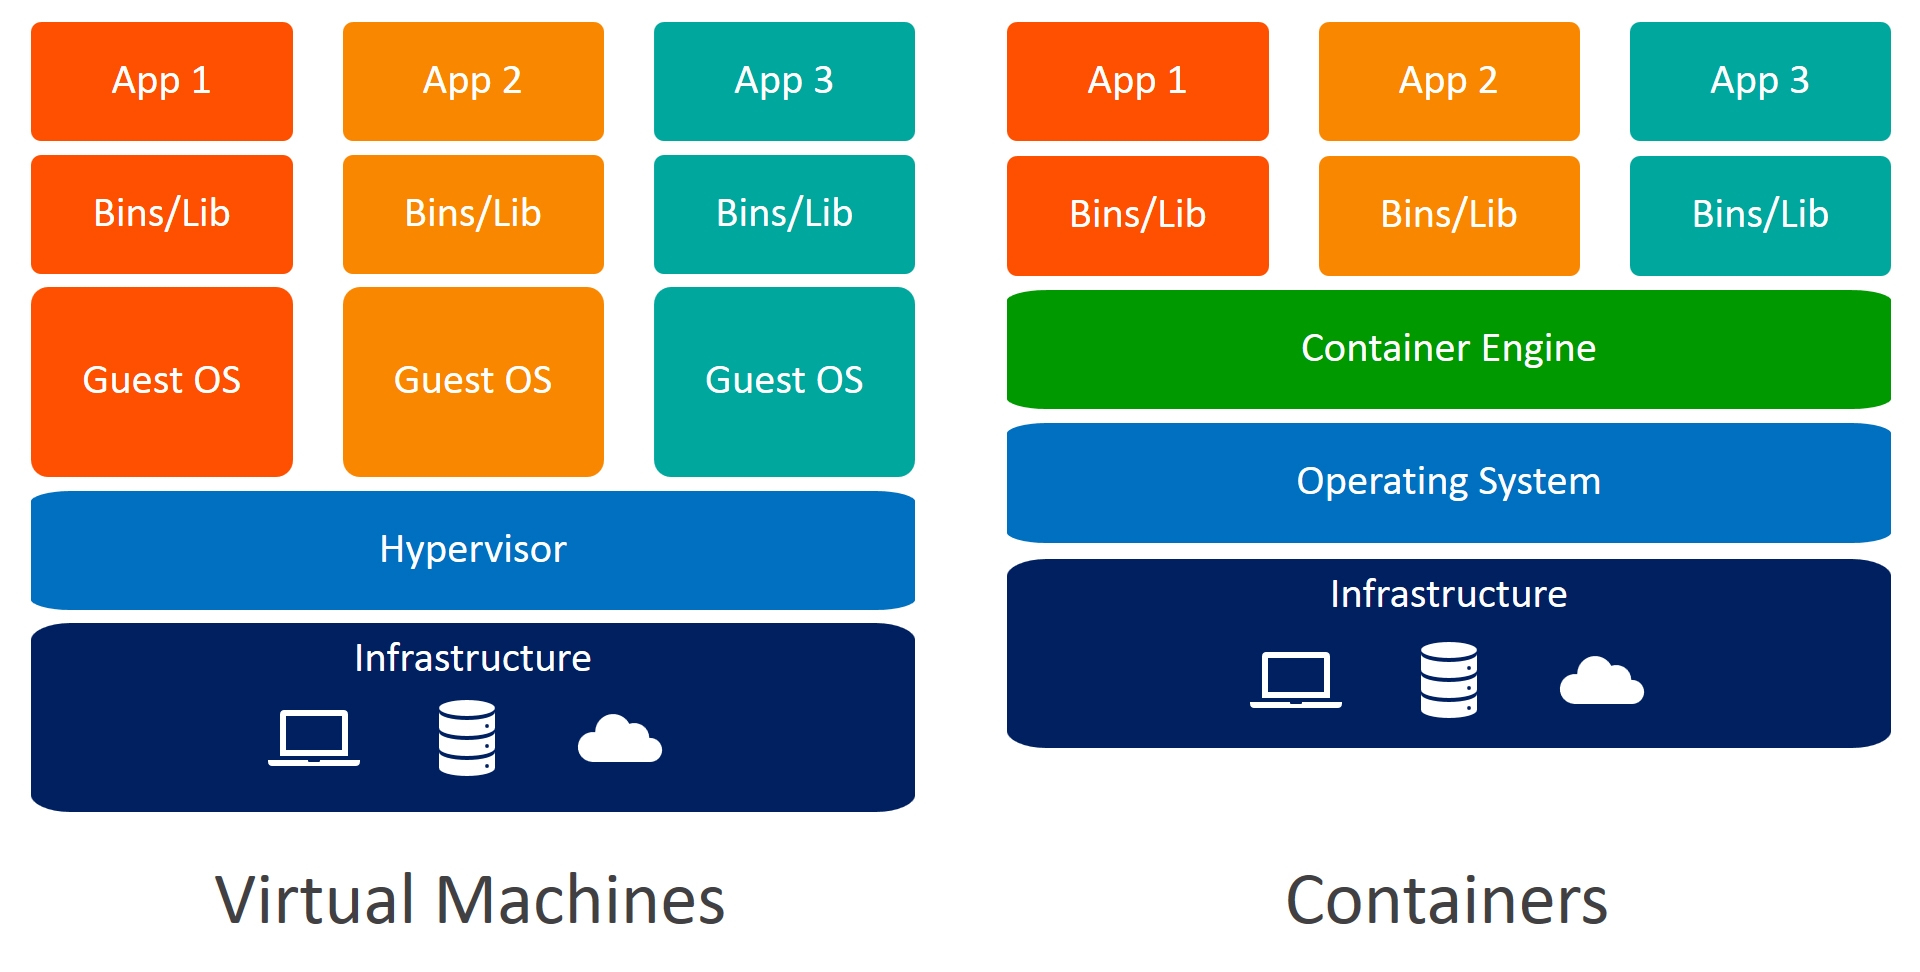
Containers are similar to virtual machines (VMs) in that they provide a way to package and isolate applications with their dependencies. However, containers are more lightweight because they share the host operating system's kernel, whereas VMs include a separate operating system for each instance.
In other words, you don't need to have whole different OS (called guest OS) installed inside your host OS. You can have several containers running within a single OS without having several different guest OS's installed.
The concept of containerization traces back to the early 2000s, with technologies like FreeBSD jails and Solaris Zones, which provided lightweight virtualization at the operating system level. These technologies allowed multiple isolated environments (containers) to run on a single host, sharing the host OS kernel.
In 2008, LXC (LinuXContainers) was launched.It was a significant milestone in container technology for Linux. LXC provided an interface for managing Linux containers, offering isolation and resource control without the overhead of traditional VMs.
Finally, in 2010, Solomon Hykes and Sebastien Pahl created Docker during the Y Combinator startup incubator group. In 2011 the platform was launched.
After 2013, various companies started adopting Docker as default container runtime because it standardized the use of containers worldwide. In 2013, Red Hat announced a Docker collaboration, in 2014 it was time for Microsoft, AWS, Stratoscale, and IBM.
Finally, in 2020, Docker became a standard choice for containers worldwide. This happened not necessarily because it's better than others, but because it unifies all the implementations under a single easy-to-use platform with a CLI and a Daemon.
Docker
Docker is an open source platform for developing, shipping, and running applications. Docker enables you to separate your applications from your machine so you can deliver software quickly.
In simple words, Docker provides the ability to package and run an application in a loosely isolated environment called a container. The isolation and security lets you run many containers simultaneously on a given host. Containers are lightweight and contain everything needed to run the application, so you don't need to rely on what's installed on the host.
You can run this Containerized application on any machine and it will operate without any dependency error. By using Docker's methods for shipping, testing, and deploying code, you can significantly reduce the delay between writing code and running it in production.

Docker is composed of the following elements:
A Daemon, which is used to build, run, and manage the containers.
A high-level API which allows the user to communicate with the Daemon.
A CLI, the interface we use to make this all available.
Docker Architecture
Docker uses a client-server architecture. The Docker client talks to the Docker daemon, which does the heavy lifting of building, running, and distributing your Docker containers. The Docker client and daemon can run on the same system, or you can connect a Docker client to a remote Docker daemon. The Docker client and daemon communicate using a REST API, over UNIX sockets or a network interface. Another Docker client is Docker Compose, that lets you work with applications consisting of a set of containers.
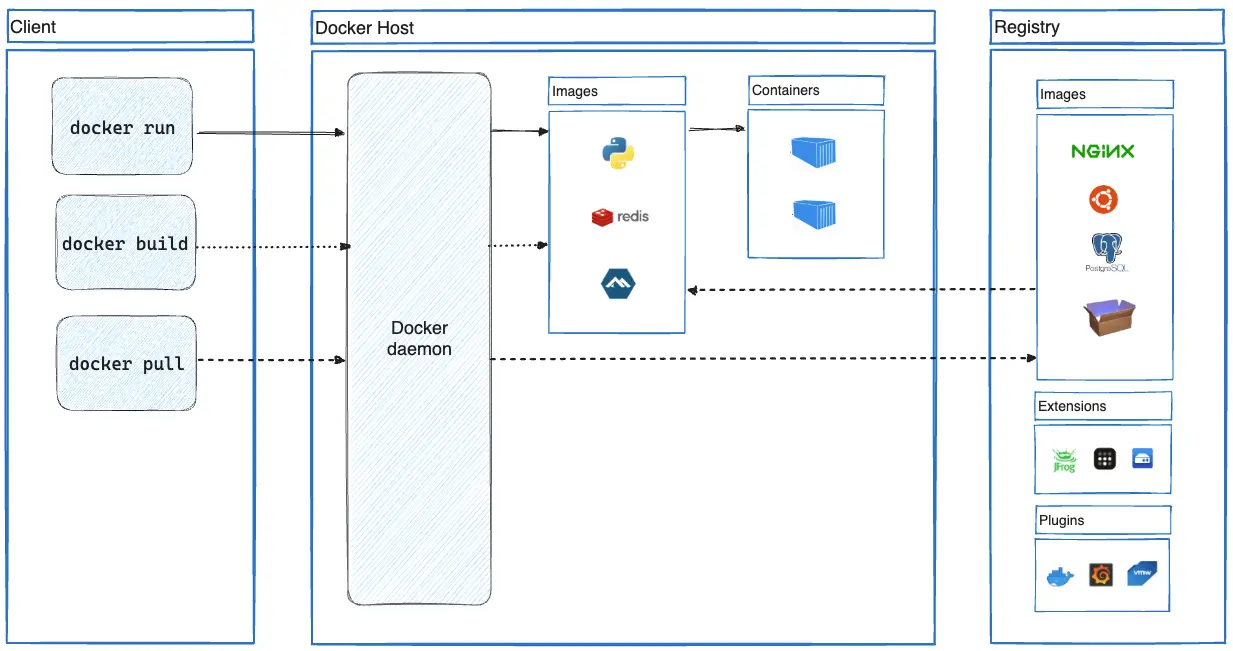
Let's understand the above diagram in detail.
Docker Client
The Docker client is the primary interface through which users interact with Docker. Users issue commands to the Docker client via the command-line interface (CLI) or through Docker's API.
Docker Daemon
The Docker daemon listens for API requests from the Docker client and manages the Docker objects such as images, containers, networks, and volumes. A daemon can also communicate with other daemons to manage Docker services.
Docker Registry
A Docker registry is a registry for storing and distributing Docker container images. Docker Hub is a public registry that anyone can use, and Docker looks for images on Docker Hub by default. You can even run your own private registry.
Why use Docker Containers?
You may have come across the famous saying, "It works on my machine." So, why not share that machine to everyone?
That's exactly the problem Docker solves in general. A Docker container is a packaged collection of all the app's libraries and dependencies already prebuilt and ready to be executed.
You can create a docker container versioned using a projects image(w'll discuss about images in the next section). So, now anyone with this projects docker image can spin-up a container and start working on the application instantly.
Docker's container-based platform allows for highly portable workloads. Docker containers can run on a developer's local laptop, on physical or virtual machines in a data center, on cloud providers, or in a mixture of environments.
Also, Docker lets you spin multiple containers simultaneously, allowing for efficient utilization of resources and enabling applications to scale horizontally to meet increased demand.
Now that we've seen why use containers, let's understand how we can build one!
What is Docker Image?
An image is a read-only template with instructions for creating a Docker container. Often, an image is based on another image, with some additional customization. For example, you may build an image which is based on the ubuntu image, but then install your application, as well as the configuration details needed to make your application run. Docker images are shareable and portable, so you can deploy the same image on multiple locations at once.
To create a custom image of your's, you can write specific instruction in a Dockerfile with a simple syntax for defining the steps needed to create the image and run it. Each instruction in a Dockerfile creates a layer in the image. When you change the Dockerfile and rebuild the image, only those layers which have changed are rebuilt. This is part of what makes images so lightweight, small, and fast, when compared to other virtualization technologies.
Docker provides a Docker Hub registry where you can upload your images and keep track of its version. The registry also contains standard image templates for operating system, programming languages, frameworks, databases, and code editors.
Now that we have idea of all basic terminologies, let’s install the docker and do a hands on practical on creating a docker image and creating a container with that image.
Installing Docker
Before we start building and running containers, we need to install Docker on your system. Docker provides an easy-to-install desktop application for all major operating systems.
Official Installation Guides
Depending on your operating system, follow the official Docker documentation to install Docker:
Windows: Install Docker Desktop on Windows
Note: On Linux, you may need to add your user to the
dockergroup to run Docker withoutsudo. The instructions are included in the Linux installation guide.
Verifying Docker Installation
After installation, you can verify that Docker is working correctly using the command line.
1. Check Docker Version
Open your terminal (or Command Prompt / PowerShell on Windows) and run:
docker --version
You should see the version of docker otherwise docker is not installed properly.
2. Run a Test Container
Run Docker’s "hello-world" container to make sure everything is working:
docker run hello-world
If everything is installed properly, you should see a message like:
Hello from Docker!
This message shows that your installation appears to be working correctly.
Now that Docker is installed and verified, you're ready to build and run your first container!
Creating a docker image
Now that Docker is installed and working, let’s build our first Docker image!
We'll start with a simple Python app that prints a message when it runs.
Step 1: Project Structure
Create a new directory for your project and add a Python script:
mkdir docker-demo
cd docker-demo
Inside that folder, create a file named app.py:
print("Hello from Docker!")
Step 2: Create a Dockerfile
In the same directory, create a file named Dockerfile (no file extension). This file tells Docker how to build your image.
Consider Dockerfile as a set of instruction to setup you project into a new environment. Firstly we choose the environment in this case `python:3.11-slim`, setup a working directory in the new environment now copy the code from local to new environment and finally mention command to run you project.
FROM python:3.11-slim

# Set the working directory inside the container
WORKDIR /app

# Copy the current directory contents into the container
COPY . .

# Run the Python script when the container launches
CMD ["python", "app.py"]
What Each Line Means:
FROM: Specifies the base image (in this case, a slim version of Python 3.11).WORKDIR: Sets the working directory inside the container.COPY: Copies the files from your local project directory to the container.CMD: The command that runs when the container starts.
This is a very basic Dockerfile as you project becomes more complex the Dockerfile will also become detailed.
Building the Docker Image
Now, let’s build the image from our Dockerfile.
In the terminal, inside your project directory, run:
docker build -t python-hello .
-t python-hello: Tags your image with the namepython-hello..: Tells Docker to use the current directory as the build context.
If successful, you’ll see output ending with something like:
Successfully tagged python-hello:latest
Running a Docker Container
Now that we have a Docker image, let’s run it:
docker run python-hello
You should see:
Hello from Docker!
Congrats! You've just built and run your first Docker container.
When building complex applications just running the container will not be sufficient you will also need to export ports, add environment variables or run multiple containers. So, lets discuss some advanced option which docker provides to address these challenges.
Port Mapping (-p or --publish)
When your container runs a web server (like Flask, Node.js, Nginx, etc.), you need to expose the container’s internal port to your machine so users can access it via browser or API calls.
Syntax:
docker run -p <host_port>:<container_port> IMAGE_NAME
host_port: The port on your local machine.
container_port: The port the app is listening to inside the container.
Example:
If your Flask app runs on port 5000 inside the container:
docker run -p 8080:5000 flask-app
You can now access it in your browser at:
👉 http://localhost:8080
💡 Tip: You can map any host port to any container port.
Environment Variables (-e or --env)
Environment variables are used to pass configuration values into your app (e.g., API keys, database URLs, debug flags) without hardcoding them.
Syntax:
docker run -e VAR_NAME=value IMAGE_NAME
Example:
docker run -e DEBUG=True -e API_KEY=12345 my-api-app
You can then access these variables in your app using:
In Python:
os.environ.get("DEBUG")In Node.js:
process.env.DEBUG
Best Practice: Use environment variables for secrets or config settings to keep your codebase clean and portable.
Detached Mode (-d)
Run the container in the background without blocking your terminal. Ideal for running servers or long-running processes.
Syntax:
docker run -d IMAGE_NAME
Example:
docker run -d -p 8080:80 nginx
- This starts an Nginx container in the background, serving content on
localhost:8080.
To check if the container is running:
docker ps
To stop the container:
docker stop <container_id>
Great! Now you can easily create a docker containers for your projects
Conclusion
In this blog we discussed basics of containers, why docker was introduced, docker architecture difference between docker container and docker image and then how to create docker container of your own. This blog aims to give you a basic understanding about docker to help you get started.
Docker is a powerful tool to build, share, and deploy applications by making them portable and consistent across environments. Whether you're working locally or deploying to the cloud, Docker gives you a powerful toolset to manage your apps reliably.
This post is just the beginning. In upcoming blogs, we’ll dive deeper into more advanced topics such as:
Docker Compose (for multi-container applications)
Docker volumes and persistent data
Networking between containers
Dockerizing full-stack applications
Deploying containers to production using Kubernetes or Docker Swarm.
That was it for this blog 🙏. I know it was quite a lengthy blog but I tried to explain each concept shortly and concisely. I hope you enjoyed it. Do comment with your thoughts about this blog.
If you’re a regular reader, thank you, you’re a big part of the reason I’ve been able to share my learnings with you.
You can connect with me on Twitter and LinkedIn.
Follow me for more such blogs 😊.
Happy Coding✌️!!
Subscribe to my newsletter
Read articles from Divesh Mahajan directly inside your inbox. Subscribe to the newsletter, and don't miss out.
Written by
Divesh Mahajan
Divesh Mahajan
I am a Full-stack Web Developer who is exploring Cloud ☁️ while facilitating the world with User Experience with my Design Thinking Skills and Enthusiast about ML.