Kubernetes Admission Controllers: The Gatekeepers of Your Cluster
 Sanmarg Paranjpe
You're probably familiar with Kubernetes managing resources through its API server, right? Pods get created, deployments roll out new versions, secrets hold sensitive data. But how do we ensure that all the things crated by developers or automated pipelines meet certain standards before they hit production?
That's where Kubernetes Admission Controllers come in! They act as interceptors for requests flowing through the API server. Imagine a busy airport with multiple terminals and gates. Before an airplane is allowed to enter Terminal A (or be assigned a specific gate), there are often mandatory checkpoints:
Security Checkpoint: Scanners check if passengers have ID, boarding passes, and prohibited items.
Baggage Claim Counter ("Namespace Lifecycle"): If you're checking in for Terminal B, the system prevents you from accessing Terminal A.

These analogies represent different Admission Controllers ensuring requests adhere to rules before they are processed by Kubernetes itself (like assigning a gate or creating the resource).
What Exactly Do Admission Controllers Do?
At its core, an Admission Controller is part of the API server's request processing pipeline. It sits between the user submitting a request and Kubernetes applying it to the cluster state.
Think of every interaction with the cluster – kubectl apply -f my-pod.yml, or your CI/CD system creating a deployment via an HTTP call – as sending data (called structured objects) to the API server's endpoint. This request goes through several Admission Controllers sequentially before Kubernetes even thinks about "answering" it.
Each Admission Controller has one of two main jobs:
Inspect: Look at the details of the object being created or modified.
Then, depending on its type:
Modify (Mutate): Change parts of that object if certain conditions aren't met OR to add specific features.
Reject (Validate): Say "No!" if the request violates a policy.
They are crucial because they allow us to enforce rules centrally and automatically across all objects entering the cluster. This is fundamental for:
Security
Compliance
Resource Management
Quality Control
Without them, enforcing consistent practices would be like trying to keep everyone honest by shouting "Hey! No!" at every object creation – it simply wouldn't scale.
Where Do They Fit in the API Request Lifecycle?
Let's break down a typical request flow:
You want to create a new Pod. You run kubectl apply -f pod.yml.
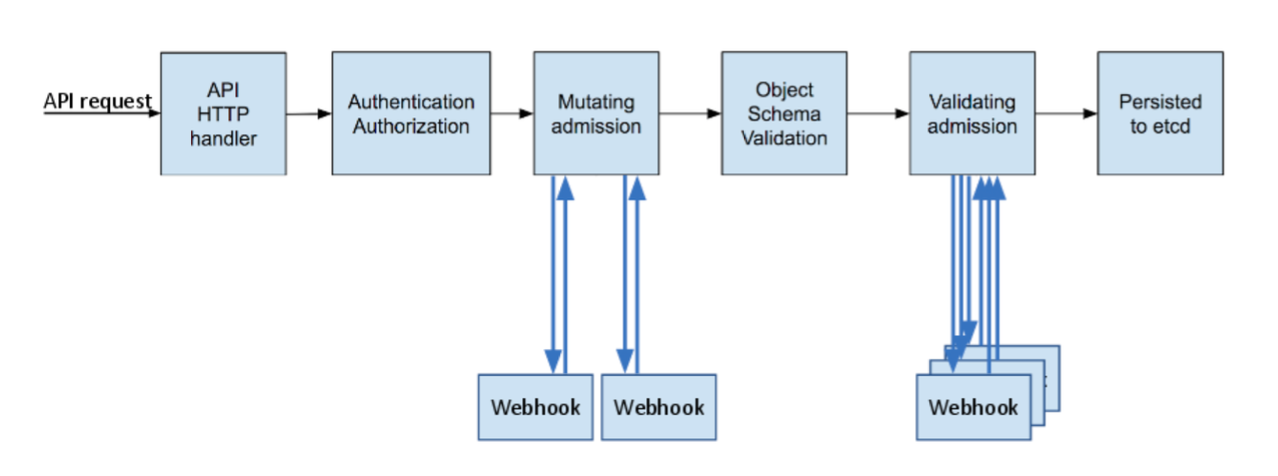
Here’s a more detailed breakdown:
User Action: You execute
kubectl applyor some other client tool action.Client Library/API Call: Your command line tool or application converts that request into an API call (often JSON) sent to the Kubernetes API server.
Admission Controller Pipeline: The API request enters a series of checks defined by the configured Admission Controllers. This pipeline is where our gatekeepers operate!
MutatingWebhook vs ValidatingWebhook / Built-in Controllers:
If there's an admission controller that needs to mutate (change) objects, it sits here and does its thing.
If there are validating controllers or built-ins checking things, they run their validation checks here. These can be simple built-in ones like
NamespaceLifecycle, or complex external ones via webhooks (ValidatingAdmissionWebhook).
Kubernetes Core Logic: Once all admission controllers have passed (either modified or validated), the request goes to Kubernetes itself.
Object Creation/Update: The cluster state is updated with your new Pod object.
Mutating vs Validating Admission Controllers
It's essential to grasp this distinction:
MutatingWebhook: This type changes the incoming object before it gets persisted or applied by Kubernetes. Think of it as someone who helps you fix things:
They can add default values (like setting
imagePullPolicy: IfNotPresentif not specified).They can automatically inject sidecar containers for logging.
They modify the request payload but don't prevent it from happening unless their validation also fails.

ValidatingWebhook: This type checks the incoming object. It doesn't change anything, only verifies conditions.
If the object is correct (passes the policy), the request proceeds normally (
Allow).If the object violates a rule (fails the policy), it says
Denyor sometimes just logs the error and lets Kubernetes proceed (though this is less common for production security – we usually prefer strict rejection).
Built-in Admission Controllers: These are part of the core Kubernetes API server configuration. They handle specific, critical cluster behaviors automatically without needing separate setup.

What Comes Out of the Box?
Kubernetes ships with several useful built-in admission controllers that you can enable by setting --enable-admission-plugins in your API server flags:
PodSecurity: This is probably the most important one for security out-of-the-box!What it does: It checks whether a Pod request meets defined security posture requirements based on cluster policies.
Why it's crucial: Prevents running non-root containers with
allowPrivilegeEscalation: true, ensures AppArmor or Seccomp profiles are used, blocks overly privileged containers. This helps harden your entire cluster against insecure configurations.
NamespaceLifecycle: Closely related to the airport analogy.What it does: Prevents operations on resources in a namespace that doesn't exist or hasn't been created by you as the authenticated user who made the request.
Why important: Stops users from modifying system namespaces like
kube-systemdirectly via API calls, promoting proper use of namespaces for isolation.
LimitRanger: Automatically adjusts resource requests and limits (CPU, Memory) for newly created resources or updates to existing ones within a namespace.- What it does: Ensures that Pods don't exceed their available resources (or set limits too low). It can also adjust initial
requests/limitsif they are missing or inconsistent.
- What it does: Ensures that Pods don't exceed their available resources (or set limits too low). It can also adjust initial
DefaultStorageClass:` Automatically sets default storage requests for containers in a Pod when none are specified.- What it does: Helps standardize resource allocation, especially useful when combined with
LimitRanger.
- What it does: Helps standardize resource allocation, especially useful when combined with
These built-ins focus on specific cluster-wide or namespace-level behaviors and policies automatically.
Dynamic Admission Controllers: Webhooks
Now, what if you need something more than just the built-in rules? Maybe you want to enforce custom security baselines unique to your company, integrate with an external service for approval workflows, or mutate objects based on complex logic involving other cluster state?
That's where Dynamic Admission Controllers, specifically using ValidatingAdmissionWebhooks (Mutating/Validating Sidecar webhooks), come into play.
Instead of being built-in, these controllers run as separate services outside the API server itself. They are called via webhook calls – essentially HTTP requests triggered by the API server whenever specific events happen or based on resource types and namespaces.
Think of them like external validators at a security checkpoint:
You submit your Pod definition (
pod.yml) to the API server.The
ValidatingAdmissionWebhookcontroller intercepts it.It sends this request (the pod's YAML) along with some Kubernetes metadata, to an external service endpoint you configured – maybe a service running in another part of your cluster or even on-premises.
Common Use Cases & Why They Matter
Admission controllers are vital for managing Kubernetes environments effectively, especially in shared or multi-tenant scenarios:
Security: Enforce
PodSecuritystandards (restricted, privileged levels). Block overly permissive capabilities (allowPrivilegeEscalation). Ensure secrets meet complexity rules.Compliance: Mandate specific labels on resources. Require documentation annotations before deployment. Check against PCI-DSS or HIPAA requirements in your YAML.
Policy Enforcement: Enforce resource limits to prevent pod evictions due to OOM (Out-of-Memory). Block deprecated API versions from being used. Standardize naming conventions across the entire cluster.
Auditing: Log every resource creation/ modification with specific metadata or decisions made by admission controllers.
The benefits are clear:
Improved Security: Reduces vulnerabilities introduced by misconfigured pods.
Ensured Compliance: Helps meet regulatory and internal standards automatically.
Consistent Policy Enforcement: Prevents drift from best practices across the board.
Centralized Auditing: Tracks changes systematically.
Potential Pitfalls & Gotchas
While powerful, admission controllers need careful handling:
Webhook Availability: If your external webhook service is down or unreachable, what happens? With
failurePolicy: Fail, requests get stuck (deny). WithfailurePolicy: Ignore, they proceed as if nothing happened – this can be dangerous for security! Check thesideEffectssetting appropriately; "None" might mean less rigorous checking.Fail-Open vs Fail-Closed: Be deliberate about your failure policy and side effects settings. For security, a fail-closed (or strict fail) behavior is often preferred – reject unknown or risky requests rather than blindly allowing them.
Version Mismatch: Ensure the webhooks are compatible with the Kubernetes API version you're targeting (
apiVersionin the webhook rule). UsematchConditionsif necessary to target specific resource versions.Testing, Testing! Never apply security or policy changes directly in production without testing first! Use namespaces (like a dedicated staging/development namespace), test against a cluster's admission controller setup carefully.
Best Practices
Target Namespaces: Use
namespaceSelectorto restrict the impact of your admission controllers. Apply stricter policies only within specific teams' or environments' namespaces (backend-prod,staging, etc.). This prevents accidentally blocking legitimate traffic.Version Awareness: Be mindful of Kubernetes version compatibility for built-in and custom webhooks. Check documentation carefully during setup.
Test Environments: Always test your admission controller configurations (especially custom ones) in a non-production environment first.
Start Simple: Leverage the built-ins (
PodSecurity,NamespaceLifecycle) before moving to complex external webhooks.
Subscribe to my newsletter
Read articles from Sanmarg Paranjpe directly inside your inbox. Subscribe to the newsletter, and don't miss out.
Written by