Mastering Docker: The Complete Guide to Efficient & Production-Ready Containerization
 Yash Singhal
While diving deep into Docker, I realized there was a need for a clear and comprehensive guide that brings everything together in one place.
I created this blog to document everything I’ve learned while containerizing and deploying production-ready applications with Docker. From understanding what Docker really is to writing efficient Dockerfiles, orchestrating multi-container apps, and applying real-world deployment practices — this guide is packed with hands-on insights and best practices.
Whether you’re a beginner or brushing up for production readiness, this guide is for you. Let’s get started!
Why need Docker?
If we go back 20 to 30 years ago. Back then, everything was tightly tied to physical hardware. You’d install an operating system right on the machine, including the kernel and user interface. To run an application, you had to compile the code yourself and manually handle all its dependencies. If your app needed more capacity or if you wanted to run another application, you had to buy new hardware, install the OS again, and configure everything from scratch. It was time-consuming and inefficient.
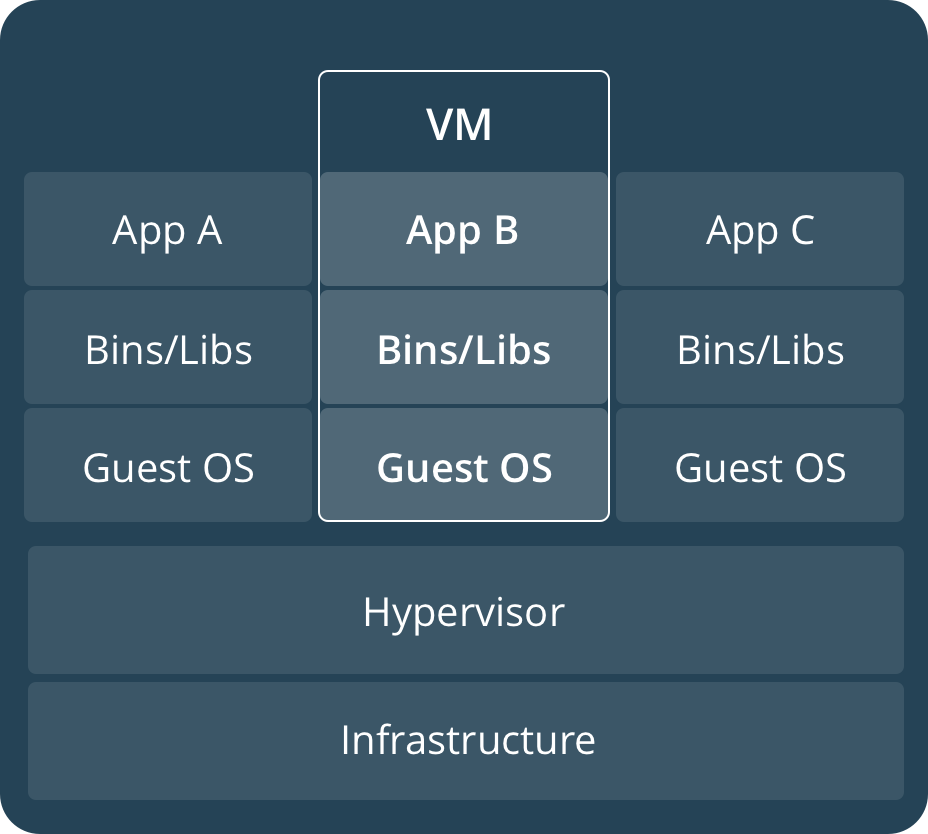
Virtualization came along and introduced a new layer called the hypervisor that sits between the hardware and operating system. This meant you could run multiple virtual machines on a single physical server—each VM with its own OS. This was a huge improvement because it let us run isolated applications more efficiently.
But even with virtual machines, you still had to install software and set up dependencies inside each VM. Your applications still weren’t truly portable—they might work perfectly on one machine but break on another because of subtle differences in environments.
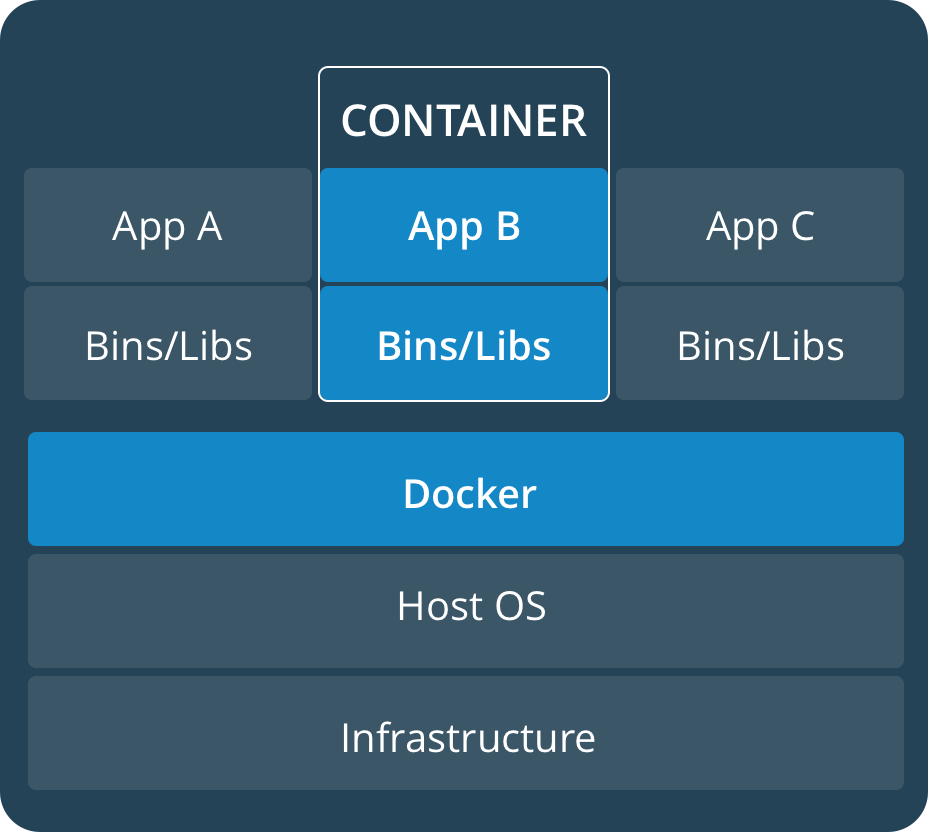
Containers
Fundamentally, a container is nothing but a running process, with some added encapsulation features applied to it in order to keep it isolated from the host and from other containers. One of the most important aspects of container isolation is that each container interacts with its own, private filesystem; this filesystem is provided by a Docker image. An image includes everything needed to run an application — the code or binary, runtimes, dependencies, and any other filesystem objects required.
What is Docker?
In simple terms, Docker is a platform that lets you package software and all its dependencies into a single container that can run reliably on any machine—whether it’s Windows, Mac, or Linux. This means you don’t have to worry about differences in environments breaking your app.
Docker has revolutionized software development by enabling the easy creation and deployment of microservice-based applications. It helps teams build, ship, and run applications consistently across different environments, making development and operations smoother and faster.

Docker Client: is a command-line tool, API, or graphical interface that users interact with to issue commands and manage Docker resources. The client sends requests to the Docker daemon, which orchestrates the execution of those commands.
Docker Daemon: also known as Docker Engine, is a background service and long-running process that runs on the host machine and actually does the work of running and managing both containers and container images. The Docker daemon is responsible for managing the lifecycle of containers and orchestrating their operations. It listens for requests from the Docker client, manages containers, and coordinates various Docker operations. The daemon interacts with the host operating system’s kernel and leverages kernel features and modules for containerization, networking, and storage.
Docker Desktop: is an easy-to-install application for your Mac, Windows or Linux environment that enables you to build and share containerized applications and microservices. With Docker Extensions, you can use third-party tools within Docker Desktop to extend its functionality.
Docker Registry: is a registry that stores container images. Docker Hub is a public registry that anyone can use, and Docker is configured to look for images on Docker Hub by default.
Containers Vs Virtual Machines
A container runs natively on Linux and shares the kernel of the host machine with other containers. It runs a discrete process, taking no more memory than any other executable, making it lightweight.
By contrast, a virtual machine (VM) runs a full-blown “guest” operating system with virtual access to host resources through a hypervisor. In general, VMs incur a lot of overhead beyond what is being consumed by your application logic.
Lets me summarise the learning till now:
Virtual Machines are slow and take a lot of time to boot.
Containers are fast and boot quickly as it uses the host operating system and shares the relevant libraries.
Containers do not waste or block host resources unlike virtual machines.
Containers have isolated libraries and binaries specific to the application they are running.
Containers are handled by the Containerisation engine.
Docker is one of the containerisation platforms which can be used to create and run containers.
Installation
Go to https://www.docker.com/get-started/ and download Docker Desktop.
➜  ~ docker --version
Docker version 27.4.0, build bde2b89
Docker Desktop includes:
Docker Engine: The core component that allows you to build, run, and manage containers.
1)
docker-run: Command used to launch a container with persistent storage using Docker volumes. Learn more about thedocker runcommand here.2)
docker build: Command to build a Docker image.Docker CLI Client: A command-line interface for interacting with Docker.
Docker GUI: A GUI for interacting with Docker.
Docker Buildx: An advanced build tool for multi-platform builds.
Extensions: Allows users to add extra functionalities to Docker Desktop.
Docker Compose: A tool to define and manage multi-container applications using a
docker-compose.yamlfile.Docker Content Trust: Ensures security by verifying the authenticity of images before pulling or running them.
Kubernetes: A container orchestration tool for deploying and managing large-scale containerized applications.
Credential Helper: A tool for securely storing and managing Docker registry login credentials.

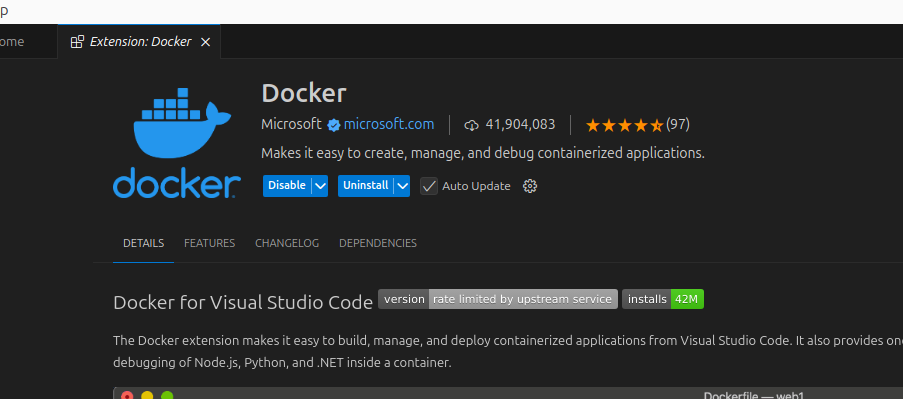
Download the Docker extension in VS Code.
docker run hello-world
Unable
to find image 'hello-world:latest' locally
latest: Pulling from library/hello-world
e6590344b1a5: Download complete
Digest: sha256:e0b569a5163a5e6be84e210a2587e7d447e08f87a0e90798363fa44a0464a1e8
Status: Downloaded newer image for hello-world:latest
Hello from Docker!
This message shows that your installation appears to be working correctly.To generate this message, Docker took the following steps:
 1. The Docker client contacted the Docker daemon.
 2. The Docker daemon pulled the "hello-world" image from the Docker Hub.
    (amd64)
 3. The Docker daemon created a new container from that image which runs the
    executable that produces the output you are currently reading.
 4. The Docker daemon streamed that output to the Docker client, which sent it
    to your terminal.To try something more ambitious, you can run an Ubuntu container with:
 $ docker run -it ubuntu bashShare images, automate workflows, and more with a free Docker ID:
 https://hub.docker.com/For more examples and ideas, visit:
 https://docs.docker.com/get-started/
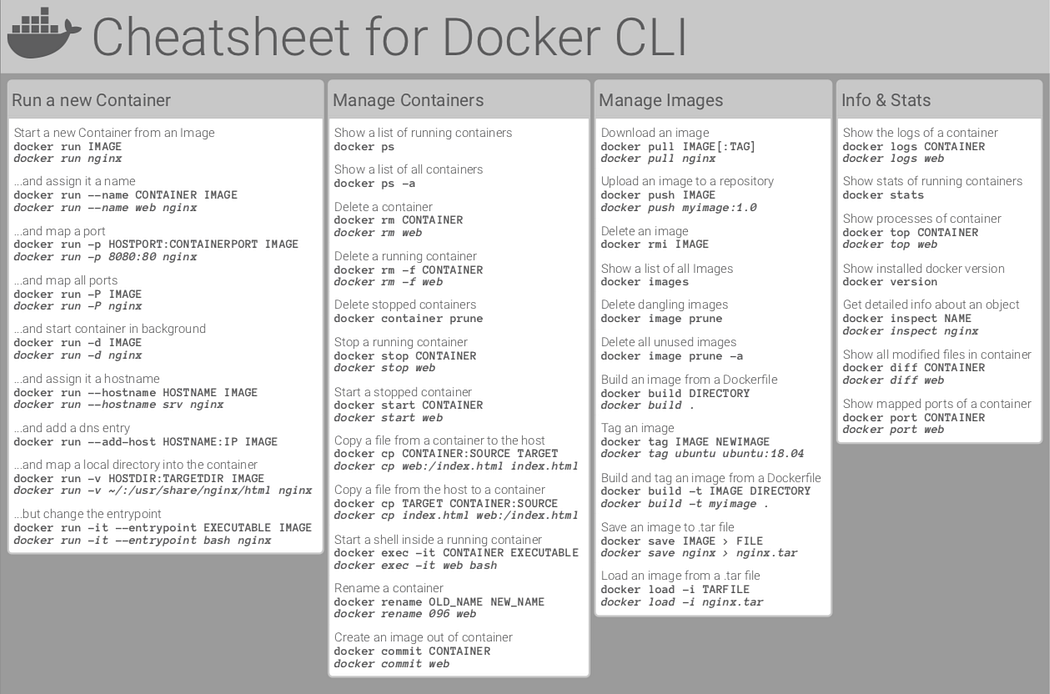
Docker CLI
Docker CLI is a command line tool that allows us to interact with Docker. It provides commands for managing containers, images, networks, volumes, and the system.
The Docker CLI works by running commands with the prefix docker.
For example, docker images lists all downloaded images.
docker images
REPOSITORY    TAG       IMAGE ID       CREATED       SIZE
hello-world   latest    e0b569a5163a   3 weeks ago   20.4kB
docker ps lists running containers.
CONTAINER ID IMAGE COMMAND CREATED STATUS PORTS NAMES
Image
A Docker image is like a recipe with all the ingredients and instructions packed together.
It includes:
The application code
System libraries and dependencies
Configuration files and environment settings
A base OS files
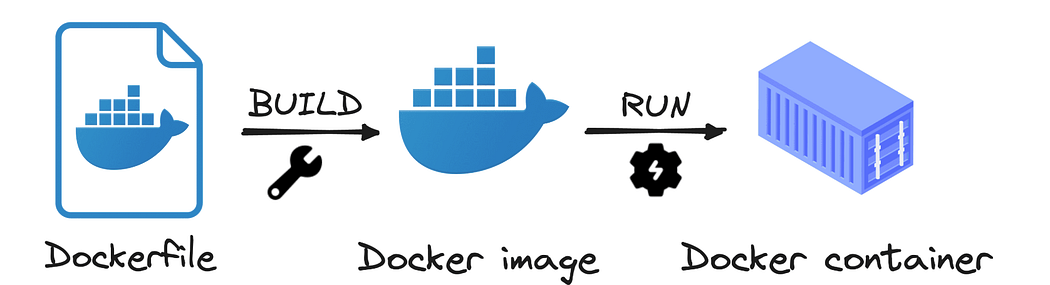
Once built, a Docker image doesn't change. If modifications are needed, a new image is created. It is a template for creating containers. We can create multiple containers from an image.
Each instruction in a Dockerfile creates a new layer in the image, making it efficient for caching and reuse.
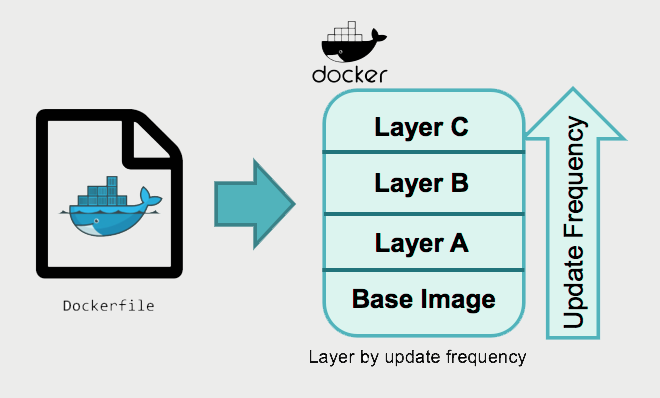
Docker images are made up of multiple layers, where each layer represents a set of instructions in the Dockerfile. These layers are stacked on top of each other to form the final image.
Layer: A stacked part of an image, created from a Dockerfile instruction.
Image: A collection of layers that define an application.
Container: A running instance of an image with a writable layer on top.
Dockerfile
A Dockerfile is simply like a recipe or instructions manual that tells Docker how to build an image.

Writing Efficient Dockerfiles
A clean, logical, and optimized Dockerfile is the first step toward reliable and maintainable containerized applications.
Start with a minimal and official base image: Use images like
alpine,node:alpine, orpython:slimto reduce bloat and security vulnerabilities. Official images are maintained and tested by Docker and the community.Pin versions explicitly: Always define version numbers for base images and installed packages. This ensures consistency across environments and prevents sudden failures due to upstream changes.
Group and combine RUN commands: Chain installation commands using
&&in a singleRUNstatement to reduce the number of layers and speed up the build process.Order commands to optimize caching: Docker uses a layer caching system. Place less frequently changed instructions (like installing OS packages) at the top, and frequently changing instructions (like
COPYorADD) near the bottom.Use a
.dockerignorefile: Exclude files and folders (e.g.,.git,node_modules,tests) that aren’t needed in the image build context. This avoids unnecessary bloat and speeds up the build process.
These practices ensure your containers build faster and are more predictable. Here's a complete guide to Dockerfile syntax and best practices.
Minimizing Image Size
Image size matters—a lot. Smaller Docker images lead to faster builds, deployments, and fewer attack vectors. Here are some proven methods to reduce Docker image size:
Use a lean base image: Choose Alpine (around 5 MB) or other minimal images over traditional ones like Ubuntu (over 100 MB). Alpine is ideal for lightweight services, although you may need to install additional libraries for compatibility.
Clean up temporary files and caches: When installing dependencies, clear cache in the same layer to prevent leftover files from ballooning image size. For example:
In case of Nodejs application:


Utilizing .dockerignore for Efficient Builds
Implementing a .dockerignore file is crucial in streamlining your Docker builds. This file excludes unnecessary files and directories from the build context, leading to faster build processes and smaller images. It's a simple yet effective way to ensure your Docker builds are as efficient as possible.
Leveraging Multi-Stage Builds for Production
Multi-stage builds are a game-changer for creating production-ready Docker images. They allow you to separate the build environment from the runtime environment, resulting in significantly smaller and more secure final images. This approach is particularly beneficial for compiled languages or when you need to include build tools that aren't required in the production environment.

Harnessing Environment Variables for Flexible Configuration
Environment variables offer a dynamic way to configure your Docker containers. They're particularly useful for managing settings that change between environments, such as database connection strings or API keys. By externalizing configuration in this way, you maintain the portability and flexibility of your Docker containers.

Docker Compose
Our application might consist of several instruments (containers) playing together (interacting). Docker Compose is the conductor that organizes all these instruments, making sure they play in harmony. See the full Docker Compose file reference here.
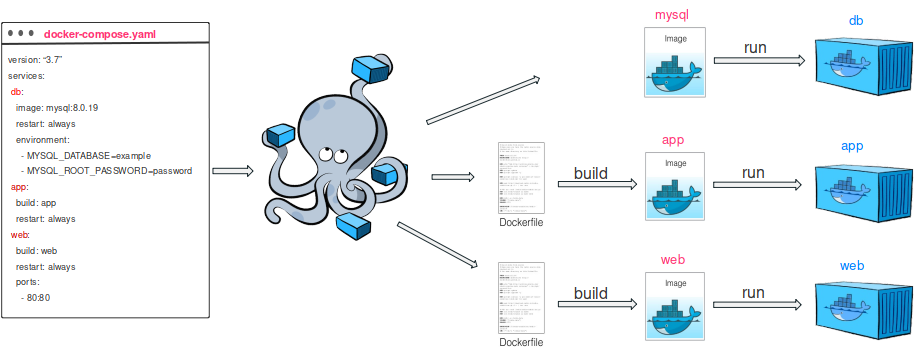
Docker Compose is a tool that simplifies running multi-container applications. Instead of manually running multiple docker run commands, you define all your services, networks, and volumes in a single docker-compose.yml file and start everything with one command.
Now, let’s do a final demonstration project that uses Docker Compose. We will use FastAPI backend, a simple HTML-JS frontend, MongoDB as a database, and a tool that interacts with MongoDB.
We’ll start by creating a structured folder layout:
mkdir fastapi-docker-project
cd fastapi-docker-project

# Create separate folders for each component
mkdir backend frontend mongodb mongo-express

# Move into the backend folder
cd backend
Move into the backend folder and create a virtual environment:
cd backend
python3 -m venv venv
source venv/bin/activate
Pip
pip install fastapi uvicorn motor pymongo pydantic
Inside the backend folder, create the following files:
backend/
│── main.py
│── models.py
│── database.py
│── requirements.txt
│── .env
In models.py, we defined Pydantic models to validate and structure data for our FastAPI application.
# backend/oldes.py
from pydantic import BaseModel
from typing import Optional

class User(BaseModel):
    name: str
    email: str

class Product(BaseModel):
    name: str
    price: float
    description: Optional[str] = None
The database.py file is responsible for connecting FastAPI to MongoDB using the Motor (async MongoDB driver).
# backend/database.py

import motor.motor_asyncio
import os
from dotenv import load_dotenv

load_dotenv()

MONGO_URL = os.getenv("MONGO_URL")
MONGO_DB = os.getenv("MONGO_DB")

client = motor.motor_asyncio.AsyncIOMotorClient(MONGO_URL)
db = client[MONGO_DB]
It fetches the MongoDB connection string and database name from environment variables.
main.py is the entry point of our FastAPI application. It:
Initializes FastAPI.
Sets up CORS middleware for frontend communication.
Defines API routes for handling users and products.
Connects to MongoDB to store and retrieve data.
# backend/main.py
from fastapi import FastAPI, HTTPException
from fastapi.middleware.cors import CORSMiddleware
from database import db
from models import User, Product


app = FastAPI()

# Allow frontend access
app.add_middleware(
    CORSMiddleware,
    allow_origins=["http://localhost:8080"],
    allow_credentials=True,
    allow_methods=["*"],
    allow_headers=["*"],
)

@app.get("/")
async def root():
    return {"message": "Welcome to FastAPI with Docker!"}

@app.post("/users/")
async def create_user(user: User):
    result = await db.users.insert_one(user.dict())
    created_user = await db.users.find_one({"_id": result.inserted_id})
    return {"id": str(created_user["_id"]), "name": created_user["name"], "email": created_user["email"]}

def serialize_user(user):
    """ Convert ObjectId to string for JSON serialization """
    user["_id"] = str(user["_id"])
    return user

@app.get("/users/")
async def get_users():
    users = await db.users.find().to_list(100)
    return [serialize_user(user) for user in users]

@app.post("/products/")
async def create_product(product: Product):
    result = await db.products.insert_one(product.dict())
    created_product = await db.products.find_one({"_id": result.inserted_id})
    return {
        "id": str(created_product["_id"]),
        "name": created_product["name"],
        "price": created_product["price"],
        "description": created_product.get("description", "")
    }

@app.get("/products/")
async def get_products():
    products = await db.products.find().to_list(100)
    return products
Create requirements.txt:
fastapi
uvicorn
motor
pymongo
pydantic
python-dotenv
Create .env:
MONGO_USERNAME=admin
MONGO_PASSWORD=admin123
MONGO_DB=fastapi_db
MONGO_HOST=mongodb
MONGO_PORT=27017
MONGO_URL=mongodb://admin:admin123@mongodb:27017/fastapi_db?authSource=admin
Now, the frontend; inside the frontend folder, create index.html:
<!DOCTYPE html>
<html lang="en">
<head>
    <meta charset="UTF-8">
    <meta name="viewport" content="width=device-width, initial-scale=1.0">
    <title>FastAPI Frontend</title>
    <script>
        async function fetchUsers() {
            let response = await fetch("http://localhost:8000/users/");
            let data = await response.json();
            document.getElementById("output").innerText = JSON.stringify(data, null, 2);
        }

        async function addUser() {
            let name = document.getElementById("name").value;
            let email = document.getElementById("email").value;

            let response = await fetch("http://localhost:8000/users/", {
                method: "POST",
                headers: { "Content-Type": "application/json" },
                body: JSON.stringify({ name, email })
            });

            let result = await response.json();
            document.getElementById("output").innerText = JSON.stringify(result, null, 2);
        }
    </script>
</head>
<body>
    <h1>FastAPI + MongoDB Frontend</h1>

    <h2>Add User</h2>
    <input type="text" id="name" placeholder="Enter Name">
    <input type="email" id="email" placeholder="Enter Email">
    <button onclick="addUser()">Add User</button>

    <h2>Users List</h2>
    <button onclick="fetchUsers()">Get Users</button>
    <pre id="output"></pre>
</body>
</html>
Next step, we will set up MongoDB & Mongo Express.
Inside mongodb folder, create init-mongo.js:
db = db.getSiblingDB("fastapi_db");
db.createCollection("users");
db.createCollection("products");
This file is a MongoDB initialization script that automatically creates the required database and collections when MongoDB starts inside Docker.
Create mongo-express/config.js:
module.exports = {
    mongodb: {
      server: "mongodb",
      port: 27017
    }
  };
This file configures Mongo Express, allowing it to connect to our MongoDB database inside Docker.
Now, we will create Docker Configuration.
Inside backend, create Dockerfile:
# Use official Python image
FROM python:3.9

# Set working directory
WORKDIR /app

# Copy and install dependencies
COPY requirements.txt .
RUN pip install --no-cache-dir -r requirements.txt

# Copy project files
COPY . .

# Run FastAPI
CMD ["uvicorn", "main:app", "--host", "0.0.0.0", "--port", "8000"]
Starts with Python 3.9 as the base environment.
Creates and switches to the
/appdirectory inside the container.Copies and installs requirements.
Copies all backend files into the
/appdirectory inside the container.Runs Uvicorn to start the FastAPI server.
--host 0.0.0.0→ Ensures the app is accessible inside the Docker network.--port 8000→ Runs the app on port 8000.
Inside fastapi-docker-project, create docker-compose.yml:
version: "3.8"

services:
  backend:
    build: ./backend
    ports:
      - "8000:8000"
    volumes:
      - ./backend:/app
    env_file:
      - ./backend/.env
    depends_on:
      - mongodb

  frontend:
    image: nginx
    volumes:
      - ./frontend:/usr/share/nginx/html
    ports:
      - "8080:80"

  mongodb:
    image: mongo
    container_name: mongodb
    restart: always
    ports:
      - "27017:27017"
    volumes:
      - mongo_data:/data/db
    environment:
      MONGO_INITDB_ROOT_USERNAME: ${MONGO_USERNAME}
      MONGO_INITDB_ROOT_PASSWORD: ${MONGO_PASSWORD}
      MONGO_INITDB_DATABASE: ${MONGO_DB}

  mongo-express:
    image: mongo-express
    restart: always
    ports:
      - "8081:8081"
    env_file:
      - ./backend/.env
    environment:
      ME_CONFIG_MONGODB_ENABLE_ADMIN: "true"
      ME_CONFIG_MONGODB_ADMINUSERNAME: "${MONGO_USERNAME}"
      ME_CONFIG_MONGODB_ADMINPASSWORD: "${MONGO_PASSWORD}"
      ME_CONFIG_MONGODB_SERVER: mongodb
      ME_CONFIG_MONGODB_PORT: "27017"
      ME_CONFIG_BASICAUTH: "false"
We use Docker Version 3.8.
version: "3.8"
Backend:
  backend:
    build: ./backend
    ports:
      - "8000:8000"
    volumes:
      - ./backend:/app
    env_file:
      - ./backend/.env
    depends_on:
      - mongodb
Builds the FastAPI backend from the
backend/directory.Maps port
8000inside the container to8000on the host, making FastAPI accessible viahttp://localhost:8000.Mounts the backend code (
./backend) into/appinside the container for live updates.Loads environment variables from
.env.Ensures MongoDB starts before FastAPI (
depends_on: - mongodb).
Frontend:
  frontend:
    image: nginx
    volumes:
      - ./frontend:/usr/share/nginx/html
    ports:
      - "8080:80"
Uses Nginx to serve frontend files (
HTML, CSS, JS).Maps port
8080on the host to port80inside the container.Mounts frontend files (
./frontend/) into/usr/share/nginx/html, making them accessible athttp://localhost:8080.
MongoDB:
  mongodb:
    image: mongo
    container_name: mongodb
    restart: always
    ports:
      - "27017:27017"
    volumes:
      - mongo_data:/data/db
    environment:
      MONGO_INITDB_ROOT_USERNAME: ${MONGO_USERNAME}
      MONGO_INITDB_ROOT_PASSWORD: ${MONGO_PASSWORD}
      MONGO_INITDB_DATABASE: ${MONGO_DB}
Runs MongoDB in a container with the name
mongodb.Maps port
27017so the database is accessible from the backend.Uses environment variables (
.env) for credentials (admin / admin123).Persists database data in
mongo_data:/data/dbto avoid data loss when restarting containers.
Mongo Express
  mongo-express:
    image: mongo-express
    restart: always
    ports:
      - "8081:8081"
    env_file:
      - ./backend/.env
    environment:
      ME_CONFIG_MONGODB_ENABLE_ADMIN: "true"
      ME_CONFIG_MONGODB_ADMINUSERNAME: "${MONGO_USERNAME}"
      ME_CONFIG_MONGODB_ADMINPASSWORD: "${MONGO_PASSWORD}"
      ME_CONFIG_MONGODB_SERVER: mongodb
      ME_CONFIG_MONGODB_PORT: "27017"
      ME_CONFIG_BASICAUTH: "false"

volumes:
  mongo_data:
Runs Mongo Express, a web-based UI for MongoDB.
Accessible at
http://localhost:8081.Uses credentials from
.envto connect to MongoDB.Disables Basic Auth (
ME_CONFIG_BASICAUTH: false) for easy access.
Finally, build and run everything…
docker-compose up --build
Go to: http://localhost:8080/
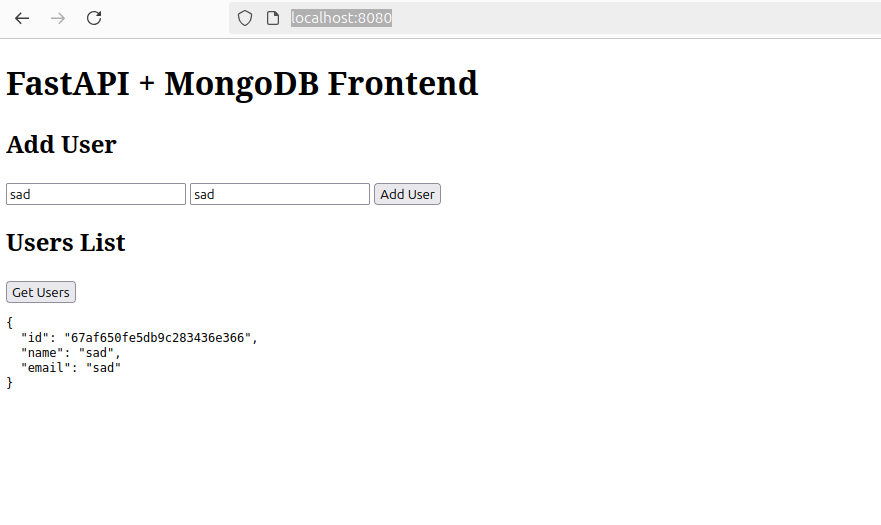
Go to http://localhost:8081/db/fastapi_db/users

Now, everything is containerized and works together seamlessly!
Setting Resource Constraints to Safeguard Performance
Defining resource constraints in your Docker-Compose file is essential to prevent any single container from monopolizing system resources. This practice is especially important in a multi-container environment, ensuring that each container has access to the resources it needs without impacting the performance of others.

Networking Best Practices
One of Docker’s most powerful, yet often misunderstood, features is networking. Docker’s built-in networking capabilities allow containers to communicate with each other and the outside world seamlessly, without needing complex configurations. Whether you're building microservices or a distributed system, understanding Docker networking is essential for scalable and secure application architecture.
1. Use Custom Networks
Isolate containers in custom bridge networks:
docker network create my-network
docker run --network my-network my-app
2. Restrict Ports
Expose only necessary ports. Use internal-only containers for backend services.
DOCKER VOLUMES
These are used to persist data in Docker containers. The storage options are:
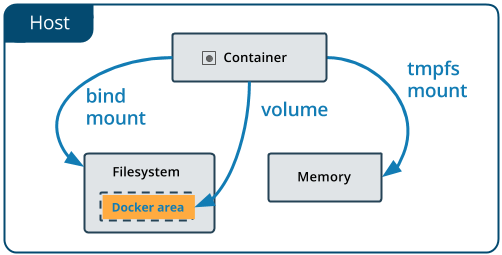
Bind Mounts
Mounts a file or directory that resides on the host inside the container. This is an effective mechanism that allows you to access files from the host inside the container. Once the container is stopped, the data remains because it lives on the host. On the downside, bind mounts are not decoupled from the host as you might like. You have to know the exact path on the host that you want to mount in the container.
Volumes
Preferred over bind mounts and can be described in a similar way except that Docker manages the storage on the host. There is no need to know the path to the file making it easier when working cross platform as Docker handles the volume. Volumes are not limited to the local host file system. They can also use different drivers (which supports external mechanisms such as Amazon S3). Learn more about Docker storage drivers and volume types.
TMPFS Mounts
Not persistent. Allows file system access for the life of the running container, making it useful to store sensitive data such as access tokens.
A volume can be mounted to a container by passing the -v ( — volume) option to the docker run command when starting a container.
docker run -d --name app_c1 -v volume_c1:/usr/src/app app:v1
The above command will map a volume named volume_c1 to the code found in the /usr/src/app directory in the Docker container.
docker volume ls — list the available volumes
You don’t need to specify a volume name in the docker run command. You can find the name assigned by Docker using docker inspect app_c1.
Removing all images, containers and volumes
docker system prune  # cleans images, containers, volumes, and networks that are not associated with a container
docker system prune -a  # same as above, but includes stopped containers and unused images

docker volume prune  # removes volumes that are not connected to containers (aka "dangling" volumes)

docker rmi $(docker images -a -q)  # removes all images that are not associated with existing containers
docker image prune -a # same as the above command
docker rmi $(docker images -a -q) -f  # same as above, but forces the images associated with existing containers (running or stopped) to also be removed

docker rm $(docker ps -a -q)  # removes all containers
docker rm $(docker ps -a -q) -f  # same as above, but forces running containers to
Secure Your Containers
1) Avoid Running as Root
Specify a non-root user in the Dockerfile:
RUN adduser --disabled-password appuser
USER appuser
2) Use Secrets Management
Store sensitive information like API keys and passwords securely:
Use Docker secrets for Swarm or Kubernetes.
For standalone Docker, pass environment variables securely:
docker run -e API_KEY=your_api_key my-app
3) Keep Your Images Updated
Regularly pull and rebuild your images to include the latest security patches:
docker pull my-app:latest
Monitor and Log Containers
1. Enable Centralized Logging
Forward container logs to centralized systems like:
ELK Stack (Elasticsearch, Logstash, Kibana).
Prometheus and Grafana for metrics.
Use the --log-driver flag to configure logging:
docker run --log-driver=json-file --log-opt max-size=10m --log-opt max-file=3 my-app
2. Monitor Container Health
Add a HEALTHCHECK instruction in your Dockerfile:
HEALTHCHECK CMD curl --fail http://localhost:8080/health || exit 1
Inspect container health:
docker inspect --format='{{json .State.Health}}' <container_id>
You can integrate Docker with the ELK Stack or Prometheus + Grafana for metrics.
Deployment Strategies
1. Rolling Updates
Use rolling updates to deploy new versions with minimal downtime. For example, with Docker Swarm:
docker service update --image my-app:new-version my-service
2. Blue-Green Deployments
Run two versions of your application simultaneously and switch traffic to the new version once it’s ready.
3. Use CI/CD Pipelines
Automate builds, tests, and deployments with tools like GitHub Actions, Jenkins, or GitLab CI.
Example CI/CD pipeline step:
deploy:
  stage: deploy
  script:
    - docker pull my-app:latest
    - docker stop my-app || true
    - docker rm my-app || true
    - docker run -d --name my-app -p 80:80 my-app:latest
Example Use Case: Deploying a Docker Container to Kubernetes
Step 1: Create a Deployment YAML File (deployment.yaml)
apiVersion: apps/v1
kind: Deployment
metadata:
  name: nginx-deployment
spec:
  replicas: 3
  selector:
    matchLabels:
      app: nginx
  template:
    metadata:
      labels:
        app: nginx
    spec:
      containers:
      - name: nginx
        image: nginx:1.14.2
        ports:
        - containerPort: 80
Step 2: Apply the Deployment
kubectl apply -f deployment.yaml
Step 3: Create a Service YAML File (service.yaml)
apiVersion: v1
kind: Service
metadata:
  name: nginx-service
spec:
  selector:
    app: nginx
  ports:
    - protocol: TCP
      port: 80
      targetPort: 80
  type: LoadBalancer
Step 4: Apply the Service
kubectl apply -f service.yaml
Step 5: Scaling in Kubernetes
Scale your deployment seamlessly:
kubectl scale deployment nginx-deployment --replicas=5
Conclusion
Docker is more than just a development tool — it’s a key piece in modern DevOps, CI/CD, and scalable infrastructure. By mastering containerization, understanding Docker’s inner workings, and following production-grade best practices, you're equipping yourself with an in-demand skillset.
Whether you're deploying microservices or just streamlining your dev workflow, Docker will save you time, headaches, and inconsistency. I hope this guide helps you as much as it helped me.
💬 Got questions or feedback? Feel free to reach out — I’d love to connect with fellow builders!
Subscribe to my newsletter
Read articles from Yash Singhal directly inside your inbox. Subscribe to the newsletter, and don't miss out.
Written by