Dare to Deploy: Building Your L3 Rollup Chain with Arbitrum and Avail Explained🚀
 0xKaushik
Hey there, intrepid blockchain builder! If you’ve ever dreamt of setting up your own Layer 3 (L3) rollup chain, it’s time to roll up those sleeves and make it happen. We’re diving into DYOR-inggg (Deploying your own rollup ) an Arbitrum Orbit L3 chain using Avail as the data availability (DA) layer on top of the Arbitrum Sepolia testnet. Don’t worry — I’ll keep this guide straightforward and peppered with some idioms to keep things lively. Let’s jump right in!🌟
Prerequisites: Setting the Stage
1. Docker🐳
First things first, you’ll need Docker and Docker Compose installed to run your chain smoothly.
Install Docker: docker (opens in a new tab)
Install Docker Compose: docker-compose (opens in a new tab)
✅ Tip: Make sure they’re up and running before you continue. If not, installing these tools is just a click away!
2. Avail Account 🏦
Before diving head-first into deploying contracts, you need an Avail account. Here’s the skinny on how to do that:
Step 1: Compatible Wallet Setup👜
You can use wallets like SubWallet, Talisman, PolkadotJS, Nova Wallet, etc. This guide will use SubWallet as an example.
- Install SubWallet:
Visit SubWallet.app and install the browser extension.
Open the extension and select the option to create a new account or import an existing one.
2. Set Up a Password🔑:
- SubWallet will prompt you to create a password, which only secures access to the wallet extension itself, not the on-chain account.
3. Secure Your Seed Phrase📜:
- Don’t lose this! It’s your key to recover your account if things go sideways.
4. Configure Avail Networks🌐:
In SubWallet, open the Networks Menu.
Search for Avail testnets and toggle the network on to connect to Avail DA mainnet or Turing testnet.
5. Retrieve Your Avail Address 📬:
Go to the SubWallet homepage and click on Get Address.
Select your network and copy your account address.
Step 2: Fund Your Account Using Avail Faucet 💧
Visit Avail Faucet, select the chain (e.g., Turing), enter your address, complete the CAPTCHA, and get some test AVAIL tokens.
3. Get AppID for Your Rollup on Avail DA
Obtain an application key (AppID) for your rollup on Avail DA by following these steps:
Step 1: Check the Next Available AppID
Go to the Data Availability pallet in the explorer.
Select the nextAppId method.
Click the + button to view the next available index/ID for a new AppID.
Step 2: Register a New AppID
Ensure your Avail DA wallet is connected to the explorer.
Navigate to the Extrinsics section under the Developer tab.
Select the dataAvailability pallet and choose the createApplicationKey method.
Enter a unique key for your app.
Important Note:
Do Not Change the appID field for this transaction. Set it to 0, as this denotes chain-level operations.
Each transaction on Avail DA has a unique appID.
6. Submit the transaction, and authorize it through your wallet.
Step 3: Verify Your AppID
Go to the Chain State section of the explorer.
Select the dataAvailability pallet and the appKeys method.
Uncheck the Include Option toggle and click + to fetch a list of registered AppIDs, confirming your AppID.
4. Arbitrum Sepolia Testnet ETH ⚡
No ETH, no fun! Make sure you have at least 1 ETH on Arbitrum Sepolia:
Get Testnet ETH: Visit Alchemy’s Sepolia faucet.
Bridge ETH to Arbitrum Sepolia: Use the Arbitrum Bridge to transfer it over.
Following these prerequisites will set you up to create and manage an AppID on Avail DA and interact with the Avail network.
Step 1: Deploy Rollup Contracts
- Clone the Nitro Contracts Repository:
git clone <https://github.com/availproject/nitro-contracts.git>
cd nitro-contracts git checkout v2.1.0-upstream-v2.1.0
yarn install
yarn build
2. Create and Configure the .env File:
Copy
.env.sampleto.env.For the
ROLLUP_CREATOR_ADDRESSon any other supported chain, please find it here.For the
ARBISCAN_API_KEYcheck out https://docs.arbiscan.io/getting-started/viewing-api-usage-statisticsEdit the following entries:
ROLLUP_CREATOR_ADDRESS="0xE917553b67f630C3982236B6A1d7844B1021B909"  # For Arbitrum Sepolia
DEVNET_PRIVKEY="<--Private-key-->"
ARBISCAN_API_KEY = ""
3. Edit the Configuration File:
Copy
scripts/config.ts.exampletoscripts/config.tsand update with your chain’s parameters:In this change only the chainId to the number you wish. then keep remaining unchanged.
config = {
  rollupConfig: {
    confirmPeriodBlocks: ethers.BigNumber.from('150'),
    extraChallengeTimeBlocks: ethers.BigNumber.from('0'),
    stakeToken: ethers.constants.AddressZero,
    baseStake: ethers.utils.parseEther('0.0001'),
    wasmModuleRoot:
      '0x3f3b4da7b5c231e6faf91ff723d235728b05c9074f2ae3cc4b3e54dd5139d34f',
    owner: '0x1234123412341234123412341234123412341234',
    loserStakeEscrow: ethers.constants.AddressZero,
    chainId: ethers.BigNumber.from('20121999'),
    chainConfig:
      '{"chainId":20121999,"homesteadBlock":0,"daoForkBlock":null,"daoForkSupport":true,"eip150Block":0,"eip150Hash":"0x0000000000000000000000000000000000000000000000000000000000000000","eip155Block":0,"eip158Block":0,"byzantiumBlock":0,"constantinopleBlock":0,"petersburgBlock":0,"istanbulBlock":0,"muirGlacierBlock":0,"berlinBlock":0,"londonBlock":0,"clique":{"period":0,"epoch":0},"arbitrum":{"EnableArbOS":true,"AllowDebugPrecompiles":false,"DataAvailabilityCommittee":false,"InitialArbOSVersion":10,"InitialChainOwner":"0xd41996ED89bb5BF7dBfB181D8D93E8067446200B","GenesisBlockNum":0}}',
    genesisBlockNum: ethers.BigNumber.from('0'),
    sequencerInboxMaxTimeVariation: {
      delayBlocks: ethers.BigNumber.from('5760'),
      futureBlocks: ethers.BigNumber.from('12'),
      delaySeconds: ethers.BigNumber.from('86400'),
      futureSeconds: ethers.BigNumber.from('3600'),
    },
  },
  validators: [
    '0x1234123412341234123412341234123412341234',
  ],
  batchPosters: ['0x1234123412341234123412341234123412341234',],
  batchPosterManager: '0x1234123412341234123412341234123412341234'
},
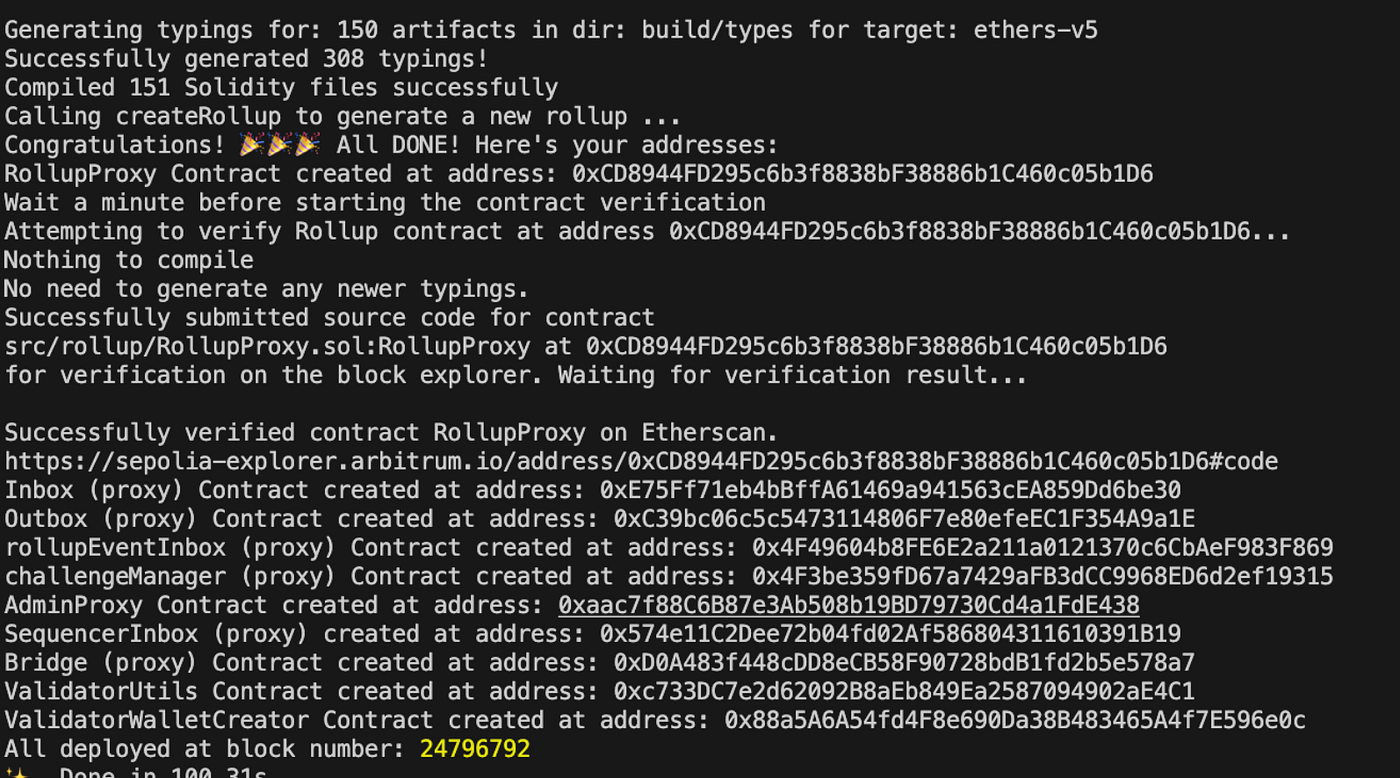
Step 2: Deploy Base Contracts on Arbitrum Sepolia
To deploy the rollup contracts on Arbitrum Sepolia, execute the following commands in sequence:
yarn build:forge:yul
yarn run deploy-eth-rollup --network arbSepolia
Heads up: If you see an error like No matches found: “\.sol”, edit the package.json file:*
"build:forge:yul": "FOUNDRY_PROFILE=yul forge build --skip \\"*.sol\\""
Re-run the command, and you’re good to go!
After deployment, note the addresses for the base contracts, as you will need them in the next configuration step.
Step 3: Configure and Start the Orbit Node
Clone the Orbit Setup Script Repository
Begin by cloning the repository for the Orbit setup script:
git clone <https://github.com/OffchainLabs/orbit-setup-script.git>
cd orbit-setup-script
Create and Configure
nodeConfig.jsonIn the
./configdirectory, create anodeConfig.jsonfile. Update it with the configuration details, including base contract addresses and network-specific settings:
chain.chain-id- Chain ID for your network.chain.chain-name- A name of your choice for the chain.chain.InitialChainOwner- Builder wallet address.bridgeand associated fields - Contract addresses obtained in Step 2.node.batch-poster.parent-chain-wallet.private-key- Private key for the builder wallet.node.staker.parent-chain-wallet.private-key- Private key for the staker wallet (use a different wallet from the builder).node.avail.seed- Seed phrase for the Avail wallet you created initially.node.avail.app-id- App ID obtained for Avail.node.avail.arbSepolia-rpc- RPC URL for Arbitrum Sepolia (obtainable from providers like Alchemy or Infura).
Here’s an example configuration:
{
  "chain": {
    "info-json": "[{\"chain-id\":<Insert your chain-id>,\"parent-chain-id\":421614,\"parent-chain-is-arbitrum\":true,\"chain-name\":\"<Insert chain name>\",\"chain-config\":{\"homesteadBlock\":0,\"daoForkBlock\":null,\"daoForkSupport\":true,\"eip150Block\":0,\"eip150Hash\":\"0x0000000000000000000000000000000000000000000000000000000000000000\",\"eip155Block\":0,\"eip158Block\":0,\"byzantiumBlock\":0,\"constantinopleBlock\":0,\"petersburgBlock\":0,\"istanbulBlock\":0,\"muirGlacierBlock\":0,\"berlinBlock\":0,\"londonBlock\":0,\"clique\":{\"period\":0,\"epoch\":0},\"arbitrum\":{\"EnableArbOS\":true,\"AllowDebugPrecompiles\":false,\"DataAvailabilityCommittee\":false,\"InitialArbOSVersion\":11,\"GenesisBlockNum\":0,\"MaxCodeSize\":24576,\"MaxInitCodeSize\":49152,\"InitialChainOwner\":\"<Insert chain owner address>\"},\"chainId\":<Insert chain id>},\"rollup\":{\"bridge\":\"<Bridge proxy address>\",\"inbox\":\"<Inbox address>\",\"sequencer-inbox\":\"<Sequencer inbox address>\",\"rollup\":\"<Rollup proxy address>\",\"validator-utils\":\"<Validator until address>\",\"validator-wallet-creator\":\"<Validator wallet creator address>\",\"deployed-at\":<Insert deployed-at block number>}}]",
    "name": "<Insert chain name>"
  },
  "parent-chain": {
    "connection": {
      "url": "https://sepolia-rollup.arbitrum.io/rpc"
    }
  },
  "http": {
    "addr": "0.0.0.0",
    "port": 8449,
    "vhosts": [
      "*"
    ],
    "corsdomain": [
      "*"
    ],
    "api": [
      "eth",
      "net",
      "web3",
      "arb",
      "debug"
    ]
  },
  "node": {
    "sequencer": true,
    "delayed-sequencer": {
      "enable": true,
      "use-merge-finality": false,
      "finalize-distance": 1
    },
    "batch-poster": {
      "max-size": 90000,
      "enable": true,
      "parent-chain-wallet": {
        "private-key": "<Insert your private key here>"
      }
    },
    "staker": {
      "enable": true,
      "strategy": "MakeNodes",
      "parent-chain-wallet": {
        "private-key": "<Insert your private key here>"
      }
    },
    "dangerous": {
      "no-sequencer-coordinator": true
    },
    "avail": {
      "enable": true,
      "seed": "<Enter your seed phrase here>",
      "avail-api-url": "wss://turing-rpc.avail.so/ws",
      "app-id": <Enter your avail app id>,
      "timeout":"100s",
      "vectorx": "0xA712dfec48AF3a78419A8FF90fE8f97Ae74680F0",
      "arbSepolia-rpc": "<Enter an arbSepolia wss url here>"
    }
  },
  "execution": {
    "forwarding-target": "",
    "sequencer": {
      "enable": true,
      "max-tx-data-size": 85000,
      "max-block-speed": "250ms"
    },
    "caching": {
      "archive": true
    }
  }
}
Fill in the required values, including private keys, app-id, and any other specified parameters.
Step 4: Configure orbitSetupScriptConfig.json
In ./config/orbitSetupScriptConfig.json, enter your chain information as outlined below:
networkFeeReceiver- Builder wallet address.infrastructureFeeCollector- Builder wallet address.staker- Staker wallet address.batchPoster- Builder wallet address.chainOwner- Builder wallet address.chainId- Chain ID for your network.chainName- Chain name.minL2BaseFee- Set this to100000000.parentChainId- Set to421614.parent-chain-node-url-https://sepolia-rollup.arbitrum.io/rpc.
Below is an example configuration:
{
  "networkFeeReceiver": "0xd41996ED89bb5BF7dBfB181D8D93E8067446200B",
  "infrastructureFeeCollector": "0xd41996ED89bb5BF7dBfB181D8D93E8067446200B",
  "staker": "0xDF819f9Fc3c28FEDFb73374C7B60A4f9BCdE6710",
  "batchPoster": "0xB0Ad5AE0a78025613F17B7e4644CE5752487B9d6",
  "chainOwner": "0xd41996ED89bb5BF7dBfB181D8D93E8067446200B",
  "chainId": 99584959107,
  "chainName": "My Arbitrum L3 Chain",
  "minL2BaseFee": 100000000,
  "parentChainId": 421614,
  "parent-chain-node-url": "<https://sepolia-rollup.arbitrum.io/rpc>",
  "utils": "0xB11EB62DD2B352886A4530A9106fE427844D515f",
  "rollup": "0xd30eCcf27A6f351EfA4fc9D17e7ec20354309aE3",
  "inbox": "0x4512e40a1ec8555f9e93E3B6a06af60F13538087",
  "nativeToken": "0x0000000000000000000000000000000000000000",
  "outbox": "0x2209755fA3470ED1AFFB4407d1e3B1f7dFC13ce9",
  "rollupEventInbox": "0x1e58240B2D769de25B4811354819C901317D0894",
  "challengeManager": "0xfC5BbC40d24EcD6FcC247EfFDc87E7D074E9B67D",
  "adminProxy": "0xf488b25e6736Ed74E8d37EA434892129E4d62E3B",
  "sequencerInbox": "0xD15347309854F1290c9a382ea2719AB5462c7719",
  "bridge": "0xC83ee8e28B7b258f41aF8ef4279c02f901288029",
  "upgradeExecutor": "0x805bB07B88dDA56030eC48644E0C276e2e5E3949",
  "validatorUtils": "0xB11EB62DD2B352886A4530A9106fE427844D515f",
  "validatorWalletCreator": "0xEb9885B6c0e117D339F47585cC06a2765AaE2E0b",
  "deployedAtBlockNumber": 11274529
}
Step 5: Download the Docker Image
Retrieve the avail-nitro-node Docker image using the command below:
docker pull availj/avail-nitro-node:v2.1.0-upstream-v3.1.1
Step 6: Update the docker-compose File in orbit-setup-script
In the docker-compose file, replace the relevant image field:
nitro:
  image: availj/avail-nitro-node:v2.1.0-upstream-v3.1.1
  ports:
  ...
Step 7: Run Your Chain
You’re almost there! From the root directory of the orbit-setup-script, run:
docker-compose up -d
Visit http://localhost:8449/ for RPC access and http://localhost/ to check out your BlockScout explorer.
Wrapping Up: You Did It!
That’s it! You’ve built your own L3 rollup chain on Arbitrum Orbit with Avail DA. Give yourself a pat on the back — you’re now part of an elite group of blockchain pioneers. Whether you’re here for innovation, learning, or just a thrilling ride, keep pushing the boundaries. The blockchain world is your oyster! 🚀
Appendix A: Checking Your Chain Logs 📝
Keeping an eye on your chain’s logs is crucial to ensure everything is running smoothly. Here’s how you can do it with a single command:
Navigate to the root directory of your Orbit setup script and run:
docker-compose logs -f nitro
This command streams real-time logs, so you can spot any issues or just confirm your chain is running as expected.
Appendix B: Depositing ETH/Native Tokens 💸
Need to top up your Orbit chain account with ETH or native tokens? Here’s how to do it:
Make sure you’re in the base directory of your setup script.
Run the following command, but don’t forget to replace
0xYourPrivateKeywith your actual private key and<AMOUNT>with the number of tokens you want to send:
PRIVATE_KEY="0xYourPrivateKey" L2_RPC_URL="https://sepolia-rollup.arbitrum.io/rpc" L3_RPC_URL="http://localhost:8449" AMOUNT="<AMOUNT>" yarn run deposit
Tip: Triple-check your private key for typos or unwanted spaces to avoid any hiccups!
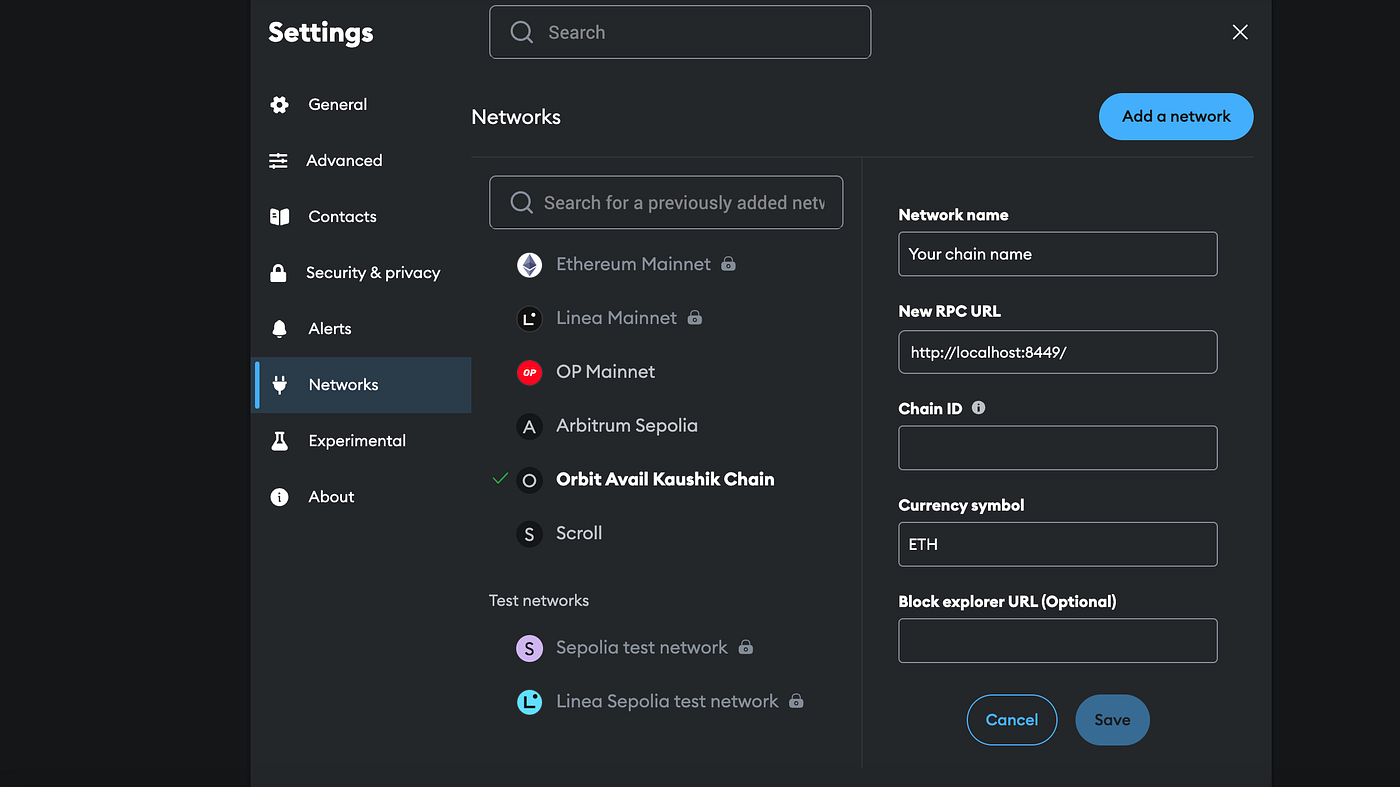
Bonus: Adding Your Orbit Chain to MetaMask 🦊
What’s a new chain without the ability to manage it through MetaMask? Here’s a quick way to add your Orbit chain:
Open MetaMask and navigate to Settings > Networks.
Click Add Network and fill in the following details:
Network Name: My Orbit Chain (or any name you prefer)
New RPC URL:
http://localhost:8449Chain ID: 123456 (replace with your chain’s ID if different)
Currency Symbol: ETH
Block Explorer URL: (Leave empty or add if available)
3. Hit Save, and you’re ready to manage your Orbit chain seamlessly through MetaMask!
Voilà! Now you’re equipped to monitor logs, deposit ETH, and use MetaMask with your chain. It’s time to see your L3 in action. 🚀
Subscribe to my newsletter
Read articles from 0xKaushik directly inside your inbox. Subscribe to the newsletter, and don't miss out.
Written by