How to Set up a Graylog Server on Ubuntu 24.04: A Comprehensive Guide
 Joseph Chisom Ofonagoro
Setting up a Graylog server on Ubuntu can seem overly technical and overwhelming, especially for beginners. However, despite the potential challenges, it's ironically straightforward.
In this tutorial, I’ll take you step by step through how to set up your Graylog server on your computer from scratch, highlighting potential errors and how to fix them.
What is Graylog?
Graylog is an open-source data collection tool used by system, network admins, as well as cybersecurity professionals, to collect logs from different input points. In simpler terms, Graylog is a SIEM tool. A popular alternative to Splunk, or even Wazuh, which I am currently exploring, and may write on soon.
As a free, open-source tool, anyone can spin it up on their computer, with its necessary dependencies, and start collecting logs.
Requirements for Setting up Graylog Server on Ubuntu 24.04
To set up the Graylog server on your Ubuntu distro, you will need to have certain dependencies in place. This is necessary as Graylog, like most security tools, especially those that are set up via the command line, doesn’t work alone.
An Ubuntu LTS Machine:
This is already obvious. While it can work on different operating systems, this guide is dedicated to setting up Graylog on Ubuntu only. Additionally, Ubuntu 20.04 and 22.04 can work, but I’ll recommend that you use 24.04 Long Term Support (LTS).
Ubuntu can be installed in different ways. Either you use it as your Main OS, you dual boot, you run it in a VM, or you can even run Ubuntu via the cloud or via WSL. All of these options can work, but for convenience, I’ll suggest you don’t use Ubuntu on your main OS, except you are partitioning a part of your drive for Graylog server setup using XFS.
MongoDB:
MongoDB is a database storage platform. For our setup, it will be used to store logs collected by the Graylog server.
To effectively use our Graylog server, we also need to have OpenJDK set up, also. OpenJDK allows us to implement Java into our setup.
For this guide, I’ll be making use of Java version 11, but you can also use the latest, which is version 17.
Elasticsearch/OpenSearch:
Another close companion when setting up a Graylog server is Elasticsearch, a core data aggregation tool. I used Elasticsearch in this tutorial, but you can use OpenSearch. They are typically the same. Opensearch was cut out from Elasticsearch in 2021.
Graylog:
Installing the tool itself is different from setting up the Graylog server. We need to have the tool installed from our CLI to access the server on the GUI.
Now that we know the requirements and have chosen the one we want to use, let’s commence with our Graylog server setup.
Please note that these tools are to be installed in this order: OpenJDK, Elasticsearch, MongoDB, and Graylog itself.
Installing OpenJDK
Firstly, update your system: sudo apt update
After that, add this command:
sudo apt install apt-transport-https gnupg2 uuid-runtime pwgen curl dirmngr -y && sudo apt install openjdk-11-jre-headless -y |
Java 17 can be installed by just changing the number in the command. So, instead of sudo apt install openjdk-17-jre-headless -yYou can do sudo apt install openjdk-17-jre-headless -y
After Java is installed, on your terminal, verify the installation with:
java -version |
It will output something like this:
openjdk version "17.0.26" 2025-01-21 |
Verify that the version number matches what you installed. Since I installed Java version 17, you can see that my version number is 11.
Installing Elasticsearch
Before you install Elasticsearch, you need to add its GPG key. To do that, type this in your terminal:
$ curl -fsSL https://artifacts.elastic.co/GPG-KEY-elasticsearch | sudo gpg --dearmor -o /usr/share/keyrings/elastic.gpg |
This won’t return any output; it runs in the background, and when it does, which is quite fast, the typing prompt appears again. After that, you should add the Elasticsearch source. To do that, type in this too:
$ echo "deb [signed-by=/usr/share/keyrings/elastic.gpg] https://artifacts.elastic.co/packages/7.x/apt stable main" | sudo tee -a /etc/apt/sources.list.d/elastic-7.x.list |
Once this is done, it doesn’t return an output. Update your system to catch the changes.
sudo apt update -y |
NOTE: The -y parameter/flag tells it to answer yes to any question that may arise during installation. For pro users, this is used to enter into unsupervised mode, and is often used when the process will be quite lengthy and the user needs to do other things while the process is running.
Like every sudo apt updateIt will typically end with these lines:
... |
Once that is done, proceed to install Elasticsearch using:
sudo apt install elasticsearch |
The last line in the output should be this:
Created elasticsearch keystore in /etc/elasticsearch/elasticsearch.keystore |
Once that is done, you will need to configure Elasticsearch to start on boot, and also enable it if it is not. To do that, run:
sudo systemctl start elasticsearch && sudo systemctl enable elasticsearch |
Running those commands should output:
Synchronizing state of elasticsearch.service with SysV service script with /usr/lib/systemd/systemd-sysv-install. |
This confirms that whenever you boot into your Ubuntu, Elasticsearch will automatically start and be enabled. Optionally, to verify this, run:
sudo systemctl status elasticsearch |
This should output:
● elasticsearch.service - Elasticsearch |
I made some of the output bold; these are the main pointers, indicating that Elasticsearch is active and starts on boot.
Use CTRL + C to exit that output, if it doesn’t immediately return to the prompt.
The next thing to do is to edit the configuration file. Type in this command on your terminal:
sudo nano /etc/elasticsearch/elasticsearch.yml |
This will open the Elasticsearch configuration file in the nano text editor.
When the file is opened, you would see that most of what’s there is commented. Leave them that way, unless it’s necessary to edit any. What we are looking for is the cluster name.
Search for it and uncomment it, or add this:
cluster.name: Graylog |
Save with CTRL/CMD + O, press enter after saving, then exit with CTRL/CMD + X.
Once you are in your terminal, reload the daemon, and restart Elasticsearch using:
sudo systemctl daemon-reload && sudo systemctl restart elasticsearch. |
These commands bring no output, so you can proceed to initiate a GET request to test your Elasticsearch installation using Curl.
curl -X GET http://localhost:9200 |
This will output something like this:
{ |
You can see that everything is in sync, including our cluster name.
Installing MongoDB
Before you begin your installation, update your system:
sudo apt update |
Once that is done, proceed to add the MongoDB GPG signing key:
curl -fsSL https://pgp.mongodb.com/server-6.0.asc | \ |
This will open up a new line, then add:
sudo gpg - -daemor -o /etc/apt/trusted.gpg.d/mongodb-server-6.0.gpg |
Just like how we did for Elasticsearch, we can now add the MongoDB repository source list.d to Ubuntu.
echo "deb [ arch=amd64,arm64 signed=/etc/apt/trusted.gpg.d/keyrings/mongodb-server-6.0.gpg ] https://repo.mongodb.org/apt/ubuntu jammy/mongodb-org/6.0 multiverse" | sudo tee /etc/apt/sources.list.d/mongodb-org-6.0.list |
Once you are done with that, update your system to pick up the changes.
sudo apt update |
After your system has been updated, install MongoDB via:
sudo apt install mongodb-org -y |
Confirm your installation with:
mongod -version |
After verifying that your installation was successful, you’ll need to ensure that MongoDB starts on boot and is enabled.
sudo systemctl start mongod && sudo systemctl enable mongod && sudo systemctl status mongod |
This will take a while, but it will output something like this:
Warning: The unit file, source configuration file, or drop-ins of mongod.service changed on disk. Run 'systemctl daemon-reload' to reload units. |
Use CTRL + C to end the process and return to your command prompt.
Alternatively, run sudo systemctl daemon-reload to keep everything in check.
Installing Graylog Server
After installing and verifying that Elasticsearch and MongoDB have been successfully installed, you may now proceed to install Graylog, which relies on both MongoDB and Elasticsearch to run its server successfully.
To begin the installation, you need to get the Graylog server Debian package. This ensures that it runs smoothly on Ubuntu (a Debian-based OS)
wget https://packages.graylog2.org/repo/packages/graylog-6.0-repository_latest.deb |
This should output something like this:
HTTP request sent, awaiting response... 200 OK |
Watch out for an output like this:
Selecting previously unselected package graylog-6.0-repository. |
Once the dpkg command has been enabled, update your system using:
sudo apt update |
Finally, you can install Graylog itself using:
sudo apt install graylog-server -y |
It will output this:
Reading package lists... Done |
Graylog does NOT start automatically!
Please run the following commands if you want to start Graylog automatically on system boot:
sudo systemctl enable graylog-server.service |
Just like the last part of our output says, we should enable Graylog to start automatically, using the suggested commands.
sudo systemctl enable graylog-server && sudo systemctl start graylog-server
This will take some time, but since it is a silent command, after running, it will just return to the command prompt. Verify that it has started and is enabled using sudo systemctl status graylog-server
Check for signs of ‘running’ and ‘active’
After validating Graylog’s status, the next step is to set up a secret password for securing user passwords and the admin password.
On your terminal, type in:
< /dev/urandom tr -dc A-Z-a-z-0-9 | head -c${1:-96};echo; |
This will generate the hashed value. Save that hash somewhere safe, because you’ll need it soon.
Next is to generate your admin password. To do that, type in:
echo -n "Enter Password: " && head -1 </dev/stdin | tr -d '\n' | sha256sum | cut -d" " -f1
This will output a prompt to enter your password. This is the password you’d use when logging into your Graylog’s WebUI. Hitting Enter will generate the password hash.
To ensure that Graylog can associate that password with your account (default username is admin), you are expected to save the password hash to Graylog’s config file, so you should also save the hash somewhere safe.
Enter your config file via: sudo nano /etc/graylog/server/server.conf
The config file is filled with commented lines. Only remove the comments from the lines you want Graylog to execute.
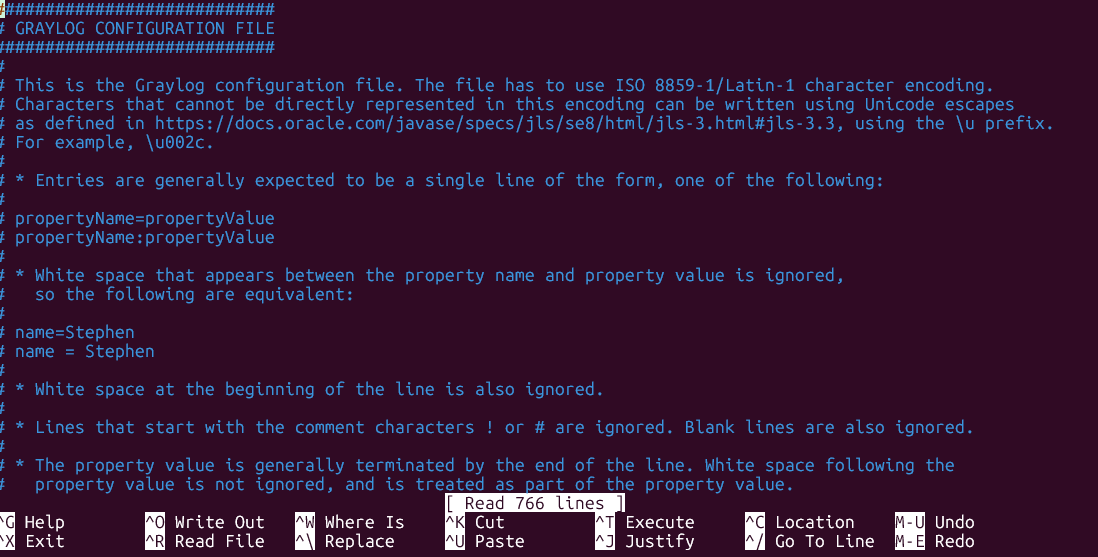
Using CTRL/CMD + W, find password_secret, uncomment it if it is commented, and add the first hash from when you ran: < /dev/urandom tr -dc A-Z-a-z-0-9 | head -c${1:-96}; echo;
Then, scroll a bit downwards, and find root_password_ssh2, add the saved hash for your admin password.
Next, scroll downwards, and under the
############### |
Locate http_bind_address, and add the bind address for your Graylog server. This is typically the localhost address, but instead of adding:
http_bind_address = localhost:9000You should add http_bind_address = 127.0.0.1:9000
Next, locate elasticsearch_hosts, and add this: elasticsearch_hosts = http://localhost:9200
The last modification on your Graylog conf is the MongoDB settings. To do that, locate the MongoDB settings by either scrolling downwards or searching for it with CTRL/CMD + W.
Uncomment or add this: mongodb_uri = mongodb://localhost:27017/graylog
After this, save and exit the configuration file.
Once you are back on the command prompt, reload the daemon with sudo systemctl daemon-reload && sudo systemctl restart graylog-server.
Verify Graylog’s status once more with sudo systemctl status graylog-server. If it is up and running, proceed to the next step.
Installing Nginx
Nginx is a multi-function server tool used for HTTP serving, reverse proxying, caching, and more. It is used primarily for two things in Graylog server setups.
Firstly, to secure HTTP connections. This is because Graylog servers don’t natively support HTTPS.
Secondly, Nginx acts as a port forwarder in Graylog server setups. The default port for Graylog is 9000, a non-standard port, but with NGINX, traffic can be routed from port 80 or 443 to Graylog’s port 9000.
To install Nginx, type in sudo apt install nginx. The last lines of the installation output should typically end like this:
Created symlink /etc/systemd/system/multi-user.target.wants/nginx.service → /usr/lib/systemd/system/nginx.service. |
After installation, you’d have to modify the NGINX configuration file, but before that, you need to know the public IP of your Ubuntu.
Use this command to find the public IPV4: ip a
If you are using an instance hosted on the cloud, using ip a may not find the actual public IPV4; instead, you can use curl ifconfig.me which I’ll ideally recommend, even when not using a Cloud-based instance. Alternatively, if using a cloud-based instance, you can find the public IP address from your dashboard.
Once you get the external IP of your Ubuntu, keep it in a safe place, and proceed to the config file using:
sudo nano /etc/nginx/sites-available/graylog.conf |
Then, paste this:
server { |
Save and exit the virtual host file, then validate that the NGINX configuration is successful with:
sudo nginx -t
This should output:
nginx: the configuration file /etc/nginx/nginx.conf syntax is ok |
Next is to enable the virtual host file using:
sudo ln -s /etc/nginx/sites-available/graylog.conf /etc/nginx/sites-enabled/ |
This won’t output anything, so you have to delete the default virtual host file from NGINX using: sudo rm -rf /etc/nginx/sites-enabled/default. Not deleting this file will prevent you from accessing your Graylog Web UI and instead will take you to an NGINX page.
Restart and check for NGINX’s status using:
sudo systemctl restart nginx |
If NGINX is running and is enabled, open up your web browser, and type in your server’s IP. i.e. http://server-ip/
This should be displayed on your screen:

Use the password you set under: echo -n "Enter Password: " && head -1 </dev/stdin | tr -d '\n' | sha256sum | cut -d" " -f1 and ‘admin’ as the login details.
On entering your password, you should see this:
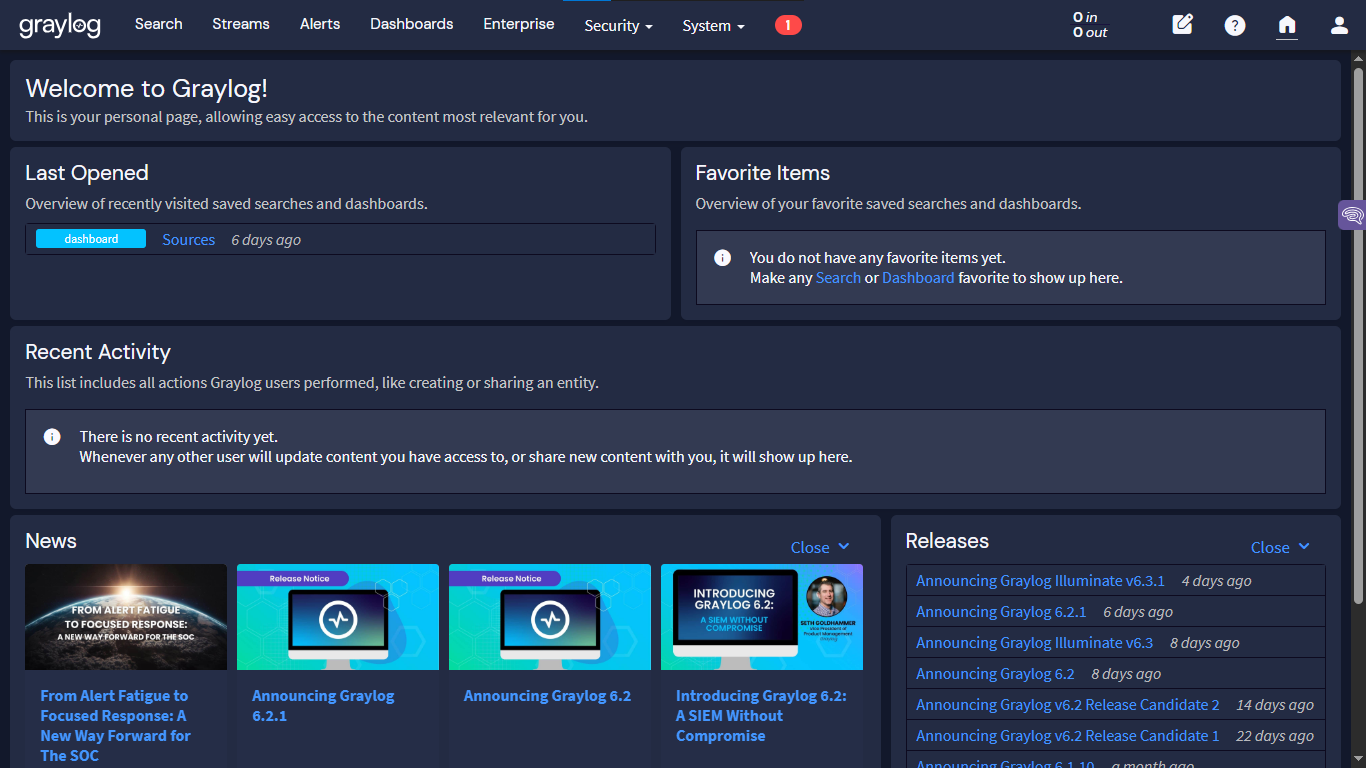
You’re in. That is your Graylog dashboard.
The next article will be dedicated to spinning up log forwarders from both Windows and Linux to your Graylog server.
Troubleshooting Graylog Server Setup
Sometimes, your Graylog UI or a component on the command line may refuse to start.
Depending on the problem category, any of these can help you fix it.
Installation Locks:
Installation locks, often denoted as dpkg locks, can be fixed by first finding the installation package already running. This is because two processes can’t use the same package manager at the same time.
You can use sudo apt --fix-broken-installs to fix any installation that wasn’t completed and might be interfering with others.
To clear the package manager, you can use:
sudo rm /var/lib/dpkg/lock-frontend |
Once you are done, restart the installation command, and it should work.
Graylog Server Connection Issues:
Anyone new to setting this up, or very new to Linux, is probably going to face this error a lot. Already, I’ve tried my best to break down the very important steps accordingly, but if for some reason, the server IP isn’t connecting, here are some tips you can follow:
- Verify the IP address:
Ensure that the IP address you added to the NGINX configuration file is the exact external IP of your Ubuntu. You can use ip a to find it, or use ifconfig.me
- Every Dependency Must Be Working:
Ensure that Graylog, ElasticSearch, NGINX, and MongoDB are running and enabled. They must all be working together.
- Check Firewall Settings:
Firewall settings may be blocking a connection. This is particularly necessary if you are using a cloud-based Ubuntu instance. Use:
sudo ufw allow 80 |
Optionally, you can consider disabling firewalls temporarily to isolate potential causes.
If ufw isn’t installed on your system, install and enable it with sudo apt install ufw && sudo systemctl enable ufw && sudo systemctl status ufw
- Check Graylog Listening Status:
Verify is Graylog is actively listening on port 9000. Use this command to do that: sudo ss -tulnp | grep 9000
It should output something like
tcp LISTEN 0 4096 [::ffff:0.your-ip-address]:9000 : users:(("java",pid=6620,fd=63) |
- Use Net Tools:
Install net tools using sudo apt install net-tools. This can help you curl your server address or run any checks regarding networking.
Some installations will require a sudo password. Once it does, type in your Ubuntu password to proceed.
When you are running a command that you copied here, and you encounter a command not found error, recheck your command for a typo error, or check online if that command exists. If it’s an installation, you can try this command:
sudo apt-get install <installation-name>Instead ofsudo apt install <installation-name>If you run into a “permission denied” error, you are most likely to be asked, “Are you root?” In such a scenario, use sudo at the start of your command.
If you have any questions, kindly comment, and I’ll answer them as soon as I can.
Subscribe to my newsletter
Read articles from Joseph Chisom Ofonagoro directly inside your inbox. Subscribe to the newsletter, and don't miss out.
Written by
Joseph Chisom Ofonagoro
Joseph Chisom Ofonagoro
Hi there! I am a curious techie. My spare time is spent with books.