Product Photography at Home: Your Complete DIY Studio Guide
 ProdShot Creator
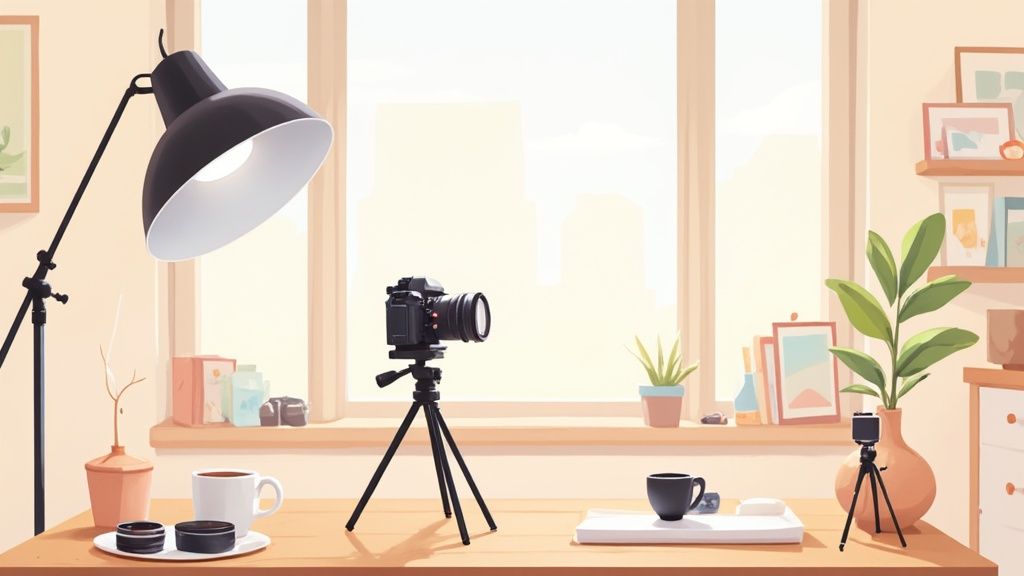
Creating Your Home Photography Studio on Any Budget
Let's be real: some of the most jaw-dropping product photos I've encountered weren't born in fancy studios. They were shot in kitchens, bedrooms, you name it. Resourcefulness is key. I've had the chance to talk with photographers earning a serious living from home, and their setups are refreshingly simple. These folks have shared their secrets to turning ordinary spaces—even tiny apartments—into productive photo hubs. Ditch the myth of needing expensive equipment; it’s all about making the most of what you have. Let’s explore how to build a practical and effective product photography setup right in your home, no matter your budget.
Space and Budget: Rethinking Your Investment
The biggest misconception? That you need a dedicated studio. Absolutely not true. A corner of your living room, a spare bedroom, even your kitchen table can be the perfect spot. Think vertical too. Shelves are your friends; use them for backdrops and props to keep floor space open. One photographer I know uses a rolling cart for her lighting and camera gear, easily storing it in a closet between shoots. This allows her to set up and pack away her "studio" in minutes without disrupting her living area. Another photographer uses a section of her basement, making it work with clever storage and DIY backdrops.
I’ve put together a table below to give you a clearer picture of the different setup options. It’s a reality check, based on real experiences, showing the cost and quality you can expect from different approaches.
| Setup Type | Real Cost | Space Needed | Quality Output | Perfect For |
| DIY Home Studio (Basic) | Around $150 (initial investment) | Small corner or table | Good to excellent (depending on skill and effort) | Beginners, budget-conscious creators, small businesses |
| DIY Home Studio (Advanced) | $500 - $1500+ (over time) | Dedicated room or larger space | Excellent to professional | Growing businesses, photographers investing in higher quality |
| Rented Studio Space | $200/day (average) | Varies depending on studio | Professional | Large-scale shoots, complex setups, occasional use |
This table demonstrates the potential cost savings and emphasizes the power of high-quality images. You can clearly see the significant difference between renting a traditional studio versus investing in a home setup.
Remember, building a home studio is a smart investment. You save money on rentals, gain control over your shooting environment, and can experiment with different lighting and styles more easily. Plus, you can shoot whenever inspiration strikes!
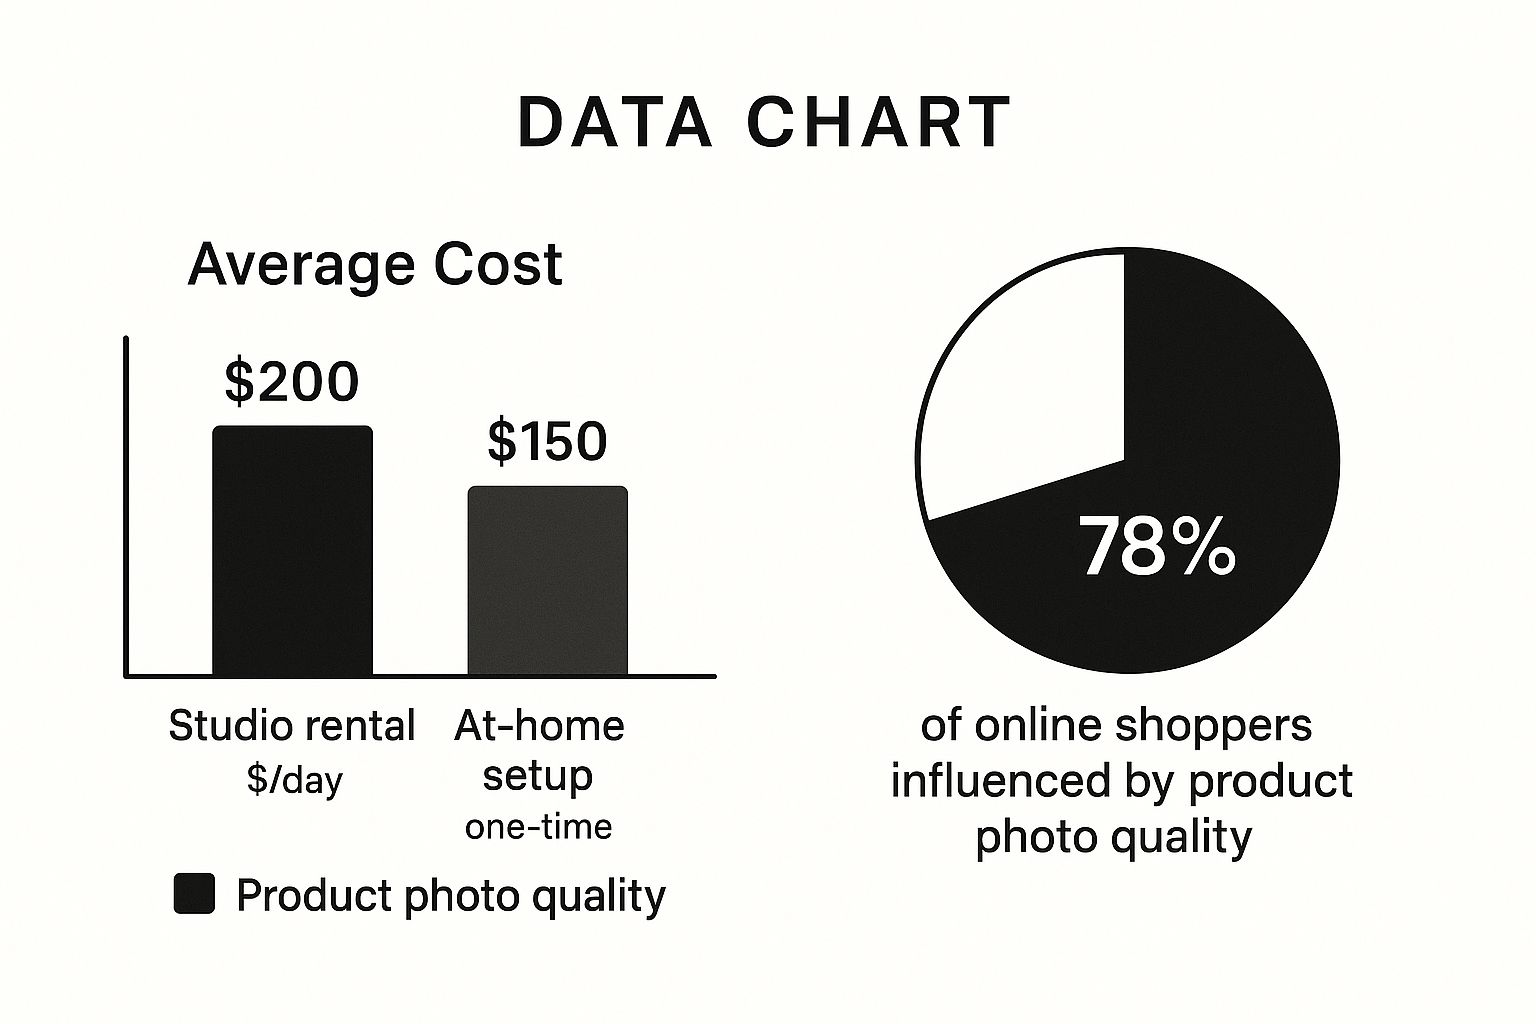
As the infographic illustrates, 78% of online shoppers are swayed by product photos. Great visuals are crucial for sales. The demand for high-quality product photography is booming; the global photography services market is predicted to grow from $55.6 billion now to a whopping $81.83 billion by 2032. For a deeper dive into these stats, check out this link on photography industry growth: Discover more insights
Essential Equipment vs. Nice-to-Haves
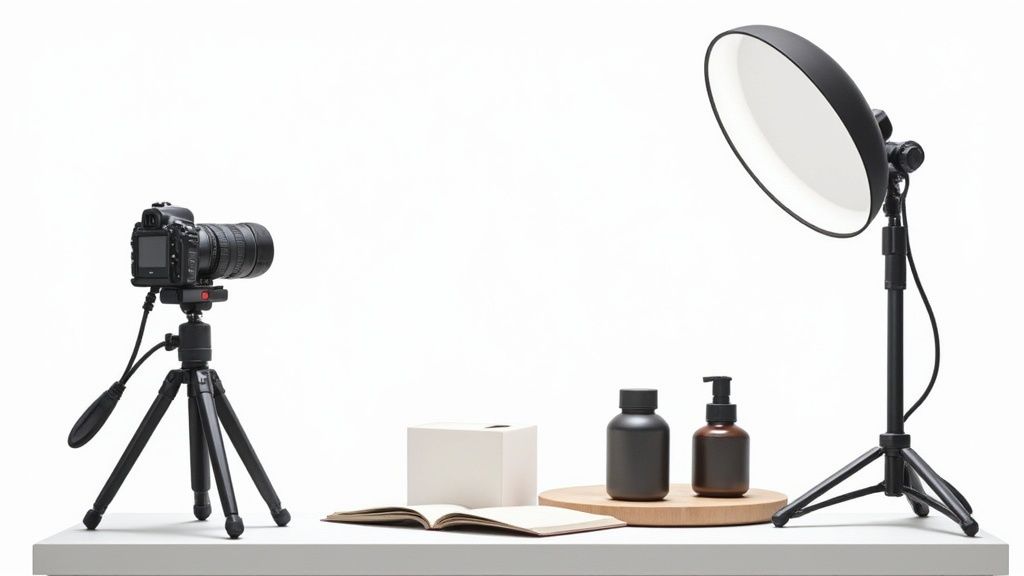
Let’s talk gear. Professional cameras offer ultimate control, but even a good smartphone camera can produce fantastic product photos. Start with the essentials: a tripod (a must for sharp shots), a simple backdrop (a white sheet or large piece of paper works like a charm), and basic lighting. We’ll cover lighting in detail later. As you become more experienced and your business expands, you can gradually add to your kit. Think lenses, light modifiers, and editing software like Adobe Photoshop or GIMP. The bottom line? Master the fundamentals with accessible tools before spending big bucks on fancy equipment.
Lighting Secrets That Transform Ordinary Spaces
Lighting is the unsung hero of any home product photoshoot. Honestly, I've seen magic happen with nothing more than window light and a reflector. On the flip side, I've also witnessed expensive studio lights fail miserably. It's not about the gear, it's about knowing how to use it. So let's dive into making light your best friend and turning your home into a product photography studio.
Natural Light: Your Free and Powerful Ally
Often, the best light source costs absolutely nothing – it's streaming right through your window. North-facing windows are usually the go-to for that soft, diffused light everyone loves. But honestly, any window can work. Take harsh afternoon sun, for example. A simple sheer white curtain softens it beautifully, creating a DIY diffuser in seconds. Photographer Aby Joanne, in her blog on at-home product photography hacks, has a cool tip: experiment with backgrounds displayed on a laptop screen near a window. It's a surprisingly professional look with minimal effort.
I've personally used this technique with jewelry photography, using a soft pastel background on my laptop to create a dreamy, ethereal look. You'd be amazed at how much you can achieve with just a window and a bit of creativity.
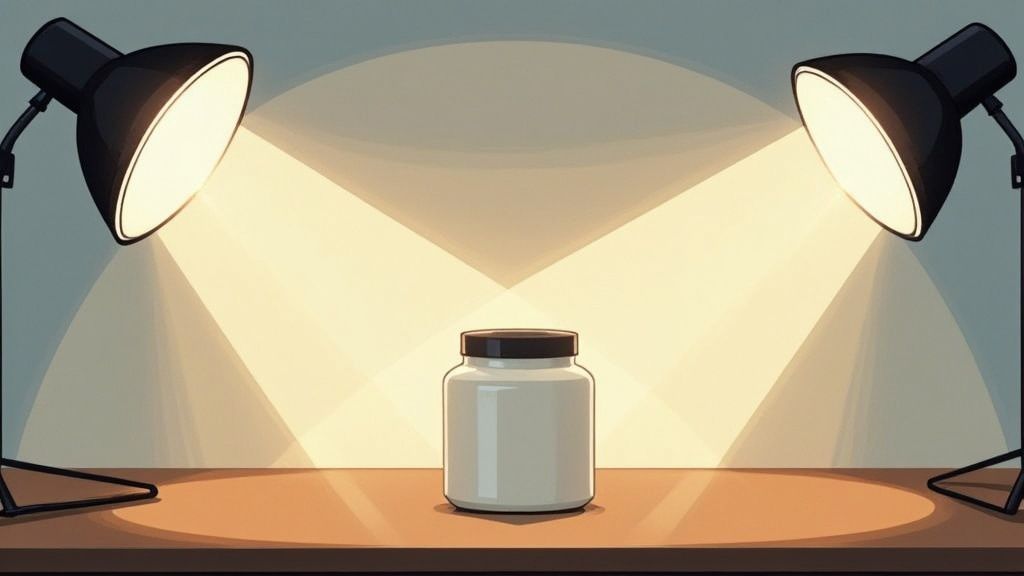
Artificial Light: Consistent and Controllable
Natural light is amazing, but it's also fickle. That's where artificial light comes in clutch. You don't need a fortune to create a really effective setup at home. Two softbox lights, one on each side of your product, can work wonders for balanced, even lighting. My biggest tip? Play around! Experiment with different distances and angles. You'll quickly find that sweet spot for your products.
Mixed Lighting: Taming the Beast
Sometimes you'll find yourself dealing with mixed lighting – a combination of natural and artificial. This can be tricky, but definitely manageable. The secret is balancing the intensity. If your window light is overpowering your artificial light, your product will look unevenly lit. Try adjusting the power of your artificial lights or use reflectors to fill in any awkward shadows. It's all about creating harmony.
Maintaining Consistency: The Professional Touch
Consistency in lighting is key, especially when you're shooting at home over multiple days. If your lighting changes drastically between shots, your product images will look disjointed. My trick? Keep a lighting log. Note down your setup: the position of your lights, the power settings, any diffusers or reflectors used. This simple step will save you so much time and frustration later on, ensuring your product images have that polished, professional look.
To help illustrate what I'm talking about, I've put together a table summarizing some common home lighting options:
Home Lighting Options: What Actually Works
Real-world comparison of lighting setups based on feedback from home photographers, including honest pros and cons.
| Lighting Method | Investment | Reliability | Results Quality | Setup Effort | Works Best With |
| Natural Light (Window) | Low (Free!) | Variable (Weather Dependent) | Soft, Diffused, Natural Look | Low to Medium (May require diffusers/reflectors) | Products with texture, lifestyle shots |
| Artificial Light (Softboxes) | Medium | High (Consistent output) | Even, Controlled Lighting | Medium (Requires some setup and adjustment) | Product-focused shots, e-commerce images |
| Mixed Lighting | Medium | Medium (Requires balancing) | Can be very versatile | Medium to High (Balancing light sources can be challenging) | Situations requiring both soft and directional light |
| LED Panels | Medium to High | High | Clean, Crisp Light | Medium | Products with reflective surfaces, detailed shots |
| Smartphone Flashlight + Diffuser | Low | Medium | Surprisingly good for close-ups | Low | Small products, macro photography |
The table above really highlights the variety of lighting setups available. It also shows that you don't need expensive equipment to achieve great results. By understanding and controlling light, you can elevate your product photography, no matter your space.
Camera Techniques That Actually Matter for Products
Forget obsessing over the latest gear. Let's talk practical camera techniques for product photography at home. Seriously, these are the things that actually move the needle. Whether you're using a fancy DSLR or just your smartphone, understanding how aperture, ISO, and shutter speed dance together is the magic sauce. I'm going to share the settings working photographers use day in and day out—the real-world stuff, not textbook theory.
Mastering the Exposure Triangle
Think of aperture, ISO, and shutter speed as three dials you're constantly tweaking to get the perfect balance. Your aperture, shown by the f-number (like f/2.8 or f/8), controls how much light floods into your lens. A lower f-number (wider aperture) means more light and that creamy, blurred background (perfect for making your product pop). A higher f-number (narrower aperture) lets in less light, keeping more of the scene sharp.
ISO measures how sensitive your camera is to light. Keep your ISO low when you've got plenty of light. Bump it up when you're shooting in dimmer conditions, but know that a higher ISO can make your photos look a bit grainy. Finally, your shutter speed dictates how long the camera's sensor is exposed to light. Fast shutter speeds freeze action, while slower speeds can blur movement (which can be an awesome creative tool).
My go-to starting point for product photography is usually an aperture around f/8. This keeps the entire product nicely in focus. I adjust the ISO based on the lighting, always aiming for the lowest setting possible to keep noise down. Then, I fine-tune the shutter speed until the exposure looks just right. It's all about that balance!
Composition: The Art of Storytelling
Composition isn't just about arranging your stuff; it's about telling a story with your product. Ever notice how some product photos instantly make you want to click "buy," while others just…don't? That's the power of composition. Think leading lines, the rule of thirds, and negative space to create images that are truly eye-catching.
Imagine shooting a sleek water bottle. Placing it off-center against a clean, minimalist background with a few thoughtfully placed props can transform a plain product shot into a lifestyle image that resonates with your audience. And that resonance translates to sales. High-resolution images are 40% more likely to be shared on social media than low-res ones Discover more insights. Plus, a whopping 2.71 billion online shoppers worldwide rely heavily on visuals to make purchasing decisions. Composition matters.
Angles and Perspectives: Showing Off Your Product’s Best Side
The same product can tell a completely different story depending on the angle. Don't be afraid to experiment! Shoot from above, from the side, even from below. A watch photographed head-on might look dull, but tilting it slightly and catching the light playing on the face suddenly adds depth and makes it sparkle.
Think about it: a handcrafted mug photographed from above showcases its unique design, while a pair of shoes shot from a low angle emphasizes their sleek profile. Play around with perspectives to find what truly highlights your product and connects with your target audience. Trust me, this experimentation is key to developing your photographer's eye. You'll be surprised by the power of a simple shift in perspective.
Styling Magic That Makes Products Irresistible
The difference between a quick snapshot and a truly stunning product photo? Often, it's all in the styling. Think about your favorite brands – the ones with product photos that stop you mid-scroll. It's the little things that make them so captivating. I've spent a lot of time studying what works in e-commerce photography, and I'm happy to share a few styling secrets to elevate your own product shots at home. These are the tricks that turn browsers into buyers.
Props and Lifestyle Scenes: Telling Your Product’s Story
Believe it or not, everyday household items can be incredibly versatile photography props. A cozy blanket, a rustic wooden cutting board, even a simple sprig of greenery can bring depth and personality to your images. Instead of just showing the product, try creating little lifestyle scenes that your target audience will connect with.
Imagine you're photographing a coffee mug. Styling it with an open book and a soft blanket instantly evokes a sense of relaxation. This storytelling approach makes the product relatable and desirable.
I remember photographing some handmade candles once. Instead of placing them on a plain background, I styled them with dried flowers and vintage books. The resulting images were warm and inviting, perfectly capturing the brand's overall aesthetic. You're not just selling a product; you're selling a feeling, an experience.
Color and Texture: Creating Visual Harmony
Color combinations can make or break your product photos. A contrasting background makes a product stand out, while complementary colors create a sense of harmony. Play around with different palettes and see what works best for your item. Texture is just as important. A rough, wooden surface can provide a nice contrast to a smooth, polished product. Home decor photos are a great source of inspiration here; they often expertly combine textures and colors to create visually appealing images. You might want to check out some home decor styling techniques.
Think about photographing a piece of jewelry. A velvet backdrop adds instant luxury, while a rough stone surface creates a more rustic, natural vibe. It’s all about finding combinations that enhance your product and its message.
Common Styling Mistakes: Avoiding the Amateur Look
One of the biggest styling mistakes is over-styling. Too many props clutter the image and distract from the product. Keep the background simple and stick to a cohesive color scheme. Another common mistake is neglecting the small details. Things like wrinkled fabrics, dusty surfaces, and fingerprints can instantly make your photos look unprofessional. Take your time to prepare your product and styling elements carefully.
Remember, the goal is to enhance your product, not overwhelm it. Think about the overall aesthetic you want to achieve and choose props and colors that support that vision. Avoid anything that feels forced or unnatural. By paying attention to detail, you can transform your home product photography from simple snapshots into professional-quality images.
Post-Production Techniques That Elevate Your Work

So, you've wrapped up the photoshoot. Your product photos are sitting there looking…good. But good isn’t great. This is where post-production comes in. It's where you transform those "goods" into something truly captivating. And the best part? You don't need to break the bank on fancy software. Let me share some of my go-to editing tricks, using tools that are either free or incredibly affordable. We'll focus on the tweaks that make the biggest impact for product photography at home.
Color Correction: Making Your Products Shine
Let's talk color accuracy. It’s everything in product photography. Imagine ordering a pair of ruby red shoes online and receiving something…well, more tomato-y. Not ideal. That’s where the white balance tool in your editing software comes in. It's like a magic wand for neutralizing any color casts from your lighting. If your photos have a yellowish tinge, the white balance adjustment will cool things down.
Next up: saturation and vibrance. These are your secret weapons for making colors sing. But a word of caution: less is more. Overdo it, and your products will look artificial. A subtle boost is all you need. Don't forget about brightness and contrast! They’re essential for highlighting details and adding depth. Think about how a touch of contrast can sharpen the edges of a dark, metallic object.
Consistency is Key: Building Your Brand Identity
Visual consistency is paramount for a professional brand. Think of it as the cohesive glue holding your visual story together. This is where presets become your best friend. Find a color correction and contrast combo you love? Save it as a preset in your editing software. Now, you can apply those same adjustments to all your product photos with a single click. This creates a unified look across your website and social media, instantly boosting your brand’s image.
Batch Editing: Saving Time and Staying Sane
Now, imagine having to edit hundreds of photos individually. Sounds like a nightmare, right? Enter batch editing. This lifesaver lets you apply the same edits to a whole group of images at once. This is especially useful if you’re shooting different product variations with only slight color or lighting changes. Most editing software offers this feature. A quick online tutorial will show you the ropes, but the basic idea is to select your images, apply your edits, and let the software work its magic on the entire batch. Time saved? Hours. Sanity preserved? Absolutely.
The Power of AI: Editing for Everyone
While we’re on the topic of efficiency, let's talk about AI. AI-powered tools are transforming home product photography, handling complex tasks like background removal and advanced color correction in record time. Did you know that 76% of small businesses using AI photography tools report saving upwards of 80% on costs? That’s huge! AI in post-production not only speeds things up but also helps ensure consistency and accuracy. Want to learn more? Discover the power of AI. And if you’re looking for expert help, consider professional product photo editing services: Check out our guide on product photo editing. These resources can take your home product photography to the next level.
Overcoming Real-World Home Photography Challenges
Product photography at home can be tricky. Let's be real, it's not always the perfectly styled Instagram dream we envision. But knowing how to handle everyday challenges is what sets apart the pros from the amateurs. I've chatted with tons of photographers who built their businesses from home, and they’ve shared amazing tips for navigating the real-world hurdles of home studios.
Cramped Quarters and Clutter Chaos
Limited space is a common issue. One photographer I know converted a small closet into a mini studio with removable shelves and a curtain backdrop. This allowed for quick setup and tear-down. Another photographer utilizes vertical space, storing props on high shelves to free up the floor. Get creative with your space – even a corner can work!
Reflections and Glossy Product Nightmares
Shiny products are notoriously difficult, often becoming reflection magnets. Polarizing filters are a lifesaver, minimizing reflections and glare. Another trick is using black or white cards just outside the frame to block reflections. Play around with their placement to see what works best.
Terrible Lighting: Making the Most of What You Have
Perfect natural light isn’t always an option. Many home photographers use a mix of artificial light and reflectors. Even simple white foam boards can bounce light back onto your product, filling in shadows. Continuous lighting, like LED panels from Neewer, is an affordable option for consistent light when natural light is unreliable.
Life Happens: Staying Focused Amidst the Chaos
Working from home means juggling photography with family, pets, and other distractions. A dedicated workspace, even a temporary one, helps create boundaries. Setting a shooting schedule and communicating it to your household can also help. But let’s face it, life happens. Flexibility is essential! Embrace the unexpected. Even amidst the chaos, stunning product photography is possible. For those considering professional help, check out our guide on the cost of professional product photography. Building a sustainable workflow is an ongoing journey.
Product-Specific Challenges: From Tiny Jewelry to Oversized Items
Different products need different approaches. Jewelry requires macro lenses and precise lighting for detail. Larger items might benefit from a wider lens and a backdrop that complements the scale. One photographer told me about shooting oversized furniture against a simple white wall, carefully positioning lights to highlight the shape and texture. Adaptability is key!
Building Systems for Consistent Professional Results
Consistency is the hallmark of professional product photography, even when you're shooting from the comfort of your own home. It's the secret sauce that elevates your images from simple snapshots to stunning, scroll-stopping visuals. Trust me, building systematic approaches – from pre-shoot planning all the way to post-production – makes a world of difference. Let me share some of my own systems that have saved me countless headaches and helped me produce consistently high-quality work.
Planning Your Shoot: Shot Lists and Mood Boards
Before you even think about picking up your camera, planning is paramount. A detailed shot list is your best friend. This list outlines all the angles, compositions, and styling details you want for each product. It keeps you laser-focused and prevents those dreaded “what do I shoot next?” moments.
Mood boards are another invaluable tool. Gather inspiration from other product photos, magazines, even nature or architecture. This helps inform your styling choices and overall aesthetic. I once planned an entire shoot around the soft, diffused light I saw in a painting – the results were magical!
Streamlining Your Workflow: Efficiency and Sanity
A smooth workflow keeps your home photography sessions manageable and, frankly, keeps you sane. Organize your workspace so everything is within easy reach. Designated areas for props, backdrops, and lighting equipment eliminate frantic mid-shoot searches.
Personally, I use clear storage bins labeled with categories like "Backgrounds," "Props - Kitchen," and "Lighting Modifiers." It makes setup and teardown a breeze.
Quality Control: Catching Mistakes Early
Quality control is a game-changer. Trust me, catching mistakes early saves you so much time and prevents the need for costly reshoots. Review your images throughout the shoot, zooming in to check for things like focus, lighting issues, or unwanted distractions.
I learned this the hard way. I once shot an entire series of photos, only to realize later that a stray hair had been in the frame the entire time! Regularly checking my images would have saved me a ton of time.
Pricing, Clients, and Portfolio Building
If you're looking to turn your home product photography into a business, pricing and client management become crucial. Do some research – see what other photographers are charging – and create a pricing structure that reflects your skills and the value you bring.
Clear communication with clients is essential for managing expectations and building strong relationships. And of course, a professional portfolio showcasing your best work is a must-have. It helps attract clients and gives them a clear idea of the quality they can expect.
By implementing these systems, you won't just create better product photos at home, you'll build a sustainable and fulfilling photography practice. You get to maintain the flexibility of working from home while achieving professional results.
Ready to take your product photos to the next level and boost your online sales? Check out ProdShot, the AI-powered tool that transforms smartphone snapshots into professional-grade images: Try ProdShot for Free!
Subscribe to my newsletter
Read articles from ProdShot Creator directly inside your inbox. Subscribe to the newsletter, and don't miss out.
Written by