Bundlers Handbook
 Tuan Tran Van
Table of contents
- Bundlers
- Webpack
- Bundler Best Practices
- Webpack and yarn magic against duplicates in bundles
- Learning by fixing: Node.js, Modules, and Packages
- Three simple tricks to speed up yarn install
- Bloated yarn.lock problem
- How did we cut bundle size by 70% overnight?
- 13 Webpack Optimization Tips You Should Know
- How to Fully Optimize Webpack 4 Tree Shaking
- References

Bundlers
What is the JavaScript bundler anyway?
A tool that people struggle with for hours just to get a basic web app set up. A thing that you use when you want to bootstrap your React project? Something that your company uses, or that your colleagues/seniors have configured already? Which is apparently supposed to optimize your final JS build.
Whether you are starting your web development journey or have already used a bunch of bundlers before, you may have these questions at some point in time. I certainly did.
To answer the above question, a module bundler provides a method for arranging and merging multiple JavaScript files into a unified single file. Using a JavaScript bundler becomes necessary when your project outgrows a single file or when dealing with libraries with numerous dependencies. As a result, the end-user’s browser and client don’t have to fetch numerous files individually.
Why do we need a JavaScript bundler?
JavaScript bundlers are a tool that helps in optimizing the delivery of JavaScript files in web applications. The following are the key benefits of using a bundler.
Merging, Splitting, and Post-processing on Modules: While working with vanilla JavaScript or any corresponding modern JavaScript framework, it’s better to split the code into multiple files for the development journey. The concept of JavaScript bundlers is a decade old now. A decade ago, for browsers to access a single file through HTTP1 protocol was a heavy operation. So, it’s better to combine all the code into one file and then make a single HTTP request. But most browsers have improved a lot since then and are now using the HTTP2 protocol for sending network requests that show no bottleneck in sending multiple requests to access files. Instead, we have started to first compile and then split the codebase to load the minimum required sources on the requested route through bundlers. We have also started to remove the unused code (tree sharking) and blank/while spaces among the combined files to minimize the requested resources (modification)
Solving the problem of cyclic dependencies: Without bundlers, one needs to take care of the import order of the JavaScript files to avoid the “not defined“ errors. Check out this file. Developers need to take care of the import order of script tags by themselves, which is error-prone. Bundlers can traverse through all the required files and decide the loading order.
Anchoring transpilation and pre-processing on modules: Nowadays, JavaScript has added some modern rules to improve the development journey. But modern browsers do not support these features yet, so one needs translators (which are generally called transpilers) to convert the modern JavaScript into the JavaScript that the browser can understand. Bundlers help in this process, where it first takes the help of the transpiler module to translate the files and then combine them for the browser to load directly.
Modern JavaScript bundlers can be imagined as compilers that convert all the development-friendly code into an optimized browser-readable format.
Behind the Scenes of Crafted Front-end Code Rendering in your User Browser
Ever wondered what happens behind the scenes when your code goes from your machine to the user’s browser? Well, let’s dive into it.
Meet our unsung hero: the bundler. It’s like the backstage manager, taking all your project files, doing some magic to optimize them, and then packing them up for a smooth delivery to web browsers. The result? A snappier and more responsive web app.
So, grab your coding beverage of choice, let’s break it down this journey step by step. We are about to uncover the nitty-gritty details of how your frontend code turns into that awesome experience
- Input Files:
A bundler starts with a set of input files, which are typically your project’s source code and assets, such as JavaScript files, CSS files, images, and more.
- Dependency Resolution:
The bundler analyzes your source code to identify dependencies. Dependencies are other files or modules that your code relies on, like importing JavaScript modules or CSS files.
- Code Transformation
Before bundling, the bundler may apply transformations to your code. For example, it might transpile modern JavaScript (ES6+) into older versions for broader browser compatibility, or it might process CSS preprocessor syntax like SASS or LESS into standard CSS.
- Bundling
The bundler combines all the input files, including their dependencies, into one or more modules. Each bundle is a single, optimized file containing the code and assets for your application.
- Optimization
During bundling, the bundler performs various optimizations, such as removing whitespace and comments, minifying code (reducing variable names to shorter forms), and eliminating dead code (code that’s never used). Some bundlers support code splitting, which means breaking the bundled code into smaller parts or chunks. These chunks can be loaded on demand when needed, reducing initial loading times. Bundlers can also handle assets like images and fonts, optimizing and providing them as part of the bundle or as separate files.
- Development Server (optional)
During development, bundlers often include a development server. This server serves your project locally, automatically rebuilds the bundle when you make a change, and may offer features like hot module replacement (HMR) for instant code updates without a full page refresh.
- Output Files
The result of bundling is one or more output files, typically named something like “bundle.js“ for JavaScript or “bundle.css “ for CSS. These files are optimized and ready for deployment. Here’s a useful link to have hands-on knowledge of how to analyze your JavaScript bundle.
- Deployment
The final bundled files, along with your HTML and other assets, are deployed to a web server or a hosting service to make your application accessible to everyone
- Loading in the Browser
In the user’s browser, when they access your web application, the bundled JavaScript and CSS files are loaded, and the code is executed.
- Rendering the Web Page
The bundled JavaScript code initializes your application, interacts with the DOM, and renders a web page according to your application’s logic and structure.
https://www.freecodecamp.org/news/javascript-es-modules-and-module-bundlers/
https://www.youtube.com/watch?v=MUSoj2JcD4A
https://www.youtube.com/watch?v=5IG4UmULyoA
Popular React Bundle Tools
Rollup vs. Parcel vs. Webpack: Which is the best bundle?
Recently, I was publishing a library to npm, and I thought of experimenting with the bundler. I was going to package my code. While Webpack has always been my standard choice, I decided to put it up against two other popular bundlers — Rollup and Parcel.
From those coming from a non-JavaScript background, a bundler is a tool that recursively follows all imports from the entry point of your app and bundles them up into a single file. Bundlers can also minify your files by removing unnecessary white spaces, new lines, comments, and block delimiters without affecting their functionality.
Let’s try to understand this through a simple code snippet:
var test = [];
for (var i = 0; i < 100; i++) {
  test[i] = i;
}
We just created an array called test and initialised its members up to 100. The minified version of this code will look somewhat like this:
for(var a=[i=0];++i<20;a[i]=i);
Fewer characters and lines. You might say the code isn’t readable, but who cares? You bundle your code once it’s ready, and minified code is easy to fetch and interpret for the browser.
It must be now easy for you to guess the importance of a bundler, right?
Suppose your code is not bundled and hosted as a package multiple times on a server. For the import of each of these files to make your code run, the browser has to send a separate HTTP request to the server. The efficiency of this transmission is directly proportional to the number and the size of the files being requested. In the case of large apps such as Facebook, this can lead to disastrous performance and UX.
However, the performance of the app substantially improves with a bundler on board, as now the browser only has to request a single file to display your app to the user. Moreover, fetching a minified file weighing a few KBs is faster than the actual file, which might run into MBs, resulting in improved load time in the app.
Why install bundlers when we can do it on our own?
Sure, you can, but when working with huge codebases, minifying an app manually isn’t a scalable solution. Let the bundler do it for you.
Making the right choice of a bundler from the many available can be life-changing for your app, depending on the use case. Coming back to the experiment I was talking about in the beginning. I thought of sharing with you my findings on how Webpack, Rollup, and Parcel fared on some important requirements a developer would have.
- Configuration of the bundler
Parcel wins here because it doesn’t require a config file at all. Just install Parcel and run parcel build, and it will do everything for you out of the box.
Webpack and Rollup both require a config file specifying entry, output, loaders, plugins, transformations, etc. However, there’s a slight difference.
Rollup has node polyfills for import/export, but Webpack doesn’t.
Rollup has support for relative paths in config, but webpack doesn’t — which is why you use
path.resolveorpath.join
Webpack config can get complex, but it provides extensive support for third-party imports, images, CSS preprocessor, and whatnot.
I had a hard time using Rollup for bundling my app that used axios, a very commonly used library for making HTTP requests — not just axios, but for other third-party integrations too. I had to research a lot and try installing many Rollup plugins before attaining victory, at the cost of dropping some imports.
- Dead code elimination
Dead code elimination, or Tree shaking, as it’s often called, is very important to achieve the optimum bundle size and hence app performance.
Parcel emerged as the winner here. Parcel supports tree shaking for both ES6 and CommonJS modules. This is revolutionary since most of the code in libraries on npm still uses CommonJS.
Most of the work Parcel does when tree shaking is also done in parallel through multicore processing using numerous worker processes, and is also cached on the file system. This means that it builds are still fast, and rebuilds are like blazing fast.
Roll comes second in the race. Right out of the box, it statically analyzes the code you are importing and will exclude anything that isn’t actually used. This saves you from writing more lines in your config file, adding extra dependencies, and bloating the size of your app.
Webpack requires some manual effort to enable tree-shaking:
Use ES6 syntax (i.e.
importandexport).Set the
SideEffectsflag in yourpackage.json.Include a minifier that supports dead code removal (eg:
UglifyJSPlugin).
Rollup and Webpack have focused more on tree shaking for ES6 since it is much easier to statically analyze, but in order to truly make a big impact, we need to analyze CommonJS dependencies as well, for which they both require plugins to be imported.
However, given the fact that JavaScript is dynamic, almost every construct in the language can be altered at runtime in impossible to predict ways.
Practically, this means that an entity such as a class, which is imported as one reference, can be statically analyzed to remove members (both static and instance) that are not used. So, rather than relying on the bundler to do it for you, it will be a good practice to visualize your components before your code and analyze them afterwards to get the best results.
- Code splitting
As your app grows, your bundle size will grow too, more so with third-party imports. The load time of your app is directly proportional to its bundle size.
Code splitting helps the browser lazy-load just the things that are needed to get the app running, dramatically improving the performance and UX.
Webpack emerges as the winner in this aspect, with minimal work and faster load time. It provides three approaches to enable code splitting available in Webpack.
Define entry points - Manually split code using
entryconfiguration.Use the commonsChunkPlugin to de-dupe and split chunks
Dynamic imports - use inline function calls within modules
During code splitting by Rollup, your code splitting chunks themselves are standard ES modules that use the browser’s built-in loader without any additional overhead, while still getting the full benefit of Rollup’s tree-shaking feature.
Parcel supports zero-configuration code splitting. Here, code splitting is controlled by the use of the dynamic import() function syntax proposal, which works like a normal import statement or require function, but returns a Promise. This means that the module is loaded asynchronously.
It was tempting to favour Rollup and Parcel over Webpack for code splitting, but both of them have only recently introduced this feature, and some issues have also been reported. So, it’s safe to stick with the good old webpack.
One compelling fact I noticed was that for the same code with code splitting enabled, the build time was the least with webpack, followed by Rollup, and lastly, Parcel.
- Live reload
During development, it’s great if your app gets updated with the fresh code that you write, instead of manually refreshing it to see the changes. A bundler with live reload capability does that refreshing for you.
Bundlers provide you with a runtime environment in addition to other utilities essential for debugging and development, in the form of a development server.
Parcel has been very thoughtful by having a development server built in, which will automatically rebuild your app as you change files. But there are issues associated with it when using HTTP logging, Hooks, and middleware.
When using Rollup, we need to install and configurerollup-plugin-serve, which will provide us with live reload functionality. However, it needs another plugin, rollup-plugin-livereload, to work. That means it’s not an independent plugin and comes with an extra dependency to run.
With Webpack, you just need to add one plugin, called webpack-dev-server, which provides a simple development server with live reload functionality turned on by default. What’s better? You can use Hooks to do something after the dev server is up and running, add middleware, and also specify the file to serve when we run the dev server. The customisability of Webpack trumps Rollup and Parcel.
- Hot module replacement
Hot module replacement (HRM) improves the development experience by automatically updating modules in the browser at runtime without needing a whole page refresh. You can retain the application state as you make small changes in your code.
You might ask how HRM is different from live reload.
Well, live reloading reloads the entire app when a file changes. For example, if you were five levels deep into your app navigation and saved a change, live reloading would restart the app altogether and load it back to the landing/initial route.
Hot reloading, on the other hand, only refreshes the files that were changed while still maintaining the state of the app. For example, if you were 5 levels deep into your app navigation and saved a CSS change, the state would not change: You would still be on the same page, but the new styles would be visible.
Webpack has its own web server, called the webpack-dev-server, through which it supports HMR. It can be used in development as a live reload replacement.
Rollup released a plugin rollup-plugin-hotreload last month to support hot reload.
As this capability is fairly new in bundlers like Rollup and Parcel, I still choose Webpack as the safe bet for I don’t want to run into avoidable issues during development.
- Module transformers.
Bundlers generally know only how to read JS files. Transformers are essentially teachers who teach the bundler how to process files other than JS and add them to your app’s dependency graph and module.
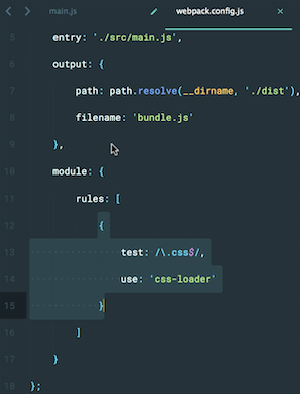
For example, in the image above, you can see a webpack config having an instruction on how to read CSS between lines 13 to 15. It basically says, “Hey Webpack, whenever you encounter a file that is resolved as .css, use css-loader imported above to read it and export it as a string“. Similarly, an HTML loader will tell Webpack how to read the .HTML files it encounters in your app and export them as strings in your bundler.
Parcel handles the transformation process very smartly. Unlike Rollup and Webpack, which need you to specify file types to transform, install, and configure, and plugins to transform them, Parcel provides built-in support for many common transforms and transpilers.
Parcel automatically runs the appropriate transformer when it finds a configuration file such as.babelrc, .postcssrc, .posthtml, etc., in a module. In addition to any transforms specified in .babelrc, Parcel always uses Babel on all modules to compile modern JavaScript into a form supported by browsers.
✅ In a nutshell
Building a library with minimal third-party imports? Use Rollup
Building a basic app and want to get it up and running quickly? Use Parcel.
Building a complex app with lots of third-party integrations? Need good code splitting, use of static assets, and CommonJS dependencies? Use Webpack.
Personally, I will continue to prefer Webpack for my projects. One might argue that Parcel, in many cases, offers built-in configurations that might provide ease of development, but it’s difficult to overlook the extensive support and customizability that Webpack provides.
Webpack
Webpack is a commonly used library among modern frontend-based applications. It is one of the popular JavaScript bundlers. It’s now a decade-old and battle-tested library. Many of full full-fledged frontend frameworks like NextJs and Gatsby use Webpack for bundling and compilation purposes by default. If you ask someone what Webpack is, they will answer that it’s a JavaScript bundler. If you go a bit more and ask why we need a JavaScript bundler and how it works, only the curious might be able to answer satisfactorily. It isn’t anyone's fault, modern frontend libraries are packed in a way that you don’t need to worry about what happens under the hood. If we take an example of a ReactJS application configured through the create-react-app library, it takes care of the configuration of bundlers and transpilers. Developers can immediately start building an application with the knowledge of ReactJS. If one wants to master the art of building fast and performant frontend applications, one needs to have a clear mental model of the functioning of all these libraries.
How does Webpack work?
Webpack is an event-driven, plugin-based compiler. That means Webpack has a life cycle for bundling the files, and each life-cycle step can be imagined as an event. We can add a plugin that will listen to these different events and act accordingly. The default functionalities can also be inserted through plugins, i.e., there will be some default plugins handling some core functionalities.
Let’s say the life cycle has these 5 methods:
compilation-start → resolve → parse → bundle → compilation-end
The plugin can be integrated to listen to these events and perform the operation on the source code files. There will be some default plugins integrated to perform the core functionality.
Any plugin-based architecture can be designed similarly; it has a life cycle for any particular feature, and custom event handlers (which can be imagined as plugins) can be added to act upon at different steps of the life cycle.
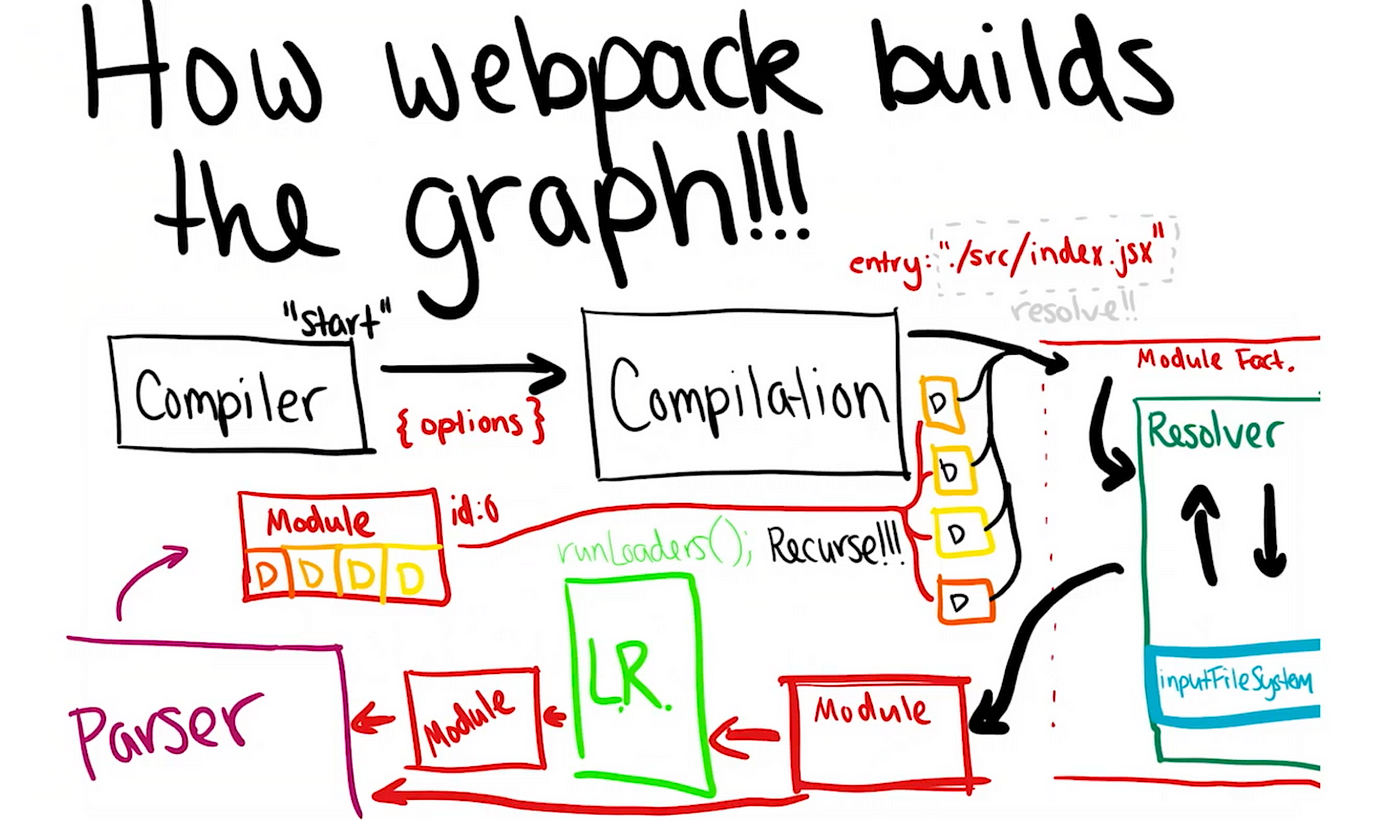
Let’s not go through the Webpack life cycle:
What happens under the hood in Webpack?
Let’s understand some keywords and then connect them to form a whole story.
Compiler: Just like a normal compiler, it will be a starting and stopping point in the webpack life cycle. It can be imagined as a central dispatcher of events.
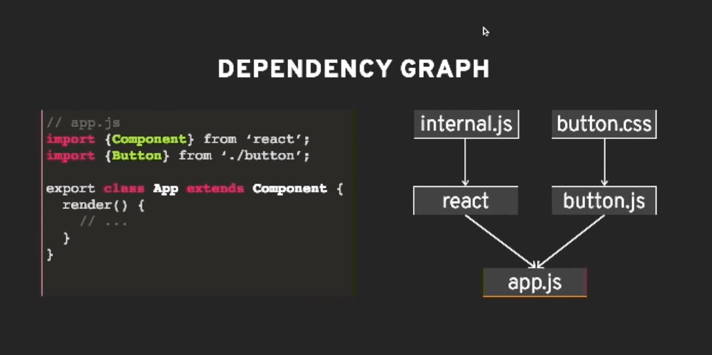
Compilation AKA The Dependency Graph: It’s like the brain. Through this, Webpack understands which sources you are using in your codebase. It contains the dependency graph traversal algorithm. It is created by the compiler.
Resolver: It converts the partial path into the absolute path. This will be used to check if some files exist, and if it does, give us some information.
Module Factory: Takes successfully resolved requests by the resolver and creates a module object with source files and some information received by the resolver.
Parser: Takes a module object and turns it into an AST (a tree representation of the source code) to parse. Find all queries and imports and make a tree to parse for bundling.
Templates: It is used for data binding for the dependency graph. It binds the tree object into the actual code in the module.
Now, let’s connect these dots:

First of all, Webpack will look at the configuration file and look for the entry point mentioned. The compiler will start the compilation from that file. A relative path will be sent to the resolver. The resolver will convert the relative path to the absolute path. The request will go to the module factory. The module factory will create a module object with some more information like the type of the file, size, absolute path, assigned id, etc.
Now, according to the file type mentioned in the module object, the compiler will look for the transpilers to convert the code into a browser-readable format. After converting the code, the parser will parse the file and look for the ‘require‘ or ‘imports‘ statements and update the object with the dependency information like below:
// example module object
{
  id: 0,
  absolutePath: '/path',
  fileType: '.jsx',
  dependency: [{ id1, relativePath }, { id2, relativePath }]
  // some more information
}
The compiler will parse the file recursively in this manner to finally form a complete dependency graph of module objects. Hash-map will also be maintained between the file ID, the absolute path, and the parsed file.
After building the dependency graph, the compiler will topologically sort all dependencies.
Topological sorting*: Topological sorting for a Directed Acyclic Graph (DAG) is a linear ordering of vertices such that for every directed edge u v, vertex u comes before v in the ordering.*
The Webpack merges all these topologically sorted dependencies with the help of a maintained hash map to make a bundle file. Minification or tree-shaking can be done on these bundle files now as post-processing measures through an event listener, which is also called a plugin. That’s it! Bundler has done his job in these simple steps :)
Let’s dry run the above bundling process for the following code:
// cat.js ES Module
export default "cat";

// bar.js CommonJS
const cat = require("./cat");
const bar = "bar" + cat;
module.exports = bar;

// foo.js ES Module
import catString from './cat';
const fooString = catString + "foo";
export default fooString;

// index.js - entry point
import fooString from './foo';
import barString from './bar';
import './tree.jpeg';
console.log(fooString, barString);
index.js is an entry for the bundler. The compiler will start the process with this information. It will convert the relative path into the absolute path and make a module object. We don’t need any transpiler here as it’s a simple JavaScript file. Now the parser will start parsing the index file. It contains 3 import statements, so the final object module created for index.js will look like this.
{
  "id":0,
  "absolutePath":"$home/index.js",
  "bundledFile": "bundledFile0.js",
  "fileType":".js",
  "dependency":[
    { "id": 1, "path": "./foo" },
    { "id": 2, "path": "./bar" },
    { "id": 3, "path": "./tree.jpeg"}
  ]
}
Webpack will now start compiling the dependencies of index.js. Webpack will recursively compile all the files until there are no dependencies left for any file and form the following dependency graph. Here, tree.jpeg will require a file loader/transpiler as NodeJS can’t understand it.

It will sort all the module objects in topological order and merge their converted chunks to form a bundle file for the browser to run directly.

The core concepts of Webpack
The Core Concepts of Webpack
The core concepts in Webpack:
Entry
Output
Loaders
Plugins
Mode
Development Server
Entry
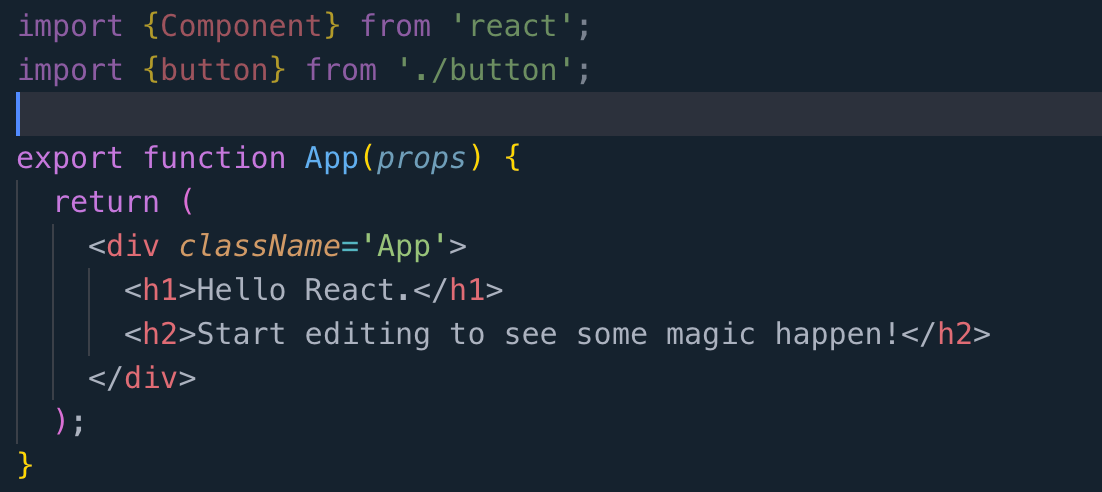
entry is the entry point of your application. This is the place where Webpack starts its journey. We know that our React applications are like a tree. All the components span out from App.js.
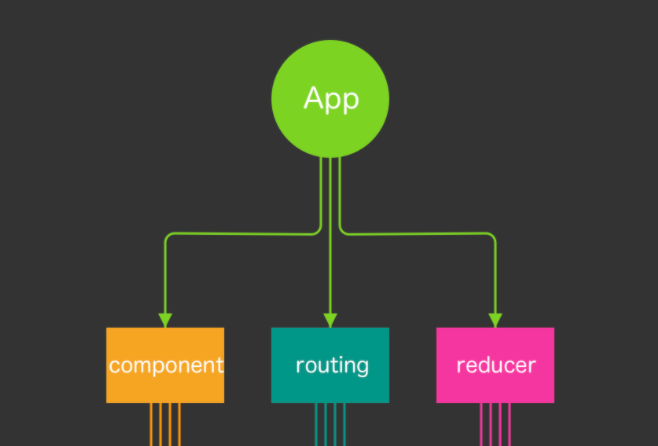
But where do our App.js live? It lives inside the index.js file, and that’s why webpack enters the application via index.js and creates a dependency graph to determine which files need to be loaded first.
Output
This is another easy concept to understand. After all the work is done, Webpack creates a bundle file. In output, we can specify the name and the location of the output file.
It also has other uses. If you want to generate bundle names for the production system for version management, you can do that here.
Let’s take this a step further and try to understand how our .jsx or .css files are handled.
Loader
Loaders are a very important concept in Webpack. They are like compilers, Webpack checks for a certain type of file and uses appropriate loaders to handle them.
A typical configuration of the loader can be like the following:
module.exports = {
    entry: { ... as before}
    output: { ... as before },

    module: {
        rules: [
            {
                test: /\.[jt]sx?$/, // matches .js, .ts, .jsx and .tsx files
                use: ['babel-loader'],, // uses babel-loader for the specified file types
                include: path.resolve(__dirname, 'src'),
                exclude: /node_modules/,
            }
        ],
    }
}
Now, look at the module part. It takes an array of rules. Each rule has several parts:
test-> It checks for a certain file type. It uses a regular expression.use-> It specifies the list of loaders used for this particular file type.include-> Which files should be processed?exclude-> Which should not be processed.
Sometimes we need more than one type of loader for a specific file. A good example is loading CSS files. The rule for that is:
{
    test: /\.css$/, // matches .css files only
    use: ['style-loader', 'css-loader'],
},
Here, both css-loader and style-loader are used to process the file. One important thing to note here is that these loaders are loaded in the reverse order.
That means first the css-loader will work and then style-loader will work on the output produced by css-loader.
Similarly, for our .scss files:
{
  test: /\.scss$/,
  use: ['style-loader', 'css-loader', 'sass-loader']
},
Plugins
Almost 80% of Webpack runs on plugins.
Plugins are another very important aspect of Webpack. Plugins are the main reason why Webpack is so powerful.
Plugins are like libraries. They can tap into any stage of the compilation process and do whatever they wish.
const {CleanWebpackPlugin} = require('clean-webpack-plugin')

module.exports = merge(common ,{
    entry:  {...},
    output: {...},
    module: {...}

    plugins: [ new CleanWebpackPlugin() ]
})
In the example above, we used a plugin named clean-webpack-plugin. What this plugin does is clean the output folder each time we run our build command.
There are lots of plugins that you can take advantage of. You can refer to WebPack’s official website if you are interested.
Mode
This is the simple concept to understand. You would want to use a different setup for your development and production. For this, you can use mode.
module.exports = merge(common ,{
    entry:  {...},
    output: {...},
    module: {...},
    plugins:{...},

    mode : 'development' or 'production'
})
If you set the mode to production, then your output bundle will be minified and optimized.
Development Server
This is the final setup for your application. While developing the application, you will not want to compile it every time you change something. That’s why you need a devServer setup for your application.
module.exports = merge(common ,{
    entry:  {...},
    output: {...},
    module: {...},
    plugins:{...},
    mode :  {...},

    devServer: {
        contentBase: path.join(__dirname, 'public/'),
        port: 3000,
        publicPath: 'http://localhost:3000/dist/',
        hotOnly: true,
    },
})
Now, this setup will serve your application from the dist that you set up earlier as your output.
Why Frontend Engineers Need to be WebPack experts
Modern web applications are not just about core functionalities. We also pay attention to factors like application performance, development productivity, and efficiency to get the maximum out of our effort.
But, are you aware that you could use WebPack to address some of these challenges?
However, just knowing how WebPack works won’t be enough to get the maximum from it. So, let’s see what you can achieve by being an expert in Webpack.
Improve Development Productivity
As developers, we always like to see faster feedback while we carry out modifications to the code. Besides, there are various methods we follow.
If you know WebPack well, you can easily enable its Hot Module Replacement feature to improve the development process.
Hot Module Replacement (HMR) allows us to modify modules while it is in the running state. Since HMR prevents full reload of the application, it will remain in the same state and will only be updated with what has changed.
All you need is to update the weppack-dev-server configuration and use its built-in HMR plugin.
module.exports = {
  entry: {
    app: './src/index.js',
  },
  ...
  devServer: {
    contentBase: './dist',
    hot: true,  // <--- Add this line
  },
  plugins: [
    ...
    new HtmlWebpackPlugin({
      title: 'Hot Module Replacement',
    }),
  ],
  output: {
      ...
  },
};
Pro tip: HMR becomes very handly in situations where you develop applications for multiple devices form factors. E.g., you can access the development server URL on both desktop and mobile and instantly see how it looks in both.
Get Better at Tree-Sharking
If your project has a significant amount of dead code or a large number of shared libraries, it’s common to experience a long application loading time. It’s common to see tree-shaking in such situations to avoid dead or unwanted code from bundling.
....
module.exports = {
  entry: {
    app: './src/index.js',
  },
  output: {
      ...
  },
  //add below line
  mode: 'development',
  optimization: {
    usedExports: true,
  },
};
But, how can we guarantee that WebPack makes a correct decision about unused code in the project?
For example, it’s common to have global-level stylesheets imported into the project, and usually, those files aren’t used anywhere. But removing such files can affect the whole project.
Webpack uses a special configuration in the package.json file named sideEffects. By default, all the files in your project are considered files with side effects, and tree-shaking won’t be performed.
However, we can manually change this behavior by changing sideEffects value to false, true, or providing an array with file names.
// All files have side effects
"sideEffects": true
// No files have side effects
"sideEffects": false
//Only these files have side effects,
 "sideEffects": [
  "./src/file1.js",
  "./src/file2.js"
 ]
}
If you enable tree-shaking in Webpack configuration, ensure to include files that don’t have side effects in package.json file settings.
Using Code Splitting to Optimize App Loading Time
If you monitor the number of unused bytes in a single bundle using Chrome DevTools, you will be amazed to see how often it happens.
Webpack provides the perfect situation by allowing you to split your code into different bundles and load them on-demand or in parallel.
Webpack provides 3 approaches for code splitting, and you will need to decide which mechanism is the most suited one for your project. For that, you should have a good understanding of Webpack.
The entry point approach is considered the most straightforward and most used code-splitting approach with Webpack. You just need to update all the separate modules in the Webpack config file manually.
....
module.exports = {
  mode: 'development',
  entry: {
    index: './src/index.js',
    second: './src/second-module.js',
  },
  output: {
   filename: '[name].bundle.js',
   path: path.resolve(__dirname, 'dist'),
   },
};
However, this approach is not very flexible, and there is a risk of having duplicate modules between chunks. If you don’t see any improvements with this approach, you can go deeper with the Prevent Duplication approach**.**
Prevent Duplication approach allows specifying the shared modules between chunks using dependOn the option. You can easily convert the entry point approach to prevent duplication with a few modifications.
....
module.exports = {
  mode: 'development',
  entry: {
    index: {
      import: './src/index.js',
      dependOn: 'shared',
    },
    second: {
      import: './src/second.js',
      dependOn: 'shared',
    },
    shared: 'shared-module',
  },
 ...
};
But the above configuration alone will not give you the desired output. You also need to enable runtimeChunk in the optimization section to prevent Webpack from copying module code between entry points.
optimization: {
  splitChunks: {
    chunks: 'all',
  },
},
If you are not satisfied with the Prevent Duplication approach, you can shift to the Dynamic Imports approach.
I think you already understand the power of Webpack code splitting and the amount of knowledge you need to configure that. So, I won’t be going into details of the Dynamic Imports approach here, and you will be able to understand it easily if you understood the previous two.
Supports Micro Frontends with Module Federation
Module federation is an exciting JavaScript architecture that allows importing code from another application dynamically at runtime.
Webpack facilitates the support you need to integrate the module federation architecture to your project through a plugin called Module Federation Plugin.
All you need to do is follow the 4 simple steps:
Import the plugin to both applications.
Make necessary modifications in the Webpack configuration for the first application and expose the components that need to be shared.
Import the shared component in the Webpack configurations of the second application.
However, this might not be that simple when you start the implementation. You should be very careful about Webpack configurations and only necessary changes.
For example, in the first application, you won’t need to change anything other than the plugins section.
const { ModuleFederationPlugin } = require(“webpack”).container;
...
plugins: [
  new ModuleFederationPlugin({
    name: "application1",
    library: { type: "var", name: "app1" },
    filename: "remoteEntry.js",
    exposes: {
      // expose each component
      "./Component1": "./src/components/Component1",
    },
      shared: ["react", "react-dom"],
    }),
    ...
  ],
...
Besides, if you have a good understanding of these concepts, you can refer to the relevant documentation and easily carry out the required configurations.
With this approach, you will be able to move away from the traditional way of sharing reusable components between micro frontends, and I think that would be a huge win for your development team.
How to set up your React app from scratch using Webpack
So, you have been using Create React App, aka CRA, for a while now. It’s great, and you can get straight to coding. But when do you need to eject from create-react-app and start configuring your own React application? There will be a time when we have to let go of the safety check and start venturing out of our own.
Let’s check out these articles:
https://www.freecodecamp.org/news/an-intro-to-webpack-what-it-is-and-how-to-use-it-8304ecdc3c60/
https://raphael-leger.medium.com/react-webpack-chunkloaderror-loading-chunk-x-failed-ac385bd110e0
https://medium.com/better-programming/learn-webpack-in-under-10-minutes-efe2b2b10b61
https://javascript.plainenglish.io/webpack-in-2021-typescript-jest-sass-eslint-7b4640842e27
https://medium.com/better-programming/micro-frontends-using-webpack-5-module-federation-3b97ffb22a0d
Bundler Best Practices
Webpack and yarn magic against duplicates in bundles
Setting up the scene
I will assume that you have some understanding of what tools like yarn, npm, and webpack are used in modern frontend projects and want to dig deeper into the magic behind the scenes.
Some terminology used in this article:
Direct dependencies: packages on which your project relies explicitly. Typically installed via yarn add package-name. The full list of those can be found in the dependencies field in package.json at the root of the project.
Transitive dependencies: packages on which your project relies implicitly. Those are the dependencies on which your direct dependencies rely. Typically, you won’t see them in the package.json file, but they can be seen, for example, in yarn.lock file
Duplicated Dependencies: transitive dependencies with mismatched versions. If one of the project dependencies has a button package version 4.0.0 as a transitive dependency and another has the same button version 3.0.0, both of those versions will be installed, and the button dependency will be duplicated.
De-duplication: the process of elimination of duplicated dependencies according to their SemVer versions (x.x.x - major, minor, patch). Typically, a range of versions within the same major version will contain no breaking changes, and only the latest version within this range can be installed. For example, a button version 4.0.0 and 4.5.6 can be “de-duplicated, “ and only version 4.5.6 will be installed.
yarn.lock file: an auto-generated file that contains the exact and full list of all direct and transitive dependencies and their exact versions in yarn-based projects.
The problem of duplicated dependencies
“Duplicated“ dependencies in any of the middle — or large-scale projects that rely on npm packages are inevitable. When a project has dozens of “direct“ dependencies, and every one of those has its own dependencies, the final number of all packages (direct and transitive) installed in a project can be close to hundreds. In this situation, it’s more likely than not that some of the dependencies will be duplicated.
Considering that those are bundled together and served to the customers, in order to reduce the final JavaScript size it’s important to reduce the number of duplicates to a minimum. This is where the deduplication process comes into play.
Deduplication in yarn
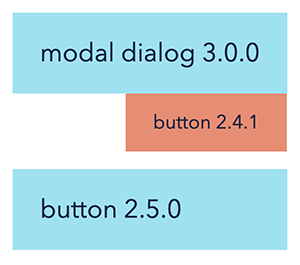
Consider, for example, a project that among its direct dependencies has modal-dialog@3.0.0 and button@2.5.0, and modal-dialog brings button@2.4.1 as a transitive dependency. If left unduplicated, both buttons will exist in the project
and in yarn.lock , we will see something like this:
modal-dialog@^3.0.0:
  version "3.0.0"
  resolved "exact-link-to-where-download-modal-dialog-3.0.0-from"
  dependencies:
    button@^2.4.1

button@^2.5.0:
  version "2.5.0"
  resolved "exact-link-to-where-download-2.5.0-version-from"

button@^2.4.1:
  version "2.4.1"
  resolved "exact-link-to-where-download-2.4.1-version-from"
Now, we know that according to semver, button@2.4.1 and button@2.5.0 are compatible, and therefore we can tell yarn to grab the same button@2.5.0 version for both of them — “deduplicate” them. From the project perspective, it will look like this:
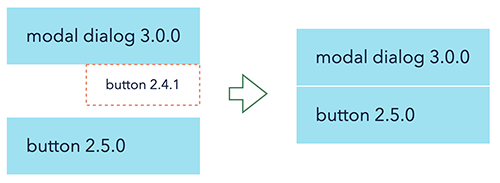
and in yarn.lock file, we’ll see this:
modal-dialog@^3.0.0:
  version "3.0.0"
  resolved "exact-link-to-where-download-modal-dialog-3.0.0-from"
  dependencies:
    button@^2.4.1

button@^2.4.1, button@^2.5.0:
  version "2.5.0"
  resolved "exact-link-to-where-download-2.5.0-version-from"
Deduplication in yarn - not compatible version
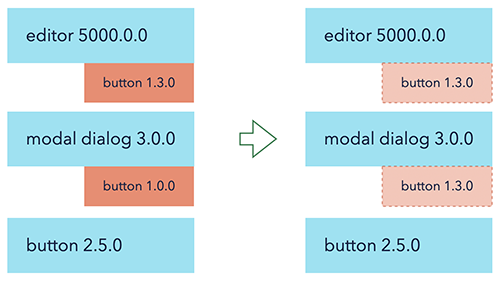
The above duplication technique is the only thing that we usually have in the fight against duplicates, and usually, it works quite well. But what will happen if a project has non-semver-dedupable transitive dependencies? If, for example, our project has modal-dialog@3.0.0, button@2.5.0, and editor@5000.0.0 as direct dependencies, and those bring button@1.3.0 and button@1.0.0 as transitive dependencies?
Using the same technique, we can de-duplicate buttons from 1.x.x version, and from the project perspective, it will look like this:
Two versions of the button are unavoidable, and in this case, usually, there is nothing we can do other than upgrade the version of model-dialog and editor to the versions when they both have button from 2.x.x range and it can be de-duplicated properly. Typically, in this case, we stop, say that our project has “2 versions of buttons,” and move on with our lives.
But what if we dig a little bit further and check out how exactly 2 buttons are installed on the disk and bundled together?
Duplicated dependencies installed
When we install our dependencies via classic yarn or npm (pnpm or yarn 2.0 changes the situation and are not considered here), npm hoists everything that is possible up to the root node_modules. If, for example, in our project above, both the editor and the modal dialog have the dependency on the same “deduped“ version of the tooltip, but our project does not, npm will install it at the root of the project.

And inside the node_modules folder, we’ll see this structure:
/node_modules
  /editor
  /modal-dialog
  /tooltip
And because of that, we can be sure that we only have one version of the tooltip in the project, or even if two completely different dependencies depend on slightly different versions of it.
Unless…
Unless those versions are not semver compatible and can not be deduplicated that easily. Basically, the situation in the project with buttons from above will look like this:
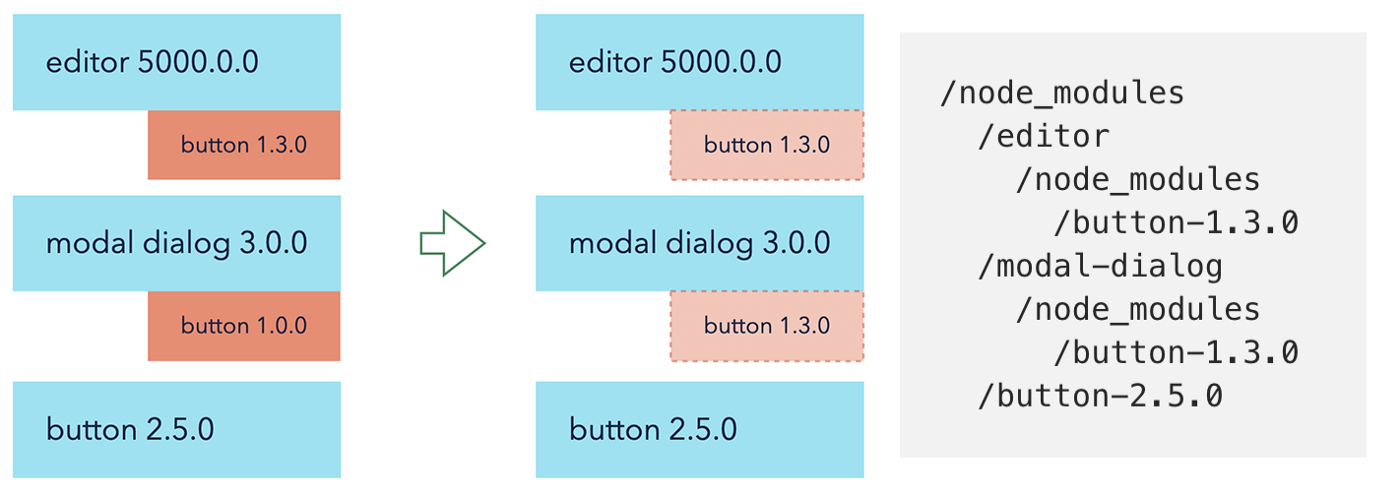
Even if dependencies are “deduped” on yarn.lock level, and we “officially” have only 2 versions of buttons in yarn.lock, every single package, with button@1.3.0 as the dependency that will install its own copy of it.
Deduplicated Dependencies and Webpack
So, if a project is bundled with Webpack, how exactly does it handle the situation from above? It doesn’t actually (there was a webpack dedup plugin in the long past, but it was removed after Webpack 2.0)
Webpack, behind the scenes, just builds the graph of all your files and their dependencies based on what’s installed and required in your node_modules via the normal code resolution algorithm. TL;DR: Every time a file in the editor does “import Button from ‘button’;”, the node will try to find this button in the closest node_modules starting from the parent folder of the file where the request appeared. The same story with the modal-dialog. And then, from a Webpack perspective, the very final ask for the button will be:
project/node_modules/editor/node_modules/button/index.js — when it’s requested from within editor
project/node_modules/modal-dialog/node_modules/button/index.js — when it’s requested from within modal-dialog
Webpack is not going to check whether they are exactly the same; it will treat them as unique files and bundle both of them in the same bundle. Our “duplicated” button just got double-duplicated.
Deduplication in Webpack - first attempt
Since those buttons are exactly the same, the very first question that comes to mind is: is it possible to take advantage of that and “trick“ Webpack into recognizing it? And indeed, it is possible, and it is ridiculously simple.
Webpack is incredibly flexible; it provides rich plugin interfaces with access to almost everything you can imagine (and to some things that you can not), and its core, most of its features are built with plugins as well. It exports a lot of them for others to use.
One of those plugins is NormalModuleReplacementPlugin — it gives the ability to replace one file with another file during a build time with a regular expression. Which is exactly what we need; the rest is just a master of coding.
First, detected all “duplicated“ dependencies by grabbing a list of all packages node_modules and filtering those that have node_modules in their install path more than once (basically all the “nested” packages from the yarn install chapter above), and grouping them by their version from package.json.
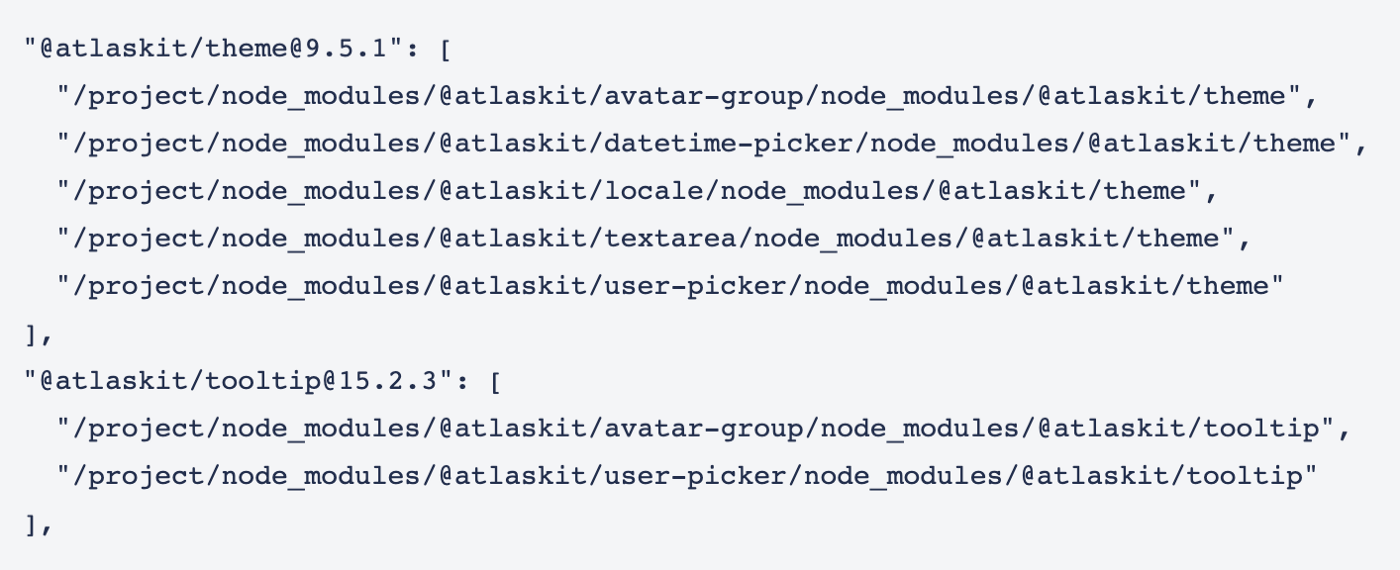
Second, replace all encounters of the “same” package with the very first one from the list

And 💥, there is no “third”, the solution works, it’s safe, and reduces bundle sizes in Jira by ~10%.
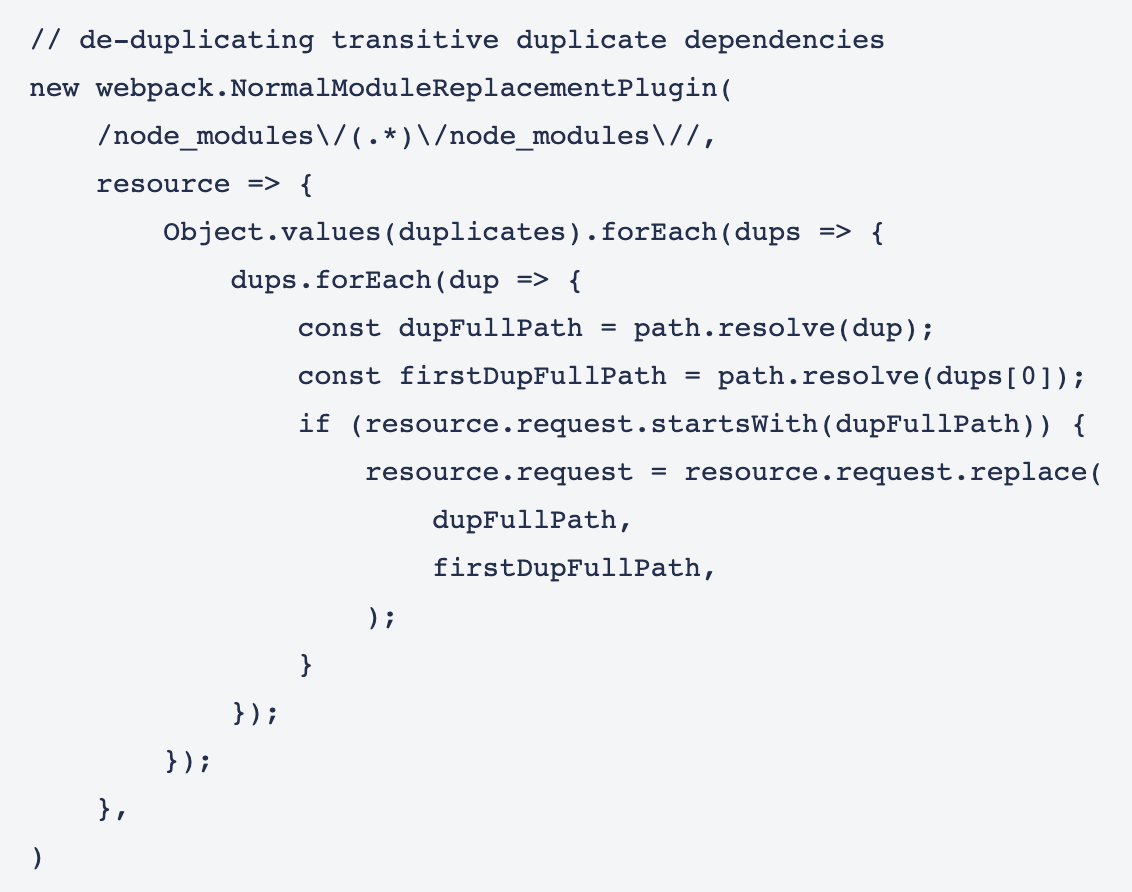
The full implementation was literally just 100 lines. Be mindful with celebrating and copying the approach, though, this is not the end of the article 😉
Check out this article for more details.
Learning by fixing: Node.js, Modules, and Packages
The project I was working on has a pretty standard frontend code setup: React, Next.js, CSS in JS, UI components from an external library to build the interface. One day I added a new component, and although everything works locally, my CI, while attempting to build the website, greeted me with this:
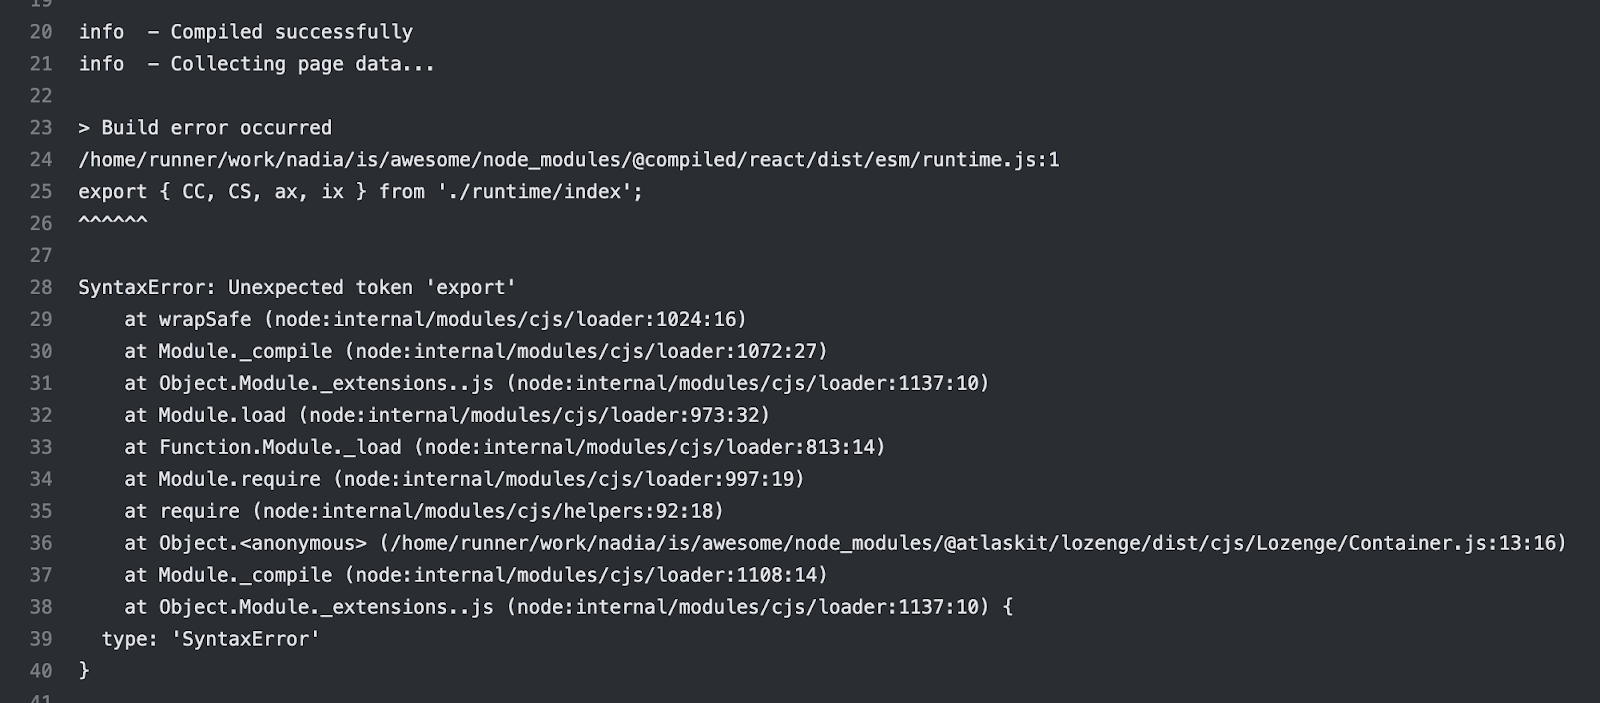
After a bit of “errr, wat?”, scratching my head furiously, meddling with UI configuration and doing usual clean-the-cache, nuke-node-modules, cargo-culting activities, I managed to reproduce the problem locally. Turned out that:
It only happens with the Logengy component, which uses Compiled - a new CSS-in-JS library.
It was working locally because the version of Node in the CI was newer than my local machine.
So clearly, the problem was either with Lozenge or with the compiled library itself, and clearly, there was something in their code that prevented it from working with the latest Node. So the solution to the problem seemed simple: downgrade the version of Node in the CI to unblock my build and raise an issue with the library in the hope that maintainers, who know their source code, can figure it out.
Only…
What can possibly a Lozenge component, that just renders a few divs, or a css-in-js library, that converts js-written styles into style tags can have, that depends on a version of Node? Especially on an old version of Node? It’s usually the other way around…
It’s a proper mystery! Time to put my Sherlock hat on and solve it.
Check out this article to explore the reason.
Three simple tricks to speed up yarn install
Dev productivity and quality of life improvements are a passion of mine. And speeding up working with code is not only fun, but also essential for building products fast. Happier and faster developers equal happier customers, who get their features and bug fixes sooner!
When dealing with an npm-based ecosystem and its myriad of packages, install dependencies time, especially in large projects, can be unreasonably long. Below are three simple tricks that can help you shave off a minute or two, or sometimes even reduce your yarn install time by half 😋

Not anymore!
Bloated yarn.lock problem
If your project runs on yarn, then more likely than not, some of your dependencies will be duplicated, even if they satisfy semver conditions. Although yarn promises that deduplication isn’t necessary, this is not exactly the truth.
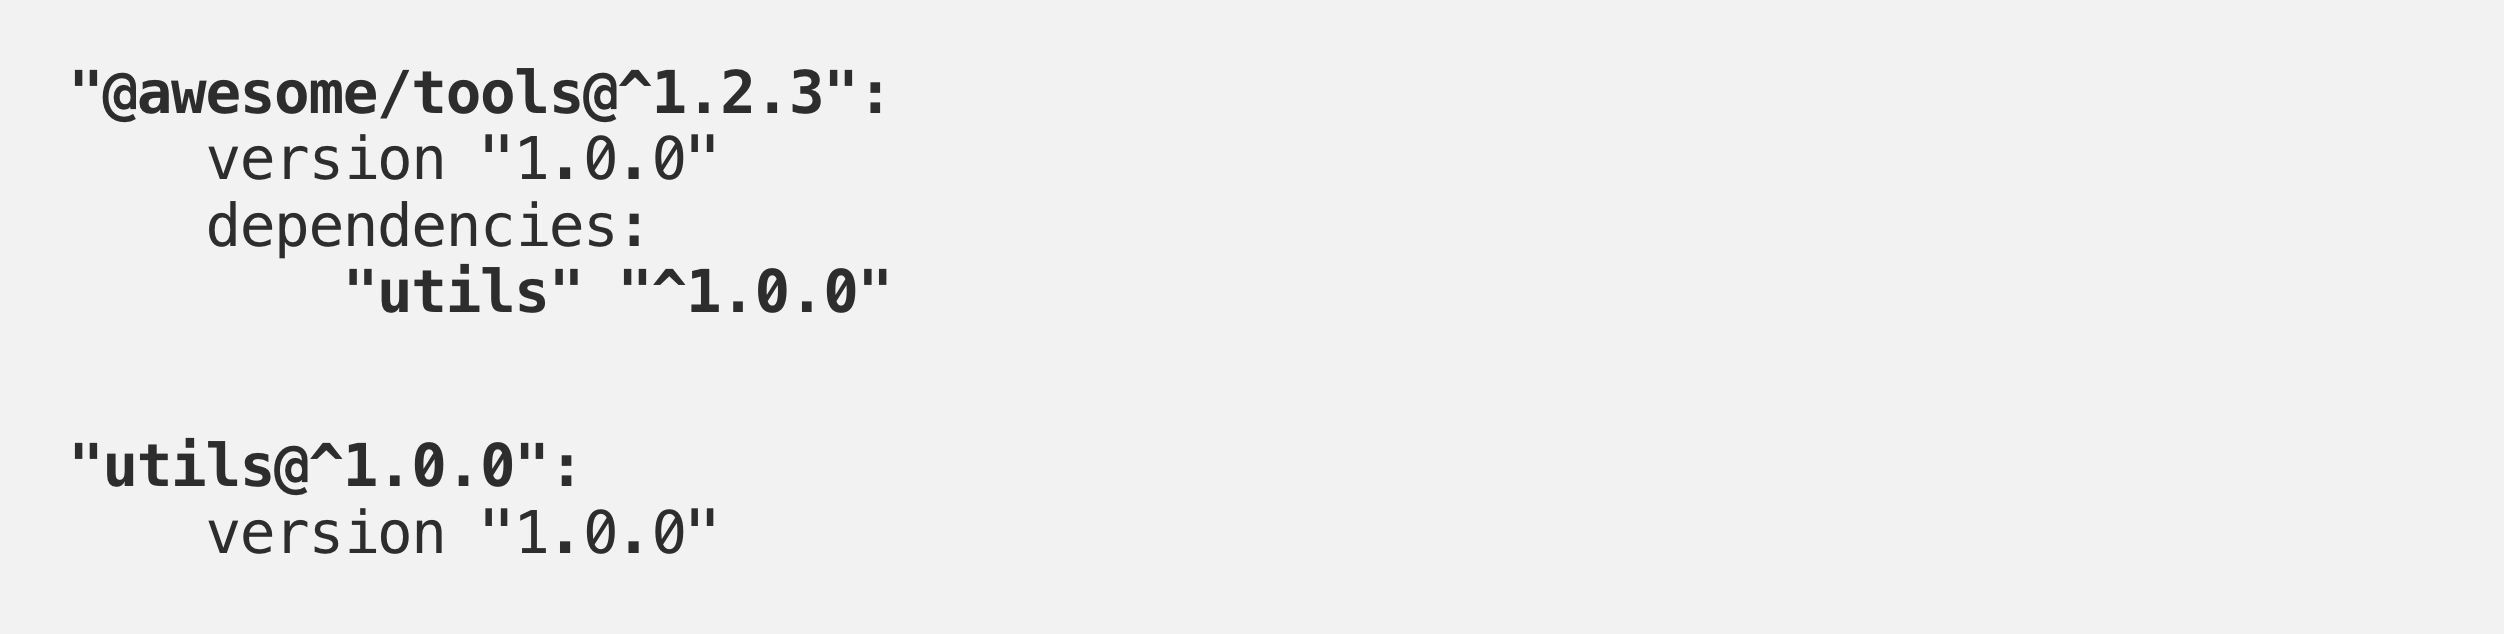
Imagine the situation: you’re adding @awesome/tools library to your dependencies, which also depends on utils@^1.0.0library, which is its latest version. After installing @awesome/tools you’ll see in your yarn.lock file:
After a few months, you want to add another library that depends on those utils, let’s say @simple/button.The Utils library released a few bug fixes and features in the meantime, and its latest version is now 1.5.1, and @simple/buttondepends on it. If you just run yarn add @simple/button, then in the yarn.lock you will see this picture:
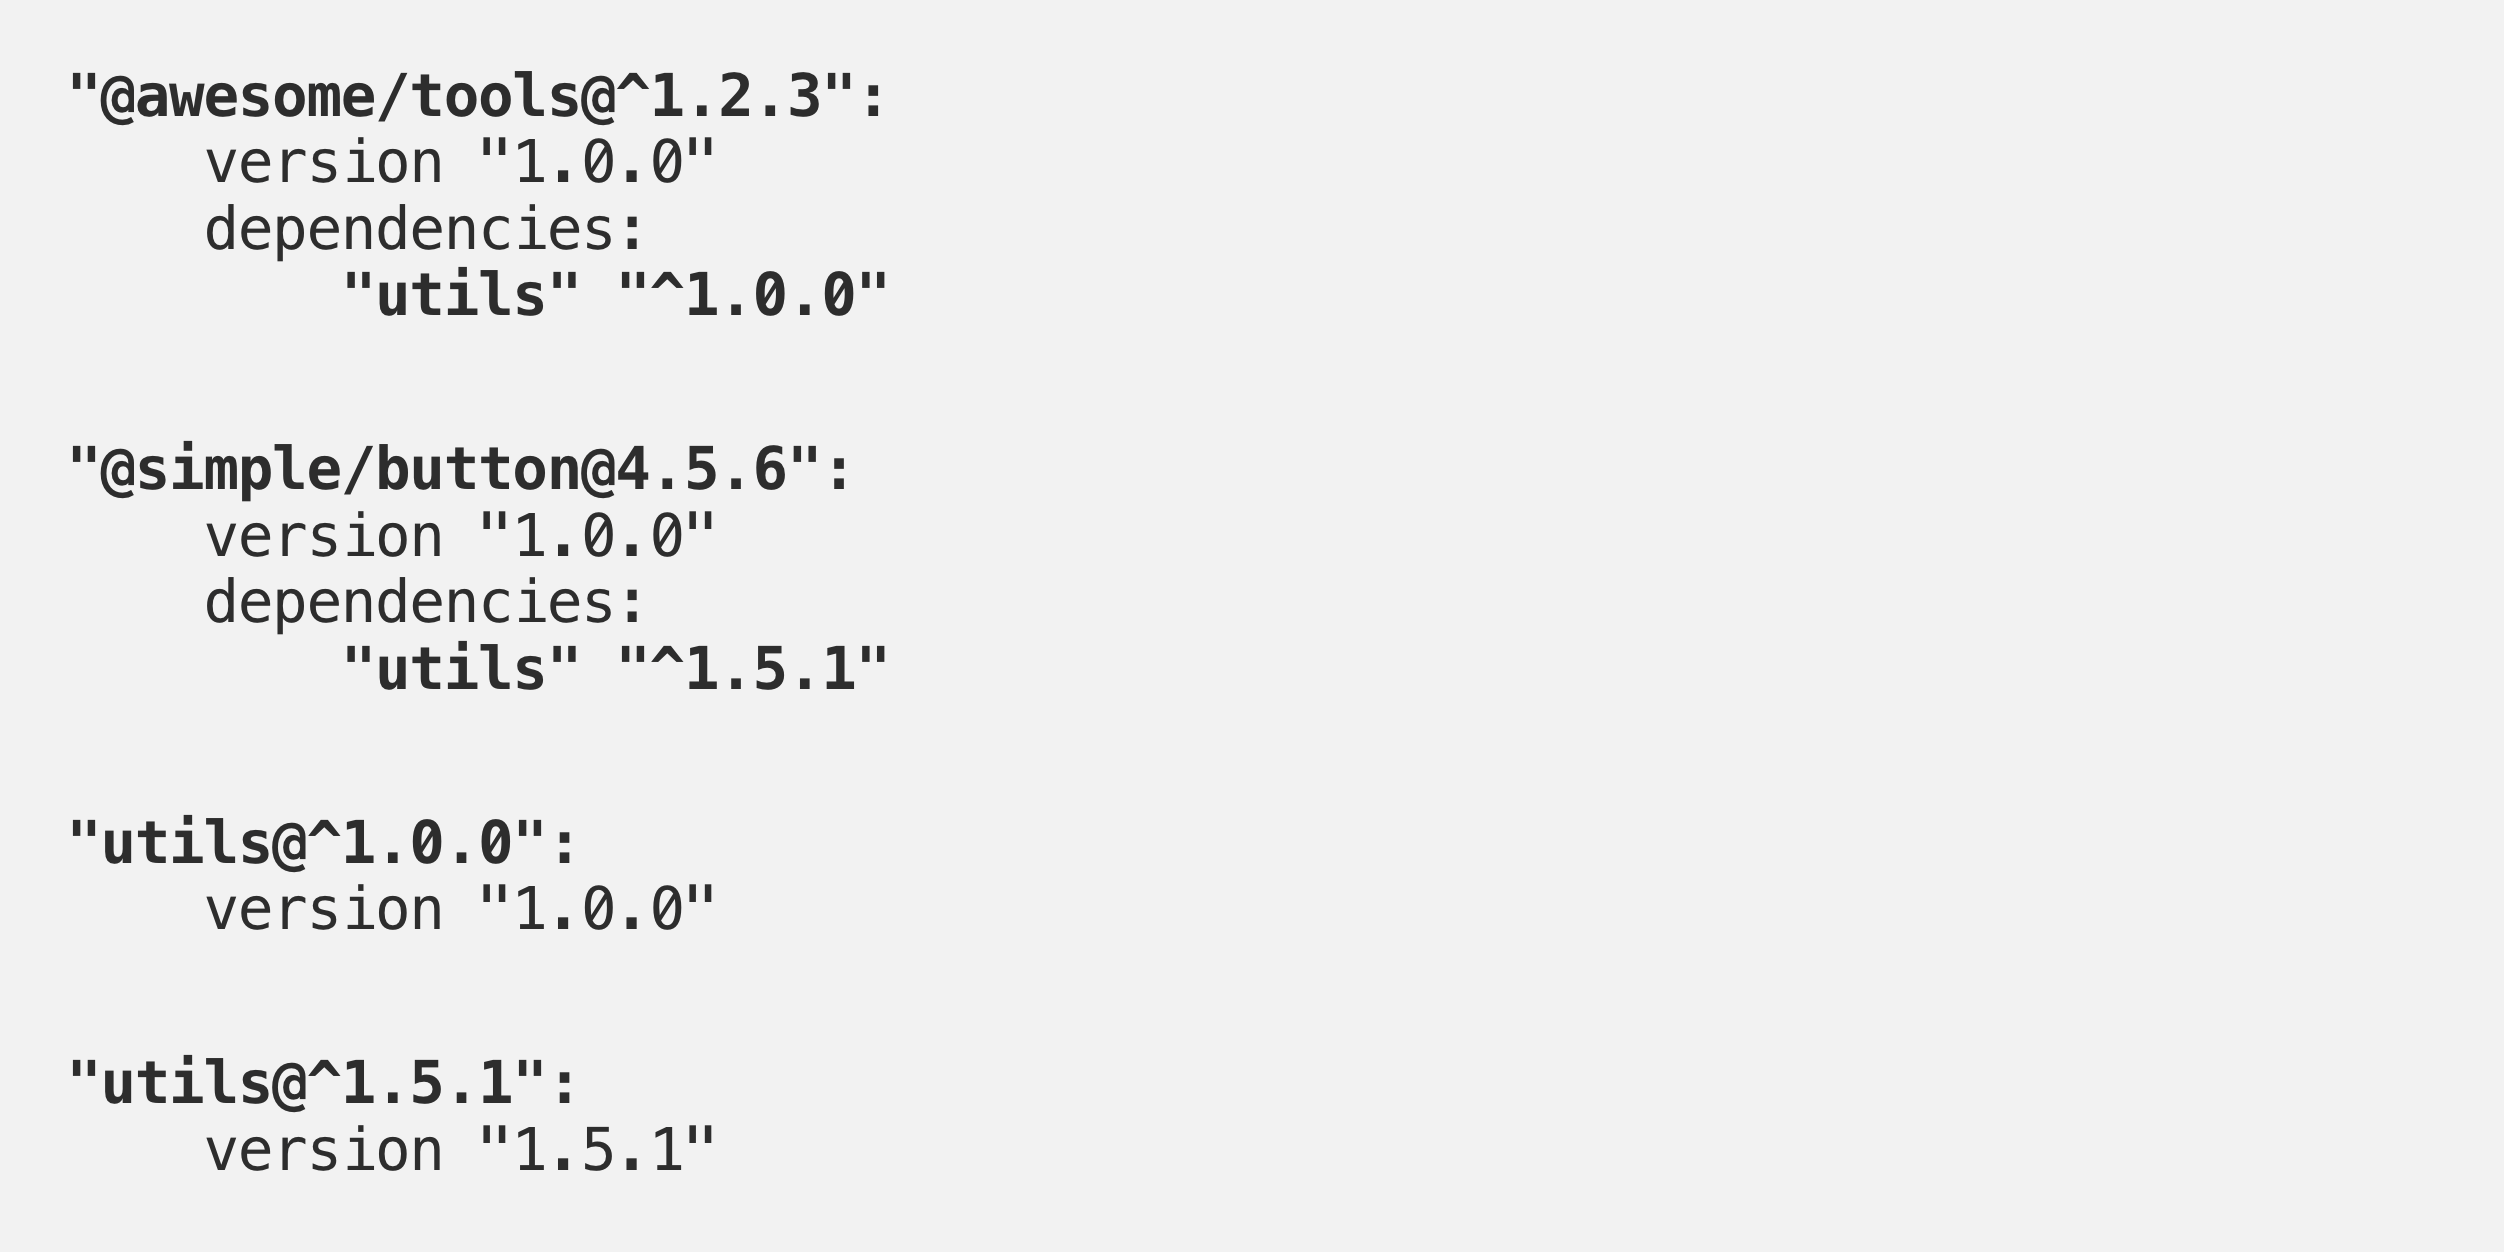
Even though 1.5.1 and 1.0.0 versions are semver-compatible, yarn will not merge them into one as you’d expect, and you’ll end up with 2 versions of the same utils in the repo.
It gets worse than that. If you have a few different libraries that depend on version 1.0.0 and a few that depend on 1.5.1, yarn will hoist one of those versions to the root of node_modules folder, but another one would have no place to go (only one version can sit at the root), and they will be installed as copies in node_modules folders of the libraries that use them. You’ll end up with this folder structure:
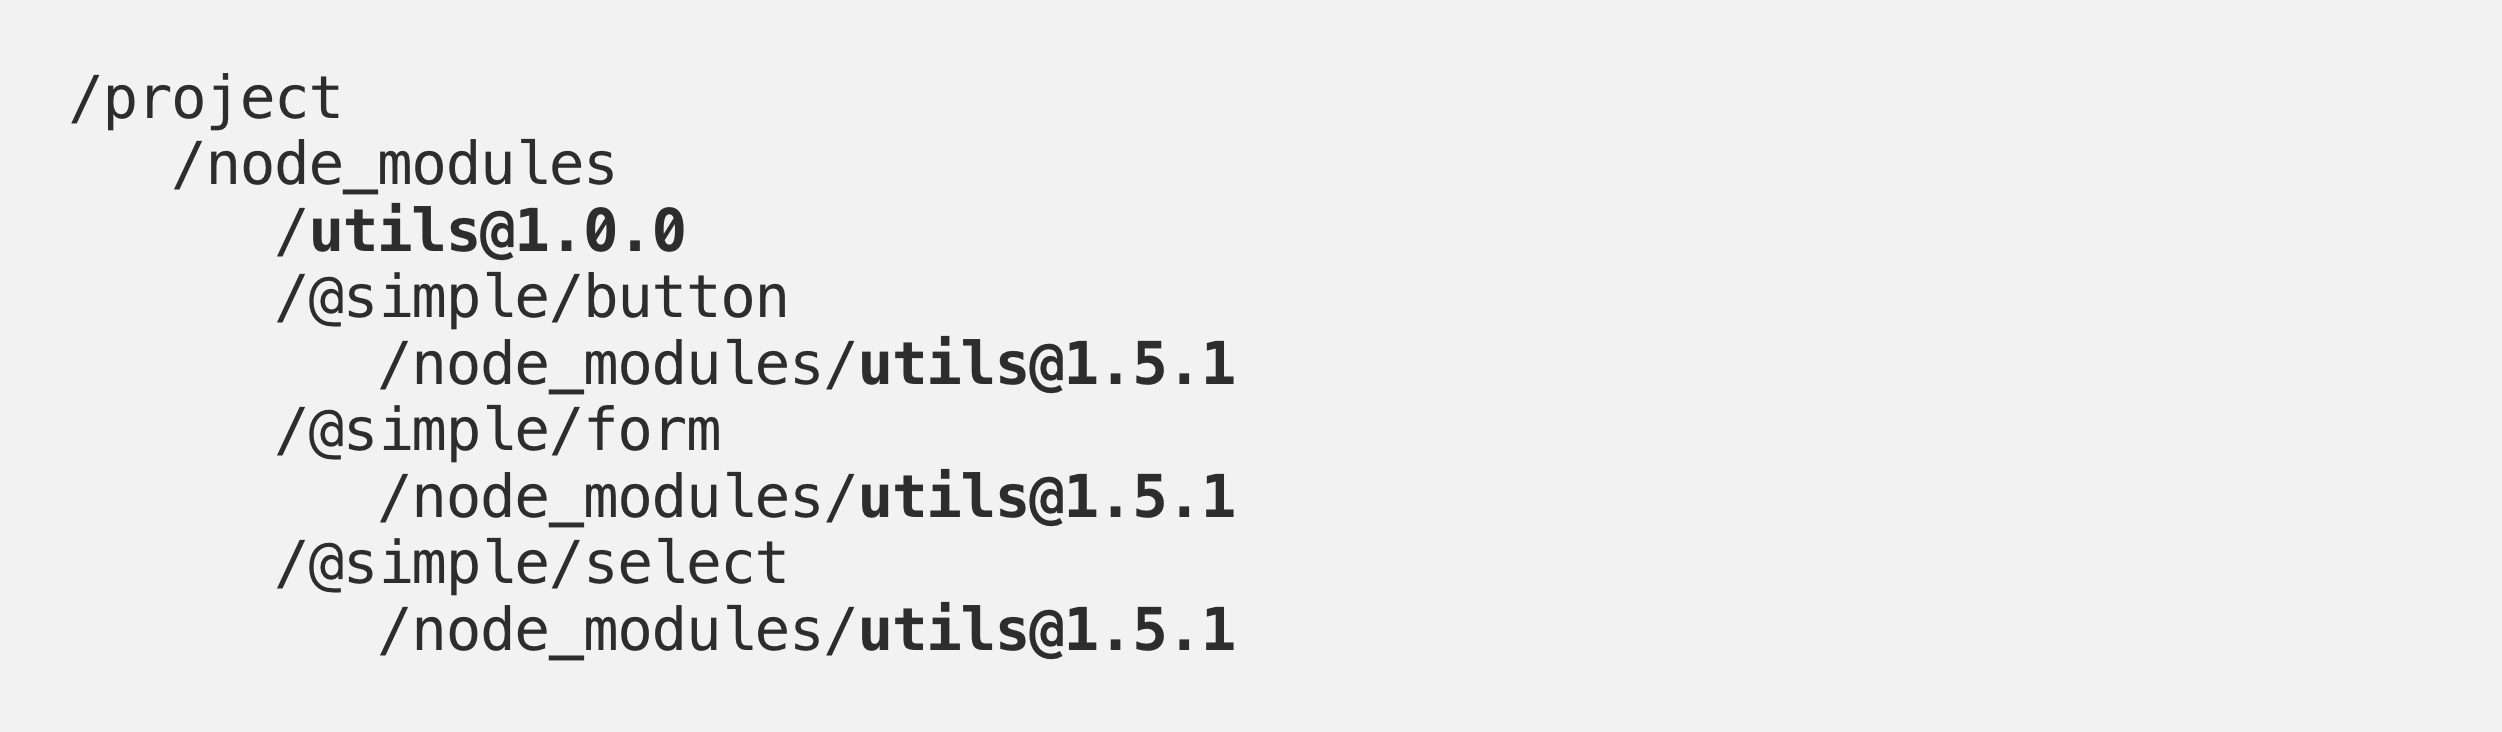
And although it seems like you only have 2 versions of utils library, in reality, it can be 5–6-infinite-number of its copies living in your project, all of which need to be copied into their place, and all of which will steal your yarn install time.
Check out this article to explore the solution🔥
How did we cut bundle size by 70% overnight?
An analysis of modern JavaScript projects reveals a concerning trend: many production applications include hundreds of transitive dependencies. According to Sonatype’s 2023 research, the average JavaScript contains 42 direct dependencies and 683 transitive dependencies, with 65% of projects containing known vulnerable dependencies.
The real cost goes so far beyond the megabytes:
Security Vulnerabilities: Each dependency is a potential attack vector.
Maintenance overhead: Keeping dependencies updated consumes developer time.
Version conflicts: Incompatible sub-dependencies create debugging nightmares.
Bundle bloated: Libraries often bring more code than you actually use.
Most concerning is the exponential nature of transitive dependencies. Adding a “single“ package can sometimes pull in dozens of sub-dependencies you never intended to include.
A client of ours recently added a simple date formatting library that seemed lightweight (12KB) — but it silently pulls in 267KB of additional dependencies. That’s a 22X multiplier!
That matters because every 100kB of JavaScript takes approximately 100ms to parse and compile on an average mobile device.
For users on slower devices or connections, this directly translates to frustration and abandonment.
Our dependency audit process
- Analyzing the current state
Before making any changes, we needed visibility into our dependency mess. These tools proved invaluable:
webpack-bundle-analyzer
Gives you a visual treemap of your bundle components.
# Installation
npm install --save-dev webpack-bundle-analyzer
// # In your webpack.config.js
const { BundleAnalyzerPlugin } = require('webpack-bundle-analyzer');
module.exports = {
  plugins: [
    new BundleAnalyzerPlugin()
  ]
}
// # Run your build to see the analysis
npm run build
npm is
Shows your dependency tree directly in the terminal:
# Show top-level dependencies
npm ls --depth=0

# Show all dependencies including their dependencies
npm ls

# Find specific packages
npm ls react

# Show only production dependencies
npm ls --prod
dep check
Identifies unused dependencies in your projects
# Installation
npm install -g depcheck

# Run in your project root
depcheck

# With custom options
depcheck --ignores="eslint,babel-*"
import-cost
# Installation steps:
1. Open VS Code
2. Press Ctrl+P (Cmd+P on Mac)
3. Type: ext install wix.vscode-import-cost
4. Press Enter

# The extension will show size information directly in your editor
# whenever you import packages
Running webpack-bundle-analyzer was eye-opening. We immediately spotted several massive libraries dominating your bundle:
A full-featured charting library (1.2MB), when we only used two simple chart types
Three different date manipulation libraries (Moment.js, date-fns, and Day.js)
Lodash is imported in its entirety rather than individual functions.
A massive UI component library where we used just four components.
- Setting Measurable Goals
We established clear metrics to track our progress:
Primary: Total bundle size (initial and chunked)
Secondary: Time to interact on mid-tier mobile devices.
Supporting: JavaScript parse/compile time
Business: Conversion rates and bounce rates
We set an ambitious goal of reducing bundle size by 50% within one sprint, with a stretch goal of 60%. We ultimately achieved 70%.
6 Techniques that delivered results: Our Step-by-Step Process
- Ruless Package Evaluation
We applied a simple but effective framework to every dependency:
Do we absolutely need this functionality?
Can we implement it ourselves in < 100 lines of code?
Is there a more lightweight alternative?
If we must use it, can we only use the needed parts?
This led to some major wins:
Example 1: Replacing Moment.js (329KB) with date-fns (85KB)
// Before: Moment.js (329KB)
import moment from 'moment';
const formattedDate = moment(date).format('YYYY-MM-DD');
// After: date-fns (only importing what we need)
import { parseISO, format } from 'date-fns';
const formattedDate = format(parseISO(dateString), 'yyyy-MM-dd');
Example 2: Replacing a full chart library with a targeted solution
// Before: Importing massive chart library (1.2MB)
import { LineChart } from 'massive-chart-lib';

// After: Using a lightweight alternative (87KB)
import { Line } from 'lightweight-charts';
In total, we eliminated 18 dependencies and replaced 7 others with lighter alternatives.
- Implementing Proper Tree-Shaking
Tree-shaking (eliminating unused code) sounds simple, but many projects don’t fully benefit from it due to configuration issues.
Common pitfalls we fixed:
Using CommonJS modules that can’t be properly tree-shaken.
Side effects preventing dead code elimination
Incorrect Webpack/bundler configuration
Our webpack optimization:
// webpack.config.js improvements
module.exports = {
  mode: 'production',
  optimization: {
    usedExports: true,
    sideEffects: true,
    minimize: true,
    concatenateModules: true,
  },
}
Ensuring proper imports:
// Before: No tree-shaking (entire library included)
import _ from 'lodash';

// After: Tree-shakeable imports

// Option 1: Individual imports
import map from 'lodash/map';
import filter from 'lodash/filter';


// Option 2: Using lodash-es for ESM modules
import { map, filter } from 'lodash-es';
This alone shaved off 347KB from our bundle.
- Dynamic Imports & Code Splitting
Rather than loading our entire application upfront, we implemented aggressive code splitting:
Route-based splitting:
// Before: All routes imported eagerly
import UserProfile from './UserProfile';
import Dashboard from './Dashboard';
import Settings from './Settings';


// After: Routes loaded dynamically
const UserProfile = React.lazy(() => import('./UserProfile'));
const Dashboard = React.lazy(() => import('./Dashboard'));
const Settings = React.lazy(() => import('./Settings'));
Feature-based splitting:
// Before: Advanced features loaded upfront
import { DataExport } from './features/export';

// After: Load on demand
const handleExport = async () => {
  const { DataExport } = await import('./features/export');
  DataExport.run(currentData);
};
We used React.Suspense to handle loading states gracefully:
<Suspense fallback={<Spinner />}>
  <Route path="/profile" component={UserProfile} />
</Suspense>
This approach reduced our initial bundle size by 35% by deferring non-critical features.
- Micro-frontends for Targeted Loading
For our most complex product area — the analytics dashboard — we implemented module federation using Webpack 5’s features to load different sections independently. While this approach took us around three weeks to fully implement (longer than our initial one-week estimate), the performance benefits justified the investment.
// webpack.config.js (simplified)
const { ModuleFederationPlugin } = require('webpack').container;

module.exports = {
  plugins: [
    new ModuleFederationPlugin({
      name: 'dashboard',
      filename: 'remoteEntry.js',
      exposes: {
        './ReportingModule': './src/components/Reporting',
        './VisualizationModule': './src/components/Visualization',
      },
      shared: {
        react: { singleton: true },
        'react-dom': { singleton: true },
        // other shared dependencies
      },
    }),
  ],
};
This approach allowed us to:
Load only the dashboard components that the user actually views
Share common dependencies between micro-frontends
Update individual modules independently
When Not to Use Micro-frontends
While powerful, this approach isn’t for everyone:
Small teams with limited DevOps resources may find the operational complexity overwhelming
Applications with heavy cross-module communication might face performance penalties
Projects requiring SSR/SSG optimization may need different architectural approaches
⚠️ Not for everyone — Micro-frontends introduce DevOps and architectural complexity. Avoid them for small apps or SSR-focused builds.
For our use case — a large dashboard with distinct functional areas — the benefits far outweighed the complexities.
- Building Dependencies Approval Process
To prevent future bloat, we implemented a dependency approval workflow:
Proposed dependency form: Developers must justify new packages
Bundle impact analysis: Automated testing of bundle size impact
Alternatives checklist: Documented consideration of lighter options
Regular audits: Monthly dependency reviews
We added bundle size budgets to our CI pipeline:
// package.json
{
  "bundlesize": [
    {
      "path": "./dist/main.*.js",
      "maxSize": "250 kB"
    },
    {
      "path": "./dist/vendors.*.js",
      "maxSize": "700 kB"
    }
  ]
}
This process has prevented at least seven unnecessary dependencies from entering our codebase in the three months since implementation.
- Compression & Caching Strategies
Beyond dependency optimization, we implemented several network-level optimizations:
Brotli compression: We replaced gzip with Brotli, which provides ~11% better compression
Long-term caching: Set far-future cache headers (1 year) with content-based hashing
CDN-hosted dependencies: Used public CDNs for common libraries when appropriate
Preloading critical assets: Implemented
<link rel="preload">for essential resources
These changes further reduced perceived load times by optimizing how resources were delivered to users, complementing our bundle size reductions.
The results: Before and After Analysis
The final results, measured using Lighthouse, WebPageTest, and our internal analytics platform, exceeded even our stretch goals:
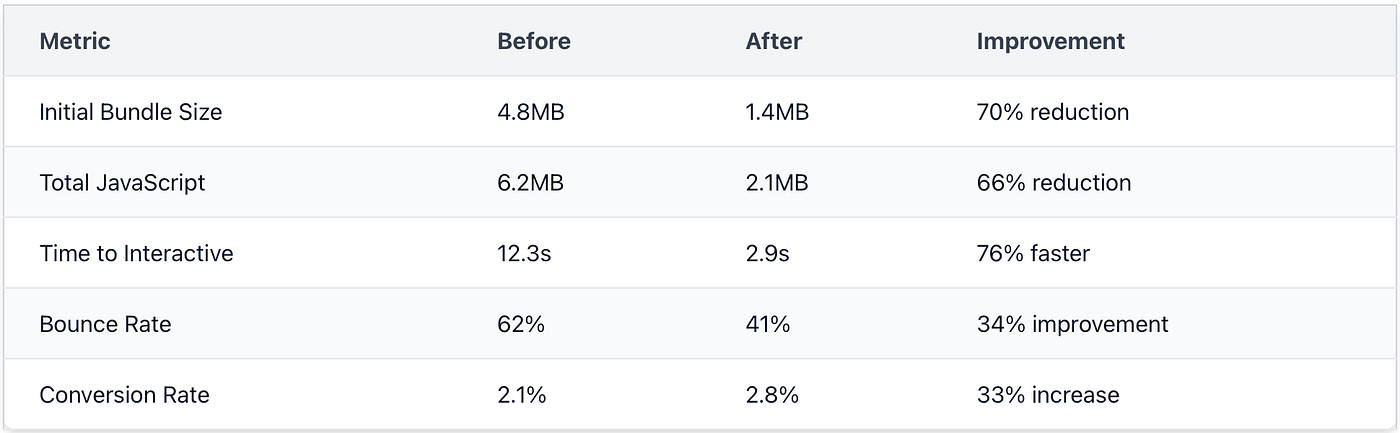
Beyond the performance metrics, we saw several unexpected benefits:
Faster build times: CI builds went from 8 minutes to under 4 minutes
Fewer bugs: Removing complex dependencies eliminated subtle integration issues
Improved developer experience: The codebase became more understandable and maintainable
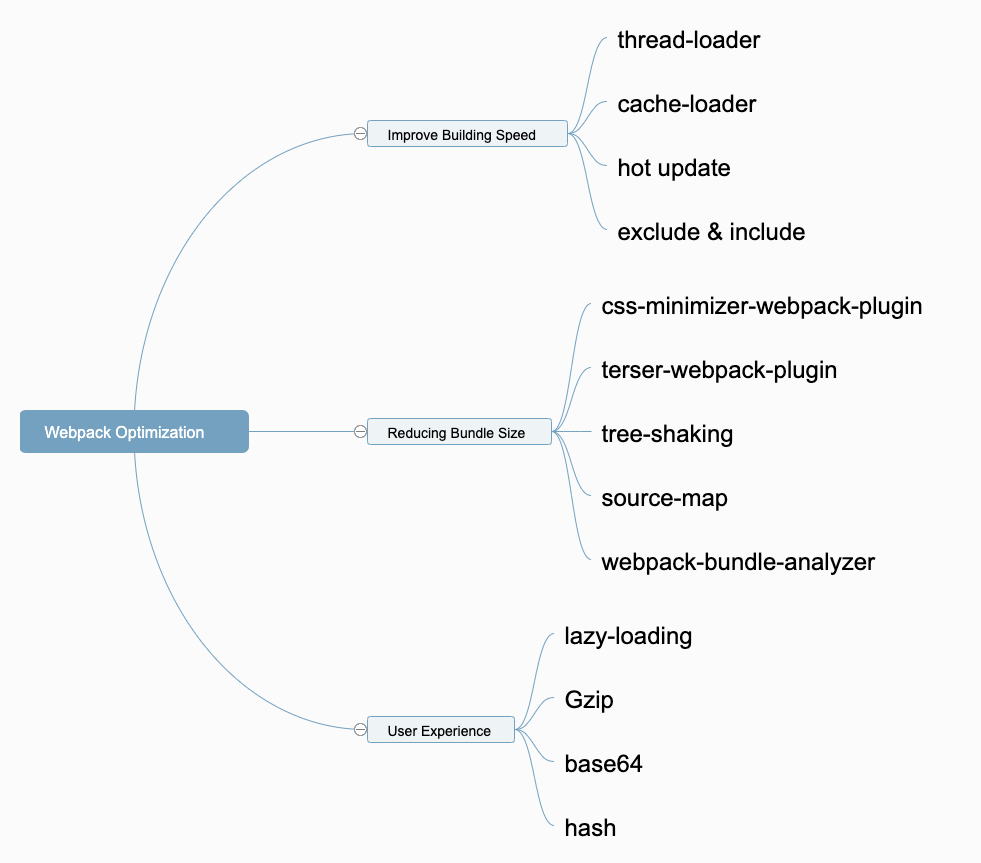
13 Webpack Optimization Tips You Should Know
I will share some of my commonly used techniques from these aspects:
Improving the building speed
Reducing the size of the packaged files
Improving the user experience.
Improving the Building Speed
- thread-loader
Multithreading can improve the efficiency of the program; we can also use it in Webpack. And thread-loader is a loader that can enable multi-threading in Webpack.
Installation of the loader:
npm i thread-loader -D
Configuration:
{
        test: /\.js$/,
        use: [
          'thread-loader',
          'babel-loader'
        ],
}
- cache-loader
In the process of deploying our project, Webpack needs to build the project several times. To speed up subsequent builds, we can use caching. The cache-related loader is cache-loader.
Installation:
npm i cache-loader -D
Configuration:
{
        test: /\.js$/,
        use: [
          'cache-loader',
          'thread-loader',
          'babel-loader'
        ],
}
- Hot update
When we modify a file in a project, Webpack will rebuild the entire project by default, but this is not necessary. We only need to recompile this file, which is more efficient; this strategy is called a hot update.
Webpack has a built-in hot update plugin; we just need to enable hot update in the configuration.
Configuration:
// import webpack
const webpack = require('webpack');
then:
{
  plugins: [
      new webpack.HotModuleReplacementPlugin()
  ],

  devServer: {
      hot: true
  }
}
- exclude & include
In our project, some files and folders never need to participate in the build. So we can specify these files in the configuration file to prevent Webpack from retrieving them, thereby improving compilation efficiency.
Of course, we can also specify that some files need to be compiled.
exclude: files that don’t need to be compiledinclude: files that need to be compiled
Configuration:
{
    test: /\.js$/,

    include: path.resolve(__dirname, '../src'),

    exclude: /node_modules/,    use: [
        'babel-loader'
    ]
}
Reducing the size of the packaged files
- Minify CSS code
css-minimizer-webpack-plugin can compress and deduplicate CSS code.
Installation:
npm i css-minimizer-webpack-plugin -D
Configuration:
const CssMinimizerPlugin = require('css-minimizer-webpack-plugin')
and:
optimization: {
    minimizer: [
      new CssMinimizerPlugin(),
    ],
  }
- Minify JavaScript code
terser-webpack-plugin can compress and deduplicate JavaScript code.
Installation:
npm i terser-webpack-plugin -D
Configuration:
const TerserPlugin = require('terser-webpack-plugin')optimization: {
    minimizer: [
      new CssMinimizerPlugin(),
      new TerserPlugin({
        terserOptions: {
          compress: {
            drop_console: true, // remove console statement
          },
        },
      }),
    ],
  }
- tree-sharking
Tree-sharking is: to compile only that code that is actually used, not the code that is not used in the project.
In Webpack 5, tree-shaking is enabled by default. You just need to make sure to use production mode when final compiling.
module.exports = {
  mode: 'production'
}
- source-map
When there is a bug in our code, source-map can help us quickly locate the location in our source code. But this file is huge.
In order to balance performance and accuracy, we should: generate a more accurate (but larger) source map in development mode; generate a smaller (but not as accurate) source map in production mode.
Development mode:
module.exports = {
  mode: 'development',
  devtool: 'eval-cheap-module-source-map'
}
Production mode:
module.exports = {
  mode: 'production',
  devtool: 'nosources-source-map'
}
- Bundle Analyzer
We can use webpack-bundle-analyzer to review the column of the bundle file after packaging, and then perform corresponding volume optimization.
Installation:
npm i webpack-bundle-analyzer -D
Configuration:
const {
  BundleAnalyzerPlugin
} = require('webpack-bundle-analyzer')// config
plugins: [
    new BundleAnalyzerPlugin(),
]
Improving the user experience
- Module Lazy Loading
If the module is not lazy-loaded, the code of the entire project will be packaged into one JS file, resulting in a very large size of a single JS file. Then, when the user requests the webpage, the loading time of the first screen will be longer.
After module lazy loading, the large JS file will be divided into multiple small JS files, and the webpage will be loaded on demand when loading, which greatly improves the loading speed of the first screen.
To enable lazy loading, we just need to write code like this:
// src/router/index.jsconst routes = [
  {
    path: '/login',
    name: 'login',
    component: login
  },
  {
    path: '/home',
    name: 'home',    // lazy-load
    component: () => import('../views/home/home.vue'),
  },
]
- Gzip
Gzip is a common algorithm for compressing files, which can improve transmission efficiency. However, this function requires back-end cooperation.
Installation:
npm i compression-webpack-plugin -D
Configuration:
const CompressionPlugin = require('compression-webpack-plugin')
// config
plugins: [

    // gzip
    new CompressionPlugin({
      algorithm: 'gzip',
      threshold: 10240,
      minRatio: 0.8
    })
  ]
- base64
For some small pictures, they can be converted into base64 encoding, which can reduce the number of HTTP requests for users and improve the user experience. url-loader has been deprecated in webpack5, we can use asset-module instead.
Configuration:
{
   test: /\.(png|jpe?g|gif|svg|webp)$/,
   type: 'asset',
   parser: {      // Conditions for converting to base64
      dataUrlCondition: {
         maxSize: 25 * 1024, // 25kb
      }
   },
   generator: {
    filename: 'images/[contenthash][ext][query]',
   },
},
- Properly configure the hash
We can add a hash to the bundle file, which makes it easier to handle caching.
output: {
    path: path.resolve(__dirname, '../dist'),
    filename: 'js/chunk-[contenthash].js',
    clean: true,
  },
How to Fully Optimize Webpack 4 Tree Shaking
Before going into technical details, let me summarize the benefits. Different applications will see different levels of benefits with this exercise. The main deciding factor is the amount of dead, tree-sharkable code in your application. If you don’t have much, then you won’t see much of a benefit from tree-sharking. We had a lot of dead code in ours.
In our department, the biggest problem was a number of shared libraries. These ranged from simple homegrown component libraries to corporate standard component libraries to giant blobs of code shoved together into a library for no rhyme or reason. A lot of it is tech debt, but a big problem was that all of our applications were importing all of these libraries, when in reality each one only needed small pieces of them.
Overall, once tree-shaking was implemented, our applications shrank from between 25% to 75%, depending on the application. The average reduction across all of them was 52%, primarily driven by these bloated shared libraries being the majority of the code in small applications.
What is considered Dead Code?
This is the simple: It’s code that Webpack can’t see you using. Webpack follows the trail of import/export statements throughout the application, so if it sees something being imported but ultimately not being used, it considers that to be “dead code“ and will tree-shake it.
Dead code isn’t always clear, though. Below will be a few examples of dead code vs “live” code, which I hope will make this more clear. Keep in mind that there will be cases where Webpack will see something as dead code even though it really isn’t. Please see the section on Side Effects to learn how to handle this.
// Importing, assigning to a JavaScript object, and using it in the code below
// This is considered "live" code and will NOT be tree-shaken
import Stuff from './stuff';
doSomething(Stuff);
// Importing, assigning to a JavaScript object, but NOT using it in the code below
// This is considered "dead" code and will be tree shaken
import Stuff from './stuff';
doSomething();
// Importing but not assigning to a JavaScript object and not using it in the code
// This is considered to be "dead" code and will be tree shaken
import './stuff';
doSomething();
// Importing an entire library, but not assigning to a JavaScript object and not using it in the code
// Oddly enough, this is considered to be "live" code, as Webpack treats library imports differently from local code imports
import 'my-lib';
doSomething();
Writing Tree-Shakable Imports
When writing tree-shakable code, your imports are important. You should avoid importing entire libraries into a single JavaScript object. When you do so, you are telling Webpack that you need the whole library, and Webpack will not tree-shake it.
Take this example from the popular library Lodash. Importing the entire library at once is a big NO, but importing individual pieces is much better. Of course, Lodash specifically needs other steps to be tree-shaken, but this is a good first step.
// Import everything (NOT TREE-SHAKABLE)
import _ from 'lodash';
// Import named export (CAN BE TREE SHAKEN)
import { debounce } from 'lodash';
// Import the item directly (CAN BE TREE SHAKEN)
import debounce from 'lodash/lib/debounce';
Check out this article to figure out more techniques about tree shaking.
References
https://sayanmondal342.medium.com/the-what-why-and-how-of-javascript-bundlers-f617f82aa09a
https://medium.com/better-programming/the-battle-of-bundlers-6333a4e3eda9
https://blog.lyearn.com/how-webpack-works-236f8cc43ae7
https://mvskiran.medium.com/the-core-concepts-of-webpack-customing-webpack-414483a86fb7
https://medium.com/ekino-france/beyond-webpack-esbuild-vite-rollup-swc-and-snowpack-97911a7175cf
https://medium.com/better-programming/6-webpack-concepts-for-advanced-react-developers-d016da2cad52
https://blog.bitsrc.io/why-frontend-developers-need-to-be-webpack-experts-32e734b6f04a
https://www.developerway.com/posts/webpack-and-yarn-magic-against-duplicates-in-bundles
https://medium.com/frontend-canteen/13-webpack-optimization-tips-you-should-know-668666f8c020
Subscribe to my newsletter
Read articles from Tuan Tran Van directly inside your inbox. Subscribe to the newsletter, and don't miss out.
Written by
Tuan Tran Van
Tuan Tran Van
I am a developer creating open-source projects and writing about web development, side projects, and productivity.