Ultimate Product Photography Guide to Boost Your Shots
 ProdShot Creator
Building Your Product Photography Studio Without Breaking the Bank
Creating product photos that truly sell doesn't require a fancy, expensive studio. I've seen some amazing shots taken with very basic setups, proving that ingenuity can go a long way. So, let's dive into how you can turn any ordinary space into a photography haven for your products. Forget the myth that you need top-dollar equipment to get started. Your smartphone—especially a newer model—is seriously powerful. Couple that with a few DIY tricks, and you'll have a studio setup that can rival the pros.
Essential Equipment and DIY Solutions
Think outside the box…literally! Shower curtains make fantastic light diffusers, softening harsh shadows, while poster board creates clean, seamless backgrounds. These budget-friendly options give a professional touch without emptying your wallet. And don't underestimate the power of a simple reflector. A piece of white foam board can work wonders, bouncing light back onto your product to fill in those pesky shadows. You can even create your own lightbox with a cardboard box and some white tissue paper. It's perfect for even, diffused lighting.
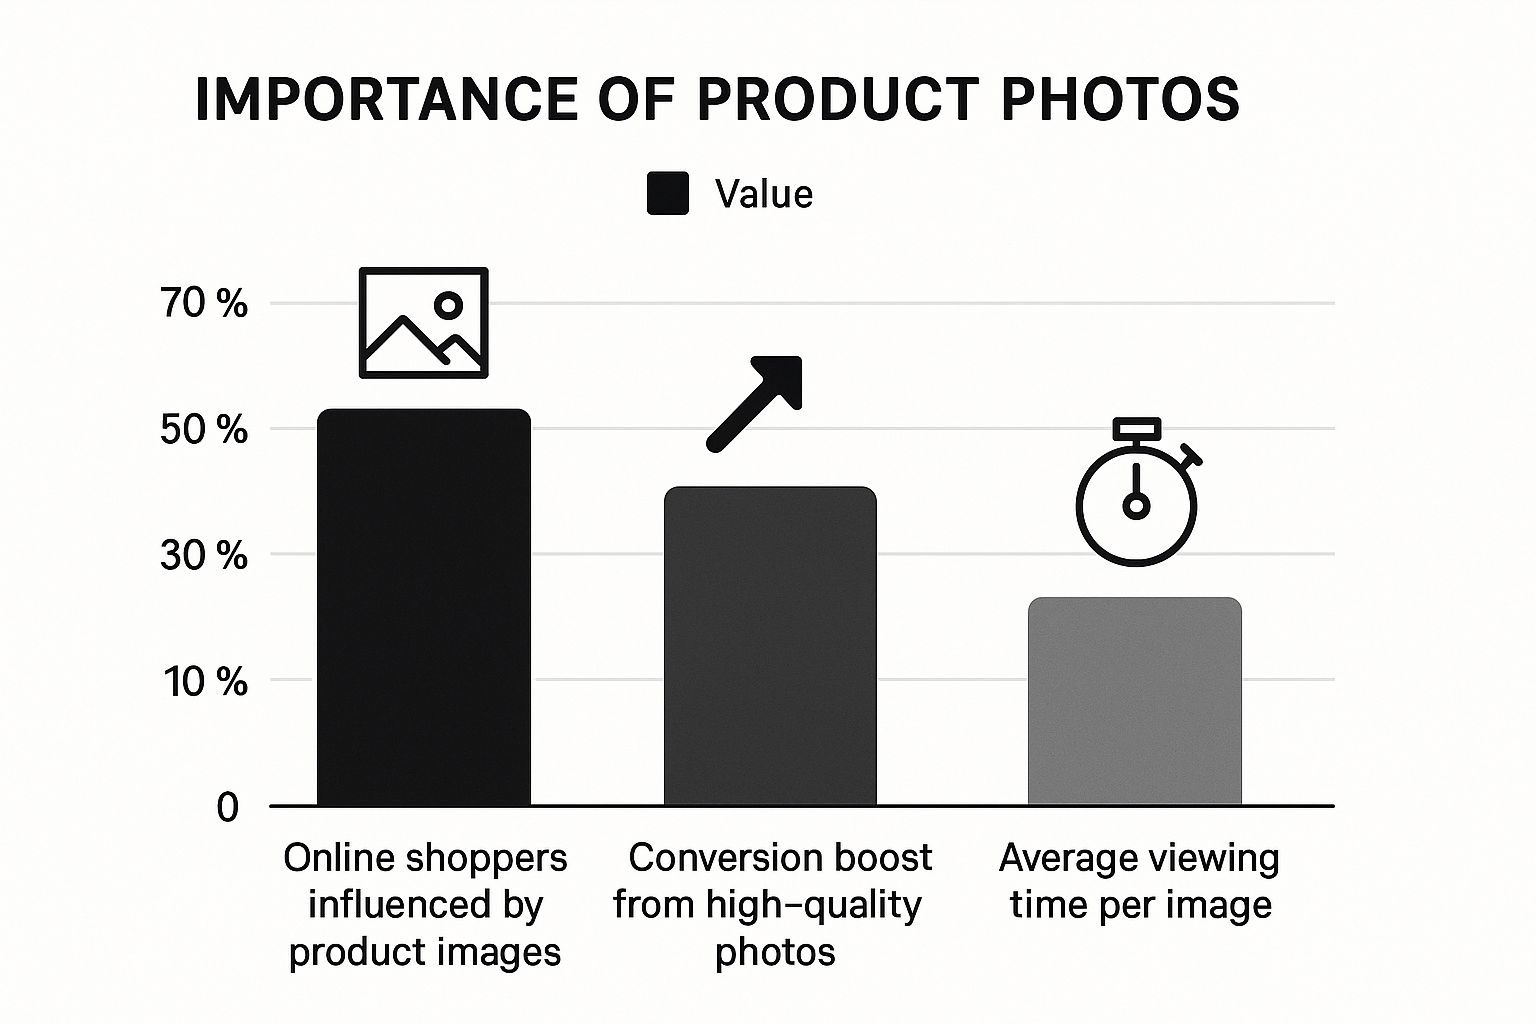
This infographic really drives home how important strong visuals are in e-commerce. 75% of online shoppers are influenced by product imagery. High-quality photos can boost conversions by a whopping 30%, and people spend an average of 2.5 seconds on each image—just enough time to make a lasting impression. This clearly shows why investing in good product photography is crucial for your e-commerce success. And speaking of investment, the global photography services market (which includes product photography) is exploding. It's currently worth $55.6 billion and is predicted to reach $81.83 billion by 2032, growing at a CAGR of 4.4%. This shows just how much demand there is for professional-looking visuals, especially in online sales. You can find out more about this growth here: Photography Industry Statistics.
Before we continue, let's talk about budget. Creating a product photography setup doesn't have to break the bank. Here’s a breakdown of what you might spend, depending on your needs:
Essential Equipment Budget Breakdown
| Equipment Category | Starter Kit ($) | Intermediate ($) | Professional ($) | Priority Level |
| Camera | 0 (Smartphone) | 500-1000 (Mirrorless Camera) | 2000+ (DSLR) | High |
| Lighting | 10-20 (DIY Reflectors & Diffusers) | 100-250 (Softboxes & Continuous Lights) | 500+ (Studio Strobes) | High |
| Backdrop | 5-10 (Poster Board) | 50-100 (Collapsible Backdrop) | 100+ (Professional Backdrop System) | Medium |
| Tripod | 15-25 (Basic Tripod) | 50-100 (Sturdy Tripod) | 150+ (Heavy-Duty Tripod) | Medium |
| Editing Software | 0 (Free Mobile Apps) | 10-20/month (Adobe Photoshop & Lightroom) | 10-20/month (Capture One) | High |
As you can see, you can get started with practically nothing and upgrade as your business grows.
Tackling Common Challenges
Let's be honest: home studios come with their own set of hurdles. Limited space? Think vertically! Use collapsible backdrops and get creative with your setup. Inconsistent natural light? Work with it! Cloudy days are your best friend for beautifully diffused light. You can also supplement with affordable artificial lighting. The key takeaway here is that your studio can grow along with your business. Start small and upgrade as you need to. It's all about creating high-quality images, not having the most expensive kit.
Learning From Others
Lots of photographers began just like you, transforming small spaces into amazing studios. Learning from their journeys – what worked, what didn't, and how they tackled obstacles – is incredibly valuable. For instance, a photographer friend of mine started using her living room window as her primary light source. She gradually invested in more equipment as her business expanded. Another photographer I know uses a collapsible backdrop stand that's easy to store away, making the most of her limited space. These real-world examples prove you don't need a huge budget for a professional-looking studio – just some creativity and a passion for taking great product photos.
Lighting Secrets That Make Products Irresistible
Lighting in product photography isn't just about making your product visible; it's about making it desirable. After years of shooting everything from tiny earrings to oversized furniture, I've learned that lighting is the secret weapon that separates so-so snapshots from images that actually sell. Let's dive into real-world lighting challenges, like dealing with gorgeous (but fickle) window light, and how to build budget-friendly artificial setups for reliable, stunning results. Sometimes, a bit of shadow adds drama, and we'll explore that, too. You'll discover how to make all sorts of materials—gleaming metal, soft textiles, even clear glass—look their absolute best.
Mastering Different Light Sources
Natural light, especially the kind you get from a big window, is a product photographer's dream...most of the time. Its soft, diffused nature is fantastic for so many products. But it's also a moving target. Overcast days are perfect, but direct sunlight? Harsh shadows galore. If you need dependable results, artificial lighting is the answer. Continuous lighting, using things like LED panels or softboxes, gives you complete control. You can dial in the exact brightness and angle you want, making sure your shots look consistent every single time. This is especially helpful for larger product catalogs where a unified look is critical.
 This screenshot shows Adobe Lightroom, a seriously powerful editing tool. Its clean interface makes adjusting white balance, exposure, and shadows a breeze, which is incredibly useful for fixing any lighting imperfections and getting that professional polish.
Tackling Challenging Products and Common Mistakes
Reflective surfaces? They can be a real headache. But you don't need a fortune in equipment to tame them. A simple lightbox beautifully diffuses light, minimizing those harsh reflections. Now, about those dark products that tend to vanish against a dark background: try a white background and some reflectors to bounce light back onto the product. This brings out the details and creates that sought-after "product floating in space" look. One beginner blunder I see all the time? Ignoring white balance. Your product can look sickly yellow under artificial light if you don't fix it. Mastering white balance, either in your camera or while editing, is a must in any product photography playbook.
Highlighting Texture and Color Accuracy
Think about how light plays with different textures. For shiny items, use reflections strategically. With fabrics, show off their softness by letting the light highlight their natural drape and folds. And for glass? Backlighting can create a gorgeous glow and show off its transparency. Accurate color is vital, too. Bad lighting can make a red dress look orange or a blue shirt appear purple. Fixing this in post-production can take forever, but setting up your lighting right from the start can save hours of editing. This ensures your product’s true colors shine through on any screen, boosting customer confidence.
Camera Mastery for Products That Pop Off the Screen
Your camera settings can dramatically affect the quality of your product photos. Whether you're using a smartphone or a professional DSLR like a Canon EOS R6, understanding a few key concepts will seriously elevate your images. Let's skip the complicated jargon and dive into the settings that truly make a difference.
Aperture, ISO, and Shutter Speed: The Photography Triangle
These three settings work together to control the exposure and look of your image. Aperture, measured in f-stops, dictates how much light enters your lens. A low f-stop (like f/2.8) gives you that dreamy, blurred background effect called a shallow depth of field. This is perfect for making your product the star of the show. I often use this when shooting jewelry or small accessories. A higher f-stop (like f/16) keeps everything in focus, which is handy for products with intricate details where you want everything crisp and clear. Imagine photographing a detailed tapestry – a higher f-stop would capture all its intricacies. ISO measures your camera's sensitivity to light. Low ISO (like 100) is best for well-lit situations and produces clean, noise-free images. Higher ISO (like 800 or above) is for darker environments, but it can introduce graininess. Finally, shutter speed controls how long your camera's sensor is exposed to light. Fast shutter speeds freeze motion – great for action shots or when you have shaky hands. Slower shutter speeds let in more light but can cause blur if there's any movement.
Balancing these three is key. For instance, if I’m shooting in a dimly lit room, I might increase the ISO and use a slower shutter speed to compensate for the lack of light. If I also want a blurred background, I’ll choose a low aperture. It’s all about finding the right combination for your specific situation.
Fine-Tuning Focus and White Balance
While autofocus is convenient, switching to manual focus gives you ultimate control over sharpness. This is especially crucial for product photography where you need precise focus on specific details. Think about shooting a watch – you want the intricate details of the face perfectly sharp. White balance is another important factor. It ensures your product's colors look accurate and natural, not too yellow or too blue. Most cameras have presets (daylight, cloudy, fluorescent), but mastering manual white balance allows for the most accurate color representation. Once, I shot a batch of photos with the wrong white balance setting, and the white products ended up looking slightly green! Lesson learned – always double-check your white balance. For more technical tips, Professional Amazon Product Photography offers great advice.
Composition: Creating Visual Harmony
Composition is all about how you arrange your product within the frame. The shooting angle can completely change the perception of a product. A low angle can make an item look powerful and important, while a high angle provides context. Framing uses elements in the scene to draw attention to your product. Imagine shooting a perfume bottle framed by flowers – it adds depth and visual interest. Finally, positioning within the frame matters. The rule of thirds suggests placing your product slightly off-center for a more balanced and eye-catching image. Even subtle changes in these elements can significantly impact how customers perceive your product's size, quality, and appeal.

To help you choose the right settings for different products, here's a handy guide:
To help you select appropriate camera settings based on the product type, refer to the table below. It provides a general guideline, and you might need to adjust these settings further depending on the specific lighting conditions and desired aesthetic outcome.
Product Type Camera Settings Guide Optimal camera settings for different product categories with explanations of why each setting works.
| Product Type | Aperture (f-stop) | ISO | Shutter Speed | Focus Method | Key Considerations |
| Jewelry | f/2.8 - f/4 | 100 - 400 | 1/125s or faster | Manual | Shallow depth of field to highlight details, minimize noise. |
| Clothing | f/4 - f/8 | 100 - 400 | 1/125s or faster | Auto or Manual | Balance between sharpness and background blur, accurate colors. |
| Electronics | f/8 - f/11 | 100 - 400 | 1/125s or faster | Manual | Crisp details, accurate representation of texture and materials. |
| Food | f/2.8 - f/5.6 | 100 - 400 | 1/125s or faster | Manual | Appealing depth of field, accurate color rendering. |
| Furniture | f/8 - f/16 | 100 - 400 | 1/60s - 1/125s | Manual | Show entire product in focus, capture details in textures. |
This table gives you a starting point for different product categories. Remember, these are just guidelines, and experimentation is key!
Styling Products That Tell Compelling Stories
Great product photography isn't just about snapping a pic of your item; it's about creating a whole vibe that speaks to your potential buyers. You want them to imagine that product in their lives, making things better, solving a problem, or just adding a touch of awesome. Think about your own online shopping experiences – the photos that really grab you are the ones that tell a story, right? Let's dive into how smart styling can transform your product shots from so-so to stunning and boost those sales.
The Power of Props and Lifestyle Context
Choosing the right props can make all the difference. A well-placed prop complements your product without overshadowing it. Let's say you're photographing a handmade ceramic mug. A simple shot is fine, but imagine adding a steaming cup of coffee and an open book next to it. Suddenly, you've created a cozy, inviting scene. It speaks to the feeling of enjoying a quiet moment.
Creating lifestyle contexts is key, too. If you’re selling hiking boots, showing them on someone’s feet out on a trail is way more impactful than a plain studio shot. Think about the setting, the lighting, and the overall mood.
Building a Consistent Visual Identity
Consistency in your styling is how you build brand recognition. Are your photos bright and airy, or dark and moody? Minimalist or vibrant? Developing a consistent visual language across all your product photography creates a cohesive brand identity that customers will recognize instantly. It builds trust and reinforces your brand message. This goes for everything from the props you choose to your color palettes and how you edit your photos. Think of Apple, for instance. Their clean, minimalist product shots are as iconic as their logo.
Overcoming Styling Challenges
Styling definitely has its challenges. Working with a tight budget or limited props requires some creative thinking. One trick I use is repurposing props. A simple wooden crate can be a background, a platform, or even a prop itself, just depending on how you use it.
Creating a cohesive look across different product categories can also be tough. Styling jewelry is a whole different ball game than styling furniture. And keeping up with seasonal trends is important, but you don't need to reshoot everything. Small tweaks, like swapping background colors or adding seasonal props, can make a big difference.
The Psychology of Styling
Successful e-commerce brands know how styling influences buyers. Color psychology is a huge factor. Warm colors like red and orange create excitement, while cool colors like blue and green evoke calm. Texture contrast adds visual interest. A smooth, polished vase against a rough, textured background, for example, really makes the vase pop.
Environmental cues, like a beach setting for swimwear or a cozy fireplace for winter clothes, help customers envision the product in their own lives. Even small styling choices can have a surprising impact on your conversion rates. Speaking of industry trends, the State of the Photography Industry 2025 shows that about 10% of photographers are branching out into different areas, including product photography.
Insider Tips for Success
Finding affordable props is easier than you think. Thrift stores, flea markets, and even your own home can be goldmines. You can also create multiple looks from the same basic setup just by rearranging props or switching backgrounds.
Developing styling formulas can speed up your shoots without sacrificing creativity. For instance, you could create a formula for styling coffee mugs that uses a specific background, lighting setup, and prop combination. This creates consistency while still allowing for some variation.
Post-Processing Workflows That Transform Good Into Great
Okay, so you've got some decent product shots. Awesome! But remember, those straight-out-of-camera images are just the beginning. The real transformation happens in post-processing. It's where you take "good" and turn it into stunning. But a word of caution: editing without a plan can result in photos that look fake and drive customers away. Let's talk about how to edit authentically, enhancing your products naturally.
Essential Editing Techniques in Photoshop and Lightroom
In my experience, Photoshop (Adobe Photoshop) and Lightroom are the absolute essentials for product photography editing. Even small tweaks can make a huge impact. Color correction, for instance, is vital. You want your online product to look exactly like the real thing, right? This builds trust with customers. We've all been there – ordering something online only to receive it in a totally different color. Accurate color is crucial.
This screenshot gives you a glimpse of the Photoshop interface. See all those tools? That's the power of Photoshop waiting to be tapped. With a little practice, you can really make these tools sing and achieve some seriously professional edits.
Background removal is another game-changer. A clean, white background keeps the focus where it should be: on your product. It instantly elevates the professional look of your images. These core techniques are foundational to great product photography. You might also want to check out product photo editing services if you’re looking for another option.
Another editing fundamental is retouching. Minor imperfections, dust, or scratches can be easily removed, creating a polished look. However, resist the urge to go overboard. A little texture can actually add to the authenticity of your product.
Maintaining Visual Consistency and Efficient Workflows
Now, imagine you've got hundreds of product images. Editing them one by one would take forever. That's the beauty of custom presets and batch processing. Presets are basically saved editing settings. Apply them with a single click to multiple images for instant, consistent results across your entire product catalog. It’s like having your own secret formula for picture-perfect product photos.
Batch processing takes this efficiency up a notch, automatically applying those presets to a whole batch of images. This is especially helpful for creating a unified brand look across all your visuals.
Avoiding Common Editing Mistakes
The biggest pitfall is over-editing. Over-sharpening, for example, creates harsh, unnatural edges. Color adjustments are important, but too much can misrepresent your product. Imagine a wooden table edited to an unrealistic shade of orange. It just looks wrong. The right background is also key. Avoid busy or distracting backgrounds that steal attention from your product. Enhance, don’t distract.
Outsourcing vs. In-House Editing
Sometimes, outsourcing your editing just makes sense, particularly if you have a mountain of images or need complex edits. Realistically, outsourcing basic edits might take a couple of days, while more intricate work could take a week or more. If you're handling editing in-house, efficient workflows are essential. This helps you scale your editing as your business grows without sacrificing quality or burning out. Quality control is key, regardless of your approach. Always double-check your images before they go live. A system for catching errors can save you from costly mistakes and protect your brand’s reputation. Think typos on product labels – they happen! Thorough quality control is your safety net.
Turning Your Photography Skills Into a Thriving Business
Ready to turn your love of product photography into a money-making venture? The world of commercial photography is full of potential, but making it work requires understanding the creative side and the business side. Let's dive into how working photographers structure their services and build successful businesses.
Pricing Strategies for Profitability
So, how do you actually put a price on your services? A lot of photographers start with hourly rates, which can be a good way to get your feet wet. But package deals often end up giving you a more stable income stream. For instance, you could offer a package with a specific number of edited and optimized photos for one price. This makes things easier for clients and makes sure you’re getting paid what you’re worth. Another popular option is tiered packages – basic, premium, and deluxe – each offering more services and value. This gives clients flexibility and control over their budget. For more insights, check out this helpful resource: Cost of Professional Product Photography.
Another approach I've seen work well is offering add-ons to your packages. Things like rush delivery, extra revisions, or specific styling requests can be priced separately and provide additional revenue streams.
The Power of Specialization
It can be tempting to try to do everything, but focusing on a specific type of product can be incredibly profitable. Think about being the go-to photographer for, say, handmade jewelry or high-end sports equipment. This focused expertise lets you hone your skills and attract clients who are willing to pay for that specialized knowledge. I know a photographer who focuses entirely on food photography, and restaurants and food bloggers keep her booked solid because she’s amazing at making food look delicious. This targeted approach also makes marketing easier because you can tailor your portfolio and outreach to a specific niche.
Client Acquisition Strategies That Actually Work
A strong portfolio is your calling card. Show off your best work and gear it towards the clients you want. If you're after high-end fashion clients, your portfolio should reflect that. Networking is just as important. Go to industry events, connect with potential clients on social media, and reach out to businesses that fit your specialty. Referrals are gold, so concentrate on building good relationships with your existing clients. Great service and top-notch images will get people talking, and that word-of-mouth marketing can do wonders for your business. I've found that offering small perks, like a discount on their next shoot, can really encourage referrals.
Managing Client Expectations and Scaling Your Business
Clear communication from the beginning is everything. Set clear turnaround times and a defined process for revisions. This avoids confusion and makes for a smoother working relationship. As you get busier, think about scaling without sacrificing quality. Hiring an assistant or outsourcing some tasks, like editing, can free you up to focus on shooting and finding new clients. I remember taking on way too many projects once and feeling totally burned out. Learning to say "no" is crucial for avoiding that overwhelm.
Adapting to Market Demands and Avoiding Common Pitfalls
The photography world is always changing. Keeping up with the latest trends and adapting your services is essential for lasting success. One mistake I see a lot of photographers make is undervaluing their work. Pricing yourself too low can hurt your reputation and make it hard to build a sustainable business. Another common pitfall is neglecting the business side. Keeping good records, managing your money wisely, and investing in marketing is just as important as taking great pictures. Solid client relationships are the bedrock of a thriving business. Good communication, delivering what you promise, and going above and beyond will earn you loyal clients who send more business your way.
Your Personal Roadmap to Product Photography Success
Creating stunning product photos isn't about reaching perfection overnight. It's a journey of consistent improvement. Whether you're shooting products for your own online store or building a photography business, a clear roadmap is essential. Let's map out a practical action plan that starts right where you are.
Setting Realistic Timelines and Milestones
Mastering product photography, just like any other skill, takes time and dedication. Don't get discouraged if you don't become a pro instantly. Break down your learning into smaller, more manageable pieces. Begin with the fundamentals of lighting, then progress to composition, styling, and finally, the art of post-processing. Setting realistic milestones is key. For example, your initial goal could be mastering basic lighting setups using natural window light. Once you feel confident with that, you can explore artificial light sources. These small victories will keep you motivated and prevent you from feeling overwhelmed.
A possible starting timeline could look something like this:
- Week 1-2: Getting a handle on basic lighting setups and camera settings. Think of this as building your foundation.
- Week 3-4: Experimenting with different styling techniques and using props to enhance your product shots.
- Week 5-6: Learning the basics of post-processing and retouching in a program like Adobe Photoshop or GIMP.
- Week 7-8: Creating a small portfolio and practicing with different product categories to broaden your skillset.
Remember, this is just a suggested timeline. Adapt it to your own pace and learning style. What works for one person might not work for another, and that's perfectly fine.
Identifying Key Skills and Outsourcing Strategically
You don't have to be a master of every single skill. Some tasks, like detailed editing, can be very time-consuming. Consider outsourcing these more complex edits initially so you can concentrate on the actual photography. This approach allows you to focus on your strengths and significantly speeds up your workflow. As your business expands, you can always bring more of these tasks in-house if you prefer. It's all about optimizing your efficiency.
Here’s a straightforward way to think about prioritizing:
- High Priority (Invest Time Now): Lighting, composition, and basic editing are the core skills that will have the biggest impact on your photos.
- Medium Priority (Learn Gradually): More advanced editing and styling can be developed over time.
- Low Priority (Outsource or Automate): Tasks like complex retouching and background removal can be easily outsourced, freeing you up to focus on other areas. Tools like remove.bg can help automate background removal.
This prioritization strategy will help you manage your time effectively and focus on the most impactful tasks.
Developing a Critical Eye: From Hobbyist to Pro
A key characteristic of successful product photographers is a well-trained eye. The ability to identify imperfections, subtle lighting issues, or composition flaws that others might miss is incredibly valuable. This skill develops with practice. Start by studying product images in successful online listings and on professional photography websites. Analyze what makes these images effective. What could be improved? Applying this critical analysis to your own work is a major step in elevating your photography from hobbyist to professional level.
Here are some important elements to focus on:
- Lighting: Is the lighting even and flattering to the product? Are the shadows enhancing the product's features or creating distractions?
- Composition: Is the product positioned well in the frame? Is the focal point clear and engaging?
- Styling: Do the props and background complement the product, or do they take away from the overall image?
- Editing: Is the editing subtle and natural-looking? Does the final product appear realistic?
Regularly reviewing your work with this critical perspective will help you pinpoint areas for improvement and refine your techniques.
Continuous Learning and Community Engagement
Photography is a continuous learning process. There's always something new to discover. Joining online communities, such as photography forums or Facebook groups, can be a great way to connect with other product photography enthusiasts. Sharing your work, asking questions, and learning from the experiences of others can be incredibly valuable. These connections provide support, inspiration, and helpful feedback, especially during those inevitable moments of frustration.
Here are a few online resources to consider:
- Photography Forums: Online forums offer a wealth of information and a chance to interact with fellow photographers.
- Facebook Groups: Search for groups specifically focused on product photography to find a community of like-minded individuals.
- Online Tutorials: Platforms like YouTube are excellent resources for free tutorials covering various aspects of product photography.
Maintaining Passion While Building a Sustainable Business
Product photography can be a challenging field. As you develop your skills and grow your business, remember the initial spark that drew you to photography. Celebrate your achievements and dedicate time to personal projects that nurture your creativity. This passion will fuel your work, keep you motivated, and attract clients who appreciate your unique artistic vision. The goal is to find the right balance between artistic expression and building a sustainable business that supports your long-term goals and personal fulfillment.
Now, are you ready to take your product photos to the next level? ProdShot utilizes AI to instantly remove backgrounds, enhance lighting, and create visually striking product images, saving you valuable time and resources. Try ProdShot for free today and see the difference.
Subscribe to my newsletter
Read articles from ProdShot Creator directly inside your inbox. Subscribe to the newsletter, and don't miss out.
Written by