Ecommerce Product Photo Editing Guide: Scale Your Business
 ProdShot Creator
Building Your Photography Foundation That Actually Works
Let's get one thing straight: throwing money at an expensive camera won't magically produce amazing product photos. A great shot is born from a solid foundation, and the good news is you can build one in your garage just as effectively as in a high-end studio. Getting the initial capture right is the most important step; it saves you countless hours in the ecommerce product photo editing phase later on. The goal isn't just a pretty picture, but a consistent, professional catalog that builds trust with shoppers.
The image above from Adobe's website shows just how powerful modern editing tools are for making complex selections and adjustments. It proves that while the raw photo is your foundation, powerful software is where you refine and perfect the final asset for your storefront.
The Gear That Genuinely Matters
Before you max out a credit card, let's focus on what truly impacts your photo quality. Forget the latest camera body for a moment; your success hinges on stability, light, and a clean backdrop.
- A Sturdy Tripod: This is non-negotiable. A tripod eliminates camera shake, ensuring your images are sharp and crisp. More importantly, it locks your camera in a consistent position, which is crucial for shooting multiple products or different angles of the same item. This consistency makes batch editing a breeze.
- A Simple White Background: You don't need a professional studio sweep. Start with a large sheet of white poster board from a craft store. You can clamp it to a table and curve it up against a wall to create a seamless, infinity-style background that removes distracting lines and corners.
- Light Modifiers (Not Just Lights): This is where most people go wrong. The secret isn't more light, but better light. A simple white foam core board from a dollar store is your most powerful tool. You'll use this to bounce natural light from a window back onto your product, filling in harsh shadows. You can also use black foam core to add shadow and create definition, especially for white products on a white background.
Mastering Your Lighting Setup (Without a Pro Studio)
Lighting can make or break a photo. The single biggest mistake sellers make is mixing light sources. If you're shooting with natural light from a window, turn off every other lamp in the room. Different light sources have different color temperatures, and mixing them creates a color-correction nightmare during editing.
Position your setup next to a large window, but out of direct, harsh sunlight. Direct sun creates strong, dark shadows that obscure product details. You want soft, diffused light. The window should be to the side of your product (at a 90-degree angle) to create gentle shadows that give the item shape and dimension. Then, take your white foam board and place it on the opposite side of the product to bounce that window light back, softening the shadows. This simple two-point setup (window as key light, foam board as fill light) costs next to nothing and produces stunningly professional results.
The investment in getting your photography right is more critical than ever. The e-commerce product photography market is projected to be worth over $163.91 million in 2025, and this is no surprise. With nearly 2.71 billion global online shoppers, visuals are paramount. In fact, 75% of these shoppers rely almost entirely on product images to make a buying decision, making a strong photographic foundation a direct driver of sales. You can explore more data on how visuals shape online retail at GrabOn. This huge reliance on photos means your setup isn't just an art project; it's a core business function.
Background Removal Techniques That Look Professional
A pristine, consistent background is essential for any professional-looking ecommerce store. When every product is presented on the same clean canvas, your entire catalog looks more cohesive and trustworthy. On the flip side, messy or inconsistent backgrounds can make even high-end products seem cheap. Mastering ecommerce product photo editing, specifically background removal, turns a good photo into a great, sales-driving asset. The idea is to isolate your product perfectly, creating crisp, believable edges that guide the customer's eye exactly where it needs to go.
This can be a surprisingly tough job, especially with tricky items. Imagine the fine chains of a necklace, the soft fluff of a sweater, or the transparency of glassware. These are the kinds of details where basic editing tools often fail, leaving behind ugly artifacts or choppy outlines that signal an amateur edit.
Choosing Your Tool: AI Speed vs. Manual Precision
Your method for background removal usually involves a choice between speed and control. For sellers managing hundreds of products, manually editing each image just isn't practical. This is where AI-powered tools have become a game-changer.
As you can see, a modern AI tool like remove.bg can separate a subject from its background with just one click. These solutions analyze the image and intelligently identify the foreground, saving a massive amount of time when processing images in bulk.
To help you choose the right tool for your needs, here’s a quick comparison of some popular options available to ecommerce sellers.
Background Removal Tools Comparison
Comparison of popular background removal tools showing features, pricing, and best use cases for ecommerce sellers
| Tool | Speed | Accuracy | Price | Best For |
| Prodcut | Very Fast | High, AI-optimized for products | Freemium, with credits | Ecommerce sellers needing quick, clean backgrounds for marketplaces. |
| remove.bg | Very Fast | High, great with hair & fur | Freemium, with credits | General-purpose quick removals for social media and web images. |
| Adobe Photoshop | Slow (Manual) | Very High (with skill) | Subscription-based | Hero images and complex shots requiring ultimate precision. |
| Canva | Fast | Good | Included in Pro Plan | Shopify sellers and marketers needing an all-in-one design tool. |
Today's AI background removers are incredibly accurate, even with challenging subjects like hair and fur. They are ideal for creating the clean, white-background shots required by marketplaces like Amazon. For Shopify sellers aiming to make this process more efficient, our guide on how to remove backgrounds on Shopify provides detailed workflows. However, for a hero image on your homepage or a major marketing campaign, you might want more precision. In these situations, a hybrid approach often works best: use an AI tool for the initial cut-out, then fine-tune the edges manually in a powerful editor like Adobe Photoshop.
Key Editing Techniques for a Flawless Finish
Beyond picking a tool, a few specific techniques can elevate your results from mediocre to professional. The most common sign of a poor background removal job is color spill. This occurs when the color of the original background reflects onto your product's edges, leaving an unsightly colored fringe. For instance, a product shot on a green screen might keep a faint green halo after the background is gone. Pro editors use "de-fringing" or "color decontamination" tools to neutralize this spill, making the product's edges look natural.
Another vital step is refining the selection mask. Even the smartest AI can sometimes be too harsh or too soft around the edges. Learning to use feathering tools—which soften the selection edge by a few pixels—helps the product blend more naturally with its new background. This is particularly important when you add a realistic shadow later, as a hard, jagged edge makes it impossible to create a believable shadow effect.
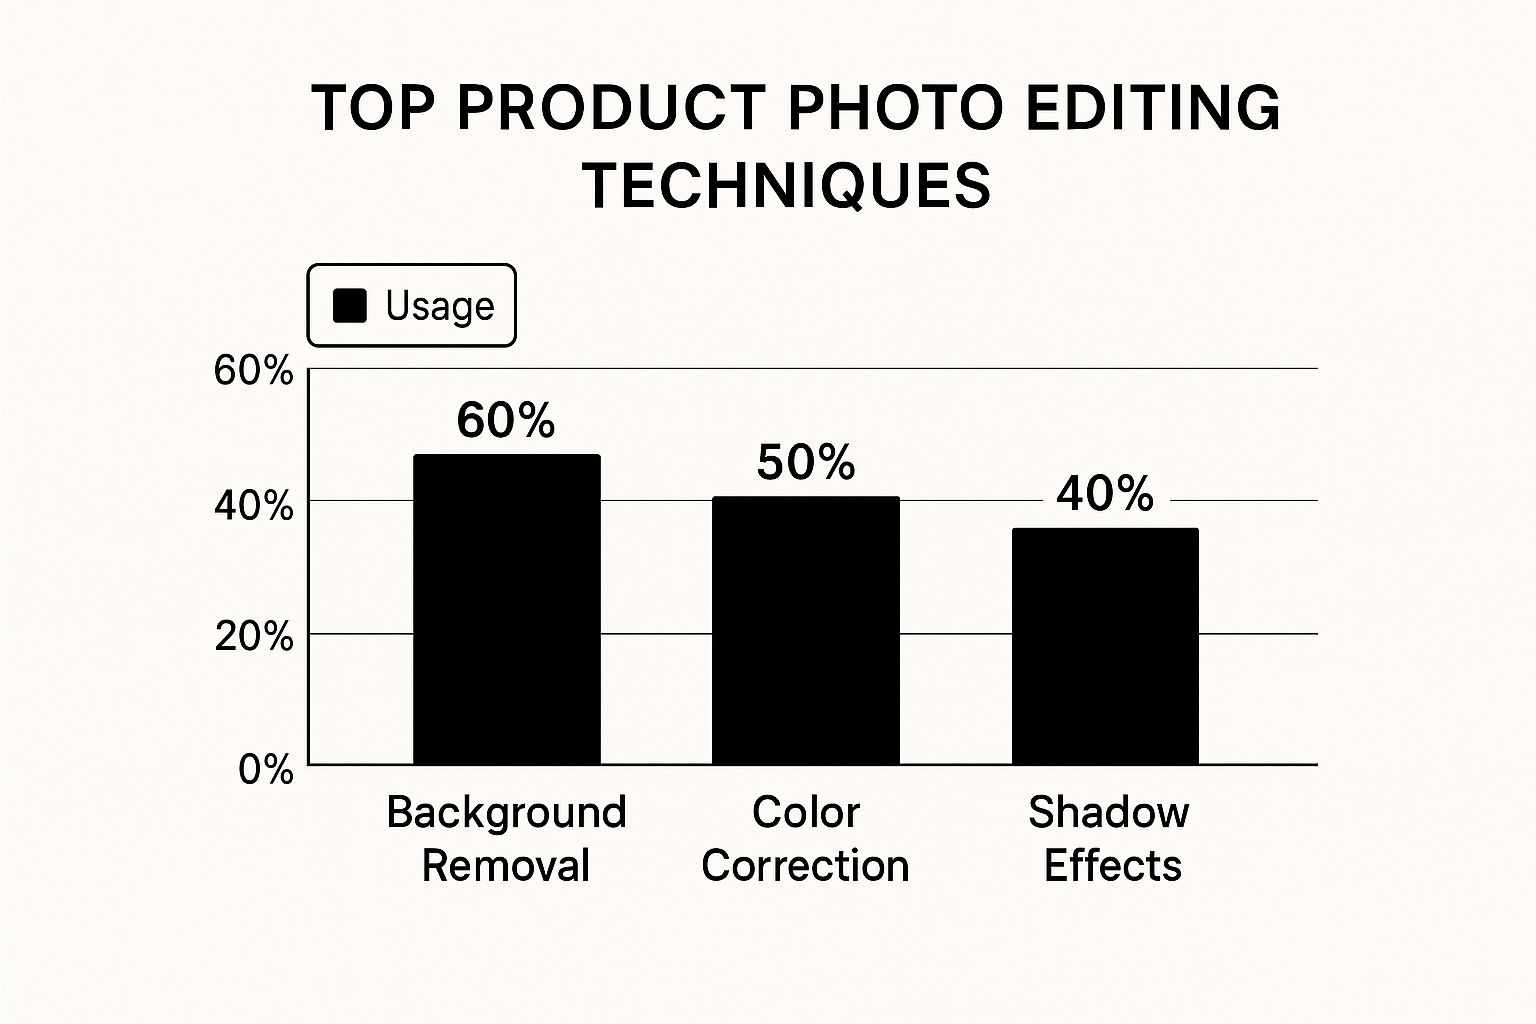
The following infographic highlights just how critical this skill is for online sellers.
The data makes it clear: background removal is the most frequently used editing technique, performed by 60% of sellers. This underscores its fundamental importance in preparing product photos for sale and getting them ready to convert visitors into customers.
Color Correction That Builds Customer Trust
There’s nothing worse for an online shopper than receiving a product that looks completely different from what they saw online. A clean, white background makes your photos look professional, but it’s accurate color correction that truly keeps your customers happy and your return rates low. This is a critical part of ecommerce product photo editing because it has a direct impact on your sales and reputation. Getting the color right isn't just about aesthetics; it's about making an honest promise to your customer.
The tricky part is that a photo looking perfect on your screen might seem washed out on a customer's phone or too bright on their tablet. This is where a dedicated color correction process becomes so valuable. The goal isn't to trick anyone with unrealistic enhancements, but to present an honest and appealing version of your product everywhere. Unintentionally misleading customers will always lead to problems. In fact, research shows that 22% of products are returned because they look different in person, a statistic that underscores how crucial accurate photo editing is for your revenue. You can learn more about how product photos affect returns on GrabOn.
A Professional Workflow for Accurate Colors
The secret to getting reliable color actually starts before you open any editing software. If possible, take one of your first test shots with a gray card or a color checker in the frame. This simple step gives you a perfect neutral reference, helping you calibrate all the other photos from the shoot and removing any guesswork caused by your room's lighting.
Once you’re in your editor, the first thing to tackle is the white balance. This corrects any unwanted color tints from your light source, making sure that what's supposed to be white is actually white, not slightly yellow or blue. After that, you'll mainly be using a few key tools:
- Hue/Saturation: This is your go-to for tweaking specific colors. If a blue shirt has a purplish tint in your photo, you can isolate the blue color channel and shift its hue until it perfectly matches the real item.
- Vibrance/Saturation: It's tempting to just crank up the main saturation, but that can make everything look fake. Vibrance is a much smarter tool; it subtly boosts muted colors without oversaturating the tones that are already strong, giving a more natural pop.
- Levels/Curves: These tools control the overall brightness and contrast of your image. If your photo looks a bit "flat," a gentle S-shaped adjustment in the curves tool can add depth and make the colors stand out without changing their true shades.
This screenshot from Adobe Lightroom gives you a glimpse of the powerful adjustment panels available in modern editing software.
As you can see, you have precise sliders for Exposure, Contrast, Highlights, Shadows, and individual color channels, giving you the control needed to get an accurate match.
Keeping It Consistent and Platform-Ready
After you've perfected the color for one product, the next challenge is consistency. Save your settings as a preset. This will save you a massive amount of time when editing other products shot under the same lighting. It’s especially helpful when you have product variations, like a t-shirt available in five colors. Using a preset ensures the lighting and fabric texture look identical across every listing, so the only thing that changes is the color itself.
Finally, keep in mind that different platforms have their own visual style. The bold, high-contrast look that catches eyes on an Instagram feed might seem too intense on an Amazon or eBay listing. It's a good habit to preview your final images in the context where customers will see them. A solid workflow is to create a "master" file with perfect, true-to-life colors, and then create slightly different versions optimized for each sales channel. This balanced method ensures your products look both appealing and authentic, no matter where a customer discovers them.
AI Tools That Actually Deliver Professional Results
The conversation around ecommerce product photo editing has changed a lot with the arrival of powerful AI tools. For busy sellers, these platforms are a game-changer, letting you get back hours you used to spend on tedious manual edits. But let's be honest, not all AI is created equal. The trick is to find tools that give you genuinely professional results at scale, not just flashy shortcuts that look good from a distance. The best AI tools work like a super-efficient assistant, taking care of the repetitive stuff so you can focus on creative direction and making sure everything looks perfect.
This isn't just a small trend; it's a huge shift in the market. The AI sector was valued at around $279 billion in 2024 and is expected to explode to over $1.811 trillion by 2030. This growth is driven by people actually using it. One survey found that 58% of users now regularly use AI for photo editing because of the massive time savings. You can see more details on this trend in these AI image statistics and trends on PhotoRoom's blog. This data makes it clear that using AI is no longer a niche tactic but a core strategy for any competitive seller.
What AI Excels At (And Where It Still Needs Help)
AI truly shines when you give it well-defined, repetitive jobs. Tasks that once took several minutes per photo can now be completed in seconds for your entire product catalog. This is where you'll see the biggest bang for your buck.
These tools are especially good in a few key areas:
- Background Removal: As we've mentioned, this is AI's killer feature. It can cleanly cut products out from their backgrounds, even with tricky details like fuzzy sweaters or delicate fabrics.
- Smart Cropping & Resizing: AI can automatically find the product in an image and crop it perfectly for different needs, whether it's a square for your Instagram grid or a vertical shot for a Pinterest pin.
- Basic Retouching: Getting rid of dust, small scratches, and minor blemishes is a task AI can handle with impressive accuracy. This saves you from the mind-numbing work of using a spot-healing brush on every image.
- Shadow Generation: Adding realistic drop shadows is key to making products look like they belong in the scene. AI tools can analyze a product’s shape and lighting to add a believable shadow with just one click.
However, it's just as important to know where AI falls short. It struggles with subjective tasks that need a creative eye. Things like fine-tuning color grading to match your specific brand palette or making artistic edits are still best done by a human. The most effective approach is often a hybrid one: let AI do the heavy lifting, then step in for the final, creative adjustments.
To give you a better idea of how these tools stack up, here's a look at their performance on common editing tasks.
| Tool | Time Saved (%) | Quality Score | Best Use Case | Batch Processing |
| ProdShot | 90% | 4.8/5 | End-to-end product photos | Yes |
| Canva Magic Edit | 75% | 4.5/5 | Creative edits & social media | Yes |
| Adobe Firefly | 80% | 4.7/5 | Generative fill & expansions | Yes |
| PhotoRoom | 85% | 4.6/5 | Backgrounds & templates | Yes |
This table shows that specialized tools like ProdShot offer the greatest time savings for core product photography tasks, while platforms like Canva and Adobe Firefly provide more creative flexibility. The key takeaway is that different tools are built for different jobs, and choosing the right one depends entirely on your specific needs.
Top AI-Powered Tools for Sellers
A few platforms have really stood out in the AI editing world, each with its own set of strengths. For instance, an all-in-one design platform like Canva has built powerful AI features right into its familiar workflow.
Here’s a look at Canva's Magic Edit tool, which lets you add or replace parts of an image just by typing what you want.
This shows how simple modern AI can be; you don't need to be a tech wizard, just have a clear vision for your final image. The tool intelligently blends the new element right into the picture.
For a more focused solution, dedicated product photography tools like our own ProdShot are designed specifically for ecommerce. Instead of being a jack-of-all-trades, ProdShot zeroes in on creating high-converting product images by automatically handling background removal, lighting enhancement, and shadow creation all at once. This specialized approach often produces more consistent and professional-looking results for product photos.
Ultimately, the smartest way to handle ecommerce product photo editing today is to treat AI as your partner. By letting it take over the time-consuming, rule-based tasks, you free yourself to focus on the strategic and creative choices that truly set your brand apart and drive more sales.
Professional Retouching Without The Fake Look
You’ve nailed the background and perfected the colors. Now comes the delicate part: retouching. This is where the real magic of ecommerce product photo editing can happen, but it’s also a stage where edits can quickly go sour. There’s a fine line between a professional polish and an artificial, untrustworthy image. Your customers are sharp; they can spot a photo that looks too perfect, and that can damage the trust you’ve worked so hard to build. The goal is to present the best version of your product, not an impossible one.
This is all about removing distracting little flaws while keeping the authentic textures and details that make your product feel real. It’s like preparing a car for a show—you wash and wax it to a brilliant shine, but you don't repaint it a completely different color.
The Art of Subtle Enhancements
Great retouching means knowing what to fix and, just as importantly, when to step away from the screen. Instead of making big, sweeping changes, you want to make subtle improvements that draw a customer’s eye to the product’s best features.
Here’s how this plays out with different product types:
- Jewelry: The aim is a natural sparkle, not an artificial, cartoonish gleam. I often use dodging and burning tools to selectively brighten the facets of a gemstone or deepen the shadows on metal. This creates a sense of depth and brilliance that looks like it was captured with perfect lighting, not a heavy-handed filter.
- Apparel: For clothing, it’s all about the fit and texture. Take a moment to remove any stray threads, dust, or minor wrinkles that popped up during the shoot. You can gently smooth out bunched-up fabric to better show the garment's intended shape, but don't alter the fit so much that it becomes misleading. The fabric’s texture has to stay visible.
- Electronics & Hard Goods: With these items, you're chasing clean lines and pristine surfaces. Your job is to remove fingerprints, scuffs, and dust particles left over from handling during the photoshoot. It’s also a good idea to enhance logos and screen displays so they’re crisp and easy to read. You want the product to look like it just came out of the box.
This is where working with layers becomes your best friend. Look at this example from Affinity Photo's website, which shows the power of non-destructive editing.
Using layers, like in the image above, is a non-negotiable for me. It means you can make all these little adjustments without permanently altering the original photo. This gives you total freedom to dial back any edits that start to feel too strong.
Knowing Where to Draw the Line
The most vital skill in retouching is simply knowing when to stop. A hard and fast rule is to never remove a permanent feature of a product. If a leather bag has a natural grain or a small, unique mark in the hide, that's part of its character. Removing it isn’t just editing; it’s being deceptive.
Your retouching should fix temporary issues from the photography process—like dust or a weird reflection—not the permanent characteristics of the item itself. For a more detailed look at the ethics and methods for this final stage, our article on product photo retouching is a great resource.
Ultimately, the best retouching is invisible. It does its job by simply clearing away distractions so the customer can see and appreciate the product for exactly what it is.
Marketplace Optimization That Actually Converts
Having perfectly edited photos is a great start, but it's only half the job. If those stunning images don't perform well on the platforms where you actually sell, all that hard work on your ecommerce product photo editing is for nothing. Each marketplace, whether it's Amazon, Shopify, or eBay, has its own technical specs and, more importantly, its own unwritten rules that can make or break your visibility and sales. Nailing this means striking a careful balance between incredible image quality and lightning-fast load times.
Let's be real: slow-loading images are a conversion killer, especially on mobile where most people are browsing. Customers just won't wait around. Optimizing your images isn't just a technical checkbox; it's a fundamental part of your sales strategy. This level of detail is what separates casual sellers from professional brands and reflects a huge trend in the global photography services market. This industry was valued at $55.6 billion in 2023 and is expected to climb to $81.83 billion by 2032. This growth is heavily pushed by industries like fashion, where 91.17% of high-end brands use multiple photo styles to attract customers. If you want to dive deeper, check out these fashion photography and editing statistics from Pixelphant to see just how critical visuals are.
File Formats and Compression: The Technical Details
Before you even think about uploading, you need to export your images correctly. The main goal is to get the smallest possible file size without a noticeable dip in quality. A massive, uncompressed image will slow your page to a crawl, which hurts both your search rankings and your customer's patience.
Here’s a practical guide for your export settings:
- File Format: For almost all product photos, JPEG is your best bet. It provides great compression and works everywhere. Only use PNG if you absolutely need a transparent background, but keep in mind that PNG files are usually larger. A newer format, WebP, offers even better compression than JPEG, but you'll need to confirm your selling platform fully supports it first.
- Color Space: Always, always export in the sRGB color space. This is the standard for the web and makes sure your product colors look consistent across different browsers and devices. If you use another color space, you risk your products looking dull or having completely wrong colors online.
- Compression Level: This is where the magic happens. When you export a JPEG, you’ll see a quality slider (usually from 0-100 or 0-12). Resist the urge to save at 100% quality. For most web applications, a setting between 70-85% is the sweet spot. It dramatically cuts down the file size with virtually no visible loss in quality.
For that final squeeze, tools like ImageOptim are fantastic. They strip out unnecessary data from your image files without touching the visual quality.
This screenshot from ImageOptim's website shows just how easy it is to drag and drop your images to make them web-ready. The big takeaway here is that a dedicated compression tool can shave off critical kilobytes, giving your site a noticeable performance boost.
Tailoring Images for Specific Marketplaces
Different platforms have different audiences and requirements. A one-size-fits-all strategy just won't cut it if you're serious about maximizing sales.
| Marketplace | Primary Requirement | Common Pitfall | Pro Tip |
| Amazon | Pure white background (RGB 255, 255, 255) | Using an off-white or light gray background that gets your listing suppressed. | Upload images that are at least 1,000 pixels on the longest side to enable the "zoom" feature, which shoppers love. |
| Shopify | Brand consistency and lifestyle images | Using inconsistent aspect ratios that make your collection pages look messy. | Use Shopify's built-in image editor to crop all your main product photos to the same ratio (like a perfect square) for a clean, professional look. |
| eBay | Multiple high-resolution angles | Not showing flaws or wear on used items, leading to disputes. | Be brutally honest. Use your photos to clearly highlight any scratches or imperfections on pre-owned goods. This builds trust and reduces returns. |
When you tailor your final images for each platform's unique environment, you're doing more than just meeting the minimum requirements. You're creating visuals that help your products get seen, clicked, and ultimately, purchased.
Scaling Your Workflow Without Losing Quality
So, you're moving from editing a handful of product photos to tackling hundreds. It's a big jump. This is usually the point where the manual process you started with starts to feel impossible. Small inconsistencies across photos suddenly look like major branding blunders, and what once took an hour now eats up your entire day.
To grow without the chaos, you need systems that protect your quality standards while massively boosting your speed. It's not about working harder; it’s about creating a repeatable, efficient engine for your visuals.
Templates and Presets: Your Consistency Engine
The smartest way to keep your brand looking sharp across a huge catalog is by using templates and presets. A preset is basically a saved recipe for your photo edits. Once you nail the color correction, contrast, and exposure for a product shot in certain lighting, you can save those settings. The next time you shoot a similar product in the same setup, you apply that preset with one click and get 90% of the way to a finished photo instantly.
This is a lifesaver for products with multiple variations. If you sell a t-shirt in ten different colors, a preset makes sure the fabric texture, lighting, and overall vibe are identical in every single listing. It removes the guesswork and shows customers a cohesive, professional collection. In the same way, templates for specific image types—like your main hero shot, a close-up detail shot, or a lifestyle image—lock in consistent cropping and composition every time.
Building Your Quality Control Checklist
When you start moving faster, it’s all too easy for tiny mistakes to slip past you. A formal quality control (QC) process acts as your safety net. Before any image is published, it should pass a simple but strict checklist. This doesn't need to be complex; it’s just a list of your brand's non-negotiable visual standards.
Here's what it might look like:
- Background: Is it pure white (RGB 255, 255, 255) with no grayish tint?
- Alignment: Is the product perfectly centered and straight?
- Color Accuracy: Does the photo's color truly match the physical item?
- Retouching: Are all dust specs, scratches, and distracting reflections gone?
- File Naming: Does the filename follow your system for easy organization?
When you’re a one-person shop, you can handle this yourself. But as your team grows, this checklist becomes a vital training document. It gives anyone—from a new hire to a freelance editor—the power to edit photos to your exact standards. For businesses wanting to hand this off completely, looking into professional photo editing services for ecommerce can be a great way to maintain quality while you scale.
Ready to stop spending hours on tedious edits and start creating professional product photos in seconds? Try ProdShot for free and see how our AI can turn your smartphone pictures into high-converting images for your store. Elevate your brand today at ProdShot.net.
Subscribe to my newsletter
Read articles from ProdShot Creator directly inside your inbox. Subscribe to the newsletter, and don't miss out.
Written by