Clothing Photography at Home: Easy Setup Tips
 ProdShot Creator
Creating Your Photography Studio in Any Living Space
You don’t need a massive, dedicated room to produce beautiful clothing photos. The truth is, your current living space is probably full of untapped potential. The secret to great clothing photography at home isn't about having a huge, empty area, but knowing how to work with what you've got. The best spot is almost always the one with the best light, no matter how small.
Finding Your Ideal Home Studio Spot
Start by looking at your windows. A large, north-facing window is a photographer's best friend because it provides soft, diffused light for most of the day. This consistent lighting is perfect for showing off fabric textures without creating harsh, distracting shadows. No north-facing window? No problem. A south-facing one can work just as well, especially on an overcast day or if you hang a sheer curtain to soften the direct sun. I’ve seen photographers shoot everything from bulky winter coats to delicate blouses in spaces smaller than 100 square feet just by prioritizing good light.
While pro studios offer tons of room, you can mimic the most important elements—a clean background and controlled light—in a surprisingly compact corner of your home. The goal is simply to isolate your product, and that can be done almost anywhere.
Before you start rearranging furniture, it's helpful to understand the space requirements for different types of clothing photography. This table breaks down what you might need for common setups.
Space Requirements for Different Photography Styles Comparison of space needs and setup requirements for various home clothing photography approaches
| Photography Style | Minimum Space | Equipment Needed | Best Room Type |
| Flat Lay | 3 x 3 ft (floor or table) | Backdrop (poster board, fabric), natural light or one artificial light, phone/camera | Any room with good floor or table space near a window. |
| Ghost Mannequin | 6 x 8 ft | Mannequin, C-stands, seamless paper, 2-3 lights, tripod | Living room corner, spare bedroom, or garage. |
| On-Model | 8 x 10 ft | Seamless paper backdrop, 2-3 lights with softboxes, camera, tripod, reflector | A living room or a larger bedroom with furniture pushed back. |
| Lifestyle/Contextual | Varies (e.g., 5 x 5 ft) | Existing furniture, props, natural light or one portable light | Any well-lit and styled part of your home (e.g., by a bookshelf, on a couch). |
As you can see, you don't need a warehouse to get started. A simple flat lay setup requires minimal space, while even an on-model shoot can be managed in a standard-sized room.
Working Around Your Home's Limitations
What about that sofa you can’t move or the built-in bookshelf that’s in the way? Instead of seeing them as problems, try working with them. A neatly styled couch can become a prop for a relaxed lifestyle shot, while a few cleared shelves can be perfect for a tabletop setup for accessories or folded shirts. It all comes down to adaptability and a quick setup.
Here are a few ways to make it work:
- Temporary Backdrops: A C-stand holding a roll of seamless paper or a portable backdrop stand can be assembled in minutes. This instantly gives you a clean, professional background, hiding any cluttered walls or furniture you can't move.
- Vertical Space: When floor space is tight, think up. You can install wall-mounted floating shelves for flat-lay shots or use over-the-door hooks to hang garments for simple, elegant displays.
- Smart Storage: Collapsible bins or a rolling cart can be a lifesaver. They keep your gear—lenses, clamps, reflectors, and styling props—organized and mobile. You can roll your entire kit out for a shoot and then tuck it away in a closet, keeping your home life and work life separate and your workflow efficient.
Smart Equipment Choices That Actually Make a Difference
Let's cut through the noise: you don't need a professional camera bag overflowing with expensive gear to take stunning clothing photos. Honestly, many successful sellers start their clothing photography at home journey with just a modern smartphone. The camera you already have in your pocket is often more than capable, and getting hung up on the "best" camera can stop you from ever getting started. The real magic happens when you focus your budget on two key areas: stability and lighting.
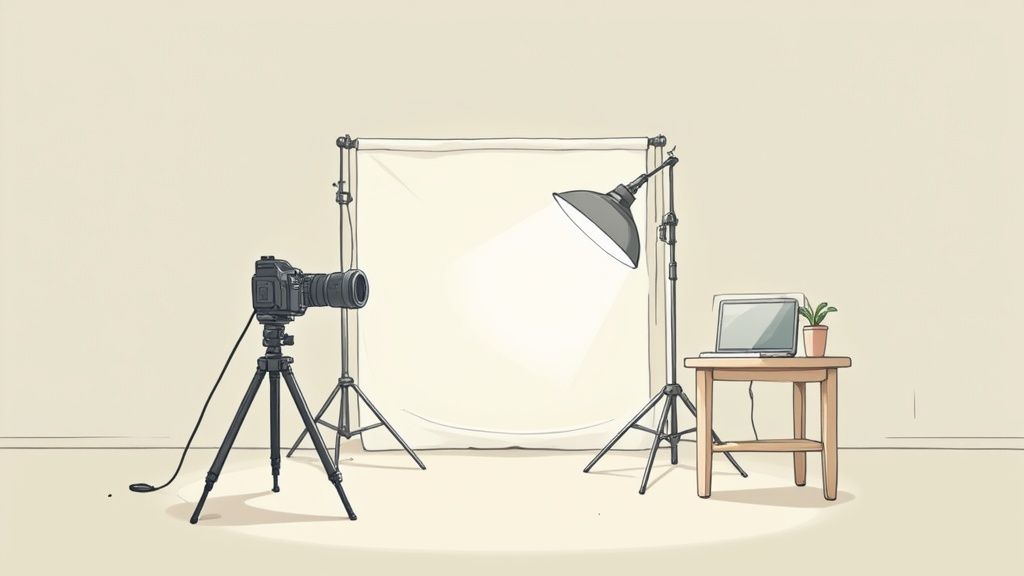
This simple illustration shows how a basic corner of your living room can be transformed into an effective shooting space with just a few key items.

As you can see, a clean backdrop and a strong light source (like a window) are the foundational elements, not a pricey camera. The main takeaway is to prioritize gear that gives you control over your environment.
Where to Spend Your Money First
If you buy one thing, make it a sturdy tripod. It’s non-negotiable. A tripod completely eliminates camera shake, which means your images will be consistently sharp and professional. It also frees up your hands to style the garment, smooth out wrinkles, or adjust the lighting. If you’re using your smartphone, make sure you get a tripod with a reliable phone mount—it’s a small detail that makes a world of difference.
After securing a tripod, your next best investment is in lighting. While natural light from a big window is fantastic, it's not always reliable. Instead of a ring light, which can create harsh, flat light and weird reflections on certain fabrics, consider a softbox lighting kit. A budget-friendly single softbox can do wonders. It creates a large, diffused light source that mimics soft window light, giving you total control over your shoot, no matter the time of day. This is perfect for making fabric textures pop and ensuring your colors are accurate, which is essential for any online store.
For sellers focusing on specific platforms like Amazon, understanding their visual requirements is key. If that's you, our guide on professional Amazon product photography offers some platform-specific insights.
To help you weigh your options, here’s a breakdown of budget-friendly gear versus their professional-grade counterparts.
| Equipment Type | Budget Option | Cost | Professional Alternative | Quality Difference |
| Camera | Modern Smartphone (e.g., iPhone 12+, Google Pixel 5+) | $0 (if you own one) | Full-Frame Mirrorless Camera (e.g., Sony A7IV) | For web use, the difference is minimal. Pro cameras offer better low-light performance and print quality. |
| Stability | Basic Aluminum Tripod with Phone Mount | $25 - $50 | Carbon Fiber Tripod with Ball Head | Pro tripods are lighter and more durable, but a basic one provides the necessary stability for static shots. |
| Lighting | Single Softbox Kit | $50 - $80 | Professional Strobe Light with Large Octabox | A softbox provides continuous, soft light. A pro strobe offers more power and faster "freezing" of motion. |
| Backdrop | Ironed Bed Sheet or Painted Wall | $0 - $20 | Seamless Paper Roll with Stand | Seamless paper provides a perfectly smooth, uniform background. DIY options work well but require more prep. |
| Reflector | White Foam Board | $5 - $10 | 5-in-1 Collapsible Reflector | A foam board does the same job of bouncing light, just without the portability and multiple surface options (silver, gold, etc.). |
This table shows that you can build a highly effective home studio for under $100. The professional gear offers more durability and convenience, but the budget options can deliver nearly identical results for product listings when used correctly.
Smart Budget Alternatives
You don't always have to buy new gear. Some of the most effective tools are DIY solutions or items you probably already have at home.
- Reflectors: Instead of a professional 5-in-1 reflector, a simple piece of white foam board from a craft store does an excellent job. Just prop it up opposite your light source to bounce soft light back into the shadows, brightening up your clothes without adding another light.
- Backdrops: You don’t need a massive roll of seamless paper to start. A clean, ironed bedsheet (neutral colors like white, grey, or beige work best), a large piece of solid-colored fabric, or even a freshly painted wall can serve as a perfect, distraction-free background.
The goal is to build a kit that gives you control and consistency. A solid tripod and one good light source will improve your photos far more than a camera upgrade ever could.
Mastering Light to Make Any Clothing Look Amazing
If you take away just one thing from this guide, let it be this: light is everything. Getting great lighting isn't about buying expensive strobes; it's about learning how to shape the light you already have. Before you even think about equipment, just spend a day watching how light moves through your home. The soft, indirect light from a north-facing window in the morning will give a denim jacket a completely different feel than the hard, dramatic light from a west-facing window late in the afternoon.
Many assume the famous "golden hour" is perfect for all photos, but for clothing, it can actually be a problem. The warm, orange glow can dramatically change how colors look, which can lead to confused customers. Your real secret weapon is often a simple overcast day. The clouds act like a massive natural softbox, spreading the sunlight evenly. This creates flattering light that shows true colors and makes textures pop.
Working with Natural and Artificial Light
Of course, you can't always schedule your shoots for cloudy days. So, what do you do when the sun is blasting through your window and creating harsh, unflattering shadows?
- Tame Harsh Sunlight: Don't run from the sun—manage it. A simple trick is to tape a thin white sheet, some parchment paper, or even a plain white shower curtain over the window. This instantly diffuses the intense light, turning it into a beautiful, usable source.
- Bounce the Light: Once you've got your main light source sorted, check out the shadows. If they're too dark, grab a piece of white foam board or a large sheet of white paper. Position it opposite your window, just out of the camera's view. Tilt it until you see it reflecting light back onto your clothes, softening the shadows and bringing out more detail.
When you're shooting in a darker room or at night, your everyday lamps can be surprisingly effective. I'd suggest avoiding the main overhead light, as it usually casts unflattering shadows. Instead, a desk lamp with a flexible neck can be a great tool. You can aim it at a wall or the ceiling to create a large, soft, bounced light. For a more creative vibe, especially in lifestyle shots, string lights can add a lovely warm glow. The aim is to create light that is both soft and directional, which is a cornerstone of professional-looking images.
Putting effort into your lighting pays off. High-resolution product images are 40% more likely to be shared on social media, which boosts your reach without any extra cost. Even more powerfully, some studies have shown that high-quality photos can lead to 94% higher conversion rates compared to their low-quality counterparts. This shows a direct link between the quality of your images and your sales. You can read more about how top-tier images influence e-commerce on Pixelphant's blog.
Photography Techniques That Showcase Clothes Beautifully
 Once you've picked your spot and have your lighting sorted, it's time to dig into the techniques that turn basic snapshots into photos that sell. This isn't about owning the most expensive camera; it's about knowing how to use the one you have to tell a story with your clothing. The idea is to make your apparel look so good that customers can almost feel the fabric right through their screens.
Choosing Your Photography Style
The way you present your clothes says a lot about your brand. There’s no single “best” method, as different styles achieve different goals. The good news is you can pull off all of them with a simple clothing photography at home setup.
- Flat Lay Photography: This is where you arrange items flat on a surface and shoot from directly above. It’s a fantastic way to create clean, organized looks for social media or to showcase a full outfit. For a real-world example, you can place a white poster board on the floor, then arrange a t-shirt, jeans, and a few accessories to create a complete, ready-to-wear concept.
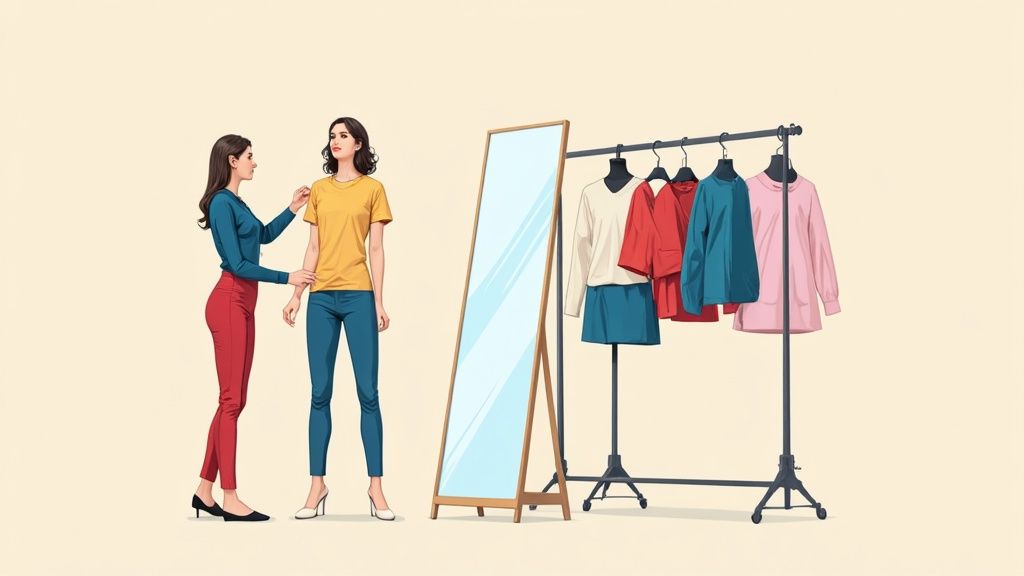
- Hanger or Mannequin Shots: Putting a garment on a hanger against a clean wall or on a mannequin gives it shape and form. This helps customers see how the fabric drapes and hangs. It’s a step up from a flat lay because it adds a three-dimensional quality that better highlights fit and structure.
- Styled or Lifestyle Shots: This is where you give your clothing context and bring it to life. Instead of just showing the item, you show it in an environment. Try draping a sweater over a stylish chair or have a model—even a friend or yourself—wear a dress while walking. This approach tells a story and helps shoppers picture themselves in your clothes.
Research confirms that a mix of styles works well. In fashion e-commerce, a huge 95.6% of brands use model photography to demonstrate fit and movement. At the same time, about 57.2% of brands use flat-lay and ghost mannequin photography, showing that these achievable at-home methods are very effective for selling online. You can find more details in these e-commerce photography statistics on Pixelphant.
Camera Settings and Composition for Impact
You don’t need to be a technical expert to get your camera settings right. For most clothing photography at home, a few simple guidelines will set you up for success. If you're using a DSLR or mirrorless camera, a great starting point is Aperture Priority mode (labeled A or Av). Set your aperture to a mid-range value like f/8 or f/11 to make sure the entire piece of clothing is sharp and in focus. You’ll want to keep your ISO as low as you can (like 100 or 200) to prevent any grainy noise in your photos. Since you have a tripod, you won't have to worry about a slower shutter speed causing blur.
Composition is all about guiding the viewer's eye to what's important. A classic technique is the rule of thirds. Imagine your frame is divided by a tic-tac-toe grid. By placing the garment or key details along those lines or where they intersect, you create a more balanced and interesting photo than if you just stuck everything in the center.
Finally, don't be afraid to get closer. Capture the rich texture of a knit sweater, the detailed stitching on a denim jacket, or the delicate pattern on a silk scarf. These close-up shots build confidence and show the quality of your items, answering customer questions before they even have to ask.
Styling Secrets That Make Everything Look Professional
Now that your setup is ready and you've got a handle on the camera, let's dive into what truly sets polished, professional shots apart from amateur ones: the styling. Great clothing photography at home is less about just taking clear pictures and more about making the clothes look so good that people have to have them. The best part? Most of these techniques won't cost you a dime.
Garment Preparation Is Non-Negotiable
Before you even think about picking up the camera, the garment itself needs to be in perfect condition. A brand-new shirt still showing its packaging creases or a dress with a noticeable wrinkle instantly signals a lack of attention to detail to potential buyers.
- Steam, Don't Just Iron: A handheld steamer is an absolute lifesaver. It’s far gentler on fabrics than a scorching iron, making it safe for delicate materials like silk or chiffon. Plus, it's much quicker for zapping wrinkles right on set. Keep it close by for quick touch-ups between different shots.
- Remove All Distractions: Carefully snip away any loose threads. Use a lint roller liberally, especially on dark fabrics like black wool or deep-wash denim where every speck shows. For stubborn pet hair or fuzz, a classic trick is to wrap packing tape around your hand, sticky-side-out, and dab the garment.
- Stuff and Shape for a 3D Look: A flat sweater or a limp handbag just doesn't have the same appeal. Use tissue paper, small hand towels, or even cotton balls to gently stuff items. This gives them a realistic, three-dimensional form, making the clothes look like they're filled out and ready to wear.
Create a Narrative with Styling
Your photos should do more than just show a product; they should tell a story that helps shoppers see the clothes in their own lives. This is your chance to get creative and build a genuine connection. Think about how lifestyle bloggers do it—they often show a full outfit to give context, like pairing a floral top with the perfect jeans to create a "brunch with friends" vibe. They aren't just selling a top; they're selling an experience.
In the same way, a cozy knit sweater looks much more inviting when draped over a comfy chair with a mug of coffee nearby than it does lying flat on a white background. As you style your clothes, consider the mood you want to evoke. Is this a sharp, professional look for the office or a laid-back feel for a weekend getaway? Use simple, relevant props—like a book, a pair of sunglasses, or a stylish bag—to support that narrative without distracting from the clothing itself. You can explore our gallery of fashion product photos to see just how much these small styling decisions can elevate the final image.
Editing Your Photos for Maximum Impact Without Overdoing It
Great photography doesn’t end when you put the camera down. That’s really just the beginning. Thoughtful, subtle editing is what takes a good shot and makes it great, ensuring your clothes look just as tempting online as they do in real life. The goal here isn't to create a fake, plastic-perfect image; it's to correct small issues and let the product's best features shine. Remember, authenticity is key. Over-editing can break a customer's trust just as easily as a blurry photo.
Essential Adjustments for Pro-Level Results
The first and most critical adjustment you'll make is color correction. Nothing leads to a disappointed customer faster than when the white t-shirt they ordered arrives looking slightly blue, or their new red dress is actually more orange. You can avoid this by using your editing software's white balance tool. Tweak the color temperature until the whites in your photo are pure white and all the other colors look true to life.
Here's a pro tip: during your shoot, take a test shot with a white or grey card in the frame. You can use this card as a perfect reference point in your editing software to get accurate colors across every photo from that session.
Next up, let's talk about brightness and contrast. Gently increasing the brightness can give your photos a more vibrant, airy feel. A small bump in contrast can make textures pop, like the cozy weave of a sweater or the subtle sheen of silk. A word of caution: don't push these sliders too far. Overdoing it will "crush" the blacks and "blow out" the whites, erasing important details. The idea is to enhance, not to completely change the image.
Cleaning Up and Polishing Your Images
Finally, it’s time to tidy up the background. Even with a perfect seamless paper setup, you might find a tiny scuff mark, a stray piece of lint, or a stubborn wrinkle that you missed. This is where a spot healing or clone tool becomes your best friend. Use it to carefully remove these small distractions. A clean, consistent background keeps the focus right where it should be: on your clothing.
If you find yourself spending hours on these repetitive tasks, especially with a large number of products, it might be time to look into more powerful tools. For anyone managing a high volume of images, learning about the benefits of specialized product photo editing services can be a game-changer. These services often use AI and expert teams to handle tasks like background removal and batch processing with incredible efficiency. This frees you up to focus on the more creative parts of running your business, all while ensuring every image looks polished and professional.
Turning Your Home Photography Skills Into Real Results
You've nailed the technical side of photography, but the real win is when those amazing photos start working for you. The whole point of improving your clothing photography at home is to connect with people and see actual results, whether that’s more sales, better engagement, or a rapidly growing follower count. This is where you shift from just taking pictures to thinking like a content strategist.
The great news is that the appetite for high-quality, genuine imagery is stronger than ever. With e-commerce booming, your home-shot photos are on a global stage, and visuals are what make or break a sale. In fact, professional-looking product photos can lift e-commerce conversion rates by as much as 250%. This number alone shows why putting a little effort into your home photography setup can pay off big time. You can find more fascinating data on how photography impacts sales at Imageretouchinglab.com.
Platform-Specific Strategies That Work
Don't fall into the trap of posting the same photo everywhere. Every platform has its own vibe and audience expectations.
- For E-Commerce (Shopify, Etsy): Clarity and trust are your primary goals here. Your main image should be a clean, well-lit shot of the product on a simple background. Then, add supporting images: detail shots that highlight fabric texture, a photo of the garment on a hanger to show its natural drape, and perhaps a lifestyle photo to give it some real-world context.
- For Instagram: This is your storytelling arena. Get creative with carousels that mix up your photo styles. For instance, you could lead with an eye-catching lifestyle shot, have users swipe to see a flat lay of a complete outfit, and finish with a close-up of a unique button or seam. Use your captions to share styling ideas or the story behind the design.
Building a Recognizable Brand with Your Photos
If you want people to instantly recognize your brand, consistency is key. Work on developing a signature photo style. Are you all about bright, airy light, or do you lean toward a moodier, more dramatic aesthetic? Whatever you choose, sticking to a consistent editing style, composition, and background helps your content stand out in a crowded feed.
Your photography is a serious business tool. By approaching it with a clear strategy, you can turn your new skills into growth you can actually measure. And when you're short on time but need incredible visuals, AI can be a game-changer. For instant, studio-quality images without the complex setup, ProdShot can automatically turn your basic smartphone pictures into polished, on-brand assets perfect for any platform. Give it a try for free and see the difference it makes.
Subscribe to my newsletter
Read articles from ProdShot Creator directly inside your inbox. Subscribe to the newsletter, and don't miss out.
Written by