Cloud Networking in Practice: Building a Highly Available VPC on AWS with Terraform
 Kene Ojiteli
After grasping the concepts of Networking, Subnetting, and IP addressing in Part 1 of my series, I was eager to move beyond theory. In this second part, I’ll guide you through the process of building a highly available VPC on AWS using Terraform, featuring public and private subnets, NAT gateways, and proper routing. Whether you're building your first cloud infrastructure or refining your core networking practices, this hands-on guide has something for you.
This article assumes you are familiar with Terraform, AWS CLI and networking basics.
Prerequisites
AWS account with programmatic access (access key + secret key) - This is where the network resources will be created.
AWS CLI - to interact with AWS on your local machine.
Terraform - installed on your local machine to provision a highly available network infrastructure.
Key Terms & Components
Virtual Private Cloud (VPC) - a logically isolated section of a public cloud service where resources can be launched in a virtual network.
Subnet - a logical subdivision of an IP network, effectively creating a network within a network. Subnets are used to break down a larger network into smaller, more manageable segments. Subnetting helps improve network efficiency, traffic management, and security.
Public Subnet - a network segment within a Virtual Private Cloud (VPC) that has a direct route to the internet through an Internet Gateway. This means that resources within the public subnet can communicate directly with the internet using public IP addresses.
Private Subnet - a network segment without a direct route to the Internet gateway. Private subnets do not have a public IP address, and resources in a private subnet will need a NAT gateway to have internet access.
Internet Gateway - a horizontally scaled, highly available AWS-managed service that connects your VPC to the internet. An internet gateway allows instances in the public subnet to send traffic to the internet and receive incoming traffic. Without the internet gateway, internet access into the VPC will not be possible.
Elastic IP - a static IPV4 address attached to a NAT gateway.
Network Address Translation (NAT) Gateway - allows private resources in a private subnet to access the internet (for example, to download packages, perform an OS update), without being publicly accessible. For this project, I will be using a public NAT gateway (this is an AWS-managed service launched in the public subnet with access to the internet via the internet gateway that routes traffic from the private subnet to the internet, and also with an elastic IP attached to it).
Route Table - contains a set of rules called routes that determine where network traffic from a subnet or gateway is directed.
Route Table Association - This is the link between a route table and a subnet. This association determines which routes (rules) in the route table are used to direct network traffic from that particular subnet or gateway.
Elastic Compute Cloud Instances are virtual servers in the AWS cloud that allow users to run applications and workloads. This resource aims to test the VPC setup by placing one instance in the public subnet (called bastion host), and the other instance in the private subnet (to verify internet/NAT access).
Security Group - acts as a virtual firewall that controls inbound and outbound traffic for your EC2 instances. It's a set of rules that specify which traffic is allowed to reach or leave an instance. Each EC2 instance will have a security group attached to it, allowing SSH access on port 22.
Step-by-Step Terraform Setup
- I created a provider.tf file where I configured the provider (AWS in this case) that my terraform configuration would interact with.

- Then a variable.tf file, where I declared input variables (such as region, availability zones, subnet names, CIDR ranges) used throughout the project.

At this point, it is important to note that this is a highly available VPC architecture designed to maintain uptime and service continuity even if part of the infrastructure fails.
I then created each Terraform resource in a separate file (alternatively, you could define all resources in a single file, but I separated them for clarity) for better understanding and easy readability.
vpc.tf is the resource block for the VPC, which includes a CIDR block.

- subnets.tf creates 2 subnets (a public and private subnet) in each availability zone (considering high availability); this can be done easily using Terraform's
countargument andelementfunction.

- igw.tf creates an internet gateway in the specified VPC (referencing the vpc_id).

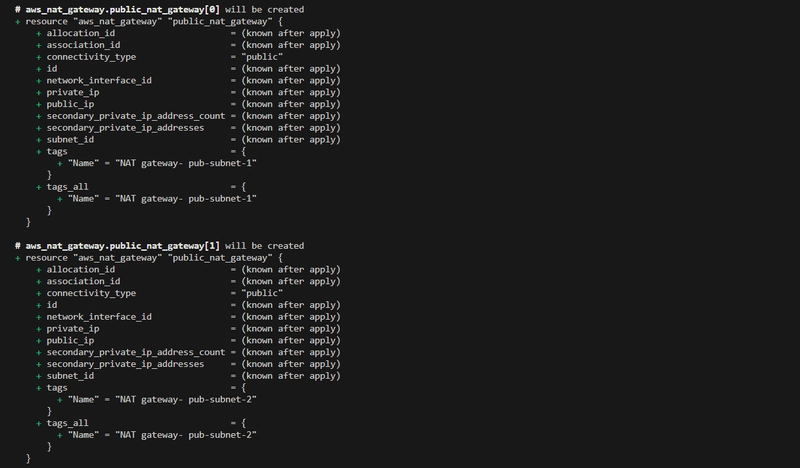
- nat.tf launches a NAT gateway in each public subnet for each availability zone (This highly available architecture uses a public NAT Gateway in each AZ), but before the NAT gateway, an elastic IP is needed (the NAT gateway is dependent on the presence of an internet gateway and is attached to an elastic IP).

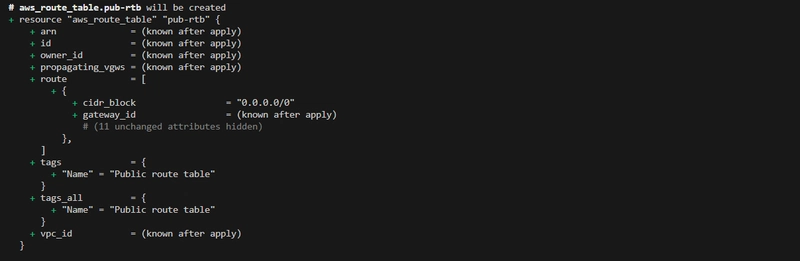
- rtb.tf creates route tables for the public and private subnets (I created one route table for the public subnet because there is one internet gateway, and two route tables for the private subnet because there are two NAT gateways).

Next, I associated the route tables with a subnet.

ec2.tf creates two instances in a public and private subnet (I will be using one Availability Zone to test this part of the project).

sg.tf creates two security groups that will be attached to the instances above, allowing port 22 for inbound traffic and all traffic for outbound traffic.
The bastion host's security group only allows SSH from my local machine to the bastion host, while the private instance security group allows inbound SSH if it comes from any instance in the Bastion SG (meaning it only allows SSH from Bastion’s security group), hence the use of security_group instead of cidr_block.


Provisioning the resources on AWS
- I configured AWS CLI on my local machine with
aws configure.

- Using
terraform initI initialised the working directory containing my configuration files to download all the necessary provider plugins.

- With
terraform planI created an execution plan used to preview the changes that Terraform plans to make to my infrastructure.


- Then, I executed the actions proposed in the plan in dependency order using the
terraform applycommand.


- After running the terraform apply command, I verified the creation of the resources on my AWS account by checking the resource map (this shows a visual representation of my VPC's architecture and resource relationships).

- And, also the running instances (notice the networking properties attached to each instance, and the absence of a public IP on the private host).


Testing the Setup
Connect via SSH: SSH into the bastion from my machine, and SCP or SSH-agent-forward Bastion → Private EC2
Test internet access:
curlon the private instance (this works via NAT), and remove NAT and repeat curl (fails, confirming NAT’s impact).
Steps
- To securely connect to an EC2 instance, a keypair is needed (I created it on the AWS console, downloaded it to my machine and navigated to the directory via CLI).

- After navigating to the keypair's location using git bash terminal, I securely connected to the bastion host via SSH using
ssh -i <your-key.pem> <default-user-based-on-machine>@<bastion_public_ip>command.

- Having gained access to the bastion host, the next step is to SSH to the private host via SSH from the bastion host. This requires having a keypair on the bastion host (meaning I have to copy my keypair from my local machine to the bastion host with either secure copy or SSH agent forwarding, I used the former method).

- Then, I verified the key’s presence in the user’s home directory (which is the destination).

- Then I accessed the private host via SSH using
ssh -i <your-key.pem> <default-user-based-on-machine>@<private_host_private_ip>.

Without changing permission, the error below will be encountered.

Using
curl, I tested internet/NAT access on the private host; I got a successful response, meaning the NAT gateway works properly.

- I removed the NAT gateway and tried to update packages and ping a network, but it wasn't successful; this implies that without the NAT gateway, outbound connections cannot be initiated to the internet.


Cleaning up Resources
- I cleaned up by running the
terraform destroycommand to avoid incurring costs. Theterraform destroycommand deprovisions all objects managed by a Terraform configuration


Challenges and Fixes
Error 1- Failed to query available provider packages: The timeout error was due to poor network connectivity. I switched to a better network, and it was resolved.

Error 2- No valid credential sources found: This error occurred because AWS needs credentials. I fixed it by configuring the CLI with the
aws configurecommand to set up my AWS credentials and region for the Terraform provider.
Error 3- Incorrect attribute value type: This error is a syntax error and was resolved by updating the attribute (shared_credential_file) from a single string ("~/.aws/credentials") to a list of strings (["~/.aws/credentials"]).

Suggested Improvements
Remote state backend using AWS S3 (for secure, shared state).
Refactor using Terraform modules to make the VPC reusable, maintainable by component.
In Part 2, I turned theory into practice, building a fault-tolerant, multi-AZ VPC with secure networking. I explored key AWS components, tested routing logic, and tackled real-world errors. With this foundation, Part 3 will focus on production-grade deployment: adding IAM, storage, monitoring, and a containerized app on top of this VPC.
Need Terraform code? Check it here
Did this help your cloud networking skills? Drop a comment!
Subscribe to my newsletter
Read articles from Kene Ojiteli directly inside your inbox. Subscribe to the newsletter, and don't miss out.
Written by
Kene Ojiteli
Kene Ojiteli
I have experience building highly accessible, scalable, and reliable cloud infrastructure and have experience with AWS, Linux, Git, Docker, and Kubernetes. S3, EC2, CloudFormation, CloudFront, Auto-Scaling Group, Elastic Load Balancer, IAM, Cloud9, VPC, RDS, Route53, and other AWS services are just a few of the ones I am familiar with. I have experience building CI/CD pipelines, high-availability web apps, and websites. I'm excited about designing, implementing, and automating cloud-based apps while utilizing best practices like configuration management, continuous integration, and deployment.