Setting Up a Wazuh Project – A SIEM & XDR Platform From Scratch
 Joseph Chisom Ofonagoro
Building cybersecurity projects can be challenging at times. Some of these projects require knowledge of some advanced concepts, and sometimes, good resources, making them inaccessible for some.
Wazuh is a free Open-source cybersecurity platform that serves as a SIEM tool, but beyond that, Wazuh on its own can also run as a near-comprehensive cybersecurity platform with endpoint and network monitoring capabilities. It can further be integrated with a wide variety of other cybersecurity tools to give it a robust edge in active incident response.
Due to its nature, Wazuh can benefit any level of cybersecurity professional in different fields of cybersecurity. Whether you are a SOC Analyst, CTI Analyst, or an Ethical Hacker, there is some exciting stuff you can do with Wazuh. This is why a Wazuh Project is just the right thing you can get your hands on. And the fun part? It’s seamless to set up.
Prerequisites
Like every single project, setting up Wazuh requires its prerequisites. Wazuh typically works in two kinds of halves: The Agent and Server. For a more detailed breakdown, there is the Manager, the dashboard, and the actual server, but in many cases, especially when you are not dealing with large enterprise environments, the server, manager, and dashboard can be configured in one, while the agent, as normal, stays separate.
The Agent:
The wazuh-agent supports various types of devices. These include:
Windows Operating Systems(OS) running Windows 11, 10, 7, and even older versions, though not recommended.
Virtual Machines running supported OS images.
Physical Linux and Windows Servers that are used in data centers.
Networking devices like Routers, Firewalls, IPS, etc., via the agentless installation.
Deployed in containerized environments via Docker and Kubernetes
IoT devices, including Point of Sales Terminals, as long as their backing OS is Windows or UNIX.
Smartphones, Android, and iOS via a third-party log forwarder.
This may look overwhelming, but don’t fret, once you get your foothold, every other thing will look much like reiterating what you’ve done before.
For this project, I used a Linux agent, but I’ll show you how to do so for both Mac and Windows.
The Server/Manager:
While the wazuh-agent has running support for a wide variety of device kinds, you can only run the server on a 64-bit Linux device.
This device can be anything, but its hardware should reflect the number of agents you intend to run on it. Check here for a detailed breakdown on how to know the system specs for your Wazuh setup.
For my project, I am using an Ubuntu 24.04 hosted on Google Cloud, with 50GB of Balanced Persistent SSD, and 2 VCPUs. This can efficiently run less than 25 agents, which I don’t intend to do.
I chose a cloud-based instance to simulate the scenario of a server that has consistent uptime. When running Wazuh in real-time work, you’ll likely host it on a cloud-based instance, so I’ll advise you to use a cloud provider to get familiar with the environment and networking procedures.
Server Setup
In this section, I’ll address how you can set up the server on your Linux Machine.
Before setting up the server, you must understand the different parts of this. There is the Server, the manager, filebeat, and then the dashboard.
The Server: This hosts the entire process. More like the backbone.
The Manager: The manager does the main work, collecting these event logs that are stored on the server. It interacts directly with the agents and contains the configuration that applies to the agents.
Filebeat: A popular log forwarding tool that not just facilitates the inflow of logs, but also helps Wazuh parse these logs.
The Dashboard: This is the web interface used to view everything that is being logged by the manager. The dashboard is accessed via the IP address of the manager, which, in most cases, especially when using the assisted installation method, is the IP address of the server too. Because of the fact that the dashboard can be accessed via a web browser, it can be viewed from any device.
There are two methods of setting up the Wazuh Server: the assisted method and the step-by-step method.
The assisted method allows you to set up the Wazuh server, manager, and dashboard with a single command. It's often used for a quick setup with default settings, ideal for those who prefer not to risk errors during configuration.
First, update your system using sudo apt update -y or the equivalent command for your Linux distribution.
Next, you'll need to download the installation assistant from Wazuh's packages:
curl -sO [https://packages.wazuh.com/4.12/wazuh-install.sh](https://packages.wazuh.com/4.12/wazuh-install.sh)
After that, run the installation command:
bash wazuh-install.sh --wazuh-server wazuh-1
Since we are installing everything, this will take some time, about 6 minutes, but it depends on your internet speed. So, sit back and watch as the process unfolds.
Once the installation is complete, it will display a username and password (the default username is admin). Be sure to copy the password and store it safely.
Next, you should access your dashboard through your web browser, where you can enroll agents. Before doing that, confirm your IP address.
Depending on your network setup, type the following in your terminal:
ip -a
This will show your IPv4 address or your private IP address. Ideally, for security reasons, you should use your public IP. To find it, type:
curl ifconfig.me
This will display your public IP address.
Once you know your IP, open your web browser and enter: https://<your-ip-address> or <your-ip-address>:443.
You will encounter a self-signed certificate error. The message might vary depending on your browser, but if it blocks the page, click on "Advanced" and proceed with the connection. It's your connection, after all.
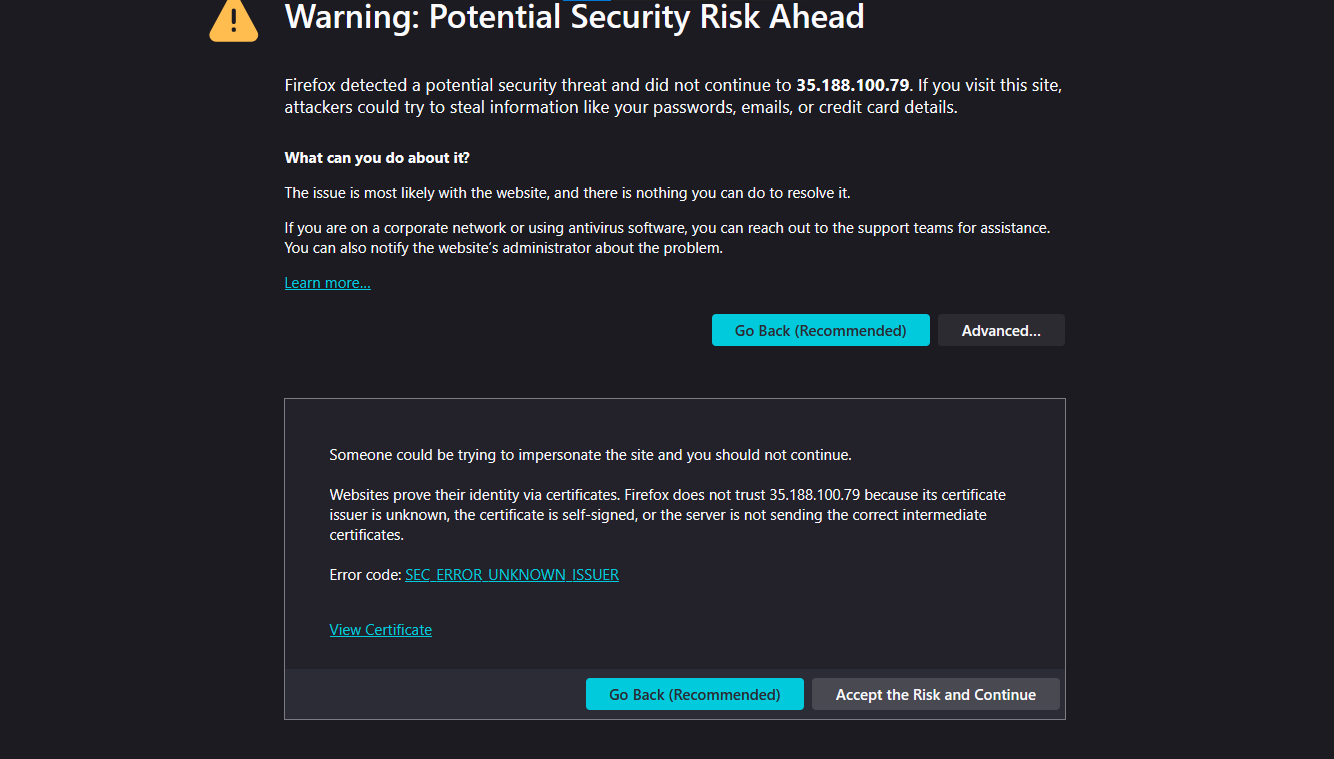
You will be prompted to log in: type in admin as the username and paste in your generated password as the password.
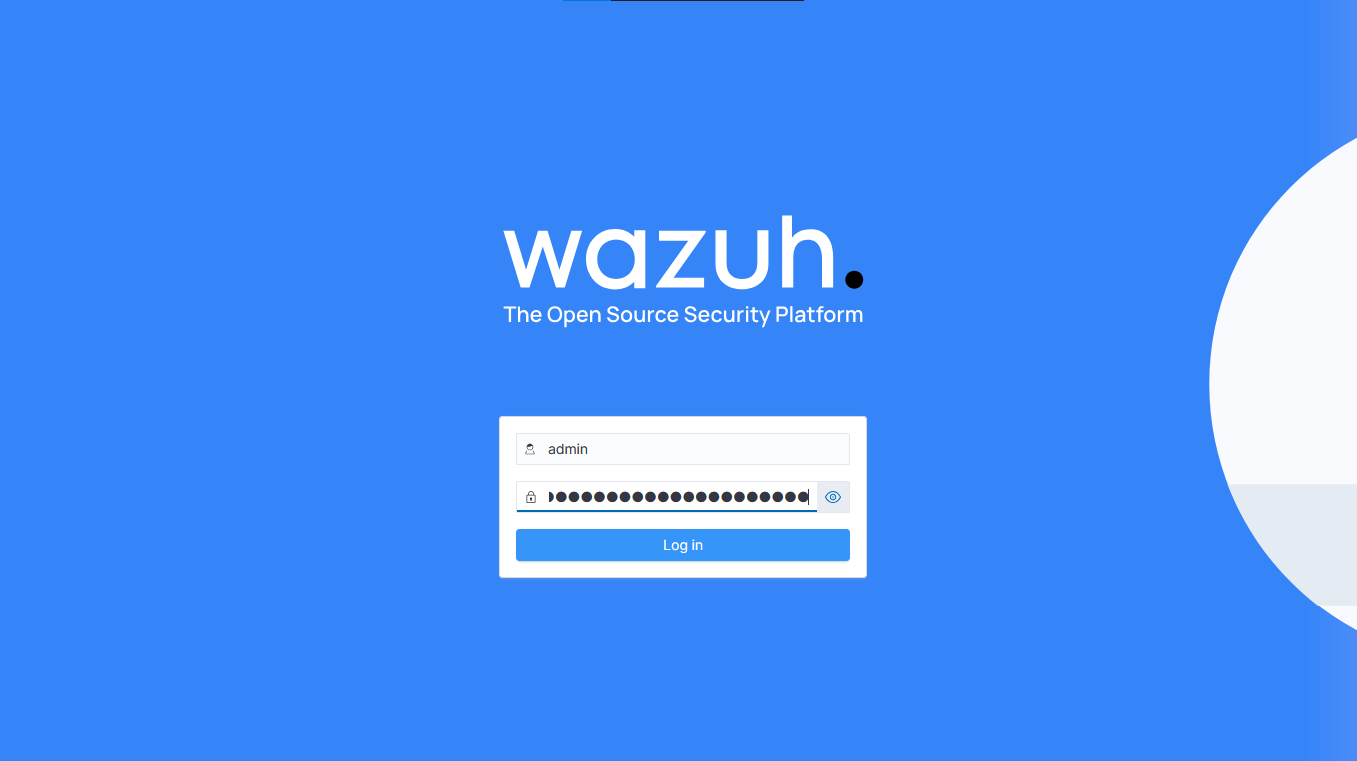
Some checks will happen, and in no time, you will be in.
For now, ignore the truckload of potentially overwhelming features and proceed to enroll an agent.
Agent Enrollment
From your dashboard, click on the menu, then click on the Agent Management dropdown, and select Summary. This will open a new page where you will see an option to deploy a new agent. Clicking this option will take you to the agent enrollment page.
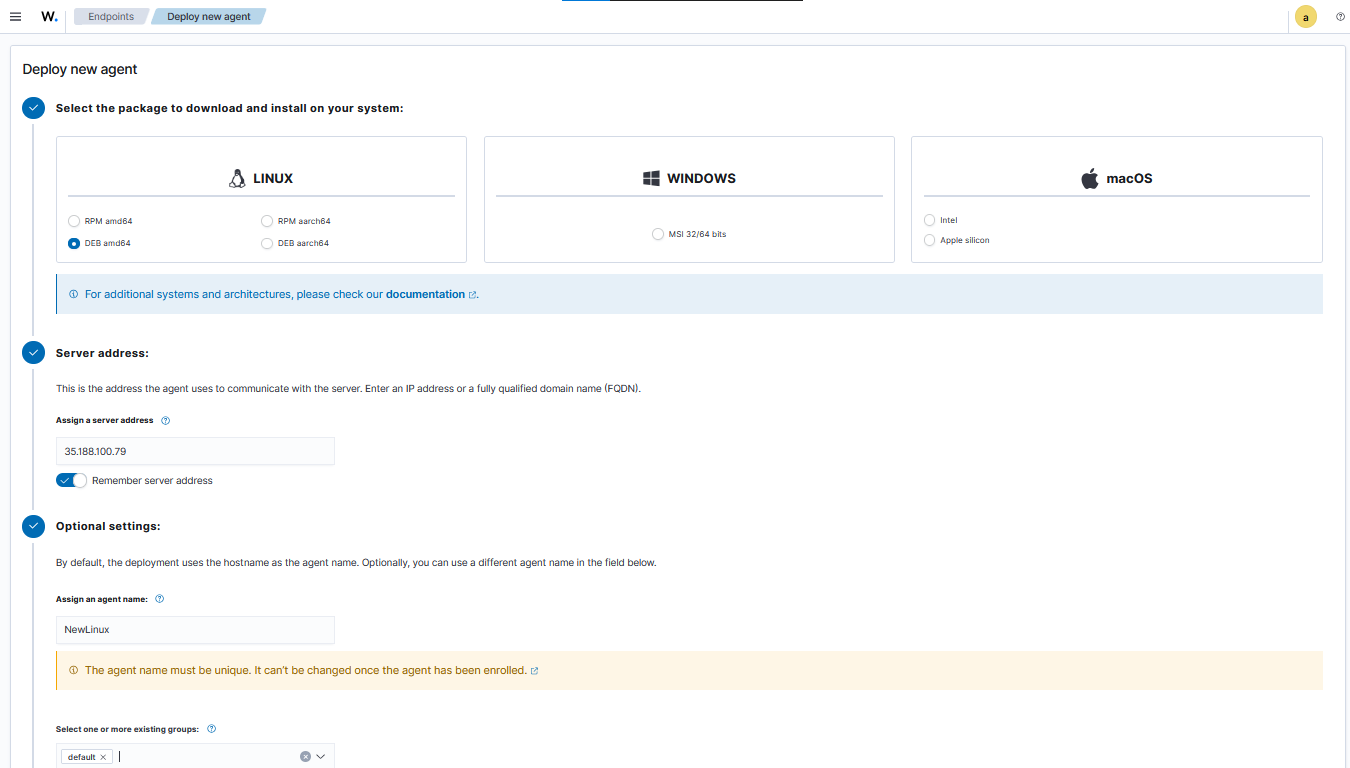
Choose your OS type.
Enter the IP address of your server.
Enter the name you want to use to identify your agent.
Add it to the group you want your agent to be in. (This is important because grouping agents allows you to push updates to all agents in a group at once, instead of one by one.)
This will automatically generate a unique single-line command for your agent setup. Copy it and paste it into your agent's PowerShell or Terminal Shell.
After that, return to the web UI and copy the start command. Paste it into your agent's terminal and then check the web UI again. You should now see your agent appearing on the dashboard.

Features
Wazuh is packed with many features that can feel overwhelming, and indeed, they are. This is why I say it can be used as a comprehensive security solution, especially when integrated with other tools, which it does easily.
When you check the home dashboard, you will see that its features are divided into four main parts:
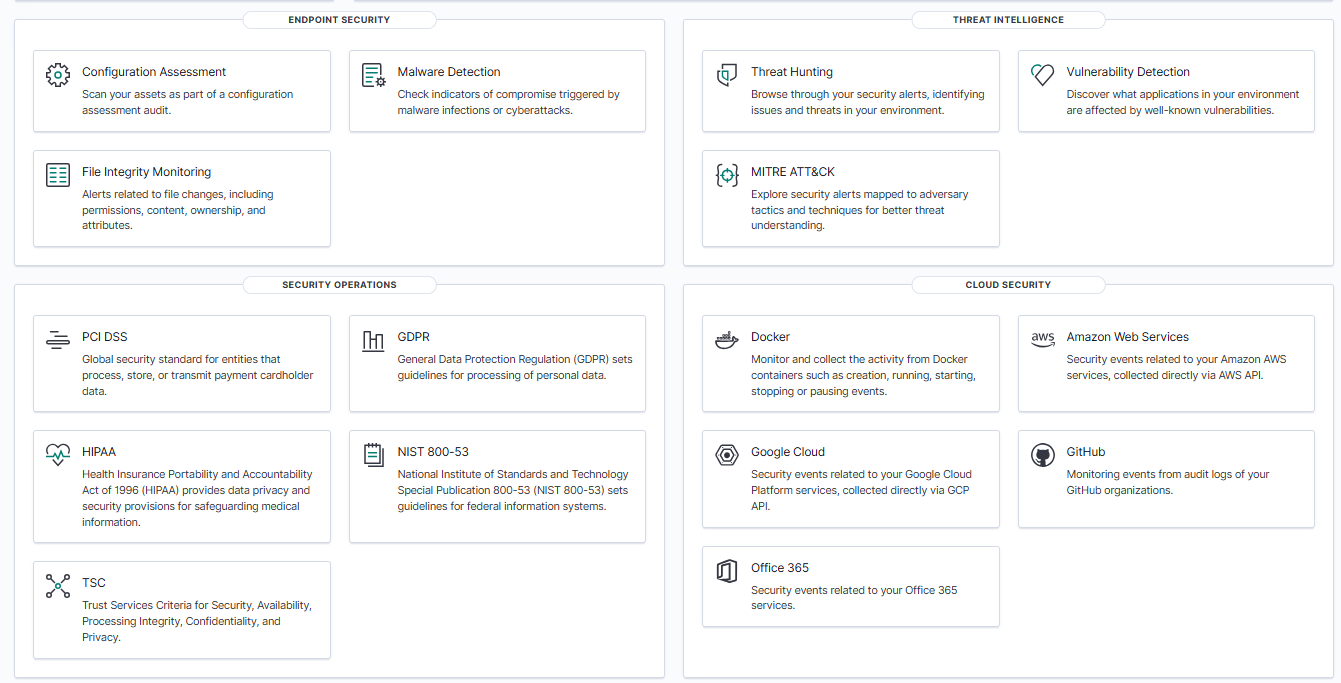
Let’s explore some of the essential ones you will likely use often.
Endpoint Security: This is where you can check the security status of your endpoints. It includes features to detect malware through scanning and, with integration with VirusTotal, scans for changes in the endpoints' filesystem, among other things.
Threat Intelligence: This section focuses on searching for logs related to potential threats, brute force attacks, and external threats targeting your endpoint. Unlike Endpoint Security, it mainly focuses on external threats and system vulnerabilities. It also helps identify the types of MITRE ATT&CK the endpoint is facing.
Security Operations: Here, you can check the compliance status of each enrolled endpoint. It includes regulatory compliance standards like the General Data Protection Regulation (GDPR), Payment Card Industry Data Security Standard (PCI DSS), National Institute of Standards and Technology (NIST), and Health Insurance Portability and Accountability Act (HIPAA). This section is often used when monitoring dedicated servers or endpoints that store user data.
Cloud Security: If you have servers on the cloud, you may want to have a deeper view into this area, as it deals with cloud-based endpoints.
Troubleshooting Wazuh Setup
Agent Not Showing on the Dashboard
Sometimes, after setting up your agent, it may not appear on the Wazuh dashboard. If this happens, first ensure that both your manager and agents are running and enabled. To do this, on your manager/server, run:
sudo systemctl status wazuh-manager
If it is not enabled or started, run:
sudo systemctl enable wazuh-manager && sudo systemctl start wazuh-manager
Next, on your agent terminal, run:
sudo systemctl status wazuh-agent
If you are using Debian Linux, check your Linux version to know how to structure your systemctl command.
For Windows, run:
Get-Service Wazuhsvc
If it is not running, start it with:
Start-Service Wazuhsvc
If you are using a Mac, check the status of your wazuh-agent with:
sudo /Library/Ossec/bin/wazuh-control status
If it's not running, start it with:
sudo /Library/Ossec/bin/wazuh-control start
If it still doesn't appear on your dashboard after this, make sure that the firewalls on your server and agents aren't blocking ports 1515, 1415, and 55000.
Firewalls can cause issues, so depending on your network setup, ensure these firewalls explicitly allow these ports and even IP addresses to communicate.
Server or Agent Setup Not Working
If your agent or server isn't responding to setup commands, you might be facing a filesystem corruption issue.
If this happens on the server, remove all Wazuh configurations and files by running:
sudo bash wazuh-install.sh --uninstall
Then, execute:
sudo rm -rf /var/ossec/
sudo rm -f /etc/wazuh-manager/ossec.conf
If you are on a Linux agent using systemd:
sudo systemctl stop wazuh-agent
sudo systemctl disable wazuh-agent
sudo systemctl daemon-reload
Then run:
sudo rm -rf /var/ossec/
For a Windows agent using PowerShell:
Remove-Item "C:\Program Files (x86)\ossec-agent" -Recurse -Force
On a Mac, create an executable .sh file and add the following:
#!/bin/bash
echo "Stopping Wazuh agent service..."
sudo /Library/Ossec/bin/wazuh-control stop >/dev/null
echo "Unloading Wazuh LaunchDaemon..."
sudo launchctl bootout system /Library/LaunchDaemons/com.wazuh.agent.plist >/dev/null || \
sudo launchctl unload /Library/LaunchDaemons/com.wazuh.agent.plist >/dev/null
echo "Removing Wazuh agent installation directory..."
sudo rm -rf /Library/Ossec >/dev/null
echo "Removing Wazuh LaunchDaemon file..."
sudo rm -f /Library/LaunchDaemons/com.wazuh.agent.plist >/dev/null
echo "Removing Wazuh user and group..."
sudo /usr/bin/dscl . -delete "/Users/wazuh" >/dev/null
sudo /usr/bin/dscl . -delete "/Groups/wazuh" >/dev/null
echo "Forgetting Wazuh package receipts..."
sudo /usr/sbin/pkgutil --forget com.wazuh.pkg.wazuh-agent >/dev/null
sudo /usr/sbin/pkgutil --forget com.wazuh.pkg.wazuh-agent-etc >/dev/null
echo "Wazuh agent uninstallation complete."
After saving, run the script.
Summary
This lightweight security platform can be integrated with other security tools, execute advanced Incident Response, and offer additional functionalities. I recommend exploring the platform thoroughly, consulting the documentation when needed, and experimenting with its features.
Subscribe to my newsletter
Read articles from Joseph Chisom Ofonagoro directly inside your inbox. Subscribe to the newsletter, and don't miss out.
Written by
Joseph Chisom Ofonagoro
Joseph Chisom Ofonagoro
Hi there! I am a curious techie. My spare time is spent with books.