Tinkering: Immich Server
 Edward Tian
A couple years ago, my family set up a shared NAS for photo backup using a Western Digital MyCloud product with multiple hard drive bays, totaling to about 21 TB of RAID 1 storage. This NAS came with WD’s own app for photo backup and management, but left much to be desired. Photos were dumped into a single folder. Accessing those photos through the app was a pain; thumbnails were small, there was no search capability or ability to filter through time periods, and scrolling back further caused the app to lag and stutter. In addition, my wife and I recently had a baby, so we were talking a lot more pictures than before. Although we created a personal private instagram account as a sort of free cloud storage of curated photos, we weren’t going to post everything we took. This led eventually to a recent conversation where my wife brought up paying for iCloud or Google Photos in order to manage our photos more easily.
I did not feel that the cost was worth it; 2TB of iCloud storage alone was 10 dollars a month at the time when we had this discussion. So, I went to work looking for another solution and discovered Immich. The goal of Immich was to provide a similar seamless photo storage and curation tool but which leveraged open source tooling, so that one could host their own photo management server. Funnily enough, the maker of Immich created it for a similar reason to why I found it now.
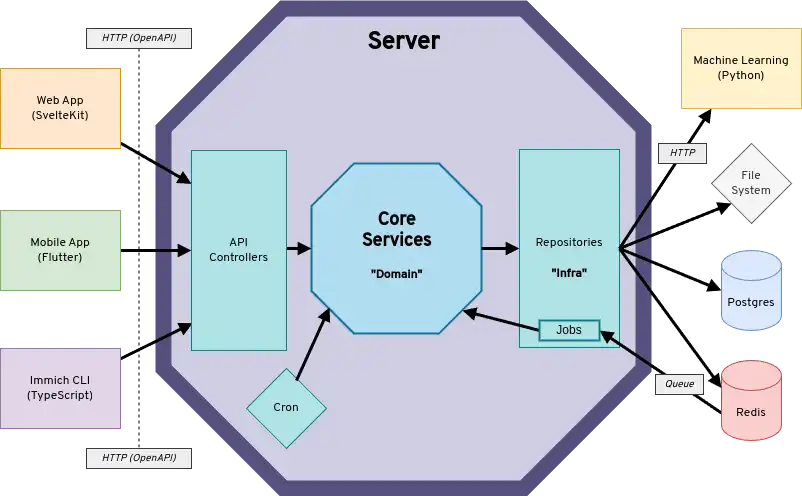
Immich’s architecture is pretty straightforward, and the installation process seemed simple so I decided to try setting one up myself, and mounting the 21 TB NAS as its primary storage location.
I ended up getting a cheap Beelink server machine, installed Linux, and then went about the Immich setup using docker compose. The entire process took about 2 hours, but it would take less time now that I’ve gone through the process once.
Once the server was set up, it’s just a matter of installing the phone app, pointing it to the server’s IP address, and then logging in. The phone app uploads your phone’s photos in the background. Once it’s been uploaded, the photo ingestion process includes indexing the photo, storing EXIF metadata like geodata, as well as using ML to extract semantic embeddings, detecting faces, and clustering them using DBSCAN. I tested it out in the app, and filtered for pictures of my wife and my child in Washington in order to get back all of my family pictures we took during a recent Seattle trip. It was seamless.
However, this server is only set up for local use - we would only be able to access photo storage and back up photos when we’re at home. This is where Tailscale comes in. Tailscale offers a free tier personal VPN service which essentially allows you to add any device which has tailscale installed to its own network. So, I installed tailscale onto the server, as well as on every phone that needed access to that server (the app is lightweight, and only needs to be interfaced with during setup), and viola - now we have Immich access wherever we have internet.
All in all, the additional hardware I had to purchase was a little over $200 - less than 2 years of iCloud subscriptions, well worth the investment.
Looking back, small projects like this would not have been approachable without the experience I gained through my career with random development technologies, like devcontainers, postgres db, linux, ML, etc. It’s always exciting when my work skills can be utilized in my personal life.
Subscribe to my newsletter
Read articles from Edward Tian directly inside your inbox. Subscribe to the newsletter, and don't miss out.
Written by