Nexus | The Complete Guide
 Murtuza Rangwala
Table of contents

What is Nexus Repository Manager ?
Nexus Repository Manager, developed by Sonatype, is a powerful repository management tool used to store, manage, and distribute software artifacts.
It plays a crucial role in modern DevOps workflows by acting as a central hub for software components, enabling faster and more secure development.
Nexus Repository Manager is an essential tool for modern DevOps teams, providing robust artifact management, security, and performance optimization. Whether you’re working with Maven, npm, .NET, or Docker, Nexus simplifies artifact storage and distribution, enabling seamless CI/CD workflows.
Why to Use Nexus Repository Manager?
Centralized Artifact Management: Stores all software dependencies and artifacts in a single place.
Performance Optimization: Caches artifacts locally, reducing external downloads and improving build speeds.
Security & Compliance: Controls the quality and licensing of open-source components to prevent vulnerabilities.
Scalability: Supports high availability and large-scale deployments.
Where Can Nexus Be Used?
Development: Manages dependencies for various build tools like Maven, npm, and Docker
CI/CD Pipelines: Stores build artifacts and integrate seamlessly with Jenkins, GitHub Actions, and GitLab CI/CD.
Production Deployments: Serves as a stable source for deployment-ready artifacts.
Key Benefits of Nexus Repository Manager
Improved Build Performance: Reduces reliance on external repositories
Artifact Versioning & Retention: Keeps track of multiple versions of artifacts.
Role-Based Access Control (RBAC): Fine-grained permission management for better security.
Mirroring Remote Repositories: Reduces network load by caching external repositories.
Staging & Release Management: Ensures only tested artifacts get deployed.
REST API & Webhooks: Automates artifact uploads, repository creation, and event-based triggers.
Prerequisites for Using Nexus
System Requirements: Supports Linux, Windows, and macOS. Ensure proper file handle limits.
Dedicated User Account: Recommended to run Nexus under a non-root user.
SSL & Reverse Proxy Setup: Configure HTTPS with Nginx/Apache for secure access.
Types of Repositories in Nexus
Proxy Repositories: Cache remote repositories (e.g., Maven Central, Docker Hub).
Hosted Repositories: Store internal, proprietary artifacts securely.
Group Repositories: Aggregate multiple repositories into a single endpoint for easier access.
Competitors
JFrog Artifactory: The main competitor, offering similar functionality with stronger multi-cloud integrations
AWS CodeArtifact, Google Artifact Registry: Cloud-native alternatives with managed services
Note: Nexus is preferred for Maven-based projects and self-hosted solutions, while Artifactory excels in multi-format repository management.
Versions of Nexus Repository Manager
Nexus Repository OSS: Free, open-source version with core repository management features
Nexus Repository Pro: Advanced features like high availability, security scanning, and enterprise support.
Nexus Lifecycle (IQ Server): Monitors and governs open-source dependencies for security and compliance.
How is Nexus Useful in DevOps?
Continuous Integration (CI): Ensures all dependencies are available for automated builds
Continuous Deployment (CD): Provides a reliable source for deployment artifacts
Collaboration: Acts as a shared repository for dev, ops, and security teams.
Monitoring & Troubleshooting: Built-in dashboards, system health checks, and logs for debugging.
Real-World Use Cases
Enterprise Artifact Management: Hosting internal libraries, dependencies, and builds
Private Docker Registry: Secure storage for Docker images within organizations.
CI/CD Integration: Automating builds and deployments with Jenkins, GitHub Actions, and Azure DevOps
Software Supply Chain Security: Ensuring all dependencies are verified and compliant before use.
Sonatype Nexus Repository Prerequisites (Hardware & Software)
Hardware Requirements:
Small scale (Testing/PoC): 2 cores, 4 GB RAM, 10 GB disk space
Medium scale (Up to 100 users): 4 cores, 8 GB RAM, 50 GB disk space
Large scale (Production, 100+ users): 8+ cores, 16+ GB RAM, 100+ GB disk space
Disk: SSD recommended
Software Requirements:
Java 17 or later (OpenJDK or Oracle JDK)
Database:
Uses an embedded OrientDB — no external database setup required (for Community Edition)
PostgreSQL (for Pro version, with external DB support)
OS Compatibility:
Linux: Ubuntu, CentOS, Red Hat (64-bit)
Windows: Windows Server 2016 or later (64-bit)
macOS: Monterey or later (for dev use only)
Network Requirements:
Port 8081 (default for Nexus web interface)
Ensure firewall allows traffic on port 8081
HTTPS recommended for secure access (TLS certificates)
Additional Tools for CI/CD:
Git (version control)
Build tools:
Maven (for uploading Java artifacts)
.NET CLI (for pushing NuGet packages)
npm (for uploading Node.js/Angular packages)
curl or HTTP clients (for API interaction)
How to install Nexus in Windows?
Prerequisites
Nexus requires Java 8 or later.
Download and install the latest JDK from Oracle or OpenJDK.
Set path and installation of JDK 8.
I am using OpenJDK 17 here
Step - 1 : Download Nexus
Download Nexus From SonaType-Nexus-Official Website I have download this https://download.sonatype.com/nexus/3/nexus-3.77.1-01-java17-win64.zip
Step - 2 : Installation
Extract the zip file
Go to C:\Users\Murtaza Rangwala\Nexus\bin in CMD with Admin Access
Run nexus.exe /install command to install it.
Then to run use this command nexus.exe /start
Step - 3: Verify Installation
Verify the Service:
Open Services (Win + R > services.msc).
Look for nexus and ensure it is running.

Then restart windows and check your specified port, if not specified it will be running at localhost:8081
Click on Sign in and it will ask for username and password, password is located in C:\nexus\sonatype-work\nexus3 OR here we get the admin password
Login: admin (Password found in sonatype-work/nexus3/admin.password)
Then it will ask to change password, do it and use nexus
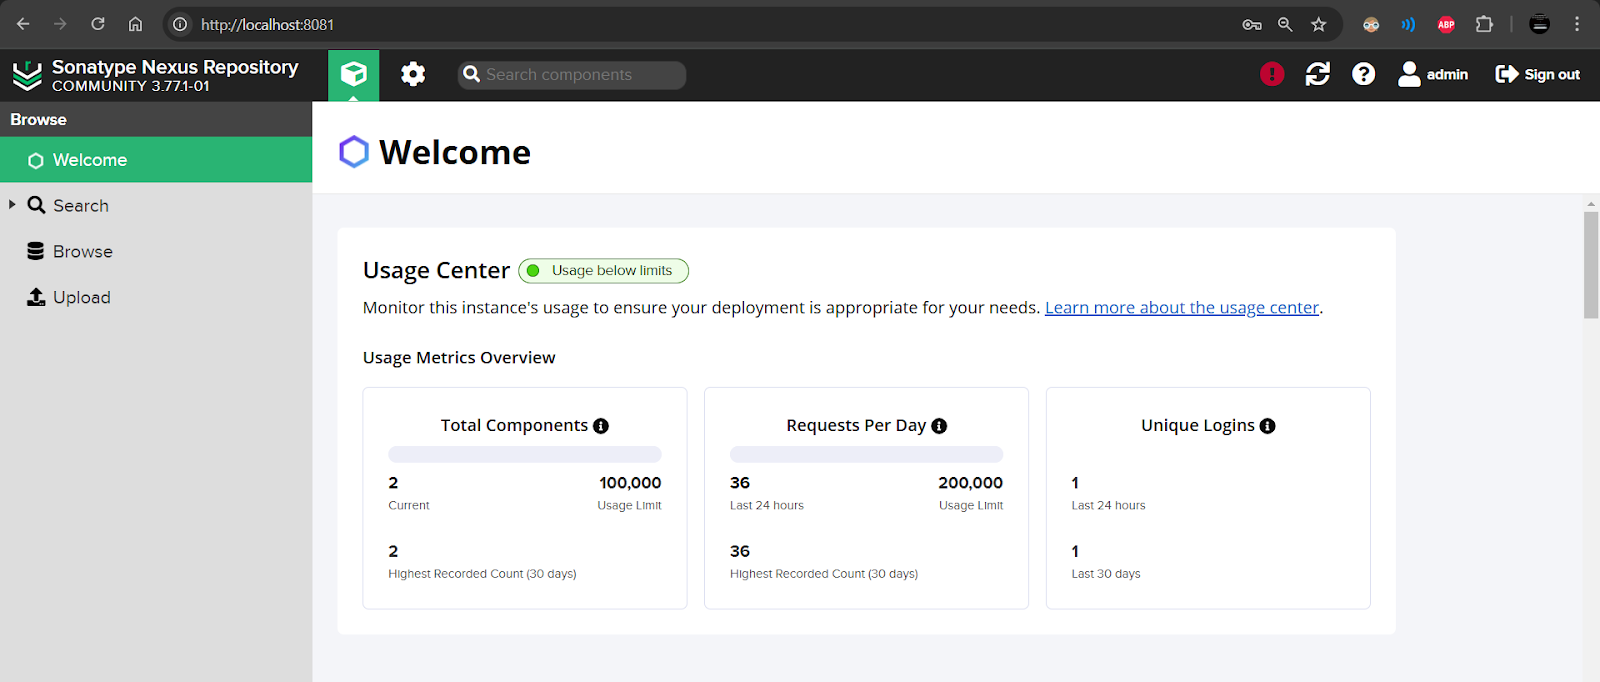
After logging it show ui like this(not exactly)
If we want to we can uninstall and stop the services by using this commands:
To Stop the Service:
nexus.exe /stop
To Uninstall the Service:
nexus.exe /uninstall
How to install Nexus in Linux/Ubuntu ?
Step 1: Update Ubuntu and Java Installation
sudo apt update
sudo apt upgrade -y
# Install Java 17 (required by Nexus):
# sudo apt install openjdk-17-jdk -y
# Verify Java installation:
java -version
Step 2: Download and Install Nexus
Create a Nexus user:
It’s best practice to run Nexus as a dedicated user.
sudo adduser nexus
### To set no password for nexus user open the visudo file in ubuntu:
sudo visudo
### Add below line into it , save and exit:
nexus ALL=(ALL) NOPASSWD: ALL
Download Nexus OSS:Get the latest version from Sonatype's site.
Or use the terminal to download:
cd /opt
sudo wget https://download.sonatype.com/nexus/3/nexus-3.79.1-04-linux-x86_64.tar.gz
Extract:
sudo tar -xvzf nexus-3.79.1-04-linux-x86_64.tar.gz
Rename the extracted folder for simplicity:
sudo mv nexus-3.79.1-04-linux-x86_64.tar.gz nexus
Set permissions:
Give the nexus user access to the installation folder:
sudo chown -R nexus:nexus /opt/nexus
sudo chown -R nexus:nexus /opt/sonatype-work
Step 3: Configure Nexus
sudo nano /opt/nexus/bin/nexus.rc
Enable Nexus to run as the nexus user:
Add this line to the file:
run_as_user="nexus"
Save and exit (use Ctrl + X, then Y, then Enter).
Step 3.1(Optional): Increase the nexus JVM heap size
Open the /opt/nexus/bin/nexus.vmoptions file:
sudo nano /opt/nexus/bin/nexus.vmoptions
To Increase the nexus JVM heap size, you can modify the size as shown below:
-XX:MaxDirectMemorySize=2703m
-Djava.net.preferIPv4Stack=true
Step 4: To Set Up Nexus as a Service
Create a new service file:
sudo nano /etc/systemd/system/nexus.service
Add the following configuration:
[Unit]
Description=Nexus Service
After=network.target

[Service]
Type=forking
User=nexus
Group=nexus
ExecStart=/opt/nexus/bin/nexus start
ExecStop=/opt/nexus/bin/nexus stop
Restart=on-abort
LimitNOFILE=65536

[Install]
WantedBy=multi-user.target
Save and exit (again, Ctrl + X, then Y, then Enter).
Reload system services and start Nexus:
sudo systemctl daemon-reload
sudo systemctl enable nexus
sudo systemctl start nexus
sudo systemctl status nexus
Look for: Active: active (running)
Step 5: Access Nexus Web UI
Open your browser and go to:http://<your-server-ip>:8081
The default admin credentials are:
Username: admin
Password: stored in this file:
sudo cat /opt/sonatype-work/nexus3/admin.password
Copy the password, then log in and change it immediately.
Step 6: Adjust Firewall (Optional)
If you use a firewall, allow port 8081:
sudo ufw allow 8081
Step 7: Verify Nexus Installation
To ensure Nexus starts at boot:
sudo systemctl is-enabled nexus
To restart Nexus at any time:
sudo systemctl restart nexus
To stop Nexus:
sudo systemctl stop nexus
Troubleshooting
Port 8081 is already in use:
Change the port in the sonatype-work/nexus3/etc/nexus-default.properties file:
sudo nano /opt/sonatype-work/nexus3/etc/nexus-default.properties
Update: application-port=8082
Restart Nexus: sudo systemctl restart nexus
Add Maven Project to Nexus
Global Steps(First time)
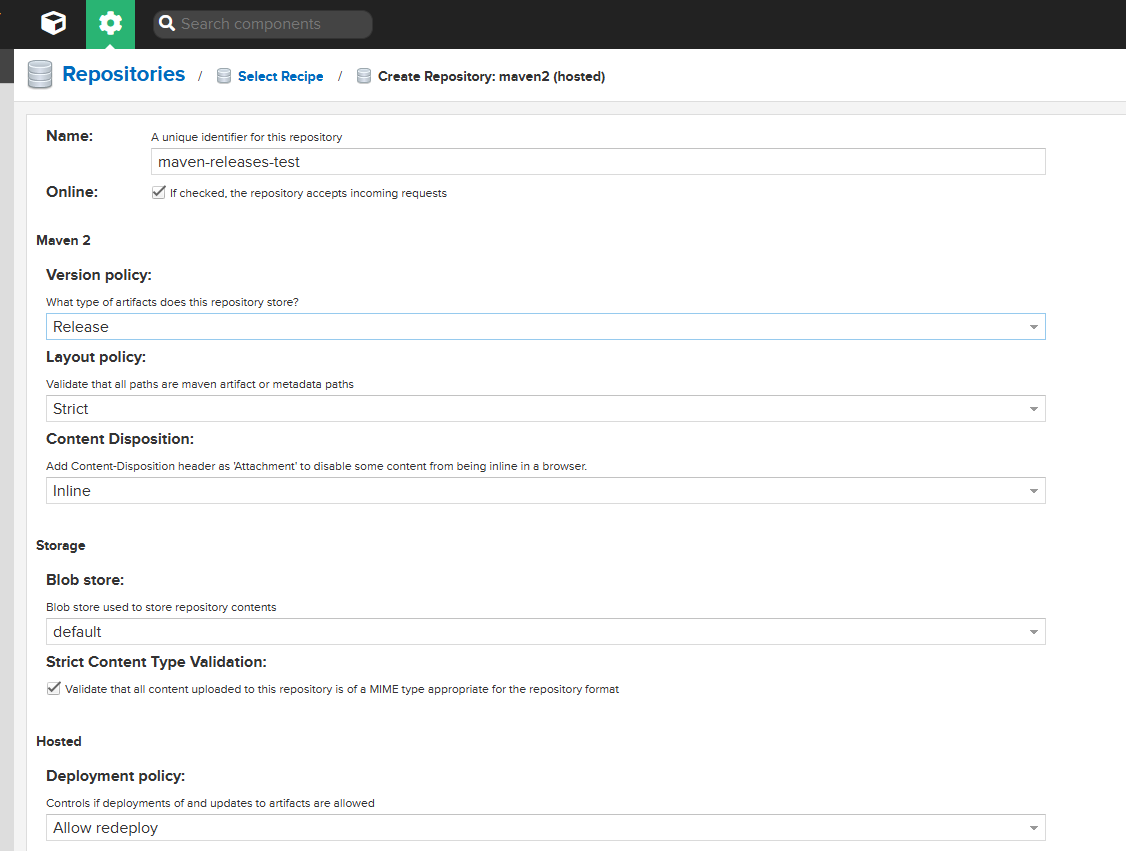
Creating Maven Repositories in Nexus:
- Navigate to Repositories → Create Repository.
Create Release Repository:
Type: Maven (hosted)
Name: maven-releases-test
Version Policy: Release
Deployment Policy : Allow Redeploy
Create Snapshot Repository:
Type: Maven (hosted)
Name: maven-snapshots-test
Version Policy: Snapshot
Deployment Policy : Allow Redeploy
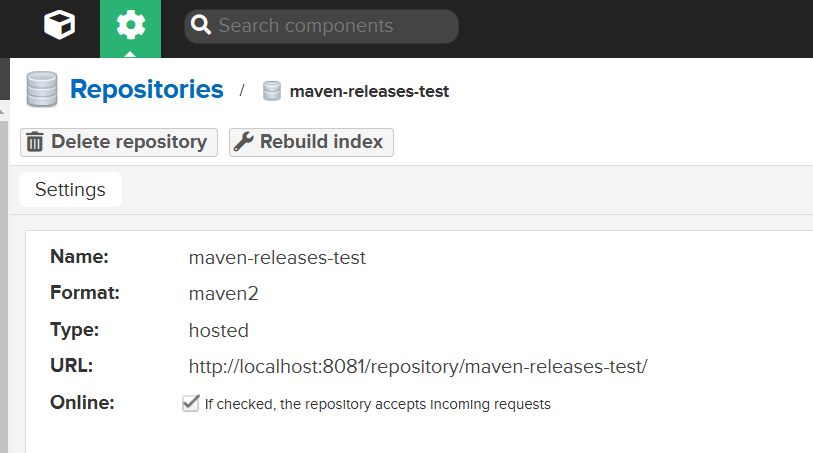
After creating we can see something like this, here URL and Name is important
Global Steps(First time)
Find settings.xml
C:\Program Files\Apache\Maven\apache-maven-3.9.9\conf\settings.xml
ORC:\Users\Murtaza Rangwala\.m2\settings.xml
<servers>
    <server>
        <id>maven</id>
        <username>admin</username>
        <password>YOUR-NEXUS-PASSWORD</password>
    </server>
</server>
It will add global configuration for Maven. Giving the username and password to maven.
In Every Maven Project
Add this in project pom.xml
<distributionManagement>
    <repository>
        <id>maven</id>
        <url>http://localhost:8081/repository/maven-releases-test/</url>
    </repository>

    <snapshotRepository>
        <id>maven</id>
        <url>http://localhost:8081/repository/maven-snapshots-test/</url>
    </snapshotRepository>
</distributionManagement>
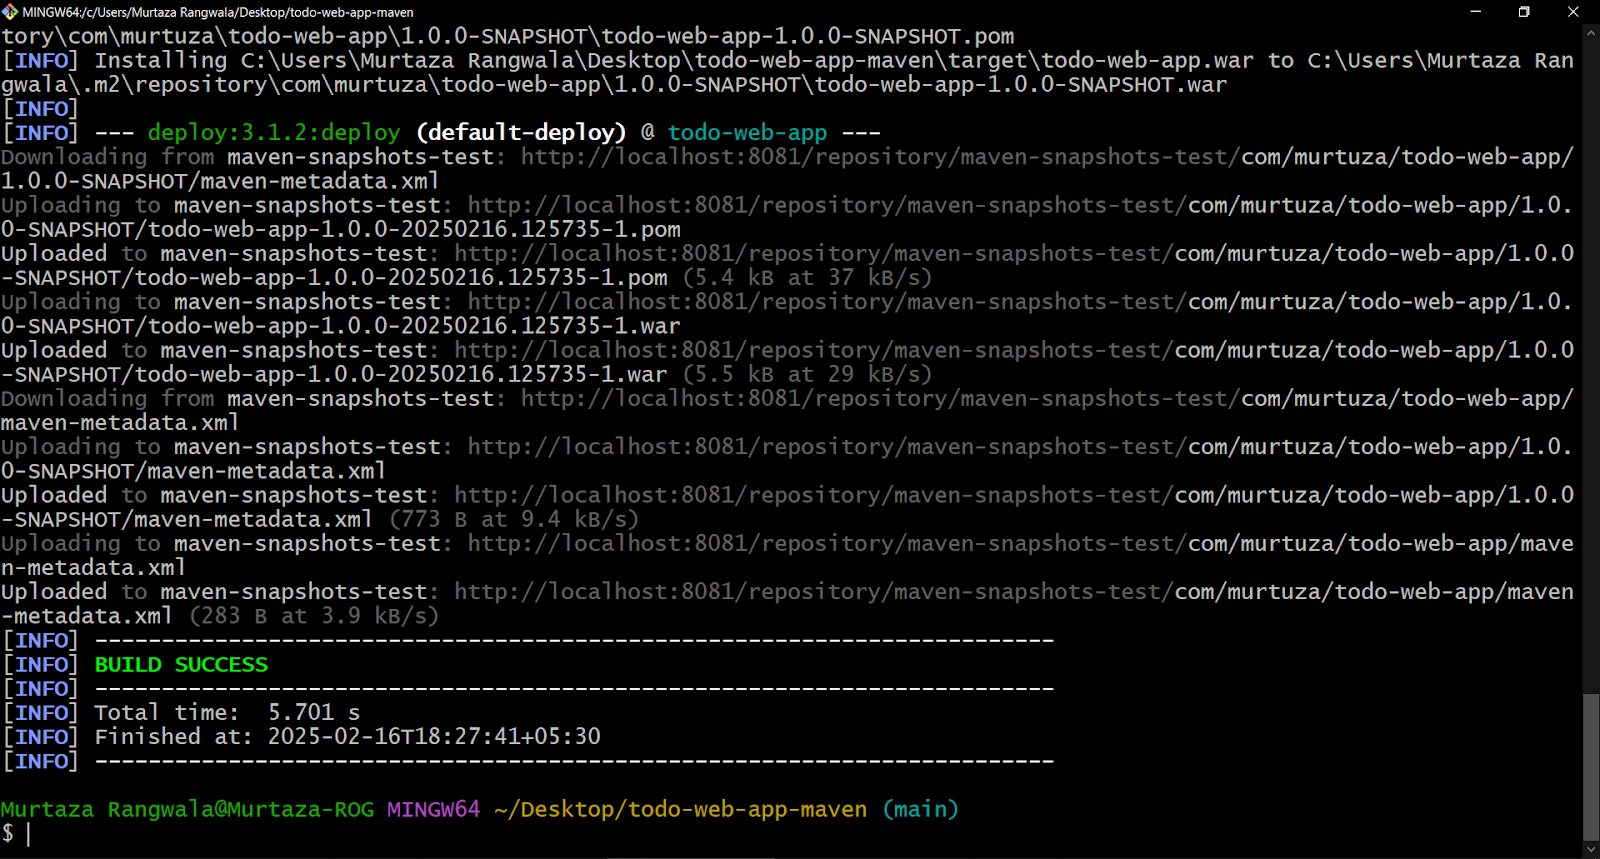
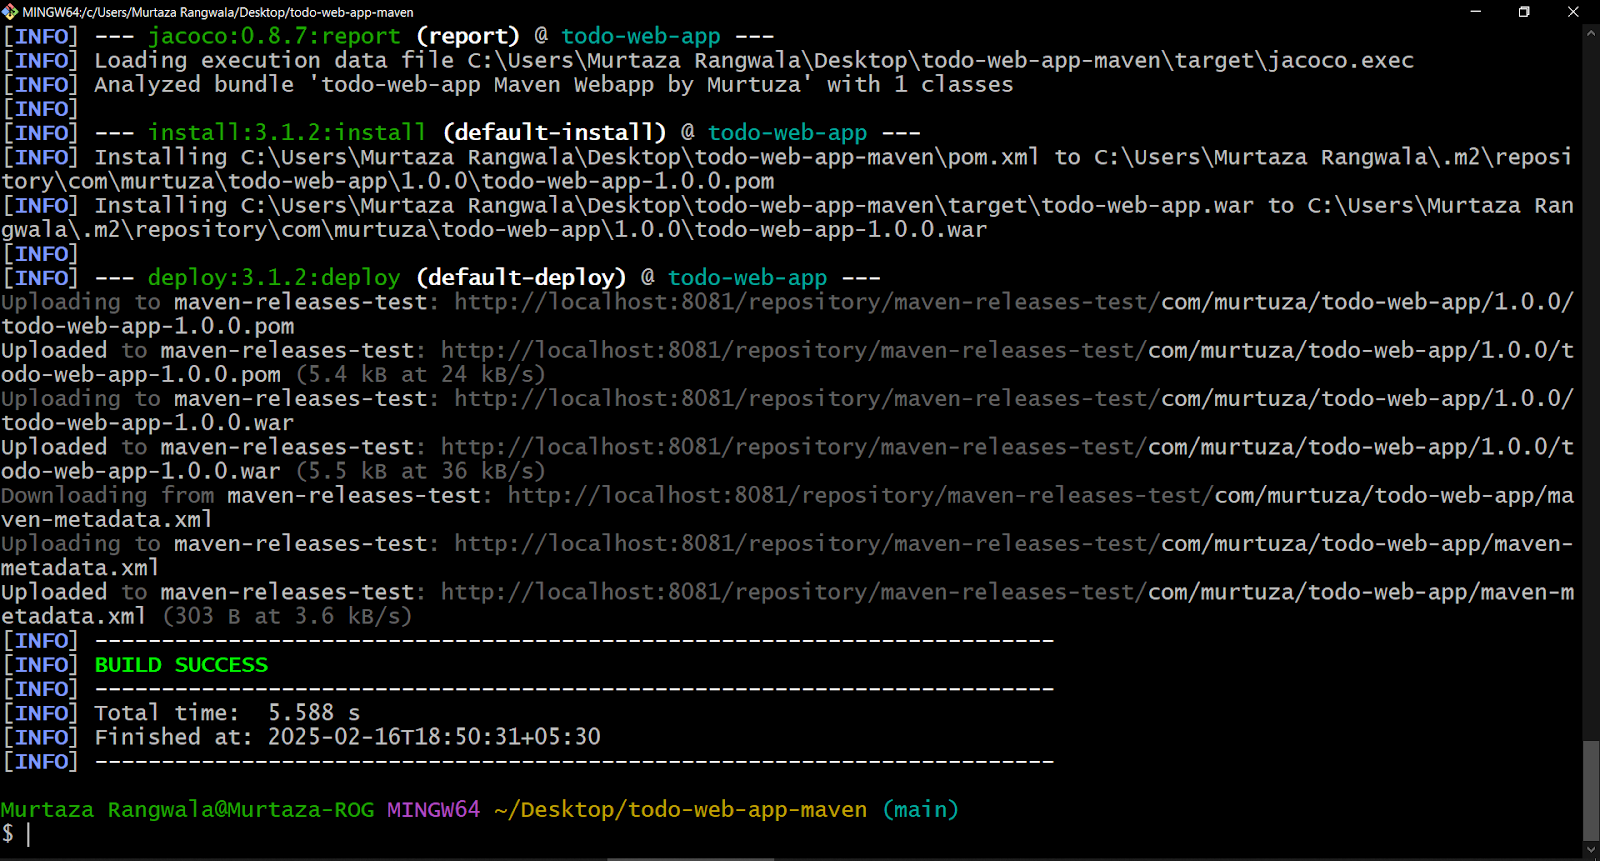
Deploy
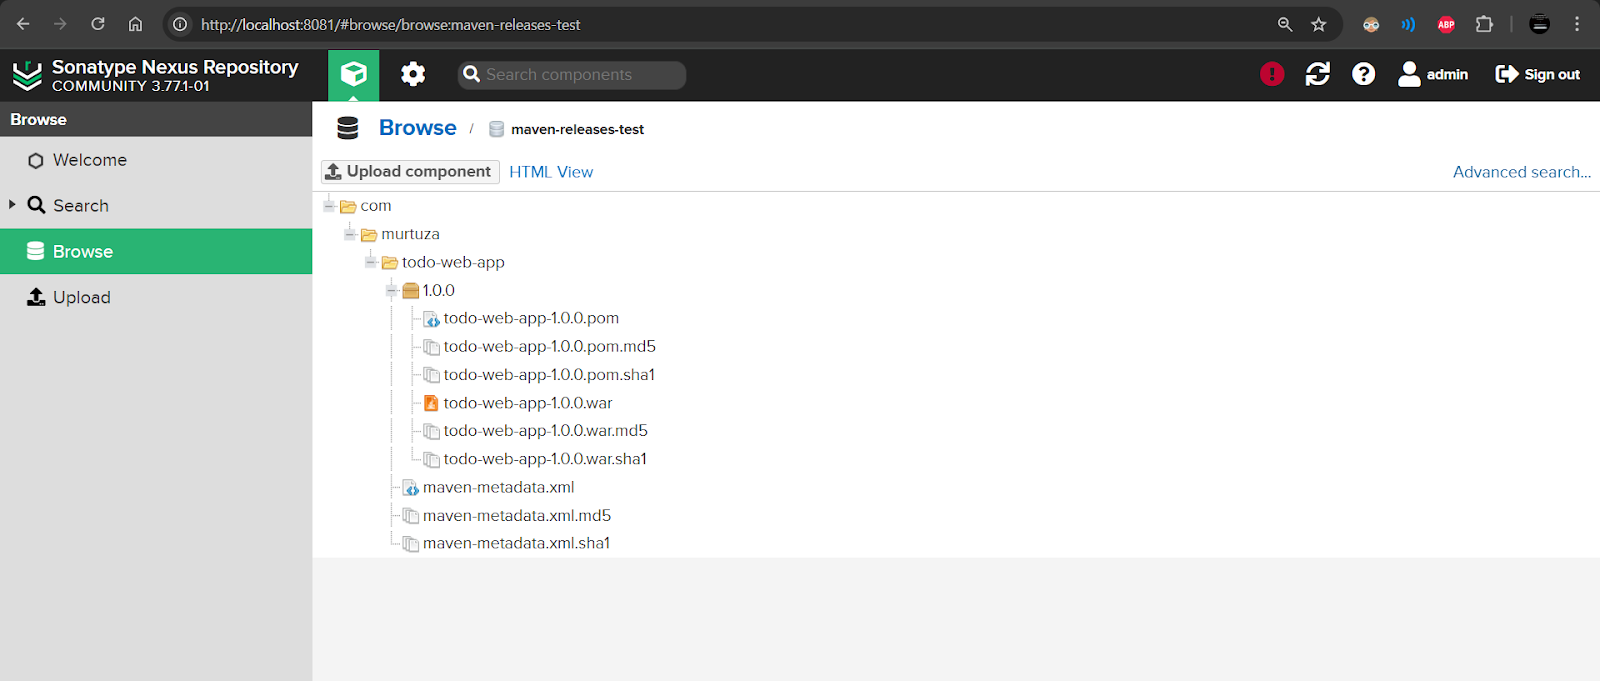
Project Configured, now run mvn clean deploy it will send artifactory to Nexus. Note here that what is written in <version> tag,
- if
<version>1.0.0-SNAPSHOT</version>it will go to snapshot as we configured while creating the nexus repo, like this here it is going insnapshots-test

- if
<version>1.0.0</version>it will go to release as we configured while creating the nexus repo, like this here is is going inreleases-test
Use 1.0.0-SNAPSHOT for snapshot deployments.
Use 1.0.0 for final releases.
Use 1.0.0-beta / 1.0.0-RC1 for pre-releases.
Configure Maven to use Nexus as a Proxy Dependency
Fetching the Project dependency from Nexus instead of Maven Central.
Make this changes in Global setting file
<mirrors>
    <mirror>
        <id>nexus</id>\
        <mirrorOf>*</mirrorOf>
        <!-- Here we can use central also instead of * -->
        <url>http://localhost:8081/repository/maven-central/</url>
    </mirror>
</mirrors>
Difference between central and * Proxies all repositories (wildcard *), Proxies only Maven Central(central).
Configure Maven to Use Nexus for Dependencies
Modify pom.xml in all your projects:
<repositories>
    <repository>
        <id>nexus</id>
        <url>http://localhost:8081/repository/maven-central/</url>
        <releases>
            <enabled>true</enabled>
        </releases>
        <snapshots>
            <enabled>false</enabled>
        </snapshots>
    </repository>
</repositories>
Now, when we build a project, Maven will pull dependencies from Nexus instead of external repositories.
Let’s Check
Run:
mvn clean install
Uploading Artifacts using CURL Command:
curl -u admin:yourpassword \
  --upload-file target/todo-web-app.war \
  "http://localhost:8081/repository/maven-releases/
Here Assuming:
Group ID:
com.murtuzaArtifact ID:
todo-web-appVersion:
1.0(use the actual version of your artifact)File to Upload:
target/todo-web-app.warRepository:
maven-releasesNexus URL:
http://localhost:8081
If you wanted to add the Timestamp while uploading it to Nexus you can use this Command to do this:
curl -u admin:yourpassword --upload-file target/todo-web-app.war "http://localhost:8081/repository/maven-releases/com/murtuza/todo-web-app/1.0/todo-web-app-1.0-$(date +%Y-%m-%d:%H-%M).war"

Angular Artifact Deployment to Nexus
Create Global npmrc file/Project Specific npmrc
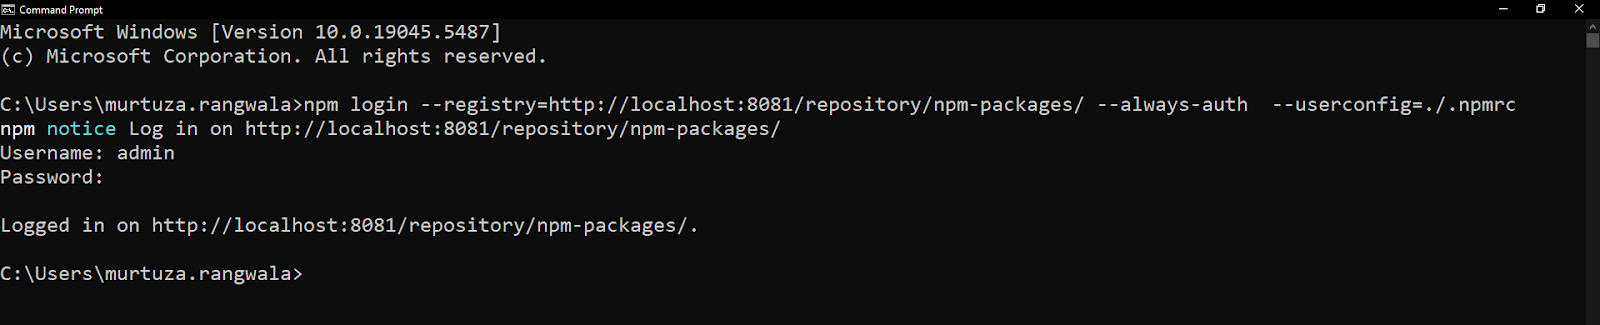
npm login --registry=http://localhost:8081/repository/angular-artifacts/ --always-auth --userconfig=./.npmrc
npm publish --registry=http://localhost:8081/repository/angular-artifacts/
Configure .npmrc for Nexus
Edit or create an .npmrc file in the root of your Angular project and add the following:
registry=http://localhost:8081/repository/angular-artifacts/
//localhost:8081/repository/angular-artifacts/:_auth=YWRtaW46eW91cm5leHVzcGFzc3dvcmQ=always-auth=true
Replace YWRtaW46eW91cm5leHVzcGFzc3dvcmQ= with your Base64-encoded Nexus credentials (admin:yournexuspassword).
To create the base64 Encoded use this command in terminal:
echo -n "admin:yournexuspassword" | base64
Add Nexus Registry to package.json
In your Angular project’s package.json, add the publishConfig section:
"publishConfig": {
  "registry": "http://localhost:8081/repository/angular-artifacts/"
}
Build Angular Project
Run the following command to create a production build of your Angular project:
ng build --prod
This generates the production build in the dist/<project-name> folder.
Package the Artifact
Create an npm package tarball for the production build:
npm pack
This creates a .tgz file, like angular-app-1.0.0.tgz.
Publish to Nexus
Run the following command to publish the artifact to Nexus:
npm publish
This will use the registry and credentials defined in .npmrc and package.json.
Verify in Nexus
Log in to Nexus UI (http://localhost:8081).
Go to Browse Repositories → angular-artifacts.
Confirm your Angular artifact (e.g., angular-app-1.0.0.tgz) is uploaded.
Automate with Bash Script
We can automate the steps with a shell script:
#!/bin/bash
# Variables
GROUP_NAME="angular/todo-app/" # Replace this with your group name
REPO_URL="http://localhost:8081/repository/Raw-Hosted/$GROUP_NAME" # Ensure this is a raw hosted repository in Nexus
USERNAME="admin"
PASSWORD="your-nexus-password" # Replace with your Nexus Password
PROJECT_NAME="todo-app" # Replace with your project name
DIST_DIR="dist/$PROJECT_NAME"
ZIP_FILE="$PROJECT_NAME-$(date +%Y-%m-%d-%H-%M).zip"

# Install dependencies
echo "Installing dependencies..."
npm install || { echo "npm install failed!"; exit 1; }

# Build Angular project
echo "Building Angular project..."
ng build --configuration production || { echo "Angular build failed!"; exit 1; }

# Check if the dist folder exists
if [ ! -d "$DIST_DIR" ]; then
  echo "Error: $DIST_DIR does not exist. Build might have failed!"
  exit 1
fi

# Create ZIP file using PowerShell (Windows-specific)
echo "Creating ZIP file using PowerShell..."
powershell.exe -Command "Compress-Archive -Path '$DIST_DIR/*' -DestinationPath '$ZIP_FILE'" || { echo "Failed to create ZIP file!"; exit 1; }

# Check if the ZIP file exists
if [ ! -f "$ZIP_FILE" ]; then
  echo "Error: ZIP file $ZIP_FILE was not created!"
  exit 1
fi

# Publish to Nexus
echo "Publishing to Nexus..."
curl -u "$USERNAME:$PASSWORD" \
  -H "Content-Type: application/zip" \
  --upload-file "$ZIP_FILE" \
  "$REPO_URL$(basename $ZIP_FILE)" || { echo "Upload to Nexus failed!"; exit 1; }

# Cleanup
echo "Cleaning up..."
rm -f "$ZIP_FILE"

echo "Artifact uploaded successfully: $ZIP_FILE"
Make it executable and run:
chmod +x upload-angular-artifact.sh
./upload-angular-artifact.sh


CI/CD Integration (Jenkins Example)
In a Jenkins pipeline, you can automate the build and upload process:
pipeline {
    agent any
    environment {
        NEXUS_REPO ='http://localhost:8081/repository/angular-artifacts/'
        NEXUS_CREDENTIALS =credentials('nexus-credentials')
    }
    stages {
        stage('Build Angular'){
            steps {
                sh 'ng build --prod'
                sh 'npm pack'
            }
        }

    stage('Upload Artifact to Nexus') {
            steps {
                nexusArtifactUploader(
                    nexusVersion: 'nexus3',
                    protocol: 'http',
                    nexusUrl: 'localhost:8081',
                    groupId: 'your-group-id',
                    version: '1.0.0',
                    repository: 'repository-name',
                    credentialsId: 'NEXUS', // Save nexus credentials in Jenkins Credential as NEXUS
                    artifacts: [[
                        artifactId: 'artifactID',
                        classifier: BUILD_TIMESTAMP,
                        file: "zip-name.zip",
                        type: 'zip'
                    ]]
                )
            }
        }

    }
}
Using Nexus to proxy for npm
Configure the Nexus repo:
Give the repo a name (e.g. npm-proxy).
Use the suggested URL for the remote repository (https://registry.npmjs.org).
If you want to make downloaded artifacts immutable, set the Maximum component age to -1.
Configure the blob store you want to keep downloaded artifacts in.
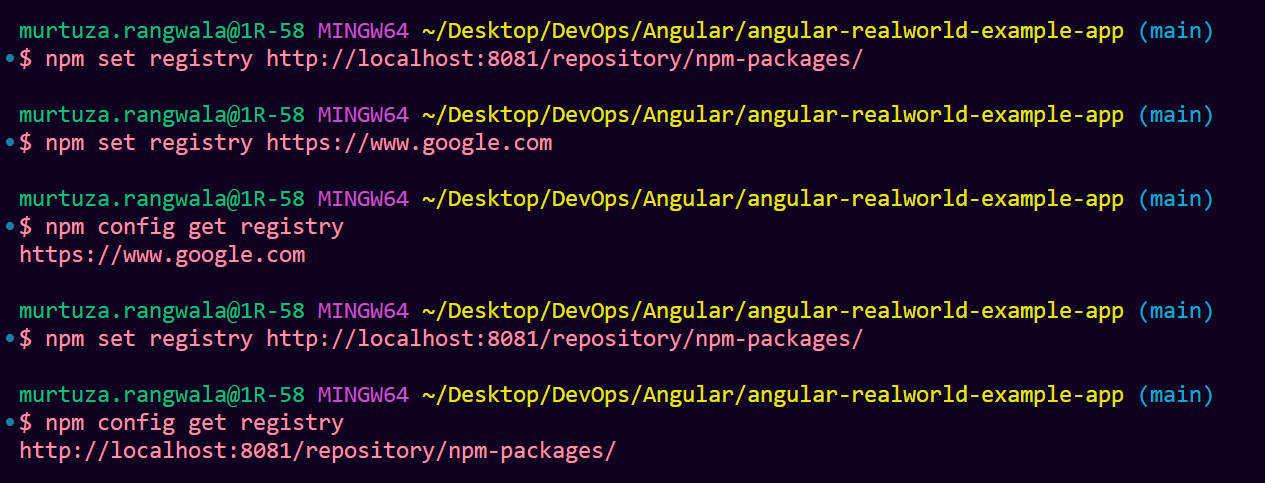
npm config set registry http://localhost:8081/repository/npm-proxy
Now we do npm install we can see it appear in the Nexus admin console, where it will be available the next time it is requested.
Add dotNet Project Atrifactory to Nexus
dotnet nuget add source "http://your-nexus-server:8081/repository/nuget-group/index.json" --name "Nexus" --username "your-nexus-username" --password "your-nexus-api-key"
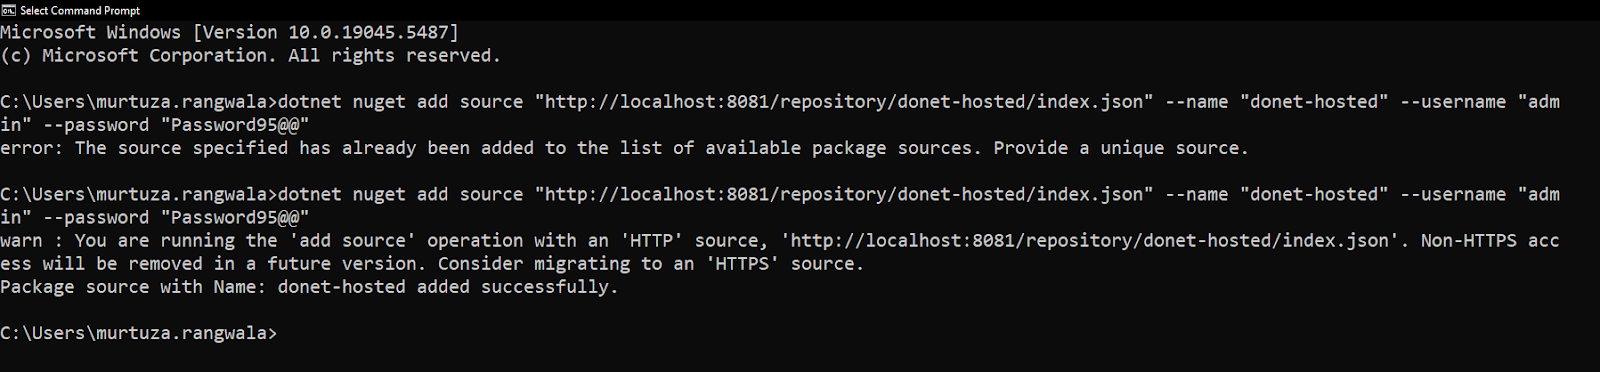
dotnet nuget add source "http://localhost:8081/repository/donet-hosted/index.json" --name "donet-hosted" --username "admin" --password "youpassword"
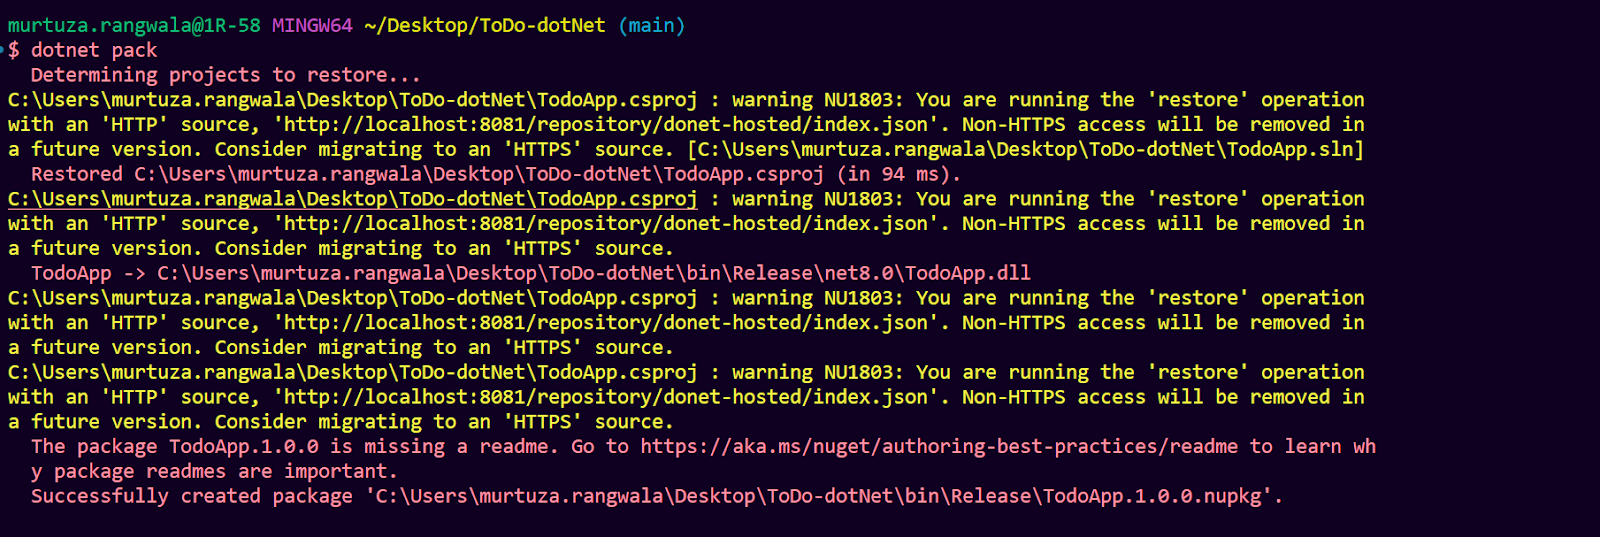
It will automatically create below code

dotnet pack
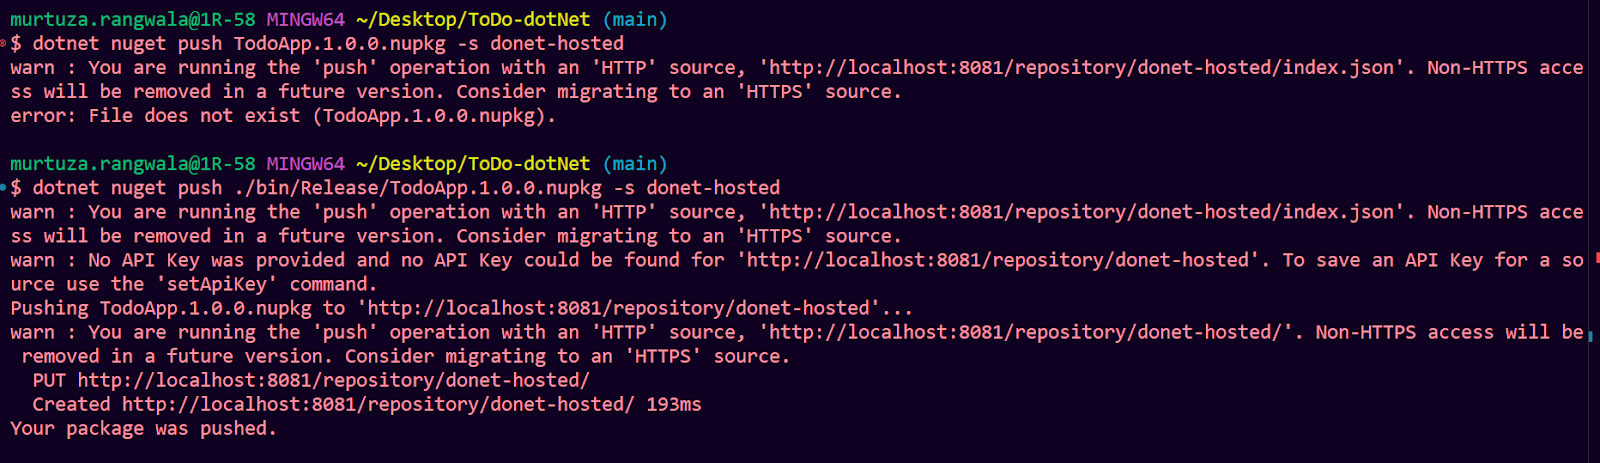
dotnet nuget push ./bin/Release/TodoApp.1.0.0.nupkg -s donet-hosted
Dotnet Nuget Package Proxy

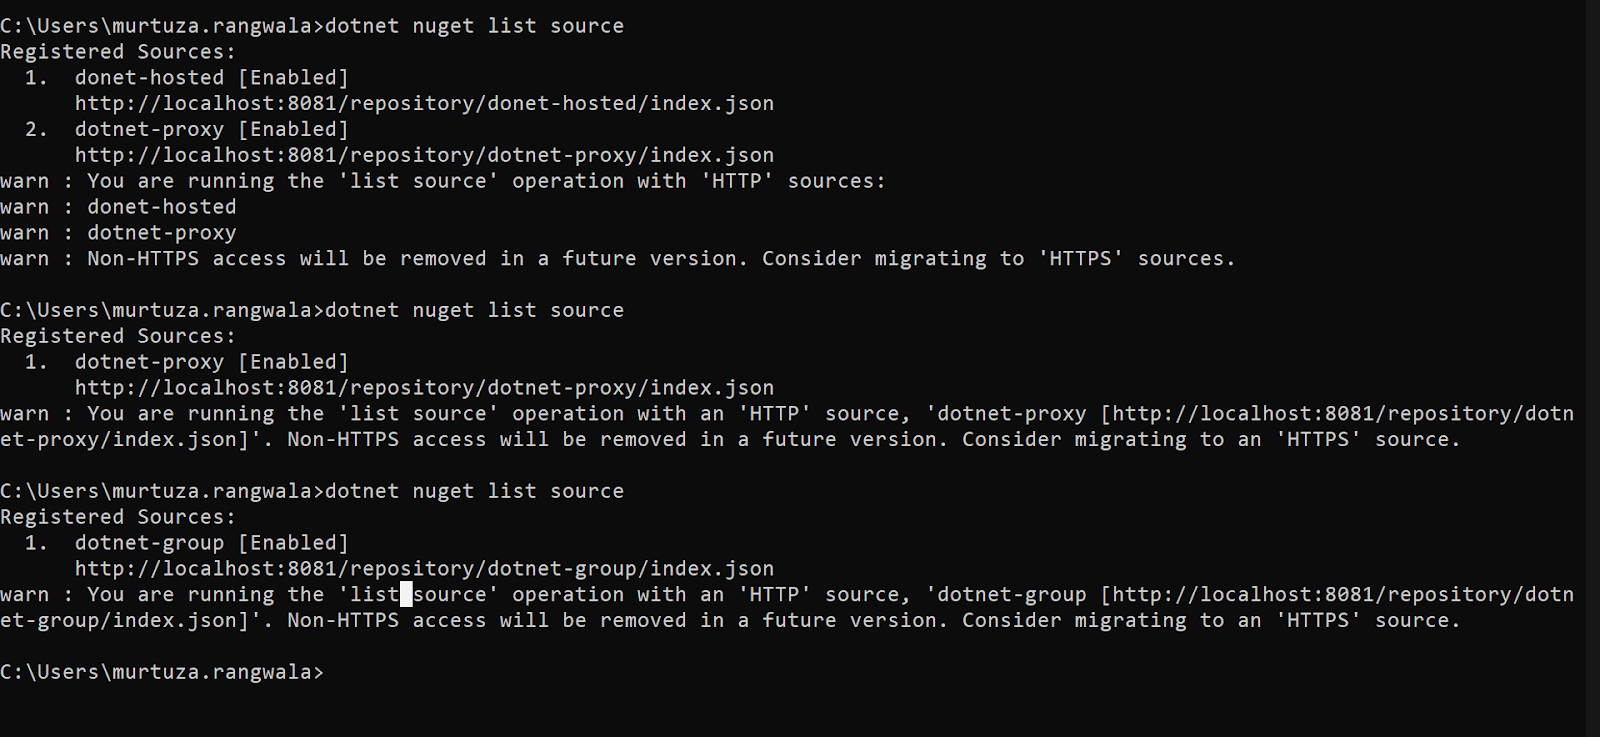
nuget sources

To check source of nuget
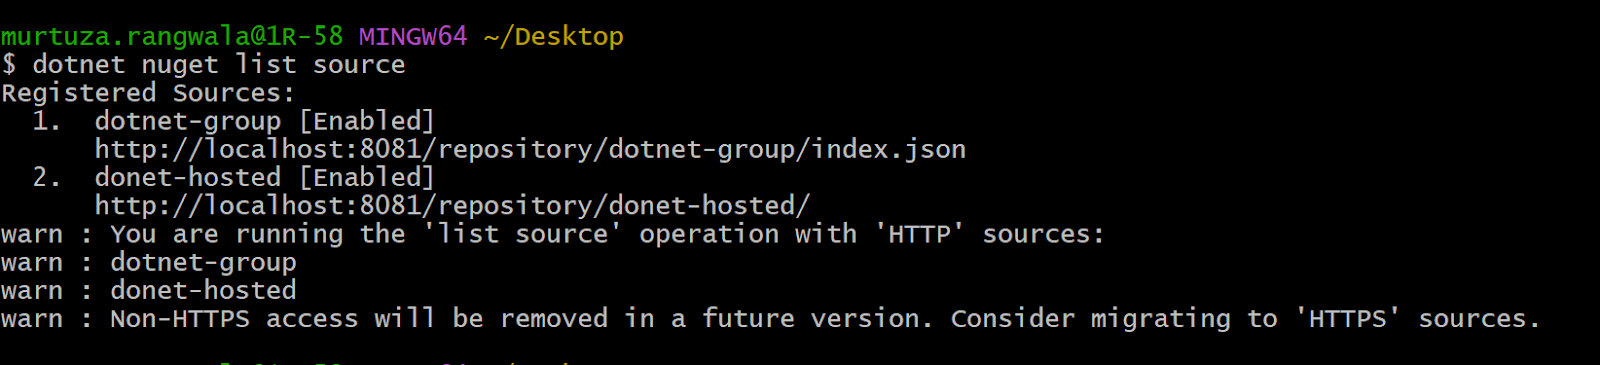
dotnet nuget list source
dotnet nuget list source
dotnet add package Newtonsoft.json

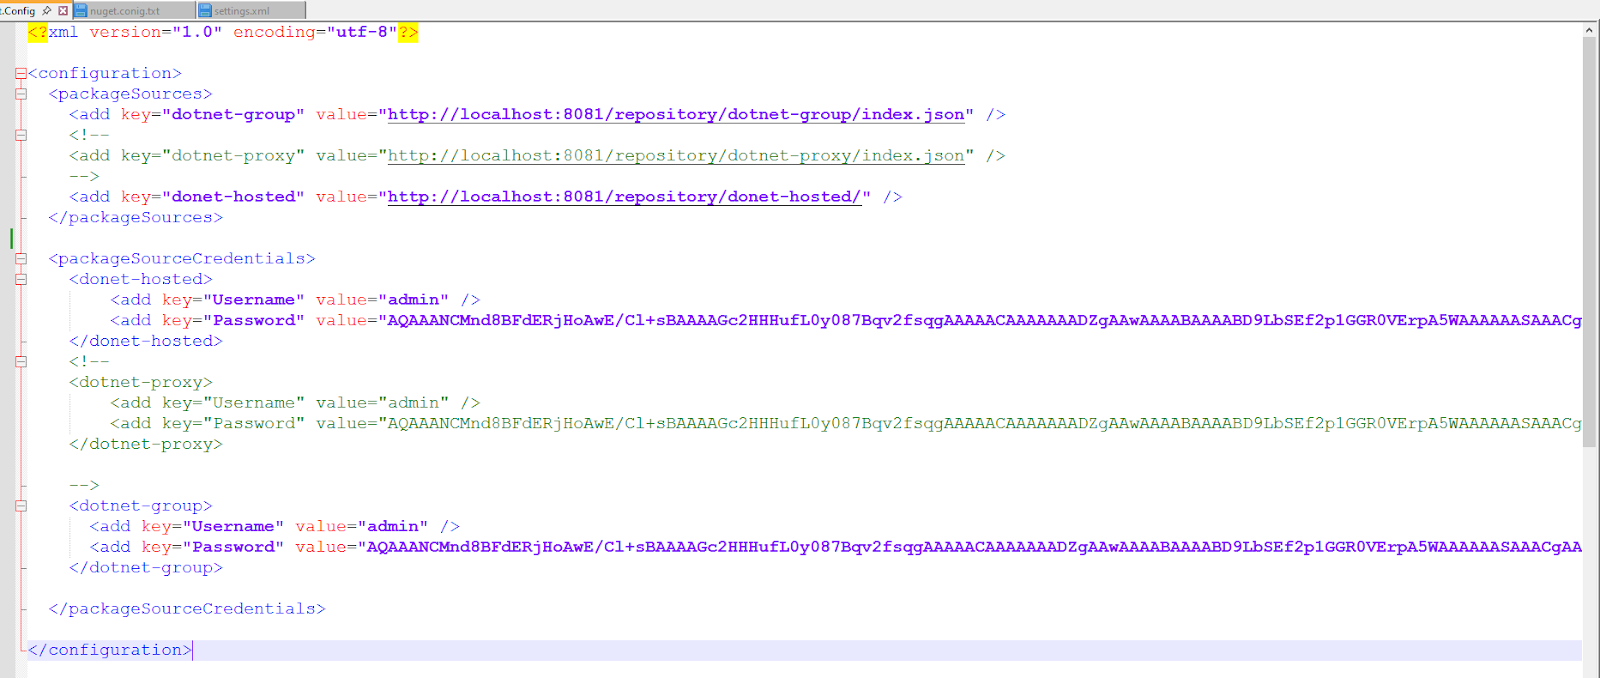
Difference between the two settings.xml Files
Maven provides two primary locations for the settings.xml configuration file:
Global Settings ($MAVEN_HOME/conf/settings.xml):
Located in the Maven installation directory
Applies to all users on the system
Used for system-wide configurations
User Settings (${user.home}/.m2/settings.xml):
Located in the user's home directory
Applies only to the specific user
Overrides global settings when both are present
According to the Maven Settings Reference, if both files exist, their contents are merged, with the user-specific settings.xml taking precedence.
Recommendation:
For configurations specific to your development environment, such as repository credentials or proxy settings, it's advisable to use the user-specific settings.xml. This approach ensures that personal configurations remain isolated and do not impact other users or system-wide settings.
For configurations that should apply to all users on a system, such as shared repository definitions or plugin configurations, the global settings.xml is appropriate.
By following this approach, you maintain a clear separation between personal and system-wide configurations, aligning with Maven's best practices.
Thank You !
Subscribe to my newsletter
Read articles from Murtuza Rangwala directly inside your inbox. Subscribe to the newsletter, and don't miss out.
Written by
Murtuza Rangwala
Murtuza Rangwala
Learner.